Configure Permissions
In VertiGIS Studio Access Control, permissions are used to determine user access to a GIS service resource.
To ensure your users can only see and edit the resources they need to work with, you can apply the following permissions to services, layers, fields, and geoprocessing tasks:
- Visible: Allows the user to see the resource anywhere that it appears (layer list, map, search results, etc.).
- Editable: Allows the user to see and modify the resource.
- Denied: Prevents the user from seeing the resource in any context.
Access Control supports MapServer, FeatureServer , and GPServer services only. Unsupported services (e.g. GeometryServer) are listed in the Access Control Designer, but are not available for selection.
When configuring permissions for MapServer and GPServer services, only the Visible and Denied permissions are available.
Permissions are applied to a specific user or group of users. To apply any permission, you must know the name of the user or group.
Integrated Windows Authentication Groups
When using Integrated Windows Authentication, users may be included in built-in privileged groups. These include:
- Enterprise Admins: DOMAIN\Enterprise Admins
- Domain Admins: DOMAIN\Domain Admins
- Administrators: MACHINE\Administrators
Unless the user is running their web browser as an administrator user, the web adapter will not recognize these groups and any Access Control permissions configured for them will not be applied.
Default permissions
ArcGIS Server permissions control 'all or nothing access' to GIS services. VertiGIS Studio Access Control honors these permissions and uses them as the default permissions, until more fine-grained permissions are configured in the Access Control Designer. The following table shows how ArcGIS Server permissions map to default permissions in Access Control.
|
Service Type |
ArcGIS Server Permission |
Access Control Default Permission |
|---|---|---|
|
MapServer / GPServer |
Visible |
Visible |
|
FeatureServer |
Editable |
Editable |
|
FeatureServer |
Not Editable |
Visible |
|
MapServer / FeatureServer / GPServer |
Denied* |
Denied |
*If ArcGIS Server denies a user access to a service, you cannot use Access Control to override this permission and allow access.
Add Service Permissions
Setting permissions at the service level allows you to set service-wide defaults. This can make some scenarios easier to manage. For example, to prevent all users in a group from accessing all layers but one, you can configure a Denied permission at the service level, and one Visible permission at the layer level.
The following procedure shows how to configure a service permission for a user or group.
To add a service permission
-
Open the Access Control Designer: Paste the following into your browser and press Enter:
https://<your-domain.com>/vertigisstudio/accesscontrol/
-
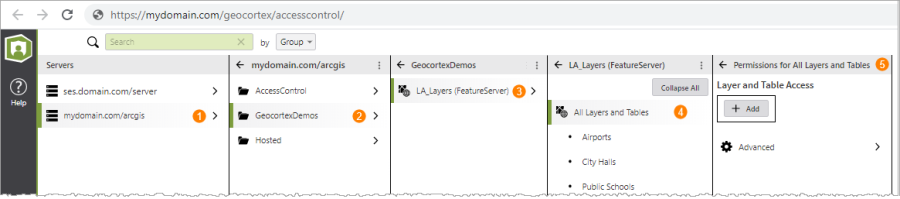
In the Designer, select the service you want to configure:
-
In the Servers panel on the left, select the ArcGIS Server containing the service you want to configure
 .
. -
The panel to the right shows all of the folders and services on the ArcGIS Server
 .
. Drill down to find the service you want to configure and select it
 .
. -
The layers and tables contained in the selected service are listed in the adjacent panel.
Select All Layers and Tables
 .
. The Permissions for All Layers and Tables panel for the selected service displays
 .
.
-
-
To add a permission that will apply to all layers and tables in the service:
-
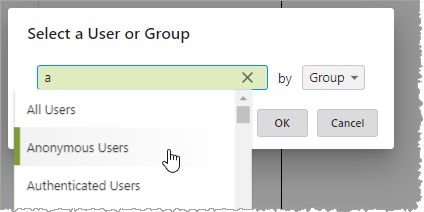
In the Permissions for All Layers and Tables panel, click Add. The Select a User or Group dialog box opens.
-
Select a user or group:
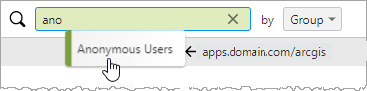
In the Select a User or Group dialog box, in the drop-down list on the right, choose whether to search by Group or by User. Start typing the name of the group/user into the text box, and then select from the drop-down list that displays.
-
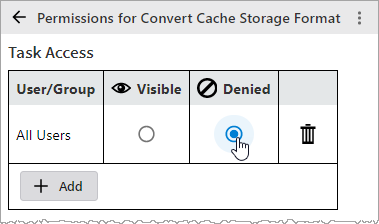
In the Permissions for All Layers and Tables table, select the permission you want to apply for this group/user.
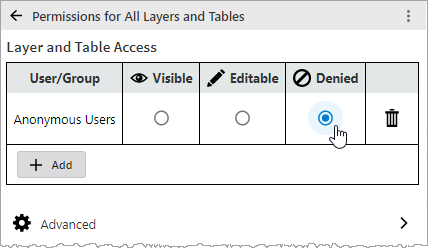
- Click Save.
-
Add Layer Permissions
The following procedure shows how to configure a layer permission for a user or group.
To add a layer permission
-
In the Access Control Designer, select the layer you want to configure:
-
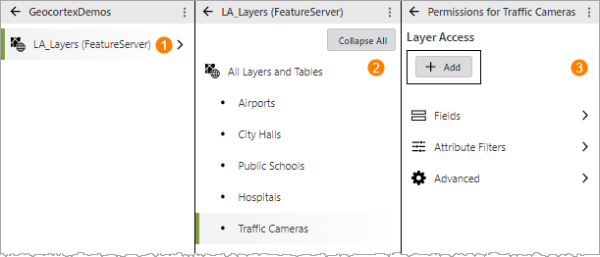
Drill down and select the service containing the layer(s) on which you want to apply permissions
. (See Add Service Permissions, step 2.) -
The layers and tables contained in the selected service are listed in the adjacent panel. Select the layer or table on which you want to configure permissions
. The Permissions panel for the selected element displays
.
-
-
To add a permission:
-
In the Permissions panel, click Add. The Select a User or Group dialog box opens.
-
Select a user or group:
In the Select a User or Group dialog box, in the drop-down list on the right, choose whether to search by Group or by User. Start typing the name of the group/user into the text box, and then select from the drop-down list that displays.
-
In the Permissions for Layer/Table Name table, select the permission you want to apply for this group/user.
-
Click Save.
-
Add Field Permissions
The following procedure shows how to configure a field permission for a user or group.
Access Control permission configuration is not permitted on certain fields and field types, and does not apply to offline FeatureServer service layers in applications that use replicas. For details, see Field Permission Restrictions.
To add a field permission
-
In the Access Control Designer, select the field you want to configure:
-
Drill down and select the service layer or table containing the field on which you want to apply permissions
. (See Add Layer Permissions, step 2.) -
In the Permissions for Layer/Table Name panel, select Fields
. The Fields panel opens, displaying all of the fields on the layer/table
.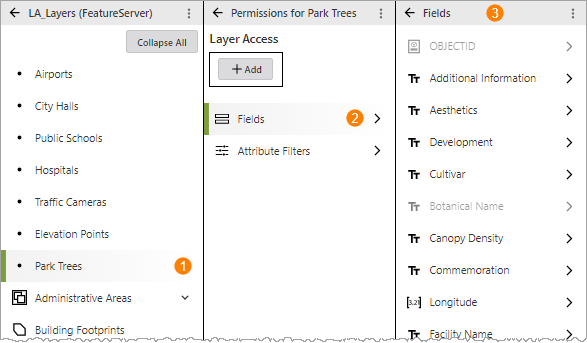
- Select the field on which you want to configure permissions. The Permissions for Field Name panel displays.
-
-
To add a field permission:
-
In the Permissions for Field Name panel, click Add. The Select a User or Group dialog box opens.
-
Select the user or group:
In the Select a User or Group dialog box, in the drop-down list on the right, choose whether to search by Group or by User.
Start typing the name of the group/user into the text box, and then select from the drop-down list that displays.

-
In the Permissions for Field Name table, select the permission you want to apply for this group/user.
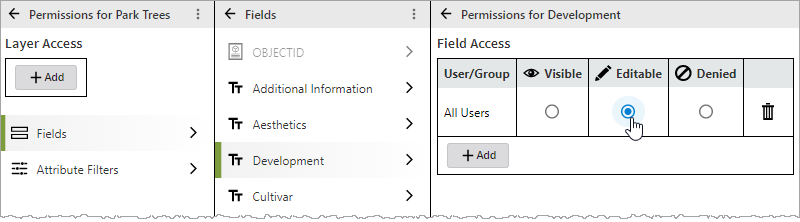
-
- Click Save.
Field Permission Restrictions
The following sections describe the restrictions that apply to field permission configuration.
Fields and Field Types
Access Control Designer displays all fields contained on a layer or in a table. However, you will notice that some fields are not available for selection, preventing you from applying permissions to them. The following table describes the restrictions that apply to certain fields and field types.
|
Field / Field Type |
Reason for Restriction |
|---|---|
|
Object ID |
To function properly, most GIS applications require the Object ID field. |
|
Global ID |
When Global ID fields are used, they act much like Object ID fields and are similarly required by most GIS applications. |
|
Primary display field of layer |
The primary display field is designated as the key field to display on a layer. If this field were excluded, Access Control would not be able to determine the next best field to display. |
|
Layer type field |
A layer type field defines the feature type of a given record. If this field were excluded, the application using the layer would not know how to represent this feature. |
Applying the Denied permissions to a field used for rendering may cause errors or prevent the field from being displayed on the map.
FeatureServer Service Replicas
Some applications, such as VertiGIS Studio Mobile and ArcGIS Collector, use the ArcGIS REST API Create Replica operation to create a replica from a FeatureServer service. Field permissions do not apply in applications that use this operation.
Add Geoprocessing Task Permissions
In addition to allowing or denying access to geoprocessing tasks at the service level (see Add Service Permissions), you can also configure fine-grained permissions at the task level. The following procedure shows how to configure access for an individual task.
To add a geoprocessing task permission
-
In the Access Control Designer, select the task you want to configure:
-
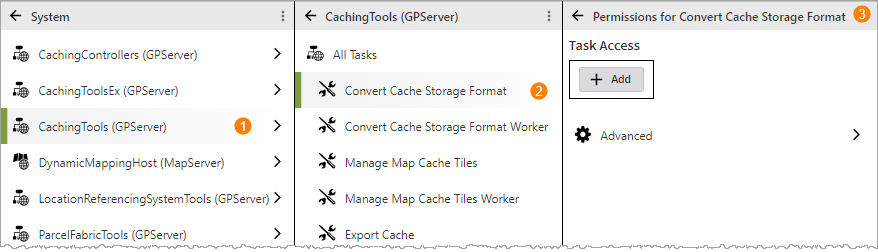
Drill down and select the GPServer service containing the task on which you want to apply permissions
. (See Add Service Permissions, steps 2a and 2b.) -
The tasks contained in the selected service are listed in the adjacent panel. Select the task on which you want to configure permissions
. The Permissions panel for the selected task displays
.
-
-
To add a permission:
-
In the Permissions panel, click Add. The Select a User or Group dialog box opens.
-
Select a user or group:
In the Select a User or Group dialog box, in the drop-down list on the right, choose whether to search by Group or by User.
Start typing the name of the group/user into the text box, and then select from the drop-down list that displays.
-
In the Permissions for Task Name table, select the permission you want to apply for this group/user.
-
Click Save.
-
Edit or Delete Permissions
You can edit or delete the permissions you have applied to a resource. There are two ways to do this:
-
Search for the resource whose permissions you want to edit/delete.
-
Search for the user or group whose permissions you want to edit/delete.
To edit or delete a permission for a resource
-
In the Access Control Designer, drill down to find the resource whose permission you want to edit.
For instructions to do this, see:
-
Add a layer permission, steps 1 - 2
-
Add a field permission, step 1
-
-
Select the resource. The Permissions table for the resource opens.
-
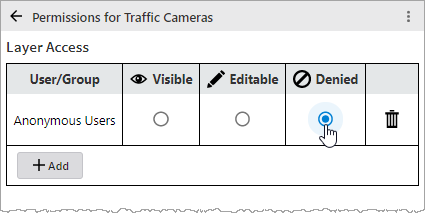
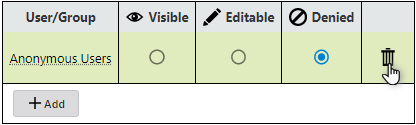
To edit the permission, simply select the new permission you want to apply.
- or -
To delete the permission, click the Delete button.
-
Click Save.
To edit or delete a permission for a specific user or group
-
At the top of the Access Control Designer, set the Search by option to Group or User.
-
In the Search bar, start typing the name of the group or user you want to search for, and then select from the drop-down list that displays.
-
A green badge displays next to the resources on which permissions are applied for the selected group/user.
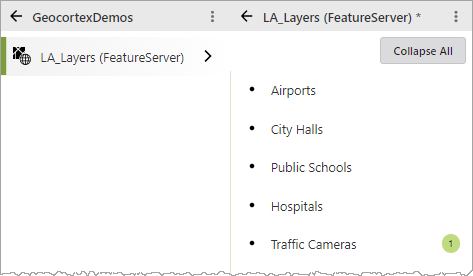
-
Select the resource whose permissions you want to edit or delete. The Permissions table for the selected resource opens.
-
To edit the permission, simply select the new permission you want to apply.
- or -
To delete the permission, click the Delete button.
-
Click Save.