Integration Module
The Integration Module implements the ability to open other applications from within an HTML5 viewer. For example, integrating Bing Maps with an HTML5 viewer enables users to open Bing Maps alongside the viewer. In the screen capture below, three mapping applications are open. Two of the applications are docked to the viewer and one is undocked.
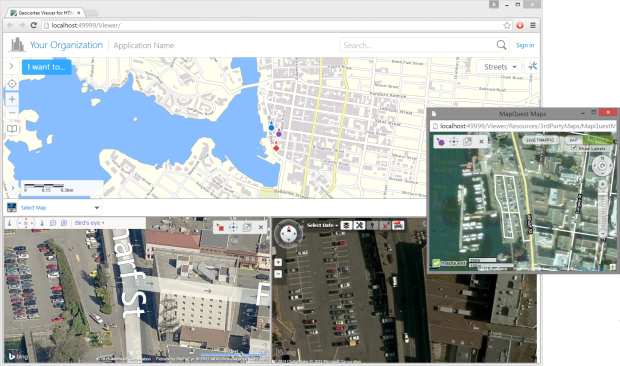
Mapping applications integrated with an HTML5 viewer
You are responsible for ensuring that you have the required licenses for the applications that you integrate.
The Handheld user interface does not support integration.
Internet Explorer's Enterprise mode does not support integration—Enterprise mode emulates Internet Explorer 8, which does not support integration.
To integrate an application with an HTML5 viewer, you configure an external component for the application in the viewer. The external component's configuration can either specify the web application to integrate, or it can specify a web page that points to the web application to integrate.
The simplest configuration points directly to a public web application (or website). In this case, the application displays in an integration pane without any additional controls beyond what the application itself offers. To configure this, all you have to do is configure the external component to point to the web application. End users will be able to open the application from the viewer and use the application's controls.
You may want to provide additional controls for interacting with an integrated application. For example, when you integrate a mapping application, you may want users to be able to center the integrated map on the viewer's map. In this case, you host a web page that points to the application that you want to integrate and you build the additional controls into the web page. You must also provide any supporting files that the web page references, such as CSS and JavaScript files. When you configure the external component in the viewer, you specify the web page that points to the application, instead of the application itself.
If the application is licensed, you may need to host a web page that provides the licensing information, instead of pointing directly to the application.
The HTML5 Viewer ships with integration samples for Bing Maps and Pictometry that you can use. See Example 1 - Integrate with Bing Maps and Example 2 - Integrate with Pictometry for instructions. As well, the VertiGIS Studio Support's Code Gallery includes a sample that integrates Google Street View.
Integration with Mapping Applications
Effective with version 2.9 of the HTML5 Viewer, Internet Explorer version 11.0 and later is required for third-party mapping applications.
When an integrated map is open, the viewer's map displays a marker that indicates the center of the integrated map. Dragging the marker pans the integrated map so that the map stays centered at the center of the marker's body.

Dragging the marker ( ) pans the integrated map (
 ) so it stays centered on the marker
You can pan and zoom the viewer's map and integrated maps independently of each other by using the standard map controls for panning and zooming. If you pan or zoom an integrated map, the marker stays synchronized with the map.
You can configure a different marker for each integrated map  . Using different markers enables users to distinguish one map's marker from another's when there is more than one integrated map open.
The HTML5 Viewer ships with integration samples for Bing Maps and Pictometry. The sample web pages contain tools for managing the integrated map and its pane independently of any other integrated applications that are open. The tools are:

|
Viewpoint Indicator - Shows the marker that is used for this integrated map. The Viewpoint Indicator is for information only—it is not clickable. The Viewpoint Indicator is configured in the CSS file that is provided with the sample. If you change a map's marker in the Integration Module, you must also update the Viewpoint Indicator in the CSS. |

|
Center - Moves the integrated map's marker to the center of the viewer's map and rescales the integrated map to match the viewer's map as closely as possible. |

|
Dock/Undock - (Desktop interface only) Allows the user to dock and undock the integrated map from the viewer. Depending on the browser settings, the map may undock to a new tab or to a new window. The Tablet interface does not support undocking integration panes. |

|
Close - Allows the user to close the current integration pane without closing any other panes that are open. |
Open an Application from an HTML5 Viewer
The Integration Module has one view—ExternalComponentView. By default, ExternalComponentView is not visible, so you must provide a way for users to activate the view. The HTML5 Viewer provides a Linked Maps button that you can add to the toolbar. Alternatively, you could add an I Want To menu item or a hyperlink that runs one of the activation commands. You can also use these commands in workflows.
The commands that activate ExternalComponentView are ShowExternalComponentView, DisplayDockedExternalComponentById, and DisplayUndockedExternalComponentById.
By default, the Linked Maps button uses the ShowExternalComponentView command. ShowExternalComponentView opens each default component (defaultComponents) that is configured. Each component opens in its own pane. If there are no defaultComponents configured, ShowExternalComponentView opens the first component that is configured in externalComponents.
The DisplayDockedExternalComponentById and DisplayUndockedExternalComponentById commands open the component that you specify as the command's parameter.
Configuration Properties
Module
-
allowedOrigins: An array of the origins of theexternalComponentsthat are on a different domain than the viewer, and that use HTML5 Viewer commands.In addition to configuring the external component's origin, you must configure the viewer's origin in the
ThirdPartyMap.jsfile that ships with the Viewer. Configuring the origins enables two-way communications between the viewer and the integration pane. For more information, see Configure Cross-Domain Access for an Integrated Application.This property is an array. To configure two or more items in an array, separate the items with commas. For example:
"allowedOrigins": ["http://mymaps.mydomain.com","https://maps.anotherdomain.com"]
If the application does not use any HTML5 Viewer commands, or it is hosted on the same domain as the viewer, then you do not need to configure any
allowedOrigins.
Views
-
ExternalComponentView: Noconfigurationproperties
View Models
-
ExternalComponentViewModel:-
containerRegionName: The name of the region that hosts this view container. The default isExternalComponentRegion. -
containerRegionType: The type of region that hosts this view container. The default isgeocortex.framework.ui.DivStackRegionAdapter. -
headerIsVisible: Specifies whether to show the header at the top of the docking area. The header contains an optional icon (selectorIconUri), the drop-down list ofexternalComponentslabeled withselectorText, and an optional Close button (showXButton).If you are going to configure only one external component, you can set
headerIsVisibletofalse. By default,headerIsVisibleistrue. -
showXButton: When set totrue, the header displays a button with an X on it that the user can click to close the integration panes. By default,showXButtonistrue. -
showMaximizeButton: To display a maximize button for the container, set totrue. Maximizing the container makes the integration pane fill the entire screen. The default istrue. -
resizeY: To allow the container to be vertically resized, set totrue. The default istrue. -
selectorIconUri: (optional) The URI for the icon to display at the left end of the header. The icon is for display only—it is not clickable. -
selectorText: The text to label the drop-down list of external components. -
statusText: The text to display on the map when integration is activated. The default text gives instructions for navigating integrated maps. If you do not want to display any text, setstatusTextto an empty string:"statusText" = "". -
defaultComponents: An array of IDs of external components to open whenExternalComponentViewis activated.This property is an array. To configure two or more items in an array, separate the items with commas. For example:
"defaultComponents": ["bingMaps","pictometry"]
-
externalComponents: An array of applications that the viewer integrates with. WhenheaderIsVisibleistrue, the integration pane's header displays a drop-down list ofexternalComponents. Each application in the array has the following properties:-
id: The unique ID that identifies this external component. The ID is a string. -
displayName: The name to display in the drop-down list of external components. The user selects a component from the drop-down list to open the application in a new pane. The display name can contain spaces and special characters. -
uri: The URI of the application or the hosted web page.If the web page is hosted on a different domain than the viewer and it uses one or more HTML5 Viewer commands, then you must configure cross-domain access. See Configure Cross-Domain Access for an Integrated Application for instructions.
-
viewpointIndicatorUri: The URI for the marker that appears on the viewer's map to mark the location of this external component's map.Markers are provided in the
Resourcesfolder of the viewer's virtual directory:Resources/Images/Icons/location-direction-[color]-32.png
This property is used with mapping applications only.
This property is an array. To configure two or more items in an array, separate the items with commas. For example:
"externalComponents": [ { "id": "bingMaps", "displayName": "Bing Maps", "uri": "Resources/3rdPartyMaps/BingMaps.html", "viewpointIndicatorUri": "Resources/Images/Icons/location-direction-red-32.png" }, { "id": "pictometry", "displayName": "Pictometry", "uri": "Resources/3rdPartyMaps/Pictometry.aspx", "viewpointIndicatorUri": "Resources/Images/Icons/location-direction-purple-32.png" } ] -
-
Configure Cross-Domain Access for an Integrated Application
Configuring cross-domain access enables the viewer and integration pane to communicate with each other. You must configure cross-domain access if all of the following conditions are met:
-
you are hosting a web page that points to the application, instead of pointing directly to the application; and
-
the web page is deployed to a different domain than the viewer; and
-
the web page uses one or more HTML5 Viewer commands.
You do not need to configure cross-domain access if the viewer and web page are deployed to the same domain, or if you are pointing the viewer configuration directly to the application, or if you are pointing the viewer to a web page that does not use any HTML5 Viewer commands.
To configure cross-domain access for an integrated application:
Step 1: Configure the web page's origin in the Integration Module
-
Run an XML editor or text editor as an administrator.
-
Open one of the viewer configuration files,
Desktop.json.jsorTablet.json.js, in the editor.By default, the configuration files are here:
C:\Program Files (x86)\Latitude Geographics\Geocortex Essentials\[instance]\REST Elements\Sites\[site]\Viewers\[viewer]\VirtualDirectory\Resources\Config\Default\
-
Add the web page's origin to the Integration Module's
allowedOriginsproperty.For example, if the web page is deployed to
http://mymaps.mydomain.com:{ "moduleName": "Integration", "moduleType": "geocortex.essentialsHtmlViewer.mapping.modules.integration.IntegrationModule", "configuration": { "allowedOrigins": ["http://mymaps.mydomain.com"] } ...The origin that you configure in the
allowedOriginsproperty must be identical to the URL that you configure in theexternalComponent'suriproperty. If the web page,webpage.html, is deployed tohttp://mymaps.mydomain.com, then theuriproperty for the external component looks like this:"externalComponents": [ { ... "uri": "http://mymaps.mydomain.com/maps/webpage.html", ... } ] -
Save the file.
-
Repeat these steps for the other configuration file.
Step 2: Configure the viewer's origin in ThirdPartyMap.js
-
Run an HTML or text editor as an administrator.
-
Open
ThirdPartyMap.jsin the editor.In the default deployment, the file is here:
C:\inetpub\wwwroot\Html5Viewer\Resources\3rdPartyMaps\ThirdPartyMap.js
-
Find the following line:
this.allowedOrigins = [];
-
Type or paste the viewer's origin in the array, within quotation marks:
this.allowedOrigins = ["http://myviewers.mydomain.com"];
The origin that you configure in the
ThirdPartyMap.js'sallowedOriginsmust be identical to the viewer's origin as it appears in the browser. Note thathttp://myviewersdoes not matchhttp://myviewers.mydomain.com, even though they map to the same machine. -
Save the file.
Configure Access to a Secured Site by an Integrated Application
If the site that the viewer belongs to is secured and SSL is enforced (in other words, the Enforce SSL setting is enabled in the Security Settings), then you must ensure that the web page uses SSL to access the integrated application.
At a minimum, you must specify https in the URL that the web page uses to connect to the application. Depending on the application, you may also have to include a URL parameter for SSL. Refer to the application's documentation for information about secure access.
Example 1 - Integrate with Bing Maps
This example shows how to integrate Bing Maps into an HTML5 viewer using the sample Bing Maps web page that ships with the Viewer.
In this example, the integration pane (ExternalComponentView) is closed by default and the toolbar includes the Linked Maps button. When the user clicks the button, Bing Maps opens in an integration pane with a header.
The main steps to adapt the Bing Maps sample are:
-
Adapt the sample Bing Maps web page:
- Configure your Bing Maps key.
- If the viewer belongs to a secured site and SSL is enforced, adapt the Bing Maps URL to use SSL.
-
Add an external component for Bing Maps to the Integration Module.
-
Configure cross-domain access.
You only need to do this if the sample Bing Maps web page is deployed to a different domain than the viewer.
-
Add the Linked Maps button to the toolbar.
The instructions assume that the Bing Maps web page is hosted at http://mymaps.mydomain.com/maps and the HTML5 Viewer is hosted at http://myviewers.mydomain.com/Html5Viewer. Replace these URLs with the URLs for your installation.
Step 1: Adapt the sample Bing Maps web page
-
Run an HTML editor or text editor as an administrator.
-
Locate
BingMaps.htmlwhere it is deployed in IIS.In the default deployment, the file is here:
C:\inetpub\wwwroot\Html5Viewer\Resources\3rdPartyMaps\BingMaps.html
-
Open
BingMaps.htmlin the editor. -
Configure your Bing Maps key:
-
Find the following line:
var bingApiKey = "";
-
Type or paste your Bing Maps key between the quotation marks.
-
-
Find the following line that sets the type of map to display:
var mapTypeId = "birdseye";
Set the
mapTypeIdvalue to the type of map you want to display. For possible values, see Microsoft's MapTypeID Enumeration documentation. -
Save the file.
Step 2: Add an external component for Bing Maps to the Integration Module
If you already have one or more externalComponents configured when you add the Bing Maps external component, remember to separate the components using commas. You may also want to configure the defaultComponent if you have more than one external component configured.
-
Run an XML editor or text editor as an administrator.
-
Open one of the viewer configuration files,
Desktop.json.jsorTablet.json.js, in the editor.By default, the configuration files are here:
C:\Program Files (x86)\Latitude Geographics\Geocortex Essentials\[instance]\REST Elements\Sites\[site]\Viewers\[viewer]\VirtualDirectory\Resources\Config\Default\
-
Add an external component for Bing Maps to the Integration Module's
externalComponentsproperty:{ "moduleName": "Integration", ... "viewModels": [ { ... "configuration": { ... "externalComponents": [ { "id": "bingMaps", "displayName": "Bing Maps", "uri": "Resources/3rdPartyMaps/BingMaps.html", "viewpointIndicatorUri": "Resources/Images/Icons/location-direction-red-32.png" } ] ...The example markup given above assumes that the web page and the viewer are deployed to the same domain. If they are deployed to different domains, you must specify the full URL, for example,
http://mymaps.mydomain.com/maps/Resources/3rdPartyMaps/BingMaps.html. -
Save the file.
-
Repeat these steps for the other configuration file.
Step 3: Configure cross-domain access
If the Bing Maps web page is deployed to a different domain than the viewer, then you must configure cross-domain access so the viewer and integration pane can communicate with each other. If the web page and viewer are deployed to the same domain, skip this step.
-
Configure the web page's origin:
-
In one of the viewer's configuration files, add the web page's origin to the Integration Module's
allowedOriginsproperty:{ "moduleName": "Integration", "moduleType": "geocortex.essentialsHtmlViewer.mapping.modules.integration.IntegrationModule", "configuration": { "allowedOrigins": ["http://mymaps.mydomain.com"] } ...The origin that you configure in the
allowedOriginsproperty must be identical to the URL that you configure in theexternalComponent'suriproperty. -
Save the file.
-
Repeat these steps for the other configuration file.
-
-
Configure the viewer's origin:
-
Open
ThirdPartyMap.js.In the default deployment, the file is here:
C:\inetpub\wwwroot\Html5Viewer\Resources\3rdPartyMaps\ThirdPartyMap.js
-
Find the following line:
this.allowedOrigins = [];
-
Type or paste the viewer's origin in the array, within quotation marks:
this.allowedOrigins = ["http://myviewers.mydomain.com"];
The origin that you configure in
ThirdPartyMap.js'sallowedOriginsproperty must be identical to the viewer's origin as it appears in the browser. Note thathttp://myviewersdoes not matchhttp://myviewers.mydomain.com, even though they map to the same machine. -
Save the file.
-
Step 4: Add the Linked Maps button to the toolbar
-
In
 beside the viewer.
 -
Click Toolbar in the side panel.
-
In the Available Tools column, find the Linked Maps tool and drag it to the desired position in the Configured Toolbar column.
-
Click Apply Changes.
-
Click Save Site.
Example 2 - Integrate with Pictometry
This example shows how to integrate Pictometry into an HTML5 viewer using the sample Pictometry web page that ships with the Viewer.
In this example, the integration pane (ExternalComponentView) is closed by default and the toolbar includes the Linked Maps button. When the user clicks the button, Pictometry opens in an integration pane with a header.
The main steps to adapt the Pictometry sample are:
-
Adapt the sample Pictometry web page:
-
Configure your Pictometry keys.
-
If the viewer belongs to a secured site and SSL is enforced, adapt the Pictometry URLs to use SSL.
-
-
Add an external component for Pictometry to the Integration Module.
-
Configure cross-domain access.
You only need to do this if the sample Pictometry web page is deployed to a different domain than the viewer.
-
Add the Linked Maps button to the toolbar.
Step 1: Adapt the sample Pictometry web page
-
Run a text editor as an administrator.
-
Locate
Pictometry.aspxin the viewer's3rdPartyMapsfolder in IIS.In the default deployment, the file is here:
C:\inetpub\wwwroot\Html5Viewer\Resources\3rdPartyMaps\Pictometry.aspx
-
Open
Pictometry.aspxin the editor. -
Configure your Pictometry keys:
-
Find the following lines:
protected static string ApiKey = "";
protected static string SecretKey = "";
-
Type or paste your Pictometry keys:
-
Put the API Key between the
ApiKeyquotation marks. -
Put the Secret Key between the
SecretKeyquotation marks.
The API Key and Secret Key are provided by Pictometry.
-
-
-
If the viewer belongs to a secured site and SSL is enforced:
-
Find the following lines:
public string IpaLoadUrl = "http://pol.pictometry.com/ipa/v1/load.php";
public string IpaJsLibUrl = "http://pol.pictometry.com/ipa/v1/embed/host.php?apikey=" + ApiKey;
-
Change the protocols to
https:public string IpaLoadUrl = "https://pol.pictometry.com/ipa/v1/load.php"; public string IpaJsLibUrl = "https://pol.pictometry.com/ipa/v1/embed/host.php?apikey=" + ApiKey;
-
-
Save the file.
Step 2: Add an external component for Pictometry to the Integration Module
If you already have one or more externalComponents configured when you add the Pictometry external component, remember to separate the components using commas. You may also want to configure the defaultComponent if you have more than one external component configured.
-
Run an XML editor or text editor as an administrator.
-
Open one of the viewer configuration files,
Desktop.json.jsorTablet.json.js, in the editor.By default, the configuration files are here:
C:\Program Files (x86)\Latitude Geographics\Geocortex Essentials\[instance]\REST Elements\Sites\[site]\Viewers\[viewer]\VirtualDirectory\Resources\Config\Default\
-
Add an external component for Pictometry to the Integration Module's
externalComponentsproperty:{ "moduleName": "Integration", ... "viewModels": [ { ... "configuration": { ... "externalComponents": [ { "id": "pictometry", "displayName": "Pictometry", "uri": "Resources/3rdPartyMaps/Pictometry.aspx", "viewpointIndicatorUri": "Resources/Images/Icons/location-direction-purple-32.png" } ] ...The example markup given above assumes that the web page and the viewer are deployed to the same domain. If they are deployed to different domains, you must specify the full URL, for example,
http://mymaps.mydomain.com/maps/Resources/3rdPartyMaps/Pictometry.aspx. -
Save the file.
-
Repeat these steps for the other configuration file.
Step 3: Configure cross-domain access
If the Pictometry web page is deployed to a different domain than the viewer, then you must configure cross-domain access so the viewer and integration pane can communicate with each other. If the web page and viewer are deployed to the same domain, skip this step.
-
Configure the web page's origin:
-
In one of the viewer's configuration files, add the web page's origin to the Integration Module's
allowedOriginsproperty:{ "moduleName": "Integration", "moduleType": "geocortex.essentialsHtmlViewer.mapping.modules.integration.IntegrationModule", "configuration": { "allowedOrigins": ["http://mymaps.mydomain.com"] } ...The origin that you configure in the
allowedOriginsproperty must be identical to the URL that you configure in theexternalComponent'suriproperty. -
Save the file.
-
Repeat these steps for the other configuration file.
-
-
Configure the viewer's origin:
-
Open
ThirdPartyMap.js.In the default deployment, the file is here:
C:\inetpub\wwwroot\Html5Viewer\Resources\3rdPartyMaps\ThirdPartyMap.js
-
Find the following line:
this.allowedOrigins = [];
-
Type or paste the viewer's origin in the array, within quotation marks:
this.allowedOrigins = ["http://myviewers.mydomain.com"];
The origin that you configure in the
ThirdPartyMap.jsallowedOriginsmust be identical to the viewer's origin as it appears in the browser. Note thathttp://myviewersdoes not matchhttp://myviewers.mydomain.com, even though they map to the same machine. -
Save the file.
-
Step 4: Add the Linked Maps button to the toolbar
-
In
beside the viewer. -
Click Toolbar in the side panel.
-
In the Available Tools column, find the Linked Maps tool and drag it to the desired position in the Configured Toolbar column.
-
Click Apply Changes.
-
Click Save Site.