Collaboration
Collaboration helps an organization share text messages, images, and markup in real time, directly in their mapping applications.
To make collaboration available to end users, you must enable collaboration in Manager. You must also provide a way for end users to open the Collaboration panel in the viewer. The easiest way to do this is to add the Collaboration tool to the toolbar. Alternatively, you could add an I Want To menu item or hyperlink.
Configure Collaboration in Essentials Manager
To configure collaboration:
Step 1 : Add Collaboration to the Viewer Toolbar
-
Open the site for the affected viewer in Essentials Manager, click Viewers in the side panel, and then click the Edit icon
 at the far right on the row containing the viewer name.
 -
Click Toolbar in the side panel.
-
Locate Collaboration in the Available Tools list.
-
Drag the Collaboration tool from the Available Tools list and drop it where you want it in the Configured Toolbar area.
-
Click Apply Changes.
Step 2: Enable Collaboration in Essentials Manager
-
In the side panel, click Collaboration and change the Mode from Disabled to Live Collaboration.
-
Click Apply Changes.
-
Click Save Site.
Create a Room in the Viewer and Add Users
To create a new room and give users permission to join the room:
-
Open and sign in to the Viewer.
-
Open the toolbar.
-
Locate Collaboration in the toolbar and click it.
The Collaboration panel opens. The Collaboration panel is initially empty.
-
Click the Join a Room drop-down menu and then click Create a Room.
Any user can create a room.
-
Type a name for the room.
-
Select a color identifier.
The color identifier helps to distinguish which messages in the Collaboration panel apply to each room.
-
Under Permissions, select Individuals or Groups, begin typing an individual or group name in the Search field, select a user or group in the filtered list, then click Add.
The user or group is included in the list under the permission settings with the View permission set by default.
-
Select user permissions from among None, View, Edit, or Admin.
User permissions can be assigned to any users that sign in to the room (Signed-in Users), and also separately for individuals or groups that have been included in the room.
The user creating the room is automatically included in the list of users as the administrator for that room. An administrator cannot edit their own permissions (set to Admin by default). Only another user with administrative privileges can edit permissions for other administrators.
-
Click Save to save the new room.
The room is immediately available for messages, drawings, and images.
Configure Collaboration in Essentials Manager to Auto-Join Rooms
You can configure Collaboration to auto-join any rooms created in the Viewer.
To configure the auto-join function:
-
Go to the side panel in Essentials Manager, click the Edit icon for the Viewer, and then click Collaboration in the side panel.
- Select Live Collaboration in the Mode list.
-
Click the box beside Specify rooms to automatically join to open a list of rooms. Alternatively, filter the list of rooms by typing the first few characters of a room name.
-
Click a room name to add it to the auto-join box.
-
Repeat the previous step to add additional rooms.
-
Click Apply Changes.
-
Click Save Site.
When users sign in to the Viewer and open Collaboration, the rooms in the auto-join list are listed below the Join a Room field. Only those rooms that users have View, Edit, or Admin authority for, appear in that list.
Note that the auto-join rooms function can also be used for the After Action Playback mode. This mode is most useful with the Collaboration feature in the Geocortex Active Operating Picture (AOP) solution.
Collaborate
The owner of a Collaboration room has the authority to modify or delete drawings and images added by the other users of the room.
Send a Message
To send a message to room participants:
-
Type your message in the message entry area.
-
Click Send.
See also...
Add a Drawing
To add a drawing:
-
Click Drawing above the message entry area.
-
Select one of the available drawing tools.
-
To change the styling for the selected drawing tool, click Style and change any of the color, pattern, and other styling attributes.
-
Draw on the map.
-
Add any applicable comments in the message entry area.
-
To clear the drawing or the related message before sending it, click the X beside the Drawing heading, and then click OK.
-
Click Send to post your drawing reference and text to the room for others to view.
To identify the drawing on the map associated with a message, click the message to pulse the drawing on the map. When you click a message for a drawing that is not in view or only partially visible on the map, the drawing on the map is centered. Depending on the zoom level for the map, the drawing is centered and zoomed in on, or it is centered without zooming.
Place an Image
To place an image:
-
Click Image above the message entry area.
-
Select an image to upload.
-
Click the location on the map to apply the image icon.
The Send button becomes available once you have located the image.
-
To move the image icon, click Locate, and then click the new location.
-
Add any applicable comments in the message entry area.
-
To clear the message or the image before sending it, click the X beside the Image heading above the message entry area. Click OK to confirm the action.
-
Click Send to post your image attachment and text for others to view.
To identify the image icon on the map associated with a message, click the message to pulse the image icon on the map. When you click a message for an image icon that is not in view on the map, the image icon is centered in the map view.
Depending on the type of message, the menu in the upper right includes one or more of the options to Erase, Copy to another room, or Edit the contents of the message.
Work with Multiple Rooms
Each user can view the rooms that they are members of when they click Join a Room. The slider beside the room names allows a user to display or hide messages for that room. Clicking anywhere on the line toggles the option on or off.
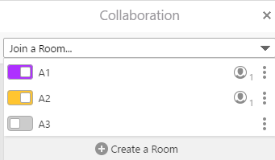
Messages for rooms A1 and A2 are displayed. Messages for room A3 are not displayed
When a user joins a room, the messages for that room are displayed. Each message contains a color identifier in the lower left to indicate the room that the message is associated with.
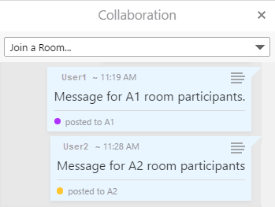
Posted messages with the room color identifier in the lower left
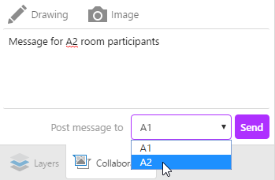
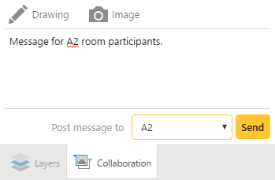
If the user joined multiple rooms, and has typed a message, they select the target room for the message from the Post message to list at the bottom of the message entry field. When the user selects a room, the color of the Send button changes to match the color identifier for the room. Note that only those rooms that the user has edit permissions for are in the Post message to list.
|
|
|
Selecting the room for the message |
|