Install the Geocortex Viewer for HTML5
Installation Methods
There are two ways to install the Geocortex Viewer for HTML5 framework:
-
Use the Viewer Template: Use the Geocortex Essentials Post Installer to add the viewer template (
.vtefile). -
Install the Viewer Manually: Drop the viewer directly into a web server.
The method that you choose has important implications for how you manage your viewers. Read about the two options below before making a decision. Choose the method that best suits your needs and follow the instructions for that method.
Installation Using a Viewer Template
This method allows you to:
-
Install the Viewer Framework: This method uses the Post Installer to deploy the viewer framework to Internet Information Services (IIS). The Post Installer performs the configuration in IIS—you do not need to do any work in IIS yourself.
-
Install the Management Pack: The Management Pack integrates the viewer framework with Manager. This allows you to use Manager to add viewers to sites and configure viewer properties.
-
Use Essentials to Upgrade your Viewers: First, use the Essentials Post Installer to upgrade the viewer template, and then upgrade all your HTML5 viewers in all your sites with a single click in Geocortex Essentials Manager.
See also...
Install the Viewer Framework Using a Viewer Template
Manual Installation
This method is for expert users with a good understanding of web servers and a willingness to manage their viewers by hand.
When you install a viewer manually, the viewer is not integrated with Manager. This means that it does not appear in your site configuration. To configure the viewer, you must manually edit the viewer's configuration files. Manual configuration is prone to error. If you introduce an error into a configuration file, the viewer may not run. You cannot use Essentials to upgrade manually installed viewers.
The viewer can be deployed using any web server. With most web servers, simply place the contents of the installation package into a folder that is known to the web server. This is enough to get the viewer application up and running.
Manual installation allows you greater control than installation using the viewer template. It allows you to:
-
Host your viewers on a different server than Essentials.
-
Use a platform and web server other than Windows and IIS to host your viewers. For example, you could use Apache on Linux, or any other platform and web server that you choose.
-
Control the URL that users use to open the viewer.
See also...
Install the Viewer Framework Using a Viewer Template
These instructions describe the steps to install the Geocortex Viewer for HTML5 using a viewer template.
If you are installing the HTML5 Viewer as part of a new installation of Geocortex Essentials, you must install Essentials first.
Installation is done using the EssentialsPost-Installation Configuration tool. There are three main steps:
-
Add the template: This adds the HTML5 Viewer template to the Post-Installation Configuration tool.
-
Install the Management Pack: This copies the Management Pack files to Manager so you can add and configure HTML5 viewers in Manager.
-
Deploy the viewer template to IIS: This creates a virtual directory in IIS and copies the HTML5 Viewer's files to the virtual directory so you can launch the viewer in a browser.
You can add the template to the Post-Installation Configuration tool without installing the Management Pack or deploying the viewer template to IIS. You can install the Management Pack later using the Post-Installation Configuration tool's Deploy Management Pack button. Similarly, you can deploy the viewer template to IIS later using the Deploy Template to IIS button.
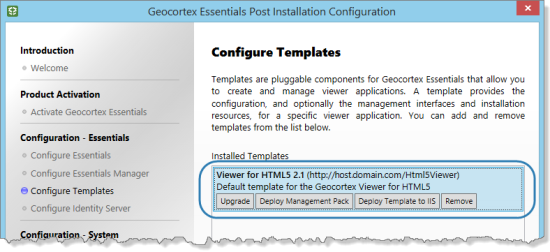
After adding the template, click the template to show the buttons
To install the Geocortex Viewer for HTML5 using Geocortex Essentials:
-
Launch the Post Installer.
-
Windows Server 2012 or Windows 8, and Newer Versions:
On the Start menu, type Post Install, and then click Post Installer.
-
Windows Server 2008 or Windows 7:
In the Start menu, click All Programs | VertiGIS | Geocortex Essentials [Version] [Instance] | Post Installer.
[Version] is the Essentials version number. [Instance] is the instance name, if Essentials is installed as a
-
-
Click Configure Templates in the side panel.
-
Click Add.
-
Browse to the folder where you extracted the files from the installation package.
-
Select the template file (
.vtefile), and then click Open.You are prompted to install the Management Pack.
-
Click Yes.
You are prompted to deploy the template to an IIS virtual directory.
-
Click Yes.
The Deploy Template to IIS dialog box opens.
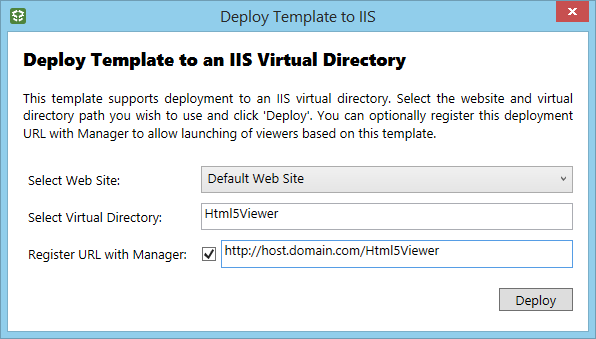
Deploy Template to IIS dialog box
-
If you want to deploy the viewer to a website that does not exist yet, create the website in IIS.
-
In the Select Web Site box, select the website that you want to deploy the viewer to.
-
In the Select Virtual Directory box, type a name or path for the virtual directory where you want the viewer to be deployed.
The URL in the box below the Select Virtual Directory box updates as you type the virtual directory.
The virtual directory must not already exist. Essentials will create the web folder needed to deploy the viewer.
The URL you register with Essentials must have the same domain as Essentials—the viewer cannot launch or load configuration from a different domain.
-
If you want to be able to launch the viewers that are based on this template from Manager, make sure the Register URL with Manager checkbox is selected.
If you clear the Register URL with Manager checkbox, the viewer launch links do not appear in Essentials. You will still be able to use Essentials to add and configure viewers.
-
If the URL beside the checkbox is not fully qualified, replace it with the fully qualified URL.
A fully qualified URL specifies the host and domain, for example,
host.domain.com. A URL that omits the domain is not fully qualified.If you do not specify the fully qualified URL here, the viewer will initially be blank when you launch it from Manager—you will have to manually enter the fully qualified URL in your browser's address bar to see the map. Also, Manager's Preview links will not work.
Geocortex Essentials 3.11.1 and later versions provide the fully qualified URL by default.
-
Click Deploy, and then close the success message that displays.
The template is listed in the Installed Templates area.
-
Click Finish. If prompted to review your settings, click OK, and then click OK again to close the Post Installer.
Add a Viewer to a Site
To add an instance of the HTML5 Viewer to an Essentials site:
-
Click the Windows Start button, type Essentials, and click Geocortex Essentials Manager.
-
If you are prompted to sign in, enter your user name and password, and then click Sign In.
Depending on how Essentials is configured in the Post Installer, you either sign in using an ArcGIS account or a Windows account.
Manager opens to the Site List.
If no sites exist, add a new site.
-
Edit the site that you want to add a viewer to.
-
In the sidebar, click Viewers.
The Viewers page opens.
-
Click Add Viewer.
The Create New Viewer dialog box opens.
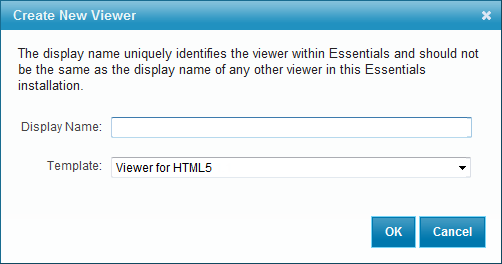
Create New Viewer dialog box
-
In the Display Name box, type a name for the viewer.
Avoid long viewer display names. Display names affect Windows file paths, which must be less than 260 characters.
We recommend using a unique display name for the viewer to prevent confusion.
- In the Template box, select Viewer for HTML5 4.14.0 from the drop-down list.
-
Click OK.
The Create New Viewer dialog box closes and Manager's Viewer Info page opens.
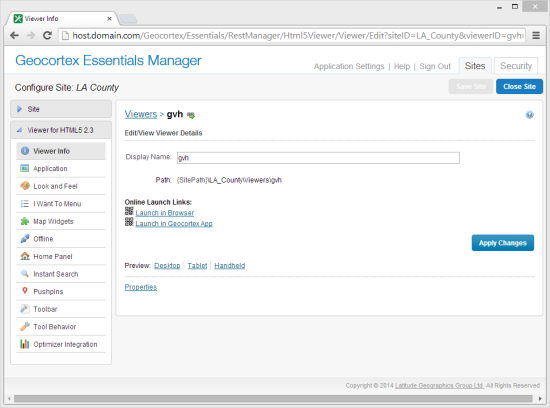
Manager's Viewer Info page showing the new viewer
-
To verify your installation, launch the viewer from Manager.
Manager provides several methods of launching the viewer, including:
-
Click one of the launch links on the Viewer Info page.
-
Hover the pointer over one of the QR codes (
 ) to enlarge the code, and then scan it with a device, such as a smartphone.
If the viewer does not load in the browser window, edit the URL in the address bar to fully specify the server and domain, for example,
myserver.companydomain.com. If the URL uses just the server name, the viewer will not display in some cases.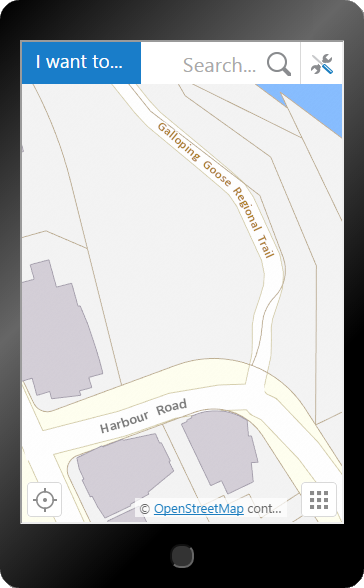
HTML5 Viewer's Handheld interface
-
Install the Viewer Manually
These instructions describe the steps to manually install the Geocortex Viewer for HTML5.
In the method described here, the Viewer files are placed in a subfolder of IIS's wwwroot folder. Alternatively, you could create an IIS virtual directory that maps to the folder where the Viewer files are stored.
To install the HTML5 Viewer manually:
-
Create a folder in a location that is known to your web server.
For example, you could create a folder named
HTML5Viewerin the following location:C:\inetpub\wwwroot\HTML5Viewer
-
Extract the files from
Viewer.zipto the new folder on your web server.Viewer.zipis provided in the installation package.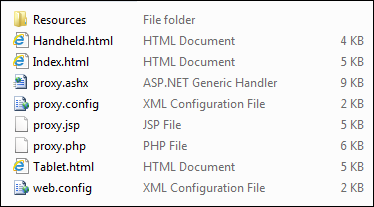
Contents of Viewer.zip
You have installed an instance of the HTML5 Viewer. The next step is to verify the installation by launching the viewer.
Launch a Manually Installed Viewer
There is an HTML file in the deployment folder for each class of device that can be used to run the viewer:
-
Index.html: For running on desktop computers. -
Tablet.html: For running on tablets. -
Handheld.html: For running on handheld devices, such as smartphones.
By default, the HTML5 Viewer is configured to target a World Cities site on a sample Geocortex server.
To verify your installation:
-
Launch the viewer in your browser using the Desktop interface.
For example, if you deployed the viewer to
C:\inetpub\wwwroot\HTML5Viewer, typehttp://localhost/HTML5Viewer/Index.htmlin your browser's address bar.
Out-of-the-box HTML5 viewer showing a sample site in the Desktop interface
-
Launch the viewer in the Handheld interface.
The URL is
http://localhost/[deployment folder]/Handheld.html. -
Launch the viewer in the Tablet interface.
The URL is
http://localhost/[deployment folder]/Tablet.html.
Point a Manually Installed Viewer to Your Site
Each HTML5 viewer has three configuration files, one for each class of device that can run the viewer:
-
Desktop.json.js: For running the viewer on desktop computers. -
Tablet.json.js: For running the viewer on tablets. -
Handheld.json.js: For running the viewer on handheld devices like smartphones.
To make the viewer point to your site rather than the sample site, you need to change the siteUri property in each of the viewer's three configuration files.
To configure the viewer to target your site:
-
Open the three configuration files in a text editor.
The configuration files are in
[deployment folder]/Resources/Config/Default, where[deployment folder]is the folder on your web server where you deployed the viewer. By default, the HTML5 Viewer is deployed to:C:\inetpub\wwwroot\Html5Viewer
-
In each configuration file, update the
siteUriproperty to point to your site. For example:"siteUri": "http://myserver.com/Geocortex/Essentials/REST/sites/MySite"
-
Save the configuration files.
-
To test the three configurations, launch each one in a browser.