Geocortex Data Store
Geocortex Core provides a document storage service, the Data Store, to Geocortex Essentials and other Geocortex products. Essentials uses the Data Store for a variety of purposes, such as storing HTML5 Viewer projects and Geocortex Mobile App Framework offline maps.
Geocortex Essentials Manager's Security & Data tab allows you to set Data Store policies and manage the documents in the Data Store.
Data Store Policies
Data Store policies control access to Data Store documents, such as projects and offline maps. You can select one of the following policies:
-
Deny Public Read Access: When this policy is selected, users must be signed in to the viewer to load, modify, and create Data Store documents. Anonymous users cannot load, modify, or create Data Store documents.
This is the default policy. This policy is appropriate in all scenarios.
-
Allow Public Read Access: When this policy is selected, signed-in users can share Data Store documents with anonymous users. Anonymous users can load Data Store documents, but they cannot modify or create documents.
This policy is appropriate in the following scenarios:
-
Your applications do not contain any sensitive information.
-
Your applications are on an intranet and it is acceptable for all intranet users, including anonymous users, to load Data Store documents.
-
-
Allow Public Read Access and Public Edit Links:
Enabling this policy may cause your applications to be at risk of malicious attacks, in particular cross-site scripting (XSS) attacks.
When this policy is selected:
-
Signed-in users can share Data Store documents with anonymous users. Anonymous users can load Data Store documents, but they cannot modify or create documents.
and
-
Signed-in users can create links that allow anonymous users to load and modify existing Data Store documents. Anonymous users cannot create documents.
This policy is appropriate when your applications are on an intranet and it is acceptable for all intranet users, including anonymous users, to view and modify Data Store documents. Do not use this policy if your applications are on the Internet.
-
Configure Data Store Policies
To configure Data Store policies:
-
In
-
Select the policy that you want to use.
-
Click Apply Details.
Manage Data Store Documents
Manager's Data Store - Documents page allows you to view information about the documents in the Data Store, change document owners, and delete documents.
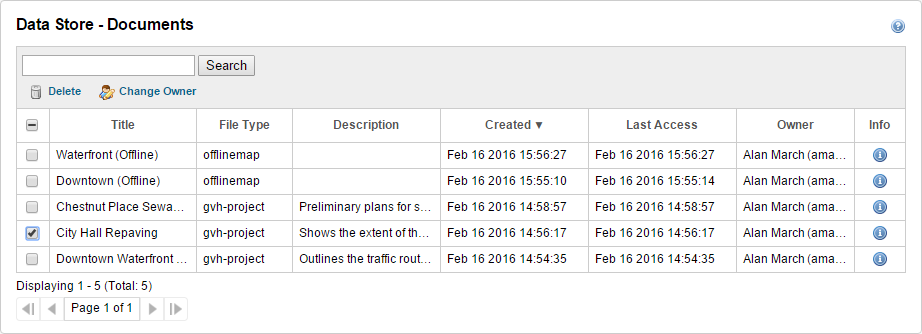
Example of Manager's page for managing Data Store documents
Because the Data Store may accumulate many documents over time, Manager provides tools to search for and sort documents. Sorting and searching operate on the entire Data Store, not only the page of documents that you currently have open, if there are multiple pages. To sort the documents, click the header for the column that you want to sort on. For example, to sort on the date that documents were added to the Data Store, click Created. Click the header again to sort in the opposite order.
You can search for any information that appears on the Data Store - Documents page except for dates—dates are not searchable. The Search function does not search document details.
Example 1: Purge Old Data Store Documents
As a site administrator, you like to monitor the Data Store to make sure it does not contain a lot of documents that no one is using. You periodically purge old documents. To do this, you open Manager's Data Store - Documents page and sort the documents on the Last Access column. This sorts the documents in ascending order, which places the oldest documents at the top of the list. (If you click the header again, it will sort the documents in descending order.)
You want to delete all the projects that have not been accessed in over a year. None of the documents on the first page have been accessed in the past year, so you select the checkbox in the header row, which selects the checkboxes for all the documents on the page. You click Delete, and then click Yes to confirm. This deletes all the documents on the page and displays the next page of documents. There are six projects on this page that have not been accessed in the last year, so you select the checkbox for each of these documents individually and delete them.
Example 2: Give Someone Ownership of Someone Else's Documents
Leslie created many HTML5 viewer projects during her time as a project manager. She has now been promoted to a new position that does not involve working with projects. Thomas has been hired to fill her project management position.
As the site administrator, you want to change the ownership of Leslie's projects to Thomas. To do this, you first ask Thomas to sign in to an HTML5 viewer and open a project. This ensures that the Data Store recognizes Thomas as a potential document owner.
When Thomas has done this, you open the Data Store - Documents page in Manager and search for Leslie. This finds all of the Data Store documents that Leslie owns. You select each of Leslie's projects. You then click Change Owner and type Thomas in the dialog box. This opens a drop-down list of Data Store users named Thomas. You select the correct Thomas and click OK. Leslie is removed as the owner and replaced by Thomas. Thomas can now assign access privileges for the projects, change the project details, and perform the other actions that are reserved for project owners. Leslie can no longer perform ownership tasks.
View Data Store Documents
To view the documents in the Data Store:
-
In
View Additional Information about a Data Store Document
To view additional information about a Data Store document:
-
In
-
Click the Document Information icon
 beside the document whose details you want to view.
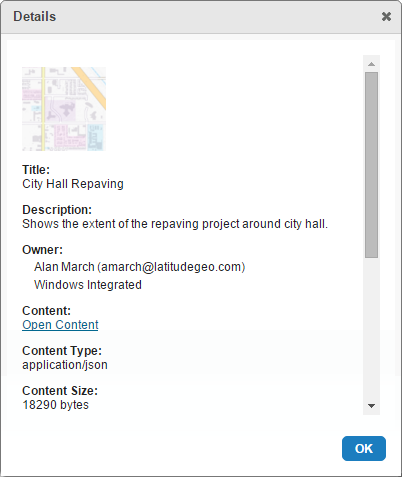
Example of additional information about an HTML5 Viewer project
-
To view the document's content in JSON notation, click the Open Content hyperlink.
Change the Owner of Data Store Documents
To change the owner of one or more Data Store documents:
This procedure changes one or more documents to have a particular owner. To change documents to have different owners, you must repeat this procedure for each new owner.
-
Make sure that the document's new owner has accessed the Data Store at least once.
You can only give ownership to users that have accessed the Data Store before. An easy way for a user to access the Data Store is:
-
Launch the viewer and sign in.
-
In the I Want To menu, click Open.
-
Load any project.
-
-
Change the owner:
-
In
-
Select the checkbox beside each document that you want to change.
This enables the Change Owner tool.
-
Click Change Owner.
-
Start to type the new owner's name or user name.
A drop-down list of matching users opens.
-
Select the new owner from the list.
-
Click OK.
-
Delete Data Store Documents
To delete one or more Data Store documents:
Deleting Data Store documents is permanent. You cannot undo this action.
-
In
-
Select the checkbox beside each document that you want to delete.
This enables the Delete tool.
-
Click Delete.
A confirmation dialog box displays.
-
Click Yes.
The documents are permanently deleted from the Data Store.