Permissions
Permissions are used to authorize or deny access to a site or part of a site. Every securable component in a site has a permission setting.
Permissions are configured separately for each site. There is no way to simultaneously configure permissions for multiple sites.
Allow, Deny, and Inherit Permissions
This section does not apply to permissions that are assigned to viewers. Permissions work differently when they are applied to a viewer. For information on how viewer permissions work, see Permissions for Viewers.
Each component of a site has a permissions value. There are three possible permissions values each component can have:
|
|
Allow: The Allow value allows access to the component. |
|
|
Deny: The Deny value prevents access to the component. When a user is denied permission to a particular component in a site, that component is not visible in the viewer. The component cannot be searched for, identified, or queried, and it does not appear in map exports, reports, or printouts. |
|
|
Inherit: Permission is not set for this component. The component inherits its value from a higher-level component in the Permissions hierarchy. One of the component's parents has an Allow or Deny permission configured. By default, component permissions are set to Inherit. |
Whenever you configure permissions for a user or role, set the permission on the Site component. Do not leave the Site component's permission as Inherit.
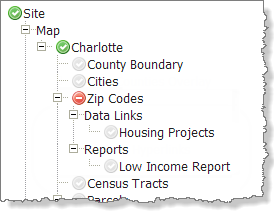
The following fragment of the Permissions hierarchy illustrates how permissions are inherited.
|
Inheritance of permissions |
Access to the Charlotte map service is allowed. The County Boundary, Cities, and Census Tracts layers inherit Allow permission from the Charlotte service. The end user will be able to see and interact with these layers in the viewer. |
|
Access to the Zip Codes layer is denied. The Housing Projects data link and Low Income Report inherit Deny permission from the Zip Codes layer. The end user will not see the Zip Codes layer, Housing Projects data link, or Low Income Report in the viewer. |
|
Services and Group Layers
Normally, when a component is assigned or inherits Deny permission, the component does not appear in the viewer. However, child components of services and group layers appears in the viewer even when the parent has been assigned the Deny permission.
If you configure Deny permission for a service in the map, but you allow at least one of the service's layers, the service appears in the Layer List as a container for its allowed layers.
For example, in the screen capture below, the Placid County service has Deny permission in Manager (rear), but it appears in the viewer's Map Layers list (front) as the container for the layers that have Allow permission.
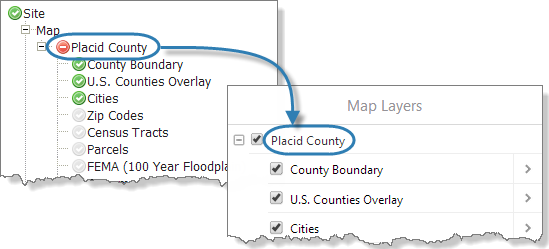
Service denied in Manager (rear) shows in the viewer (front)
If you assign Deny permission to a group layer, but you allow at least one of the sublayers, the group layer appears in the Layer List as a container for its allowed sublayers.
In tiled map services, it is not possible to prevent users from seeing secured layers, because the map images are pre-generated. However, layer operations and layer data in tiled map services are secured. For example, users cannot query a layer that they do not have permission to access.
Deny Permissions Take Precedence Over Allow Permissions
It is possible for a user to have more than one permission for a particular component or site. For example, a user could belong to two groups, Group A and Group B.
If the Group A permissions for Component 1 are set to Allow and the Group B permissions for Component 1 are set to Deny, the user is denied access to Component 1. On the other hand, if the permissions for Component 2 are set to Allow in both Group A and Group B, the user is allowed access.
You can see the precedence of the Deny permission illustrated in the table below:
|
Group A Permissions |
Group B Permissions |
User in Groups A and B |
|---|---|---|
|
|
|
|
|
|
|
|
A single Deny permission has precedence over any number of Allow permissions.
Permissions for Viewers
When permissions are assigned to a viewer, the permissions function differently than permissions that are assigned to other components. Viewer permissions are used by the Geocortex Mobile App Framework to build the Available Viewers list. If the user sets Allow permission for a viewer, the viewer shows in the list. If the user sets Deny permission for the viewer, the viewer does not appear in the list.
The HTML5 Viewer does not use viewer permissions—only the Geocortex Mobile App Framework uses viewer permissions. This means that viewer permissions do not affect whether a user can launch an HTML5 viewer in a browser. In particular, Deny permission does not prevent users from launching the viewer in a browser.
Viewer permissions function as follows:
|
|
Allow: Show the viewer in the list of viewers that appears when the user launches the Geocortex Mobile App Framework. |
|
|
Deny: Do not show the viewer in the list of viewers that appears when the user launches the Geocortex Mobile App Framework. |
|
|
Inherit: Permission is not set for this viewer. The viewer inherits its value from the next higher component in the Permissions hierarchy that has Allow or Deny permission configured (the Viewers component or the Site component). |
By default, viewer permissions are inherited.
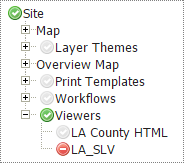
The following fragment of the Permissions hierarchy illustrates how permissions are assigned and inherited.
|
Inheritance of viewer permissions |
The LA County HTML viewer inherits Allow permission from the Viewers component. The Geocortex Mobile App Framework will show the LA County HTML viewer in the Available Viewers list. |
|
The LA_SLV viewer is assigned Deny permission. The Geocortex Mobile App Framework will not show the LA_SLV viewer in the Available Viewers list. |
|
The Global Roles
The Global roles are special roles that would otherwise be difficult or impossible to define. There are two Global roles:
-
Global - All Users: This role is similar to the Windows "Authenticated Users" identity. Any user who is signed in through one of the enabled security providers belongs to the Global - All Users role.
For example, suppose you have secured a site using ArcGIS Online. If you apply Allow permission to the World map service using the Global - All Users role, any user who is signed in to ArcGIS Online has access to the World map service.
-
Global - Everyone: This role is similar to the Windows "Everyone" identity. Everyone belongs to the Global - Everyone role, whether they are signed in or not.
Permissions set for the Global - Everyone role take precedence over permissions set for the Global - All Users role.
To use a Global role, select the role from the drop-down list when you are applying permissions, the same way that you would select any other role.
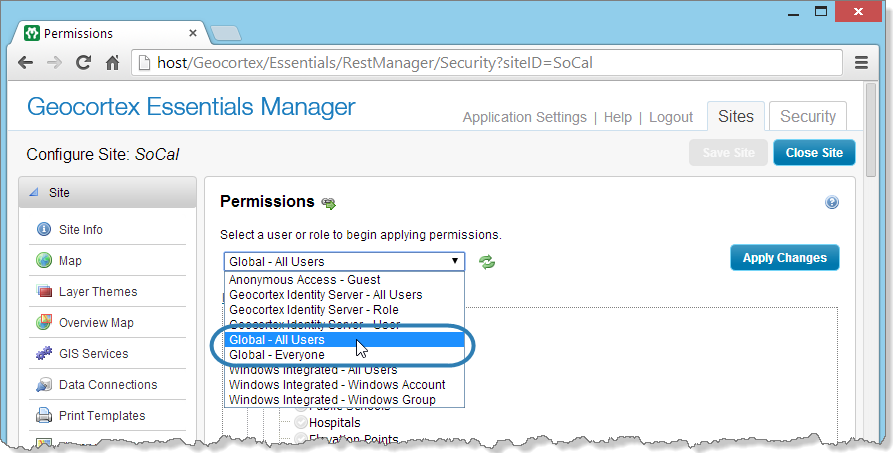
Global - All Users and Global - Everyone roles on Manager's Permissions page
Configure Permissions
To secure a site, you apply permissions to the site's securable components for the users and roles in each security provider that you want to use for the site. The security providers must be enabled. For example, if you have enabled Geocortex Identity Server and Anonymous Access, you would set permissions for Identity Server users and roles, and for the Anonymous Access - Guest role.
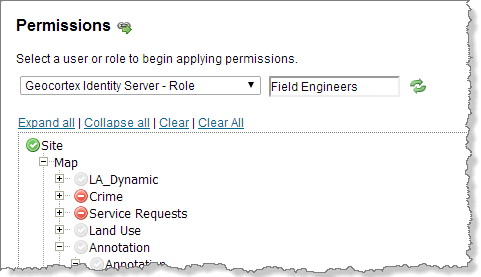
Permissions set for the Field Engineers role in the Geocortex Identity Server security provider
Configuration Tips
-
To locate components more easily in the Permissions hierarchy, use the Expand All and Collapse All hyperlinks immediately above the Permissions hierarchy.
-
If you have already configured permissions for a particular user or role, click Show Permission Entries and click the Edit tool
 to load the permissions that are configured for that user or role. This is often quicker than using the drop-down list.
 -
To remove all of the permissions for the currently selected user or role in this site, click the Clear hyperlink.
-
To remove all of the permissions for a particular type of user or role, click Show Permission Entries, and then click the Clear All hyperlink beside the type or user or role.
-
To remove all of the permissions for all users and roles in this site, click the Clear All hyperlink.
-
If the hierarchy does not refresh when you select a new user or role, click the Update Permissions tool
 .
. -
You do not need to click Apply Changes for every user and role that you configure permissions for. For example, you could change the permissions for Role1, then for User1, then for Role1 again, and then click Apply Changes.
To configure permissions:
You must configure permissions for each site that you want to secure.
-
In
-
On the Permissions tab, select the type of user or role that you want to configure permissions for.
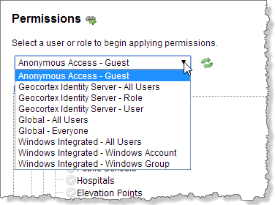
Drop-down list of types of users and roles
-
If an additional box appears, type in the user name or role.
-
If you are using Integrated Windows Authentication, start to type the user or group name, and then select the user or group from the drop-down list that appears.
-
For Geocortex Identity Server's default setup, click in the box to open a drop-down list of users or roles.
-
If you have configured custom membership and role providers for Geocortex Identity Server, you may have to type in the user name or role in full. For some providers, like SQL Server, a drop-down list of user names and roles appears when you start typing. Select the user or role from the drop-down list.
-
-
Press Enter, or click the Update Permissions tool
. -
Click the permission setting beside each item in the hierarchy that you want to change.
Clicking the setting cycles the value from Inherit
 , to Deny
  , to Allow
  , and then back to Inherit again. In the screen capture below, the pointer is positioned to change the permission setting for the Crime service.
Click the permission setting to change the value
Make sure you set the permission for the Site component—do not leave it as Inherit.
-
Repeat these steps for each user and role that you want to set permissions for.
-
Click Apply Changes.
View a Summary of Permissions
The permissions summary lists all of the permissions that are currently configured for the site. The summary provides a quick way to load or remove the permissions that are configured for a user or role.
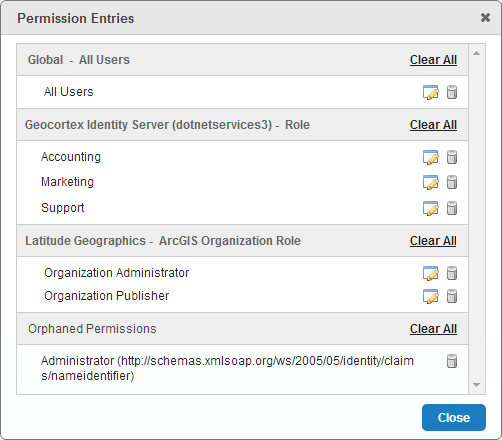
Summary of all the permissions that are configured
The permissions summary provides many of the same tools as the Permissions page, such as loading permissions into the Permissions hierarchy, and removing (clearing) permissions.
To load or remove permissions using the permissions summary:
Removing permissions is permanent. You cannot undo the deletion after you click Apply Changes.
-
In
-
Click Show Permission Entries.
-
Load or remove permissions:
-
Load Permissions: To load the permissions that are configured for a particular user or role into the Permissions hierarchy, click the Edit icon
. -
Remove Permissions: To remove the configured permissions for a particular user or role, click the Remove Permission icon
 beside the user or role. Click OK to confirm.
 -
Remove All Permissions: To remove all of the configured permissions for a particular type of user or role, click the Clear All hyperlink beside the type of user or role. Click OK to confirm.
The Clear All function in the permissions summary is different than the Clear All function on the Permissions page. In the permissions summary, Clear All clears all the permissions for one type of user or role. On the Permissions page, Clear All clears all the permissions in the entire site.
-
-
Click Apply Changes.
Remove Orphaned Permissions
Orphaned permissions are permissions that are configured for a user or role that Essentials cannot locate in the security provider. There are two ways that permissions can become orphaned:
-
The user or role was deleted in the security provider.
-
The security provider was moved or deleted.
When a user or role is intentionally deleted in the security provider, you can use the permissions summary to remove the permissions that were configured for that user or role. Although the orphaned permissions do not do any harm, it is a good practice to remove orphaned permissions so they do not accumulate.
When a security provider is moved or deleted, Essentials cannot find any of the users and roles in the security provider. Depending on how many different users and roles had permissions configured, you may see a long list of orphaned permissions in the permissions summary. If moving or deleting the security provider was not intentional, this alerts you to the fact that there is a problem. When you restore the security provider, Essentials will again be able to locate the users and roles in the security provider and the permissions will no longer be orphaned.
To remove permissions for a user or role that Essentials cannot locate:
Removing orphaned permissions is permanent. You cannot undo the deletion after you click Apply Changes.
-
In
-
Click Show Permission Entries.
-
In the Orphaned Permissions area:
-
Remove Permissions: To remove the orphaned permissions for a particular user or role, click the Remove Permission tool
beside the user or role. -
Remove All Permissions: To remove all of the orphaned permissions in the site, click the Clear All hyperlink beside Orphaned Permissions.
-
-
Click OK to confirm.
-
Click Apply Changes.
Advanced Permissions Configuration
If you require solutions to your complex permissions systems, you may want to manually set advanced permission settings that change the way that Allow and Deny permissions apply in Essentials.
Note that when you configure the advanced permissions settings described below, Essentials permissions function differently than described throughout the product documentation. You and other administrators should be careful to document your changes, as these settings complicate site permissions.
Before resorting to these settings, we recommend that you create additional roles to accommodate users who need special access to your sites.
Set Precedence for Allow Permissions Over Deny Permissions
By default, Deny permissions take precedence over Allow permissions. See Deny Permissions Take Precedence Over Allow Permissions for more information.
If you require more granular permissions settings for users who belong to multiple roles, you can manually set the Precedence attribute on existing <Permissions> elements in the Site.xml.
When you manually set a Precedence attribute, you define whether an Allow or a Deny permissions setting should take precedence.
Manually setting Precedence attributes complicates a site's permissions, and must be edited manually if changes are needed. If you need greater control over permissions, we recommend creating additional roles for users so that precedence is not required.
By default, if a user belongs to both Group A and Group B, and the Group A permissions for Component 1 are set to Deny, then even if the Group B permissions for Component 1 are set to Allow, the user will be denied access to Component 1. The table below shows the default behavior, without any Precedence settings changed:
|
Group A Permissions |
Group B Permissions |
User in Groups A and B |
|---|---|---|
|
|
|
|
|
No precedence settings defined for Component 1. |
||
When you set the Precedence attribute to AllowBeforeDeny on Component 1 or its parent, then the user in Group A and Group B is allowed access to Component 1:
|
Group A Permissions |
Group B Permissions |
User in Groups A and B |
|---|---|---|
|
|
|
|
|
With the |
||
You can see a simplified version of this example in the code snippet below:
<Layer DisplayName="Component 1" Identifiable="false" IncludeInLayerList="true" Visible="false">
    <Permissions Inherit="True" Precedence="AllowBeforeDeny">
        <Allow Type="http://schemas.xmlsoap.org/ws/2005/05/identity/claims/nameidentifier" ... />
        <Deny Type="http://www.geocortex.net/security/claims/category/user" ... />
    	 <Deny Type="http://www.geocortex.net/security/claims/category/guest" ... />
    </Permissions>
</Layer>
The Precedence attribute has three possible settings:
-
AllowBeforeDeny: Prioritizes Allow permissions for the component and its children. -
DenyBeforeAllow: Prioritizes Deny permissions for the component and its children.You should use this setting only if a parent component has
Precedenceset toAllowBeforeDenyand you need to override the behavior. -
Inherit: Ensures that precedence is inherited from parent components. This is the default behavior ifPrecedenceis not explicitly set.
Set User Permissions to Take Precedence Over Other Permissions
You may want to target a specific user who should be allowed to access resources even though they belong to roles do not have access to those resources.
Giving precedence to user permissions over role permissions is an advanced feature of Essentials. Essentials Manager's user interface does not acknowledge this feature. You must manually edit the REST API's web.config if changes are needed. If you need greater control over permissions, we recommend creating additional roles for users so that precedence is not required.
You can give additional access to a user regardless of their roles using the gcx.security.userAllowBeforeDeny app setting in the REST API. This setting gives precedence to Allow permissions set at the user level. Once you have set this app setting, you can then set permissions for individual users where Allow permissions shall override Deny permissions set in other roles that the user belongs to.
See how the app setting affects user permissions in the following table:
|
User Permissions |
Group Permissions |
User in Group |
|---|---|---|
|
|
|
|
|
|
|
|
|
With the |
||
To give a user additional access to resources beyond their roles:
-
Locate the REST API
web.configfor your Essentials instance.The typical location for the file is at the following path:
C:\Program Files (x86)\Latitude Geographics\Geocortex Essentials\Default\REST Elements\REST\web.config
-
Open the web.config file in a text editor or XML editor.
You can use Notepad, a text editor included with Windows.
-
In the file, place the new
gcx.security.userAllowBeforeDenyapp setting on a new line within the<appSettings>element.For example:
<appSettings> ... <add key="gcx.security.userAllowBeforeDeny" value="true" /> </appSettings> -
Save the
web.configfile.