Custom REST Endpoints
You can extend Geocortex Essentials by implementing custom REST endpoints that provide functionality that is not built into Essentials.
Implementing a custom REST endpoint involves both programming and configuration. Custom REST endpoints are configured through their own configuration file, RestResources.xml, which can be deployed anywhere in the Sites folder. You can deploy multiple RestResources.xml files. As well, a single RestResources.xml file can be used to register and configure multiple endpoints.
Essentials automatically detects new RestResources.xml files, and also detects updates to existing RestResources.xml files. This means that you do not need to restart the Geocortex Essentials REST API web application to deploy or redeploy your custom REST endpoints, and you can update properties and parameters on the fly without interrupting service.
For detailed information about the elements and attributes that can appear in a RestResources.xml file, refer to the REST Resources XML Reference.
You can configure custom properties for custom REST endpoints and you can place constraints on the objects that a parameterized REST endpoint is permitted to operate on.
We recommend that you deploy and verify the core part of your site before you extend the site.
Example 1 - Create a Custom REST Endpoint that Exports Feature Maps
This example shows how to create and deploy a custom REST endpoint that exports feature maps
This example requires development knowledge and Geocortex Essentials knowledge.
Step 1: Create a new project for Geocortex Essentials extensions
This step assumes that you do not already have a class library (assembly) for custom extensions. If you already have a class library for custom extensions, skip this step.
-
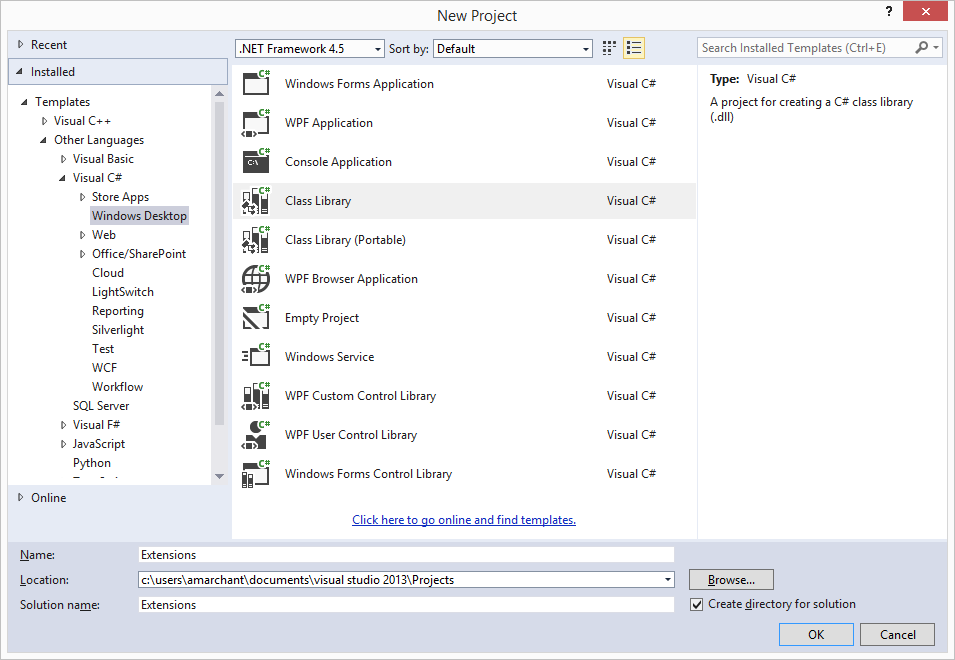
In Visual Studio, create a new class library project for custom extensions and give it a meaningful name, like Extensions.
Visual Studio will create a C# class file named
Class1.cs.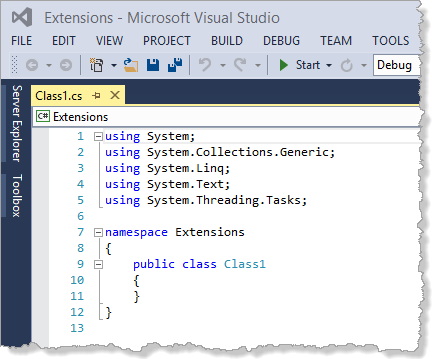
-
Rename the C# class file to something meaningful, like
ExtractFeatureMapOperation.In this example, the names of Geocortex Essentials REST endpoints end in
ResourceorOperationdepending on what the REST endpoint does. Resources provide a representation of a server-side entity. Operations perform a task and execute some business logic to generate a response.
Step 2: Add a class file
This step assumes that you did not create a new project in the previous step. If you created a new project in the previous step, skip this step.
-
In Visual Studio, create a new class file named
ExtractFeatureMapOperation.In this example, the names of Geocortex Essentials REST endpoints end in
ResourceorOperationdepending on what the REST endpoint does. Resources provide a representation of a server-side entity. Operations perform a task and execute some business logic to generate a response. -
Edit
ExtractFeatureMapOperationto match the following code:using System; using System.Collections.Generic; using System.Linq; using System.Text; namespace Extensions { public class ExtractFeatureMapOperation { } }
Step 3: Reference the required libraries
-
In Visual Studio, add references to the following libraries:
-
Geocortex.Essentials.Rest.dll -
Geocortex.Rest.dll -
Geocortex.Essentials.dll
The assemblies are located in the Geocortex Essentials REST API
binfolder. In the default Essentials installation, thebinfolder is located here:C:\Program Files (x86)\Latitude Geographics\Geocortex Essentials\Default\REST Elements\REST\bin
In order to create custom REST endpoints, the project must reference
Geocortex.Essentials.Rest.dll,Geocortex.Rest.dlland any other assemblies that the endpoint will use. This example also usesGeocortex.Essentials.dll. -
-
In the References section of the Solution Explorer, right-click one of the newly referenced assemblies and select Properties.
-
Set the assembly's Copy Local property to False.
Because the class library project is not meant to be run by itself, you do not want the referenced assemblies to be copied to the project output folder during compilation.
-
Set Copy Local to False for the other newly referenced assemblies.
Step 4: Add the REST attributes to the class
All REST endpoints in the Geocortex Essentials REST API must define the class-level RestRoute attribute. The RestRoute attribute specifies the URL that will be used to access the custom REST endpoint. The RestRoute attribute is defined in the Geocortex.Rest.RestRouteAttribute class.
The RestRoute URL is relative to the root of the REST API—it is not fully qualified. In the default installation, the root of the REST API is here:
http://[host]/geocortex/essentials/rest
In a named instance of Essentials that is installed in the default location, the root of the REST API is here:
http://[host]/geocortex/essentials/[instance]/rest
In this example, the URL will indicate that ExportFeatureMapOperation belongs to a feature map within a layer:
sites/{SiteID}/map/mapservices/{MapServiceID}/layers/{LayerID}/featuremaps/{FeatureMapID}/extract
This URL contains parameters (enclosed in curly brackets, like {SiteID}) that enable the REST endpoint to be used for any feature map, in any layer, in any site. When configuring the REST endpoint's deployment, the site administrator will be able to restrict the endpoint to, for example, a certain set of layers or a specific site.
-
Add the
RestRouteattribute to the top of theExtractFeatureMapOperationclass and add ausingdirective so the class can make use of theGeocortex.Restnamespace.The
RestRouteattribute contains an additional parameter calledIgnoreCase. SettingIgnoreCaseto true allows the REST endpoint to respond to requests no matter what capitalization is used.... using System; using System.Collections.Generic; using System.Linq; using System.Text; using Geocortex.Rest; namespace Extensions { [RestRoute("sites/{SiteID}/map/mapservices/{MapServiceID}/layers/{LayerID}/featuremaps/{FeatureMapID}/extract", IgnoreCase = true)] public class ExtractFeatureMapOperation { ... -
Add an instance of the
RestRouteParameterattribute toExtractFeatureMapOperationfor each of the parameters in the URL (SiteID,MapServiceID,LayerIDandFeatureMapID).The
RestRouteParameterattribute describes parts of theRestRoutethat are parameterized, such as{SiteID}. The parameters that you define here will be populated with the values provided in the URL when the REST endpoint is requested.RestRouteParameter's first parameter specifies the name that you want to use to refer to the parameter in code.ResourceParameterNameis the string between curly brackets in theRestRoutethat will be used to identify the parameter's value in the request's URL.... namespace Extensions { [RestRoute("sites/{SiteID}/map/mapservices/{MapServiceID}/layers/{LayerID}/featuremaps/{FeatureMapID}/extract", IgnoreCase = true)] [RestRouteParameter("SiteID", ResourceParameterName = "SiteID")] [RestRouteParameter("MapServiceID", ResourceParameterName = "MapServiceID")] [RestRouteParameter("LayerID", ResourceParameterName = "LayerID")] [RestRouteParameter("FeatureMapID", ResourceParameterName = "FeatureMapID")] public class ExtractFeatureMapOperation { ... -
Add any additional parameters that you want to use to customize
RestRouteParameter's behavior.The table below lists the additional parameters that you can use.
RestRouteParameter Parameters
Parameter
Data Type
Description
ConstraintString
Defines a pattern to use as a constraint on the parameter. The parameter will be populated with the value in the URL only if the constraint pattern is matched by the value in the URL.
ConverterType
Transforms the string value in the URL to a
System.Typeof our choice. Used in conjunction with theValueTypeparameter.DefaultString
The default value used when the parameter is not defined in the URL.
IgnoreCaseBoolean
Whether or not the parameter is case sensitive.
RequiredBoolean
Whether or not the parameter is required.
ValueString
When using a pattern for the
Constraintparameter, sets the replacement value.ValueTypeType
Used in conjunction with the
Converterparameter, sets theSystem.Typeof the parameter.
Step 5: Extend the abstract base class
-
Set
ExtensionResourceBaseas the base class and add ausingdirective for theGeocortex.Essentials.Rest.Resourcesnamespace.Custom REST endpoints extend the
Geocortex.Essentials.Rest.ExtensionResourceBaseabstract base class. This base class provides functionality that simplifies creation of JSON responses. For example, extendingExtensionResourceBaseautomatically makes the Geocortex Essentials JSON formatter available.using System; using System.Collections.Generic; using System.Linq; using System.Text; using Geocortex.Rest; using Geocortex.Essentials.Rest.Resources; namespace Extensions { [RestRoute("sites/{SiteID}/map/mapservices/{MapServiceID}/layers/{LayerID}/featuremaps/{FeatureMapID}/extract", IgnoreCase = true)] [RestRouteParameter("SiteID", ResourceParameterName = "SiteID")] [RestRouteParameter("MapServiceID", ResourceParameterName = "MapServiceID")] [RestRouteParameter("LayerID", ResourceParameterName = "LayerID")] [RestRouteParameter("FeatureMapID", ResourceParameterName = "FeatureMapID")] public class ExtractFeatureMapOperation : ExtensionResourceBase { } } -
Add the
RepresentAsJsonmethod.Implementing the
ExtensionResourceBaseabstract base class requires that you also implement theRepresentAsJsonmethod. You will complete the implementation of this method when you implement the business logic that the REST endpoint will perform.... public class ExtractFeatureMapOperation : ExtensionResourceBase { protected override System.Collections.Specialized.OrderedDictionary RepresentAsJson() { throw new NotImplementedException(); } } ...The
RepresentAsJsonmethod returns anOrderedDictionary. Ordered dictionaries are a convenient way to organize the components of a REST resource JSON response. Suppose that you have certain data that you want returned in the JSON response. Storing the data in anOrderedDictionaryautomatically serializes the data in the JSON response. For example, consider the followingOrderedDictionarydefinition:OrderedDictionary json = new OrderedDictionary { { "name", "John" }, { "age", 28 }, { "dob", new DateTime(1981, 11, 04) } };This would be automatically serialized to JSON as follows:
   {
      "name" : "John",
      "age" : 28,
      "dob" : "/Date(373708800000)/"
   }
Step 6: Prepare to implement the business logic
At this point, you have all of the components required for a custom REST endpoint—you have defined a class that will act as the endpoint, set the appropriate class-level attributes, and extended the ExtensionResourceBase abstract base class. You could deploy the endpoint to the Geocortex Essentials REST API now, but there would be no point without the logic that you want the endpoint to perform.
The custom REST endpoint in this example is responsible for generating a feature map image. To do this, the endpoint will take the objectID from the request's query string, discover the geometry of the feature represented by that objectID, and then use the geometry to generate the feature map.
For brevity, this example takes some shortcuts. Proper error handling and parameter checking are omitted, and the business logic is implemented within the REST endpoint. A better practice is to implement the business logic in classes external to the REST endpoint and use the REST endpoint as a facade to the business objects.
-
Add missing references to any .NET assemblies. This example requires the following references:
Geocortex.CoreSystem.DataGeocortex.EssentialsSystem.Data.DataSetExtensionsGeocortex.Essentials.RestSystem.DrawingGeocortex.GisSystem.WebGeocortex.RestSystem.XmlSystemSystem.Xml.LinqSystem.CoreWindowsBase -
Update the list of
usingdirectives to match the list below.Alternatively, you could update the list as you program the business logic.
using System; using System.Collections.Specialized; using System.Drawing; using System.IO; using System.Web; using Geocortex.Core.Imaging; using Geocortex.Essentials; using Geocortex.Essentials.Configuration.Rest; using Geocortex.Essentials.Rest.Resources; using Geocortex.Gis; using Geocortex.Gis.Geometries; using Geocortex.Rest; namespace Extensions { ... public class ExtractFeatureMapOperation : ExtensionResourceBase { ... -
At the top of the class, add convenience properties for each
RestRouteParameterthat you have defined (SiteID,MapServiceID,LayerID, andFeatureMapID).These convenience properties provide easy access to the
RestRouteParametervalues that are provided to the REST endpoint.... public class ExtractFeatureMapOperation : ExtensionResourceBase { /// Gets or sets the site ID. /// </summary> /// <value>The site ID.</value> public virtual string SiteID { get; set; } /// <summary> /// Gets or sets the map service ID. /// </summary> /// <value>The map service ID.</value> public virtual string MapServiceID { get; set; } /// <summary> /// Gets or sets the layer ID. /// </summary> /// <value>The layer ID.</value> public virtual string LayerID { get; set; } /// <summary> /// Gets or sets the feature map ID. /// </summary> /// <value>The feature map ID.</value> public virtual string FeatureMapID { get; set; } -
Add convenience properties for each of the objects that the
RestRouteParameterattributes represent (Site,MapService,FeatureLayer, andFeatureMapDefinition).These objects are in the
Geocortex.Essentialsnamespace./// <summary> /// Gets the <see cref="Geocortex.Essentials.Site"/> to which this resource belongs. /// </summary> /// <returns> /// The <see cref="Geocortex.Essentials.Site"/>, or null if it cannot be determined. /// </returns> public virtual Site Site { get; private set; } /// <summary> /// Gets the <see cref="Geocortex.Essentials.MapService"/> to which this resource belongs. /// </summary> /// <value></value> /// <returns> /// The <see cref="Geocortex.Essentials.MapService"/>, or null if it cannot be determined. /// </returns> public virtual MapService MapService { get; private set; } /// <summary> /// Gets the <see cref="Geocortex.Essentials.FeatureLayer"/> to which this resource belongs. /// </summary> /// <returns> /// The <see cref="Geocortex.Essentials.FeatureLayer"/>, or null if it cannot be determined. /// </returns> public virtual FeatureLayer Layer { get; private set; } /// <summary> /// Gets the <see cref="Geocortex.Essentials.FeatureMapDefinition"/> to which this resource belongs. /// </summary> /// <returns> /// The <see cref="Geocortex.Essentials.FeatureMapDefinition"/>, or null if it cannot be determined. /// </returns> public virtual FeatureMapDefinition FeatureMap { get; private set; } -
Add an
Initmethod to initialize the values of the properties.Whenever the custom REST endpoint receives a request, you will call the
Initmethod immediately. TheInitmethod is overridden from theExtensionResourceBase.Use the implicit
Controllerproperty to retrieve theSiteobject. TheControllerrepresents theEssentialsRestController, which provides access to a number of properties about this request and the REST context. TheControlleralso maintains the collection ofSiteobjects that are registered with the Geocortex Essentials REST API./// <summary> /// Called before the formatter (the method for the format) to initialize the resource. /// </summary> public override void Init() { base.Init(); SiteID = Request.Values["SiteID"] as string; MapServiceID = Request.Values["MapServiceID"] as string; LayerID = Request.Values["LayerID"] as string; FeatureMapID = Request.Values["FeatureMapID"] as string; Site = Controller.GetSite(SiteID); MapService = Site.Map.MapServices.FindByIDCaseInsensitive(MapServiceID); Layer = MapService.Layers.FindByIDCaseInsensitive(LayerID) as FeatureLayer; FeatureMap = Layer.FeatureMaps.FindByID(FeatureMapID); } -
Complete the implementation of the
RepresentAsJsonmethod.A call to the
GetFeatureMapOutputUrlmethod, which you will write in Step 7, does most of the work. TheRepresentAsJsonmethod simply returns thehrefproperty representing the URL to a generated feature map image./// <summary> /// Represents this resource as an ordered collection of name/value pairs that are /// used to format the JSON representation. Each "key" is represented as a property /// of an object whose value is "value". When the JSON object being formatted /// has properties that themselves are objects, they too should be formatted as /// <see cref="T:System.Collections.Specialized.OrderedDictionary"/> objects. /// </summary> /// <returns> /// An <see cref="T:System.Collections.Specialized.OrderedDictionary"/>. /// </returns> protected override OrderedDictionary RepresentAsJson() { OrderedDictionary json = new OrderedDictionary(); json.Add("href", GetFeatureMapOutputUrl()); return json; }
Step 7: Implement the business logic
-
Add the
GetFeatureMapOutputUrlmethod.The
GetFeatureMapOutputUrlmethod does the following:-
Retrieves the data representing the image as a byte array.
-
Stores the byte array in a temporary file in memory.
-
Makes the URL to the temporary file absolute.
-
Returns the URL.
The
GetFeatureMapOutputUrlmethod is a wrapper for the endpoint's core logic. The core logic itself resides in theExtractmethod, which you will add in the next step./// <summary> /// Gets the feature map output URL. /// </summary> /// <returns>A string representing a temporary URL for the feature map image.</returns> private string GetFeatureMapOutputUrl() { string url = string.Empty; // Get the data to store as a file in cache. byte[] data = Extract(); if (data != null && data.Length > 0) { string filename = string.Format("{0}.jpg", FeatureMap.ID); // Determine the URL absolute of the application. string externalUrl = HttpContext.Current.Request.GetRestApplicationUri(); // Cache the fie contents and obtain a URL to it. // The file will be available for 4 minutes. using (Stream stream = TempFileHandler.CreateTempFile("image/jpeg", filename, null, Guid.NewGuid(), 4, externalUrl, out url)) { stream.Write(data, 0, data.Length); } } return url; } -
-
Add the
Extractmethod.The
Extractmethod is responsible for generating the feature map image. The steps to generate the feature map image are:-
Make sure you have an
objectidfrom the request.Assume that the REST endpoint was requested with the
objectidGETorPOSTparameter. If theobjectidis not there, the REST operation will throw an exception. -
Use the
objectidto build a filter.Create a
LayerQueryFilterwith awhereclause using an equality operator on theOBJECTIDfield. To build thewhereclause, get theobjectidparameter from theRequest.Valuescollection. TheRequestproperty provides access to theGeocortex.Rest.RestRequestobject, which stores a collection of all of the properties provided to our REST endpoint. This includes the parameters that you defined, such asSiteIDandMapServiceID, as well as any query string or form post parameters. -
Query the layer using the filter and get the geometry.
Once you have constructed the filter, you query the layer to get the result. There should be a single result, because the feature is specified by an
OBJECTID. Use theGeometryFromRowconvenience method of theFeatureDataTableto get the geometry from the first result. -
Set up a clone of the feature map.
Clone the feature map belonging to the
Layerobject and then construct and initialize theFeatureMapDefinitionobject using the clone. Cloning ensures that the underlying object is not altered for other users requesting the same object in the REST API. Assign some default values for the feature map, such as a default buffer distance and highlight color. These values could also be parameterized in the request. -
Generate the image.
The two null parameter values in the
GenerateFeatureMapImagecall represent the list of visible layers and the map service transparencies. Setting the parameters to null allows them to assume the default values. -
Convert the image to a byte array and return the byte array.
Use the
ConvertToByteArrayconvenience method to translate the image into a byte array. We will writeConvertToByteArrayin the next step. Finally, return the byte array.
/// <summary> /// Extracts the Feature Map given the parameters of the REST operation. /// </summary> /// <returns>A byte[] array representing the feature map.</returns> /// <exception cref="System.InvalidOperationException">If extract is attempted without an objectid parameter.</exception> private byte[] Extract() { // Make sure we have an object ID if (Request.Values["objectid"] == null) { throw new InvalidOperationException("ExtractFeatureMapOperation requires an 'objectid' parameter."); } // First, discover the geometry representing this feature. // Build a filter using the OBJECTID. LayerQueryFilter filter = new LayerQueryFilter(); filter.ReturnGeometries = true; filter.OutputSpatialReference = MapService.SpatialReference; filter.WhereClause = String.Format("OBJECTID = {0}", Request.Values["objectid"]); // Query the layer. FeatureDataTable results = Layer.Query(filter); // Grab the geometry. Geometry featureGeom = results.GeometryFromRow(results.Rows[0]); GeometryCollection geometries = new GeometryCollection(); geometries.Add(featureGeom); // Set up our feature map. First, clone it so as not to modify the state on the server. FeatureMapDefinition featureMap = FeatureMap.Clone() as FeatureMapDefinition; featureMap.BufferDistance = 300; featureMap.BufferUnit = DistanceUnit.Feet; featureMap.HighlightColor = Color.Cyan; featureMap.ImageDescriptor = new ImageDescriptor { Dpi = 96, Height = 300, Width = 300, ImageFormat = ImageFormat.Jpg }; // Draw. MapImage mapImage = featureMap.GenerateFeatureMapImage(Layer, geometries, null, null); // Get a byte array from the image. byte[] data = ConvertToByteArray(mapImage.Bitmap); return data; } -
-
Add the
ConvertToByteArraymethod.The
ConvertToByteArraymethod translates a bitmap image into a byte array so the image can be streamed./// <summary> /// Converts the image to a byte array. /// </summary> /// <param name="image">The image.</param> /// <returns>The byte array.</returns> private byte[] ConvertToByteArray(Bitmap image) { byte[] data = null; using (MemoryStream stream = new MemoryStream()) { image.Save(stream, System.Drawing.Imaging.ImageFormat.Jpeg); data = stream.ToArray(); } return data; }
Step 8: Compile the assembly
The implementation of the custom REST endpoint is now complete.
-
Compile the Extensions assembly and resolve any errors.
The compiled assembly should be called
Extensions.dll.
Step 9: Deploy and register the custom REST endpoint
-
Copy the compiled
Extensions.dllassembly from thebinsubfolder of the Extensions solution to the Geocortex Essentials REST APIbinfolder.In the default Essentials installation, the REST API
binfolder is here:C:\Program Files (x86)\Latitude Geographics\Geocortex Essentials\Default\REST Elements\REST\bin
-
Create a new XML file called
RestResources.xmland save the file anywhere within theSitesfolder. -
Add a reference to the XML schema definition (
.xsd) file that ships with Geocortex Essentials.The following code assumes that you saved
RestResources.xmlto the rootSitesfolder, where the XSD file is located.<?xml version="1.0" encoding="utf-8" ?> <RestResources xmlns:xsi="http://www.w3.org/2001/XMLSchema-instance" xsi:noNamespaceSchemaLocation="RestResources.xsd"> ... </RestResources> -
Add a
<Resource>tag withAssemblyandClassNameattributes that reflect the assembly and fully qualified class name used in the custom REST endpoint.<?xml version="1.0" encoding="utf-8" ?> <RestResources xmlns:xsi="http://www.w3.org/2001/XMLSchema-instance" xsi:noNamespaceSchemaLocation="RestResources.xsd"> <Resource Assembly="Extensions" ClassName="Extensions.ExtractFeatureMapOperation" /> </RestResources> -
Save the file.
-
Browse to the Geocortex Essentials REST API
Sitesdirectory to ensure that the deployment of the custom REST endpoint did not cause any problems.In the default Essentials installation, the URL looks like this:
http://[host]/geocortex/essentials/rest/sites/
In a named instance of Essentials that is installed in the default location, the URL will look like this:
http://[host]/geocortex/essentials/[instance]/rest/sites/
Step 10: Run the custom REST endpoint
Custom REST endpoints, like all endpoints in the REST API, are accessed via requests to URLs. To test a custom REST endpoint, you construct a URL to the endpoint. This example uses a site called CharlotteDemo to illustrate how to test the endpoint. Assume that the site has a map service called Charlotte with a Zip Codes layer that has a feature map configured for it. The feature map is identified using the ID ZipCodeFeatureMap.
When requesting a (non-custom) Geocortex Essentials REST endpoint, the default response format is HTML. In this example, you have not configured an HTML response for the custom REST endpoint, so you will have to explicitly request the endpoint using the JSON or PJSON (pretty JSON) format parameter.
Recall that the custom REST endpoint created in this example requires an objectid parameter. The URL that you use to run the endpoint must provide the OBJECTID of the Zip Code that you want to generate an image for.
In the default Essentials installation, the URL request looks something like this:
http://[host]/geocortex/essentials/rest/sites/CharlotteDemo/map/mapservices/Charlotte/layers/0/featuremaps/ZipCodeFeatureMap/extract?objectid=2&f=pjson
In a named instance of Essentials that is installed in the default location, the URL request will look something like this:
http://[host]/geocortex/essentials/[instance]/rest/sites/CharlotteDemo/map/mapservices/Charlotte/layers/0/featuremaps/ZipCodeFeatureMap/extract?objectid=2&f=pjson
Compare the URL to the RestRoute attribute that you defined in Step 4 above:
sites/{SiteID}/map/mapservices/{MapServiceID}/layers/{LayerID}/featuremaps/{FeatureMapID}/extract
When the RestRouteParameter attributes are populated in the above request, {SiteID} is set to CharlotteDemo, {MapServiceID} is set to Charlotte, {LayerID} is set to 0, and {FeatureMapID} is set to ZipCodeFeaturMap.
Browse to the URL. The response should look something like this:
   {
      "href" : "http://host/geocortex/essentials/rest/TempFiles/FeatureMap.jpg?guid=3335a3c8-de04-45a1-a7cc-cf5af889c22a&contentType=image%2Fjpeg"
   }
A client application that uses the Geocortex Essentials JavaScript API can now consume this REST endpoint and create a hyperlink to the feature map image.
Example 2 - Add Custom Formatters to a Custom REST Endpoint
This example builds on Example 1, which creates and deploys a custom REST endpoint that returns a JSON response containing a URL to a feature map image. This example uses the same site to test the formatters—a site called CharlotteDemo with a map service called Charlotte that has a Zip Codes layer with a feature map. The feature map is identified using the ID ZipCodeFeatureMap.
Suppose that you want to stream the image back to the calling application, rather than just returning the URL to it. To satisfy this requirement, you will add a custom formatter to the REST endpoint. Formatters allow REST endpoints to respond to different format requests.
You have seen three formats so far in this example—HTML (the default format for Geocortex Essentials built-in REST endpoints) and the two formats that the custom REST endpoint accepts, JSON and PJSON (pretty JSON). Extending the ExtensionResourceBase abstract base class automatically makes the Geocortex Essentials JSON formatter available. Example 1: Create a Custom REST Endpoint that Exports Feature Maps uses the Geocortex Essentials JSON formatter.
New formats are added to a REST endpoint by creating a parameterless public method that returns void and decorating the method with REST attributes that specify which types of request the formatter will handle. The method can be named anything that you want. The attributes of interest are:
-
RestFormat: Specifies the supported format to which this formatter responds, for example,
json,pjson, orfile. -
RestRequestType: Specifies the request type to which this formatter responds, for example,
GETorPOST. -
RestResponseContentType: Specifies the MIME type which should be used when generating the output response to the caller, for example,
text/plain,image/jpeg,orapplication/pdf.
The format is specified by appending the f parameter and its value to the REST request URL, for example, f=json.
In this example, you will modify the custom REST endpoint to accept a format parameter called file that will stream the binary image content to the caller instead of returning JSON. You could also adapt these steps to create an HTML formatter for the custom REST endpoint so that it can return HTML responses.
Implement a Custom Formatter
You want to implement a custom formatter that will stream binary image content back to the calling application. To do this, you will create a formatter that responds to GET and POST requests that have the file format parameter. The response's MIME type will be image/jpeg.
The formatter's method, call it WriteFile, should write the response using the OutputStream property of the Response object. Note that this is different than the JSON formatter described in Geocortex Essentials JSON formatter, which uses the Output property.
To implement the custom formatter:
-
In Visual Studio, open the Extensions project and the
ExtractFeatureMapOperationclass. -
Add a method called
WriteFileExtractFeatureMapOperationclass.The code should look like this:
/// <summary> /// Writes the binary representation of the resource to the response output. /// </summary> [RestFormat("file")] [RestRequestType("GET")] [RestRequestType("POST")] [RestResponseContentType("image/jpeg")] public void WriteFile() { byte[] data = Extract(); Response.OutputStream.Write(data, 0, data.Length); } -
Recompile the Extensions assembly.
-
Redeploy the custom Extensions library.
-
Test the formatter by pointing your browser to the URL with the
fileformat parameter appended, for example:http://[host]/geocortex/essentials/rest/sites/CharlotteDemo/map/mapservices/Charlotte/layers/0/featuremaps/ZipCodeFeatureMap/extract?objectid=2&f=file
You should see the feature map image.
Geocortex Essentials JSON Formatter
When you created the custom REST endpoint in the first example, you did not have to specify a JSON formatter because extending the ExtensionResourceBase abstract base class automatically makes the Geocortex Essentials JSON formatter available. The code snippet below shows the definition of the Geocortex Essentials JSON formatter.
   /// <summary>
   /// Writes the JSON representation of the resource to the response output.
   /// </summary>
   [RestFormat("json")]
   [RestRequestType("GET")]
   [RestRequestType("POST")]
   [RestResponseContentType("text/plain")]
   [RestRequestContentType("")]
   [RestRequestContentType("application/x-www-form-urlencoded")]
   public void WriteJson()
   {
      Response.Output.Write(JsonSerializer.Serialize(RepresentAsJson());
   }
In this code snippet, the RestFormat attribute accepts the value json, meaning the formatter accepts requests where the format parameter, f, is equal to json—f=json. The two RestRequestType attributes specify that the formatter accepts both GET and POST requests. JSON responses are textual, so the RestResponseContentType attribute is set to text/plain. The RestRequestContentType attributes are used to specify what type of requests this formatter will respond to.
This implementation of a JSON formatter calls a utility serializer, JsonSerializer, to serialize the OrderedDictionary returned by the RepresentAsJson method. The Response property accessed in this method represents the Geocortex.Rest.RestResponse object belonging to the context of the request. The Response property is capable of writing a value directly to the HTTP response stream, which allows the serialized dictionary to be written directly to the response output.
Example 3 - Add Properties to a Custom REST Endpoint
This section builds on Example 1 and Example 2. This example uses the same site to test the properties—the site called CharlotteDemo with a map service called Charlotte that has a Zip Codes layer with a feature map. The feature map is identified using the ID ZipCodeFeatureMap.
There may be circumstances in which you want to create a generic REST endpoint that can operate using default values for some of the settings. For example, the ExtractFeatureMapOperation class creates a feature map image that is 300 x 300 pixels. You might want these values to be dynamic so the application consuming the endpoint can request images of any dimensions by providing width and height values in query string parameters or in a form post. You might also want the dimensions to be configurable by a site administrator.
When you created the custom REST endpoint, you interrogated the Request.Values collection to gain access to the objectid parameter passed in by the calling application. This example shows how to make the custom endpoint's behavior configurable by an administrator. Specifically, you will modify the endpoint so an administrator can control the width and height of the generated feature map image.
These principles can be extended to configure or manipulate the behavior of any custom REST endpoint.
Step 1: Add properties to the REST resource configuration
-
Open the
RestResources.xmlfile that registers the custom REST endpoint. -
Add properties called
ImageWidthandImageHeightto theResourceelement and set their values to 500 instead of the default values of 300:<?xml version="1.0" encoding="utf-8" ?> <RestResources xmlns:xsi="http://www.w3.org/2001/XMLSchema-instance" xsi:noNamespaceSchemaLocation="RestResources.xsd"> <Resource Assembly="Extensions" ClassName="Extensions.ExtractFeatureMapOperation"> <Properties> <Property Name="ImageWidth" Value="500"/> <Property Name="ImageHeight" Value="500"/> </Properties> </Resource> </RestResources> -
Save the file.
Step 2: Modify the custom REST endpoint to honor the configured properties
You must now modify the custom REST endpoint to allow properties defined by the administrator to override the default values. To do this, you will modify the Extract method that you created in Step 7 of Example 1. The Extract method hard-coded the values of the height and width in the ImageDescriptor:
   featureMap.ImageDescriptor = new ImageDescriptor
   {
      Dpi = 96,
      Height = 300,
      Width = 300,
      ImageFormat = ImageFormat.Jpg
   };
To modify the custom REST endpoint:
-
In Visual Studio, open the Extensions project and the
ExtractFeatureMapOperation. -
In the
Extractmethod, set the default values for the width and height to 300. -
Interrogate the
ExtensionPropertiesproperty to see if validImageHeightandImageWidthproperties have been configured.ExtensionPropertiesis an intrinsic property of theExtensionResourceBaseabstract base class that theExtractFeatureMapOperationclass extends from. -
If valid properties are configured, apply the configured height and width.
Your code should look like this:
private byte[] Extract() { ... // Set up our feature map. First, clone it so as not to modify the state on the server. FeatureMapDefinition featureMap = FeatureMap.Clone() as FeatureMapDefinition; featureMap.BufferDistance = 300; featureMap.BufferUnit = DistanceUnit.Feet; featureMap.HighlightColor = Color.Cyan; // Set the height and width defaults. int height = 300; int width = 300; // Look for configured values to override height and width defaults. if (ExtensionProperties["ImageHeight"] != null) { int h; if (int.TryParse(ExtensionProperties["ImageHeight"], out h) && h > 0) { height = h; } } if (ExtensionProperties["ImageWidth"] != null) { int w; if (int.TryParse(ExtensionProperties["ImageWidth"], out w) && w > 0) { width = w; } } featureMap.ImageDescriptor = new ImageDescriptor { Dpi = 96, Height = height, Width = width, ImageFormat = ImageFormat.Jpg }; // Draw. MapImage mapImage = featureMap.GenerateFeatureMapImage(Layer, geometries, null, null); // Get a byte array from the image. byte[] data = ConvertToByteArray(mapImage.Bitmap); return data; } -
Recompile the Extensions assembly.
Step 3: Redeploy the endpoint, restart the application and test the properties
-
Redeploy your custom REST endpoint.
-
Test the configured properties by pointing your browser to the URL with the
fileformat parameter appended, for example:http://[host]/geocortex/essentials/rest/sites/CharlotteDemo/map/mapservices/Charlotte/layers/0/featuremaps/ZipCodeFeatureMap/extract?objectid=2&f=file
The feature map image should appear two thirds larger than in Example 2.
Example 4 - Add Parameter Constraints to a Custom REST Endpoint
This section builds on Example 1 and Example 2. You do not need to do Example 3 before you add parameter constraints. This example uses the same site to test the parameter constraints—the site called CharlotteDemo with a map service called Charlotte that has a Zip Codes layer with a feature map. The feature map is identified using the ID ZipCodeFeatureMap.
Ideally, REST endpoints should be as generic and reusable as possible. For example, in this example you created an ExtractFeatureMapOperation REST endpoint that can be used by any layer in any map service in any site.
In some circumstances, generic endpoints need to be restricted so that they can only operate when the request for the endpoint meets certain criteria. For example, suppose you have created a generic REST endpoint that enables spatial editing on a layer. Because it is generic, you could stand up the REST endpoint and immediately allow editing on all layers of all map services in all sites deployed on the server. However, there may be reasons to exclude some layers from being edited.
Parameter constraints enable administrators to constrain request parameters to matching a value or regular expression. They can apply to GET or POST parameters, as well as to parameterized RestRoute path components. When a custom REST endpoint receives a request and the request's parameter values do not match the constraints, an error is returned to the caller. This behavior is built in. You do not need to modify your endpoint to honor the constraints.
This example describes how to use parameter constraints to constrain your ExtractFeatureMapOperation endpoint to working only for layers that have feature maps configured for them. As an additional exercise, you could also constrain the IDs of feature maps.
Step 1: Configure parameter constraints
Parameter constraints are implemented using the ParameterConstraints element in the RestResources.xml file. The Parameter sub element specifies the name of the parameter that you want to constrain and the constraint to apply.
A constraint can be expressed as a simple value or as a regular expression. If the constraint is a simple value, a request will execute only if the value of its parameter matches the constraint exactly. Complex constraints are defined using .NET Framework Regular Expressions.
For example, to allow an operation to be performed only on the layer with ID 7:
<Parameter Name="LayerID" Constraint="7" UseRegularExpression="false" />
To allow an operation to be performed only on layer 12 or layer 3:
<Parameter Name="LayerID" Constraint="^(12|3)$" UseRegularExpression="true" />
To allow an operation to be performed on any layer except layer 5, layer 9, or layer 23:
<Parameter Name="LayerID" Constraint="^(?!(\b5\b|\b9\b|\b23\b)).*$" UseRegularExpression="true" />
Define constraints on your ExtractFeatureMapOperation endpoint as follows:
-
Open the
RestResources.xmlfile that registers your endpoint. -
Add a parameter constraint called
SiteIDto theResourceelement. Set the constraint toCharlotteDemo. -
Add a parameter constraint called
LayerID. Set theUseRegularExpressionattribute totrueand specify a constraint that will allow requests to execute against the Zip Codes layer (layer 0) and the Parcels layer (layer 7). Your code should look like this:<?xml version="1.0" encoding="utf-8" ?> <RestResources xmlns:xsi="http://www.w3.org/2001/XMLSchema-instance" xsi:noNamespaceSchemaLocation="RestResources.xsd"> <Resource Assembly="Extensions" ClassName="Extensions.ExtractFeatureMapOperation"> <Properties> <Property Name="ImageWidth" Value="500"/> <Property Name="ImageHeight" Value="500"/> </Properties> <ParameterConstraints> <Parameter Name="SiteID" Constraint="CharlotteDemo"/> <Parameter Name="LayerID" Constraint="^(0|7)$" UseRegularExpression="true" /> </ParameterConstraints> </Resource> </RestResources> -
Save the file.
Step 2: Test the constraints
-
Test the parameter constraints by pointing your browser to a layer that has a feature map, and verify that the feature map image is returned as expected.
The URL should look something like this:
http://[host]/geocortex/essentials/rest/sites/CharlotteDemo/map/mapservices/Charlotte/layers/0/featuremaps/ZipCodeFeatureMap/extract?objectid=2&f=file
-
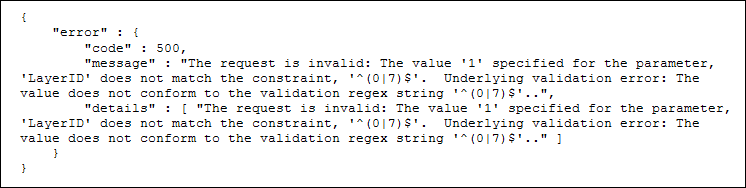
Modify the URL to something that should be blocked by the parameter constraints, for example, change the layer ID from 0 to 1.
If you leave the format parameter as
file, you should get an ASP error. Changing the format parameter topjsonallows you to see the reason for the error, as shown below.