Account Types that can Sign in to Manager
By default, users with the following types of account can sign in to Manager:
-
Portal for ArcGIS: If you configure sign-in using Portal for ArcGIS, the following accounts have access to Manager:
-
Administrative accounts in your Portal for ArcGIS organization.
-
The account that you use to set up access to Portal for ArcGIS in the Post Installer.
-
-
ArcGIS Online: If you configure sign-in using ArcGIS Online, the accounts that have access to Manager depend on the URL that you configure in the Post Installer:
-
Main ArcGIS Online URL: If you enter
https://www.arcgis.com/in the URL box, the only account that has access to Manager is:-
The account that you use to set up access to ArcGIS Online in the Post Installer.
-
-
Organization URL: If you enter the URL for your organization's ArcGIS Online portal, for example,
https://myorganization.maps.arcgis.com/, the following accounts have access to Manager:-
Administrative accounts in your ArcGIS Online organization.
-
The account that you use to set up access to ArcGIS Online in the Post Installer.
-
-
-
Windows: If you configure sign-in using Windows, the following accounts have access to Manager:
-
Accounts that belong to the Windows group that you configure in the Post Installer.
-
If you try to sign in to Manager using any other type of account, you are denied access.
You can change which accounts have access to Manager:
-
Change which ArcGIS accounts have access to Manager.
Includes instructions for both Portal for ArcGIS and ArcGIS Online.
Change which ArcGIS Accounts have Access to Manager
You can change which accounts have access to Manager. Use this method if you configured Manager sign-in using Portal for ArcGIS or ArcGIS Online.
Security-related settings and data are stored in the XML-based Security Store, which is a component of Geocortex Core. The Security Store has a ClaimsToAccept element that you can edit to change the accounts that have access to Manager. Each Claim element within ClaimsToAccept defines one or more accounts that have access to Manager.
The default ArcGIS claims are:
<Claim Type="http://www.geocortex.com/security/ags/app-role" Value="this_app:shared" />
<Claim Type="http://www.geocortex.com/security/ags/app-role" Value="this_app:owner" />
<Claim Type="http://www.geocortex.com/security/ags/app-role" Value="this_org:org_admin" />
If you configured Manager sign-in using Portal for ArcGIS, these claims apply to Portal for ArcGIS accounts. If you configured Manager sign-in using ArcGIS Online, the claims apply to ArcGIS Online accounts.
Follow the instructions below to:
-
Prevent organization administrators from signing in to Manager.
-
Allow someone from outside your organization to sign in to Manager.
Follow the instructions to allow a group to sign in to Manager.
Allow a Particular Individual to Sign in to Manager
To allow a particular individual to sign in to Manager:
Step 1: Edit the Security Store
-
Launch the Post Installer.
-
Right-click the Geocortex Essentials title bar icon and select Edit Security Store.
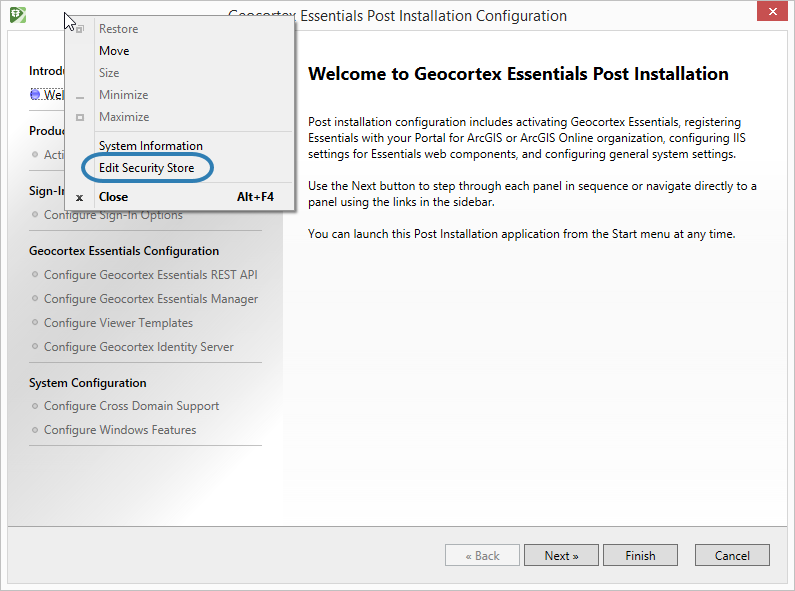
The Post Installer's title bar menu offers the Edit Security Store option
-
After the Security Store opens, find the following markup in the XML:
<PolicyDetails xml:id="manager-access">This element controls access to Essentials.
-
Find the
ClaimsToAcceptelement within thePolicyDetailselement.
-
Add the following
Claimelement anywhere within theClaimsToAcceptelement:<Claim Type="http://schemas.xmlsoap.org/ws/2005/05/identity/claims/nameidentifier" Value="[account]" Issuer="[issuer]" />
-
In the
Valueattribute of the newClaimelement, replace[account]with the ArcGIS user name of the user that you want to add, for example,Value="amarch".To find out the user name, go to the My Organization page in your portal.
Note that, if you are using ArcGIS Online sign-in to Manager and Enterprise Logins are configured for your ArcGIS Online organization, the user name is appended with an underscore followed by an identifier for your organization, for example, amarch_Latitudegeo.
-
Find the
IssuersToAcceptelement within the samePolicyDetailselement asClaimsToAccept. -
Find the
Issuervalue that starts withurn:gcx:ags, for example,Issuer="urn:gcx:ags:50136408-91F3-45B7-8B8E-5BBBFA89F44E". -
In the
Issuerattribute of the newClaimelement, replace[issuer]with theIssuervalue that you located in the previous step.The new
Claimelement should now look something like this:<Claim Type="http://schemas.xmlsoap.org/ws/2005/05/identity/claims/nameidentifier" Value="amarch" Issuer="urn:gcx:ags:50136408-91F3-45B7-8B8E-5BBBFA89F44E" />
-
Select Save.
You do not need to remove any
Claimelements from the XML.
Step 2: Restart the RestManager Web Application in IIS
This makes the changes to the XML take effect.
-
Launch Internet Information Services (IIS) Manager.
-
In the Connections panel, click Application Pools.
-
In the Application Pools panel, right-click EssentialsAdministrationAppPool4 and click Recycle.
-
Close IIS Manager.
Allow a Group to Sign in to Manager
You can use this method to allow someone from outside your organization to sign in to Manager.
To allow a group to sign in to Manager:
Step 1: Create an ArcGIS Group
-
Sign in to Portal for ArcGIS or ArcGIS Online using the same account that you used to sign in to Portal for ArcGIS or ArcGIS Online in the Post Installer.
-
Create a group for Geocortex Essentials administrators.
We recommend that you make the group private.
-
Invite the users that you want to be able to sign in to Manager to join the new group.
You can invite members of your organization, as well as ArcGIS users who do not belong to your organization.
-
Share the Essentials Manager web mapping application with the new group:
-
Click My Content.
-
In the side panel's Folders area, click Geocortex Products.
The Geocortex Products folder contains two web mapping applications that were created by the Post Installer—Geocortex Essentials and Geocortex Essentials Manager.
-
Click Geocortex Essentials Manager to view its details.
-
Click Share.
-
Select the checkbox for the group that you want to be able to sign in to Manager.
-
Click OK.
-
-
Get the ID for the new group:
-
Click Groups.
-
Click Details to view the group's details.
-
Click Share.
-
Follow the instructions for the sign-in method that you are using:
Portal for ArcGIS
-
In the Link to this group box, copy the value of the id parameter.
You will use this value in Step 2.
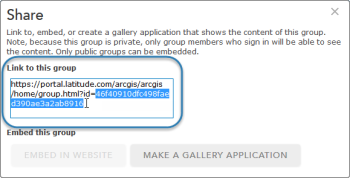
Copy the ID
ArcGIS Online
-
In the Link to this group box, copy the URL.
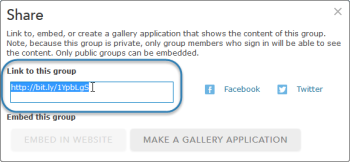
Copy the URL
-
Point your web browser to a site that expands short URLs, such as
http://longurl.orgorhttp://knowurl.com. -
Paste the URL into the input box.
-
Click the button to expand the URL.
-
In the expanded URL, copy the value of the id parameter.
You will use this value in Step 2.
-
-
Step 2: Edit the Security Store
-
Launch the Post Installer.
-
Right-click the Geocortex Essentials title bar icon and select Edit Security Store.
The Post Installer's title bar menu offers the Edit Security Store option
-
After the Security Store opens, find the following markup in the XML:
<PolicyDetails xml:id="manager-access">This element controls access to Essentials.
-
Find the
ClaimsToAcceptelement within thePolicyDetailselement.
-
Add the following
Claimelement anywhere within theClaimsToAcceptelement:<Claim Type="http://www.geocortex.com/security/ags/group" Value="[group]" Issuer="[issuer]" />
-
In the
Valueattribute of the newClaimelement, replace[group]with the ID that you located in Step 1, for example,Value="c71a947bb05d4c3d890d24933455791e". -
Find the
IssuersToAcceptelement within the samePolicyDetailselement asClaimsToAccept. -
Find the
Issuervalue that starts withurn:gcx:ags, for example,Issuer="urn:gcx:ags:50136408-91F3-45B7-8B8E-5BBBFA89F44E". -
In the
Issuerattribute of the newClaimelement, replace[issuer]with theIssuervalue that you located in the previous step.The new
Claimelement should now look something like this:<Claim Type="http://www.geocortex.com/security/ags/group" Value="c71a947bb05d4c3d890d24933455791e" Issuer="urn:gcx:ags:50136408-91F3-45B7-8B8E-5BBBFA89F44E" />
-
Select Save.
You do not need to remove any
Claimelements from the XML.
Step 3: Restart the RestManager Web Application in IIS
This makes the changes to the XML take effect.
-
Launch Internet Information Services (IIS) Manager.
-
In the Connections panel, click Application Pools.
-
In the Application Pools panel, right-click EssentialsAdministrationAppPool4 and click Recycle.
-
Close IIS Manager.
Allow your Entire Organization Access to Manager
Giving your entire organization access to Manager is not recommended. We recommend that you limit access to particular individuals or to a group that is created for this purpose.
To allow your entire organization to sign in to Manager:
Step 1: Edit the Security Store
-
Launch the Post Installer.
-
Right-click the Geocortex Essentials title bar icon and select Edit Security Store.
The Post Installer's title bar menu offers the Edit Security Store option
-
After the Security Store opens, find the following markup in the XML:
<PolicyDetails xml:id="manager-access">This element controls access to Essentials.
-
Find the
ClaimsToAcceptelement within thePolicyDetailselement.
-
Add the following
Claimelement anywhere within theClaimsToAcceptelement:<Claim Type="http://www.geocortex.com/security/ags/app-role" Value="this_app:org" />
-
Select Save.
You do not need to remove any
Claimelements from the XML.
Step 2: Restart the RestManager Web Application in IIS
This makes the change to the XML take effect.
-
Launch Internet Information Services (IIS) Manager.
-
In the Connections panel, click Application Pools.
-
In the Application Pools panel, right-click EssentialsAdministrationAppPool4 and click Recycle.
-
Close IIS Manager.
Prevent Organization Administrators from Signing in to Manager
If you do not want organization administrators to be able to sign in to Manager, remove the this_org:org_admin claim from the Security Store.
To prevent organization administrators from signing in to Manager:
Step 1: Edit the Security Store
-
Launch the Post Installer.
-
Right-click the Geocortex Essentials title bar icon and select Edit Security Store.
The Post Installer's title bar menu offers the Edit Security Store option
-
After the Security Store opens, find the following markup in the XML:
<PolicyDetails xml:id="manager-access">This element controls access to Essentials.
-
Find the
ClaimsToAcceptelement within thePolicyDetailselement.
-
Delete the following
Claimelement from theClaimsToAccept:<Claim Type="http://www.geocortex.com/security/ags/app-role" Value="this_org:org_admin" />
-
Click Save.
Step 2: Restart the RestManager Web Application in IIS
Restarting the RestManager web application causes the changes to the Security Store's XML to take effect.
-
Launch Internet Information Services (IIS) Manager.
-
In the Connections panel, click Application Pools.
-
In the Application Pools panel, right-click EssentialsAdministrationAppPool4 and click Recycle.
-
Close IIS Manager.
Change which Windows Accounts have Access to Manager
You can change which accounts have access to Manager. If you configured Manager sign-in using Windows, you can change which accounts have access to Manager by selecting a different Windows group in the Post Installer.
To change which Windows accounts have access to Manager:
-
On the server that hosts Manager, use the Windows management tools to create a local group.
Alternatively, you can use a domain group.
-
Add the users that you want to be able to sign in to Manager to the group.
-
Launch the Post Installer and click Configure Sign-In Options in the side panel.
-
In the Group box, type the name of the group that users must belong to in order to sign in to Manager.
-
Click Finish and close the Post Installer.