Set Up Cross-Origin Resource Sharing (CORS)
Configuring CORS via Internet Information Services (IIS) Manager is supported. However, if Essentials and a viewer are hosted on separate domains and you use the Geocortex Mobile App Framework, you must use the following method to configure CORS safely. If you configure CORS in both Essentials and IIS Manager, CORS functionality will break.
If Essentials and an HTML5 viewer run on different domains, they require cross-origin resource sharing (CORS) to be set up. For example, when your Essentials installation and a viewer are deployed to different domains, the viewer cannot load configuration from Essentials. This is because the browser does not allow cross-domain requests without CORS. For an introduction to CORS, see the Wikipedia article Cross-origin resource sharing.
This article outlines how you can configure CORS for your Essentials installation. The configuration requires two steps:
-
Configure CORS in Essentials Manager.
-
Configure CORS for each viewer that requires access to Essentials.
If you require cross-origin access to another domain that hosts resources used by Essentials or the viewer, you can configure a proxy page. See Set Up a Proxy Page for the HTML5 Viewer.
Recommendations
-
Deploy Essentials and the viewer to the same domain to reduce management overhead and simplify Essentials upgrades.
-
While the legacy method of configuring CORS is still supported, we recommend configuring CORS in Essentials Manager.
Configure CORS in Manager
If you have previously configured CORS in Internet Information Services (IIS) Manager, you need to manually remove the old configuration settings before configuring CORS in Essentials Manager. For more information, see Remove the Previous CORS Configuration from Essentials.
You can configure cross-origin resource sharing for Essentials in Manager. From Manager's Security & Data tab, go to the Security | CORS page to configure CORS.
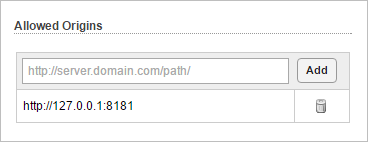
In most Essentials environments, you can configure CORS by adding the URL where your viewers are hosted using the Allowed Origins form. You can add URLs as fully qualified domain names or IP addresses. For example, add an entry for https://viewer.domain.com if that is the domain your viewer is hosted on.
If your URLs use both http:// and https://, add both forms of the full URL as separate entries.

The CORS Allowed Origins form
If your CORS setup requires custom HTTP request methods and headers, you can also configure them from the Allowed Methods and Allowed Headers forms on this page. These settings only require configuration in custom environments that require additional HTTP headers. For more information, see Allowed Methods and Allowed Headers Configuration.
The entry http://127.0.0.1:8181 points at localhost and is required in order to use the Geocortex Mobile App Framework.
Add or Remove Values
You can add an allowed value by entering it in the form's text box and clicking the Add link. Existing entries are displayed below the input form. To remove an entry you can click the Remove icon ![]() next to each entry.
next to each entry.
Once you have added values, click Apply Details to save the configuration.
Configure Your Essentials Domain in Your Viewers
To complete CORS configuration, you must configure each of your viewers to use the domain name where Essentials is hosted.
To configure Essentials' trusted origin in your viewers:
-
Run a text editor as an administrator.
Notepad is a text editor included with Windows.
-
Open the default viewer host file in the editor.
The default host page for HTML5 viewers is
Index.html. For a typical HTML5 viewer deployment, theIndex.htmlhost file is located here:C:\inetpub\wwwroot\Html5Viewer\Index.html
-
Find where the
viewerConfigvariable is defined:var viewerConfig = { ...
} -
Immediately before the section where the
viewerConfigvariable is defined, configure the Essentials origin to be a trusted origin. Use thegeocortex._configDomainsobject to configure trusted origins.For example, if Essentials is hosted at
http://myserver.mydomain.com:geocortex._configDomains = { "http://myserver.mydomain.com": true }; -
Save the
Index.htmlfile. -
Repeat Steps 1–5 for
Tablet.html,Handheld.htmland any other host files. -
Repeat Steps 1–6 for each of your HTML5 viewers.
Allowed Methods and Allowed Headers Configuration
In addition to the Allowed Origins forms, you can configure the Allowed Methods and Allowed Headers values for Essentials. The default values provided in these fields are sufficient for most Essentials environments.
-
Allowed Method: Add or modify HTTP request methods that Essentials accepts from allowed origins. The default allowed methods for CORS are
GET,POST,HEAD, andOPTIONS. Web browsers may not honor your additional configurations. See the W3C's Method Definitions specification for more information about methods. -
Allowed Header: Add or modify HTTP header fields that Essentials accepts from allowed origins. The default allowed headers for CORS are Content-Type and X-Requested-With. See the W3C's Header Field Definitions specification for more information about header fields.
Cookies and Authorization Headers
In most cases, cookies and authorization headers are not a required configuration step. The following documentation applies to advanced deployments only.
In order to support CORS HTTP requests that include cookies and authorization headers, you must configure Essentials to use the Access-Control-Allow-Credentials CORS header.
Configure Essentials
You must edit your Essentials's RestAppSettings.xml file. If Essentials was installed in the default location, you will find the RestAppSettings.xml file here:
C:\Program Files (x86)\Latitude Geographics\Geocortex Essentials\Default\REST Elements\Sites\RestAppSettings.xml
Locate the beginning of the <Cors> element in the file, and add AllowCredentials="true" to the XML tag as follows:
<Cors AllowCredentials="true">
With Essentials now accepting CORS requests with credentials, you can now configure your viewers to issue the CORS requests.
Configure the Viewer to Make CORS Requests to Essentials
Before the viewer can make CORS requests to Essentials, it needs to be configured to make requests to the server running Essentials that you have enabled credentials for in the previous section.
In your viewer's Index.html, Tablet.html, and Handheld.html, add the following lines inside the <script> tags at the bottom of the file:
<script>
// Uncomment the below line to only use local copies of Esri API files. This is
// done automatically in the Geocortex Mobile App Framework.
// var geocortexUseLocalEsriApi = true;

   var viewerConfig = {
      "configurations": {
         "default": "Resources/Config/Default/" + shellName + ".json.js"
      },
      "viewerConfigUri": null
   };

   var enableCors = function(viewer,loader) {
      require(["esri/config"], function(esriConfig) {
         esriConfig.defaults.io.corsEnabledServers.push({
            host: "server.organization.com",
            withCredentials: true
         })
      });
   };

   new geocortex.essentialsHtmlViewer.ViewerLoader().loadAndInitialize({
      onInitialized: enableCors
   });
</script>
The host property points to the server of the Essentials instance that you have configured for cookies and authorization headers. The withCredentials property is set to true.
Configure the Viewer to Make CORS Requests to Other Servers
You can duplicate the configuration that the viewer uses to make requests to Essentials for other servers that require CORS requests with credentials. In this case, assign the host to the URL of the server you need to make requests to. You must ensure that the server uses the Access-Control-Allow-Credentials CORS header and that it is set to true.
Remove the Previous CORS Configuration from Essentials
If you have configured CORS for your Essentials installation in IIS Manager, you need to remove the previous CORS configuration before using the CORS settings in Essentials Manager.
To remove IIS Manager CORS configuration settings from Essentials:
-
Open Internet Information Services (IIS) Manager.
-
In the Connections panel, navigate to the site that hosts Essentials.
-
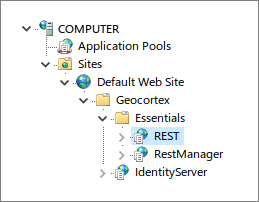
Locate the REST application.
For a typical Essentials installation, you can find the REST application within the following directory:
Your Computer\Sites\Default Web Site\Geocortex\Essentials
Once you have located it, select the REST application.

Default location of the REST application
-
In the REST application's Feature View, select the HTTP Response Headers section.
Note any custom HTTP response headers you want to keep.
-
Remove every HTTP response header with following name:
-
Access-Control-Allow-Origin -
Access-Control-Allow-Methods -
Access-Control-Allow-Headers
To remove an HTTP response header, right-click it and select Remove from the context menu.
-