Configure a Web AppBuilder in Portal for ArcGIS Application
To run VertiGIS Inline views in Web AppBuilder in Portal for ArcGIS apps, you must:
-
Deploy the Inline widget to Web AppBuilder in Portal for ArcGIS.
-
Register the Inline widget with Web AppBuilder in Portal for ArcGIS.
-
Create a new 2D app, add the Inline widget to the app, and then configure the widget to run the view.
After you have registered the widget, share it with other Inline users in your organization. This allows them to configure their Web AppBuilder apps to run views. If the widgets are not shared, the other users will not see the widgets in Web AppBuilder.
Deploy the Inline Widget to a Web AppBuilder in Portal for ArcGIS
To deploy the widget:
-
Download the widget.
-
Extract the widget folder and save it to an appropriate location. It does not matter where you save the folder. You will point the Application Extension (AppBuilder) to this location (in the next section).
Register the Inline Widget with Web AppBuilder in Portal for ArcGIS
To register the widget:
-
Sign in to Portal for ArcGIS as an administrator.
-
In Content, click Add Item and select Add an application.
-
Set the Type to Application Extension (AppBuilder).
-
In the Manifest URL box, paste the URL to the
manifest.jsonfile for the widget you want to register.You can either use the local copy of the
manifest.jsonfile or if your portal has access, the public copy of themanifest.jsonfile.2D In-Panel Widget
-
Local:
[https]://[host.domain.com]/[virtual_path]/widgets/Inline/manifest.json -
Public:
https://apps.vertigisstudio.com/inline/wab/portal-widget/manifest.jsonFor Portal 10.8.1: When setting up a widget using the public copy of the
manifest.jsonfile, you must configure additional admin settings, as follows:-
Remove
apps.vertigisstudio.comfrom the Trusted Servers section. -
Add
apps.vertigisstudio.comas anallowedProxyHostby entering the code below into the Update Security Configuration section.{
"allowedProxyHosts":"apps.vertigisstudio.com"
}
-
-
-
Click anywhere outside the Manifest URL box.
Portal for ArcGIS will get the default title from the
manifest.jsonfile and enter it into the Title box. -
Enter a meaningful title in the Title box. For example, VertiGIS Inline Widget for In-Panel 2D.
By default, the widgets all use the same title. Portal for ArcGIS does not allow multiple items to have the same title. -
Enter one or more tags. For example, VertiGIS, Inline, and Widget.
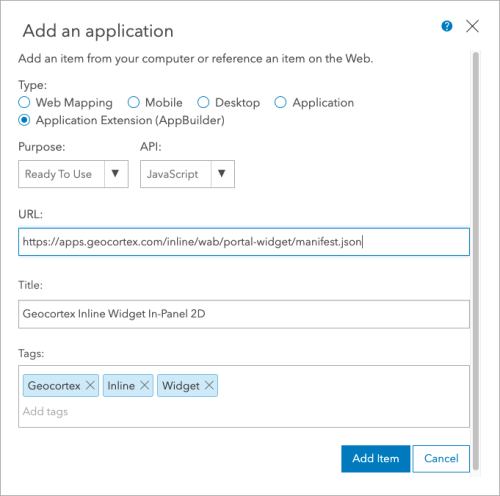
Example configuration for a VertiGIS Inline widget's item in Portal for ArcGIS
-
Click Add Item.
Create 2D App, Add and Configure the Inline Widget
-
Create a new 2D app in Web AppBuilder, using the Dashboard Theme.
Inline supports the Web AppBuilder's Dashboard theme only.
-
Open the Widget panel.
-
Search for and select the Inline widget and click OK.
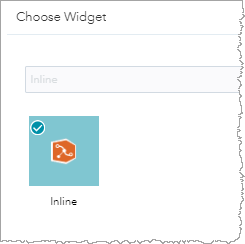
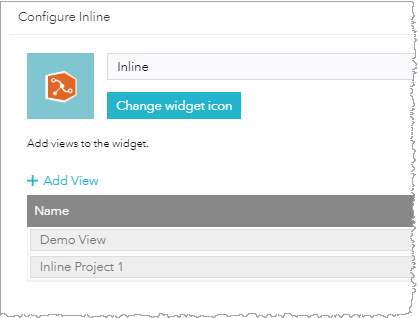
The Configure Inline window opens.
-
Click Add View.
-
Select the views you want to add to the widget. You can add views from different data sources.
-
Click OK.
Inline appears in your app.
-
Save the app.
You can now run the Inline view in the Web AppBuilder in Portal for ArcGIS app.