Map Areas
Map areas make it possible to work with your operational map data while offline, for example, to collect data in the field. When you reconnect online, you can update your device with any new data that has been added while you were offline, or send the data you have collected to the online map.
While you are offline, your map area is fully functional. You can search for and view features, add and edit features, add attachments and related records, use geolocation and run workflows. In fact, all the functions you would normally perform on the online map.
Map areas do not support duplicate layers in a web map. For more details, see Esri's Technical Support article.
Your map area may be one of the following:
- A Pre-generated map area: A map area created - usually by a GIS Administrator - as part of a web map in ArcGIS Online or Portal for ArcGIS, and then added to a Mobile app. Pre-generated map areas are available to multiple users.
-
A Custom map area: A Custom map area is one that you create on your device in either a Custom Mobile app, or VertiGIS Studio Go while you are online. You define an area of your online map, set the level of detail, and then download it to your device. You can go offline at this point. You then activate the map area and it functions exactly like a Pre-generated map area. When you reconnect online, you can upload all your data to the web map from where other users can access it. In turn, you can download any data added by other users while you were offline.
When you create a map area, it automatically includes attachments and related records that are within the area that you define, although you can choose to exclude attachments if you think the resulting download will be too large.
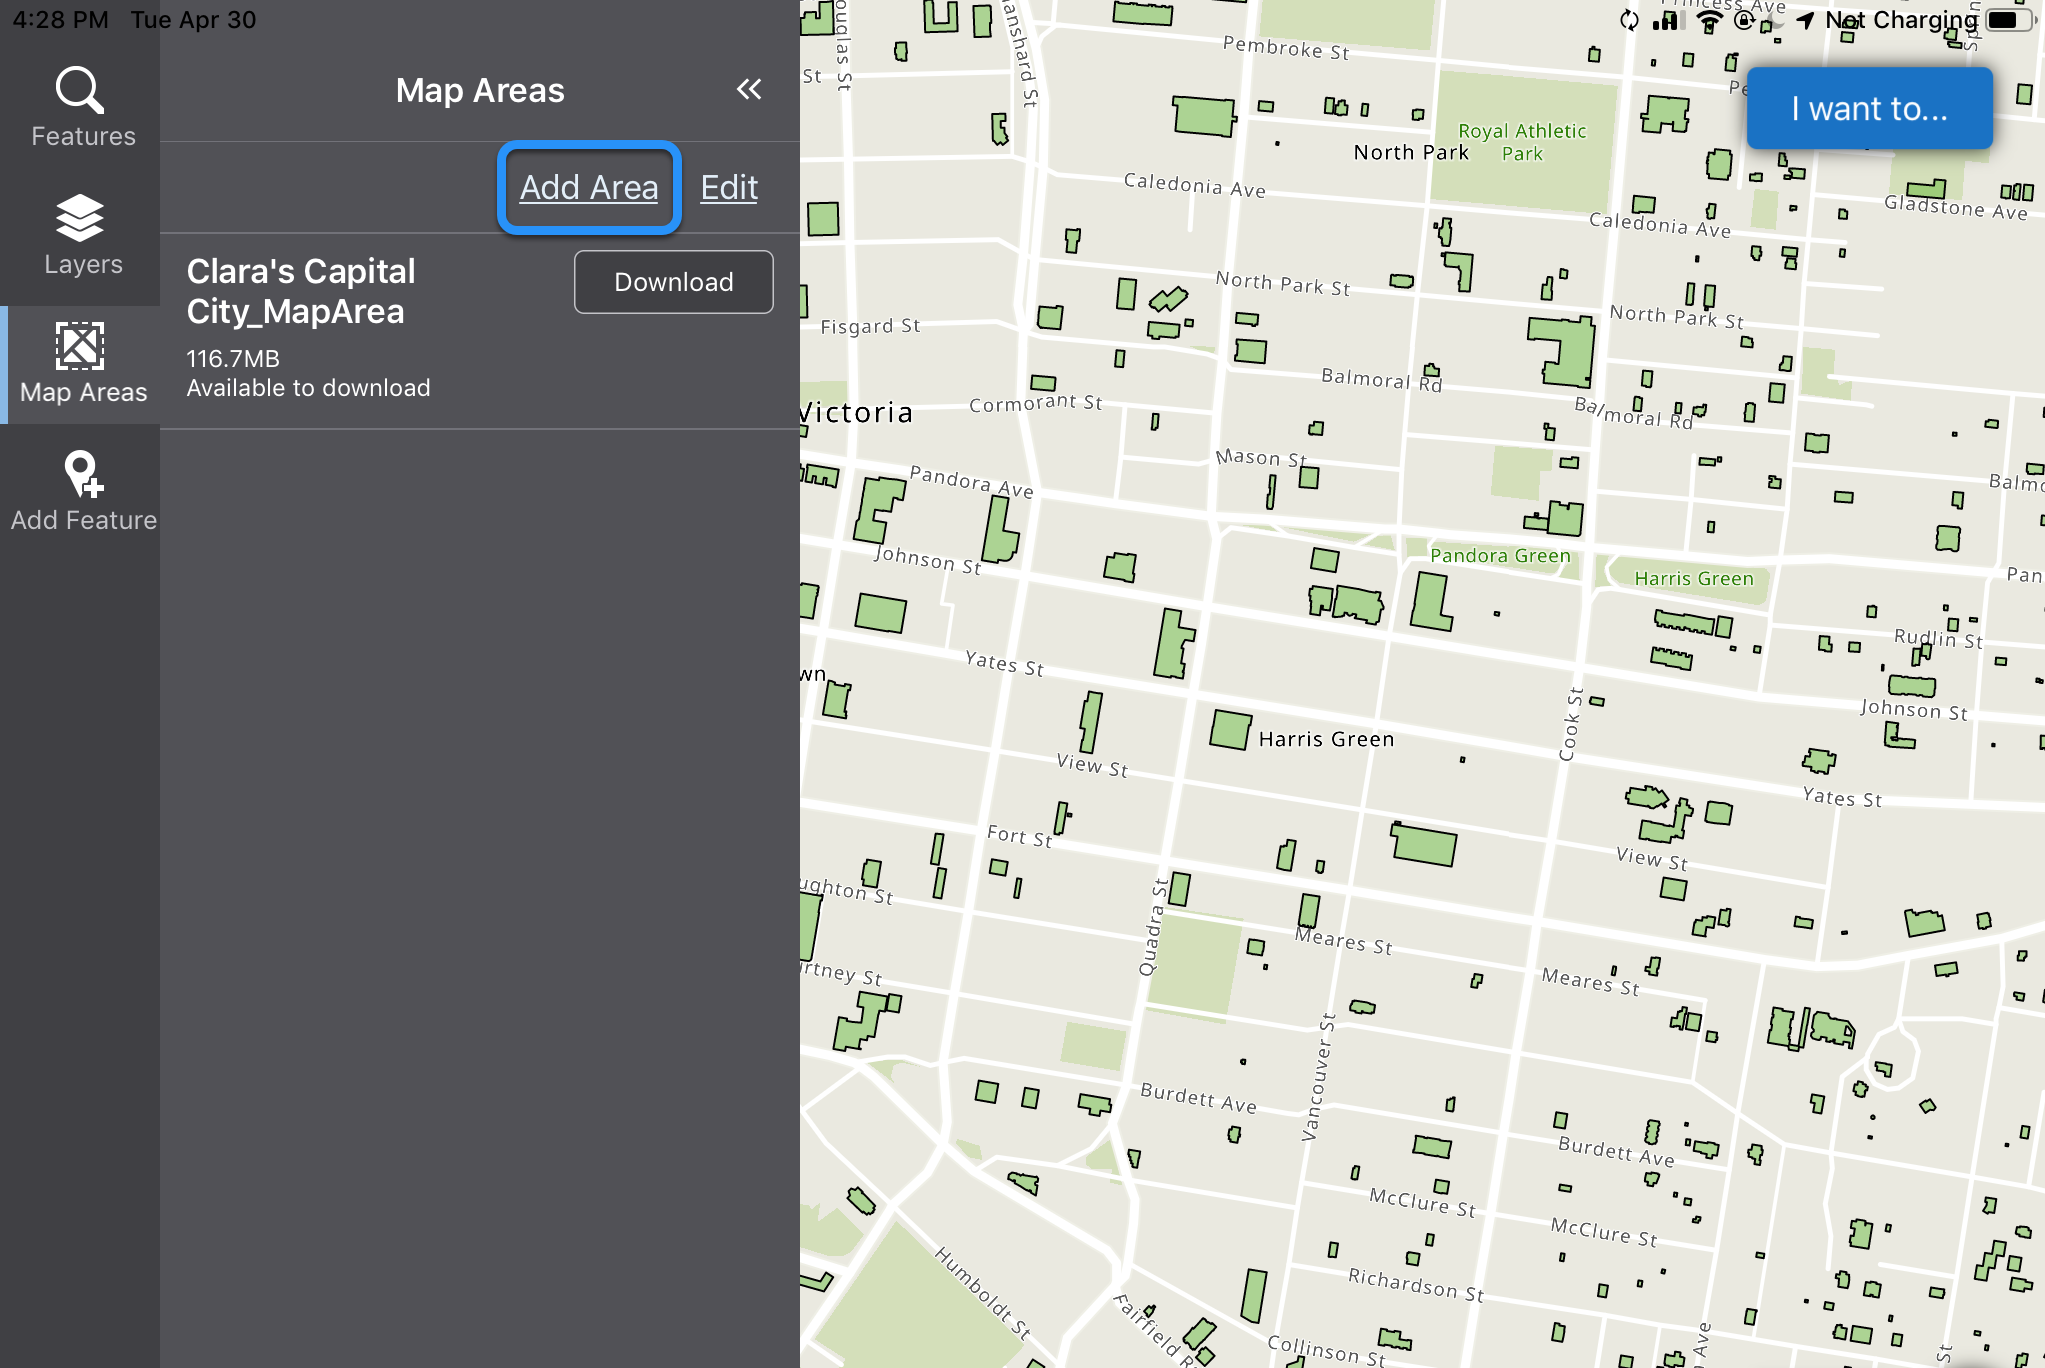
Use a Pre-Generated Map Area
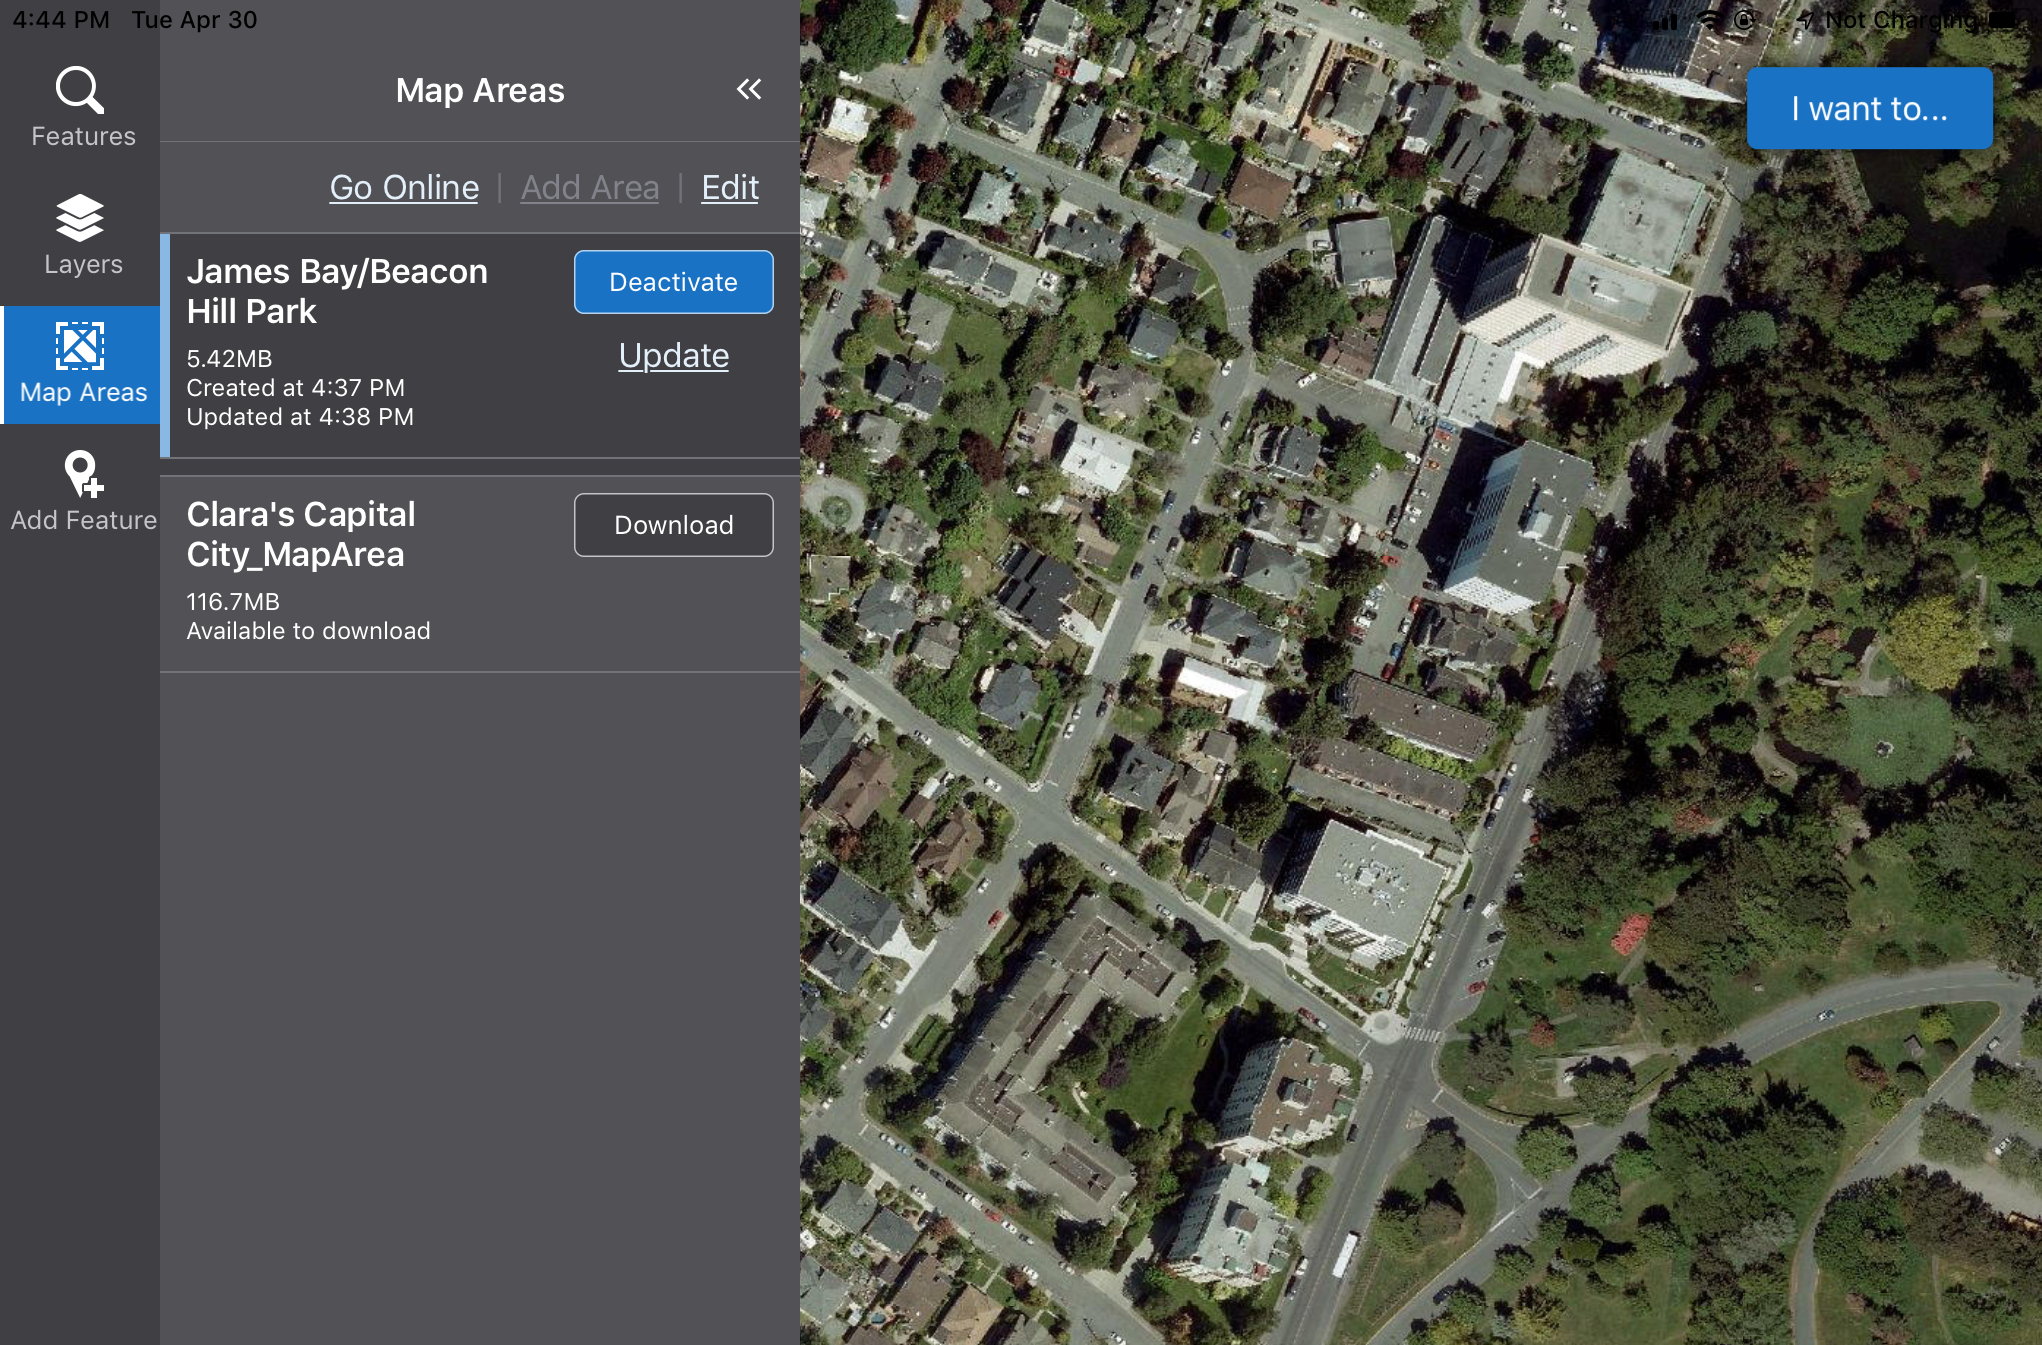
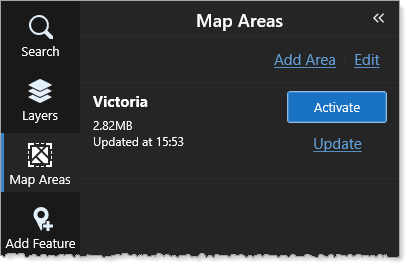
Pre-generated maps are usually available to you and listed in the Map Areas panel when you open the Mobile app on your device. You may have several map areas listed. If you plan to work with a map area, you have to download it to your device and then activate it. You can only work with one map area at a time.
To use a Pre-generated map area:
- In the Mobile app, click Map Areas.
-
Beside the name of your map area, click Download.
Once the map has downloaded, the Activate button and Update link appear.
-
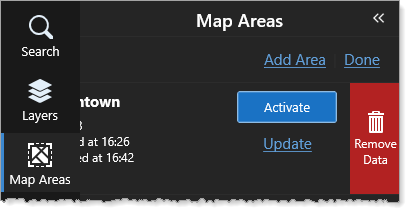
To use this map area, click Activate.
The map area replaces the online map. You can perform all the functions you could on the online map, including search for and add features. Your changes are stored locally on your device so that you can upload them later.
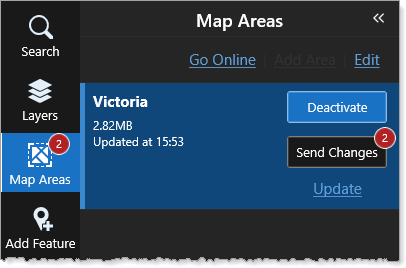
When you make a change to a map area like adding an attachment to an existing feature, or adding a new feature, the number of changes is tracked and displayed on the Map Areas icon in the task bar and beside the Send Changes button, which appears in the Map Area box.
- Do any of the following:
Click Send Changes: Your changes to the feature (added an attachment) or to the map (added new feature) are sent to the online map.
Click Update: Any changes made by others to the online map since you last clicked Update, are pulled down and added to your map area.
Click Deactivate: Closes the map area and returns to the online map. You can also click Go Online to return to the online map.
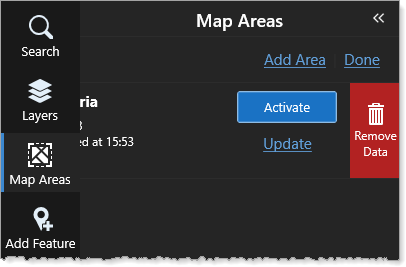
You can only remove a map area that has been deactivated.
To remove a map area:
-
To remove a map area, first click Deactivate, and then click Edit.
The Remove Data option appears beside the map areas.
-
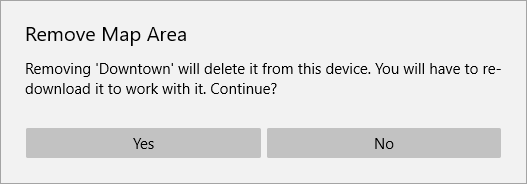
Click Remove Data to delete all the data related to the map area.
The Remove Map Area confirmation opens.

The map area and it's data are removed from the device, but you cannot delete the map area itself as this was set up in ArcGIS Online. So the map area remains available to download again.
Use a Custom Map Area
To define and use a Custom map area:
-
On your device, tap on your Mobile app icon to open the app.
-
In the taskbar, tap Map Areas.
-
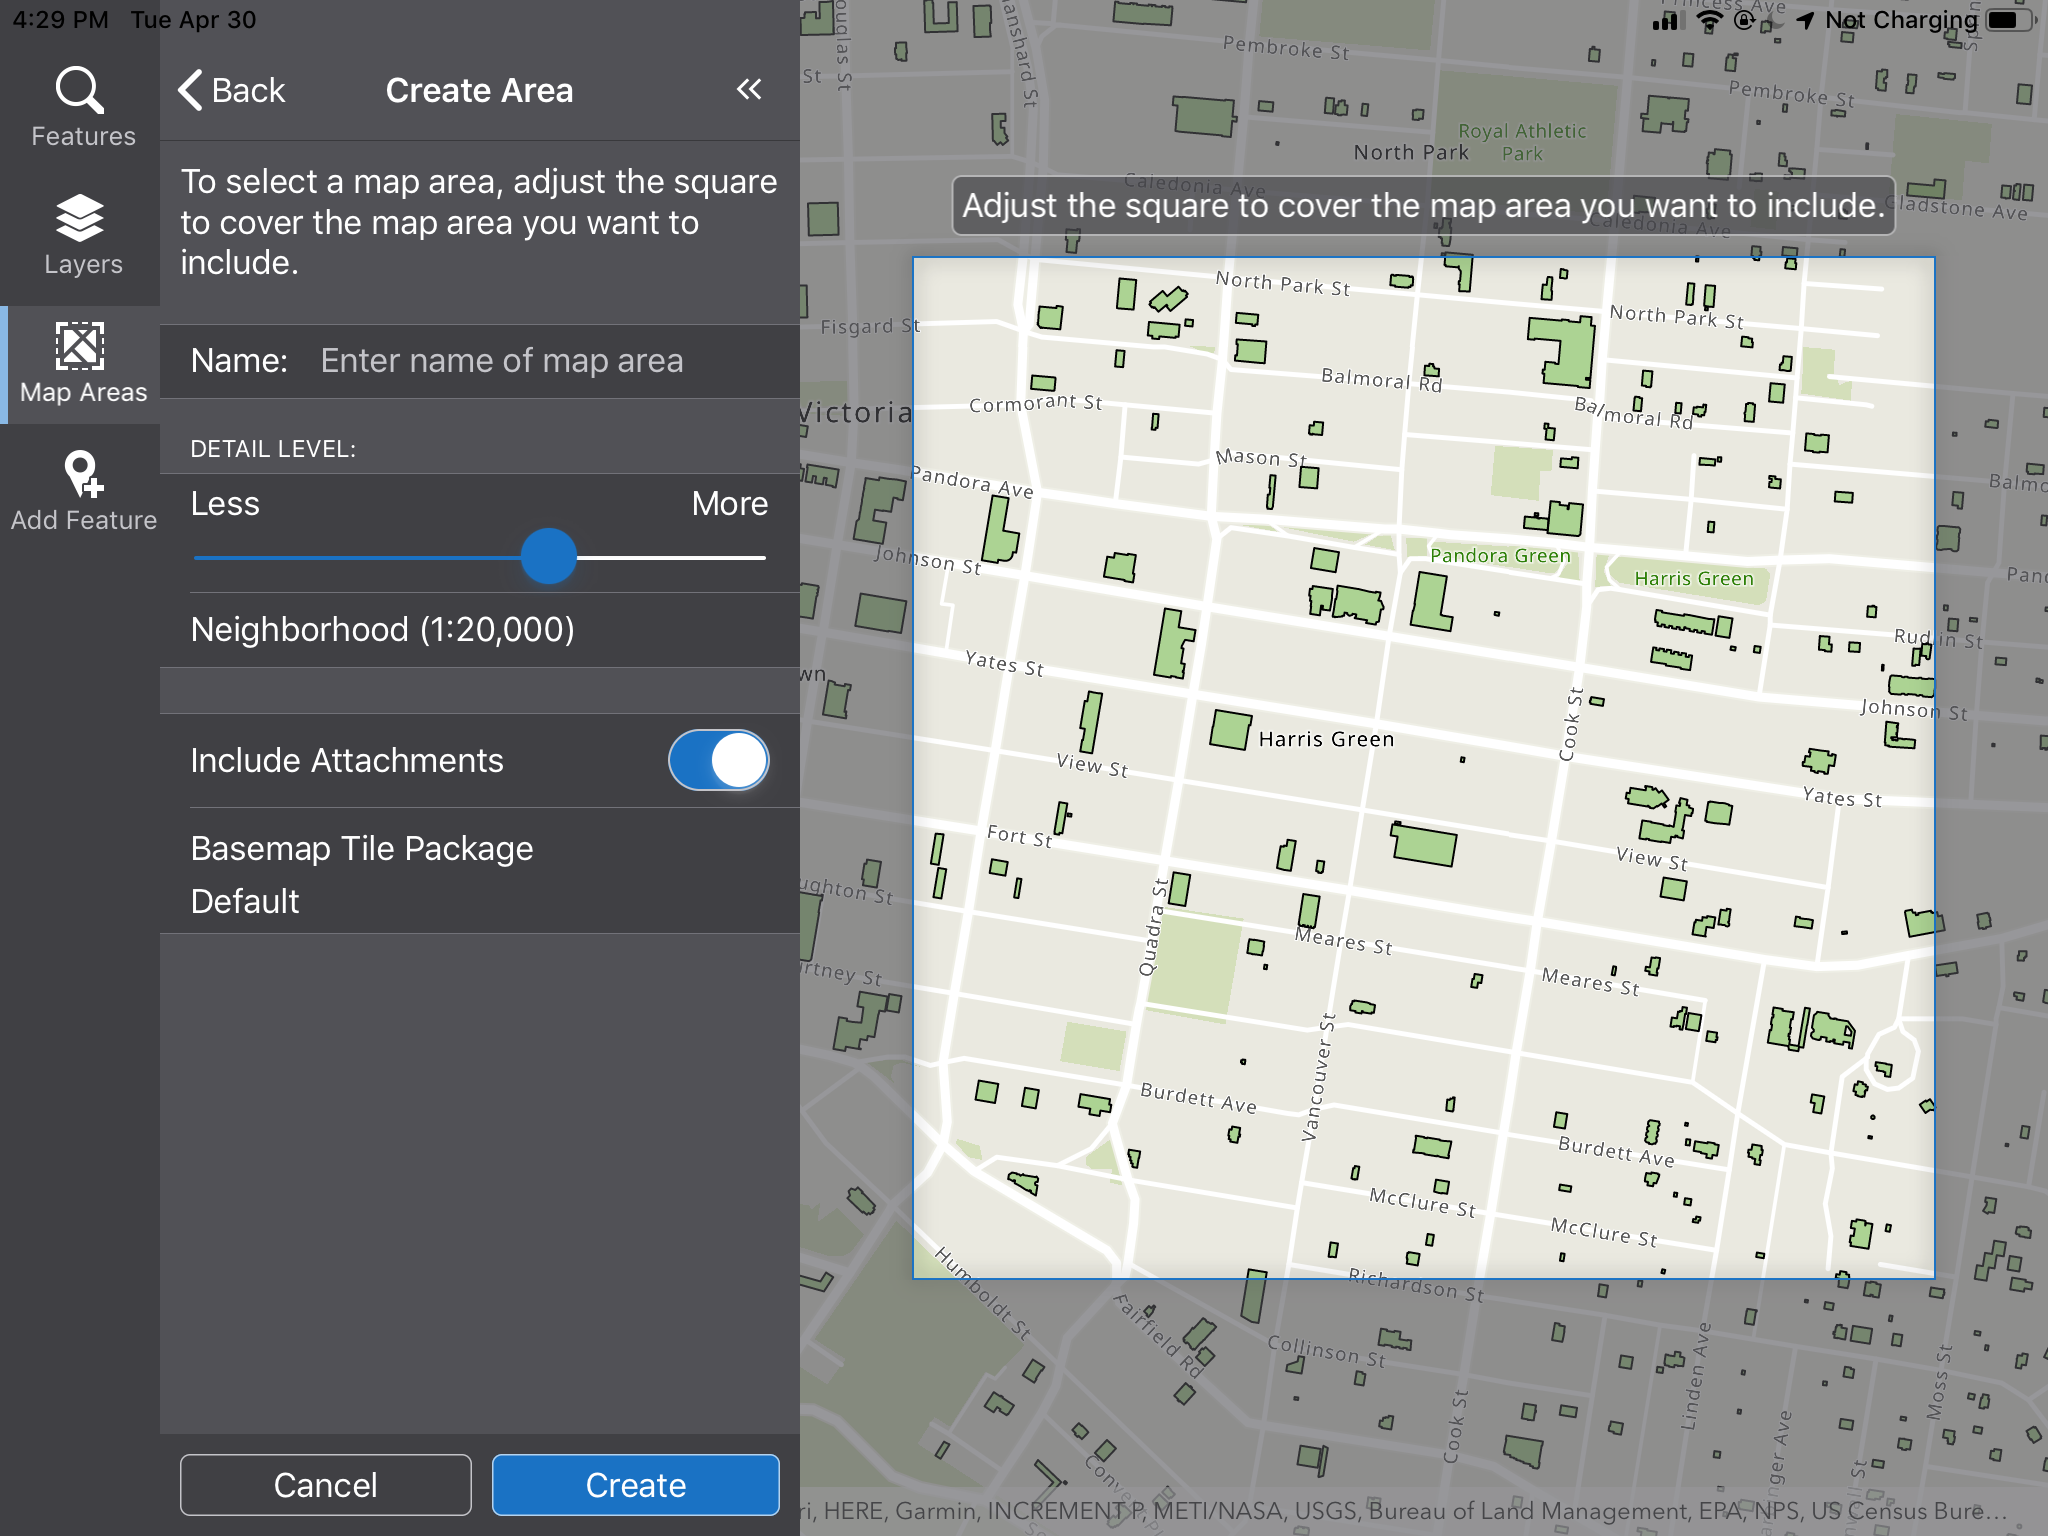
At the top of the Map Areas panel, tap Add Area.
The Create Area panel appears.
-
At the top of the map, select the type of map area you want:
-
Basic: The map area is a square. This is the default.
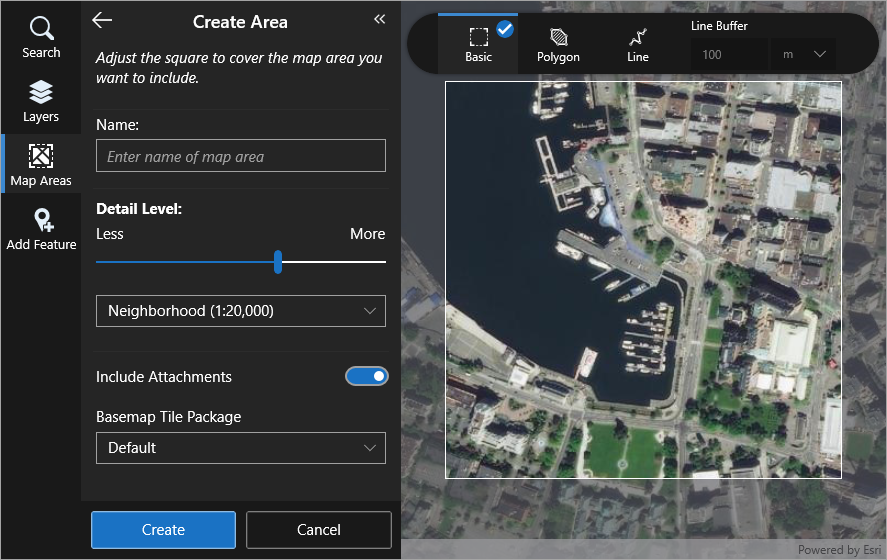
Adjust and move the map under the highlighted square until the area you want to include is inside the square.
You can zoom the map in or out (pinch or spread) and pan the map until you have the map area you want. -
Polygon: The map area is any shape you create.
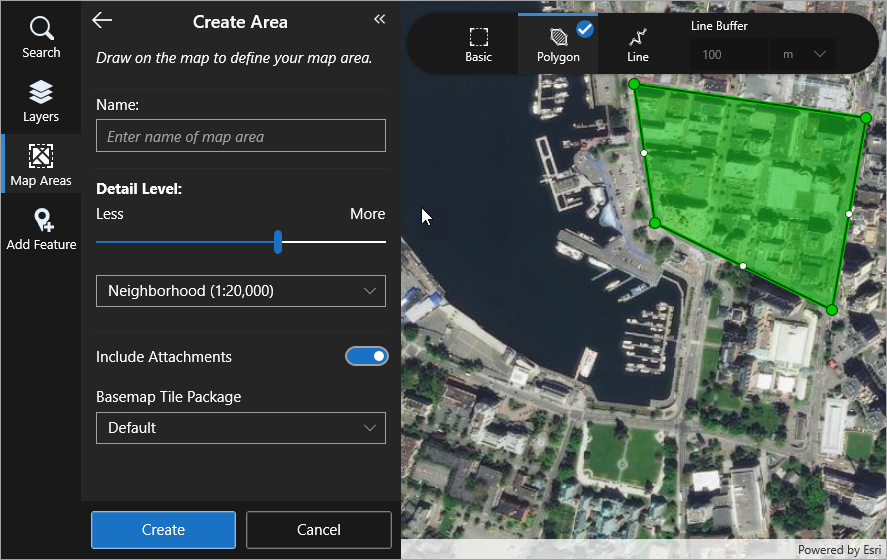
To create the shape for the map area:
-
On a computer or tablet, click the map repeatedly. You can optionally double-click the same location to finish creating the shape. To modify the shape, drag any vertex.
-
On a smartphone, pan and tap the map to place the next vertex at the crosshair in the middle of the map. You can optionally double-tap the same location to finish creating the shape. To modify the shape, tap any vertex, pan the map to a new location, and then tap the map.
-
-
Line: The map area is a specified distance (buffer) around a line you draw on the map. You might want to use this mode if, for example, you are only interested in features located along a road.
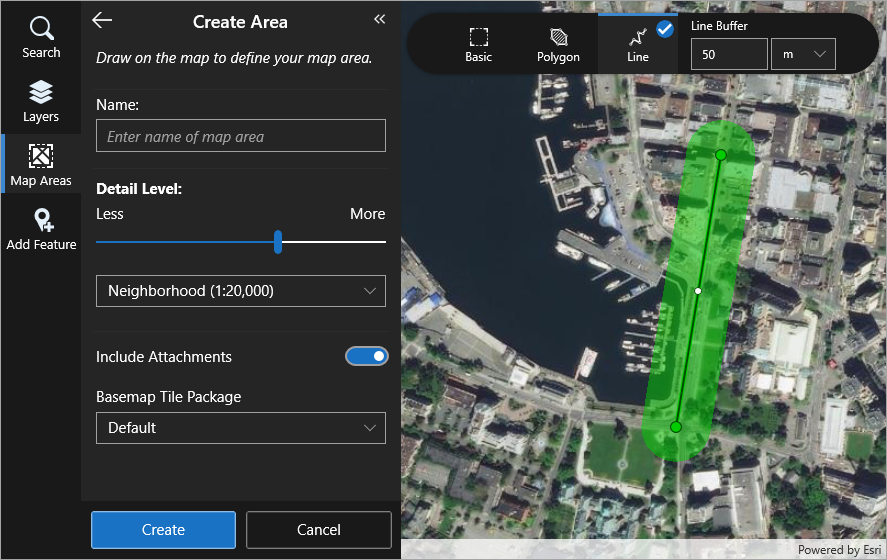
To create the line for the map area:
-
On a computer or tablet, in the Line Buffer settings at the top of the map, set the distance around the line you want to include, and then click the map repeatedly to create a line for the map area. You can optionally double-click the same location to finish creating the line. To modify the line, drag any vertex.
-
On a smartphone, in the Line Buffer settings at the top of the map, set the distance around the line you want to include, and then pan and tap the map to place the next vertex at the crosshair in the middle of the map. You can optionally double-tap the same location to finish creating the line. To modify the line, tap any vertex, pan the map to a new location, and then tap the map.
-
-
-
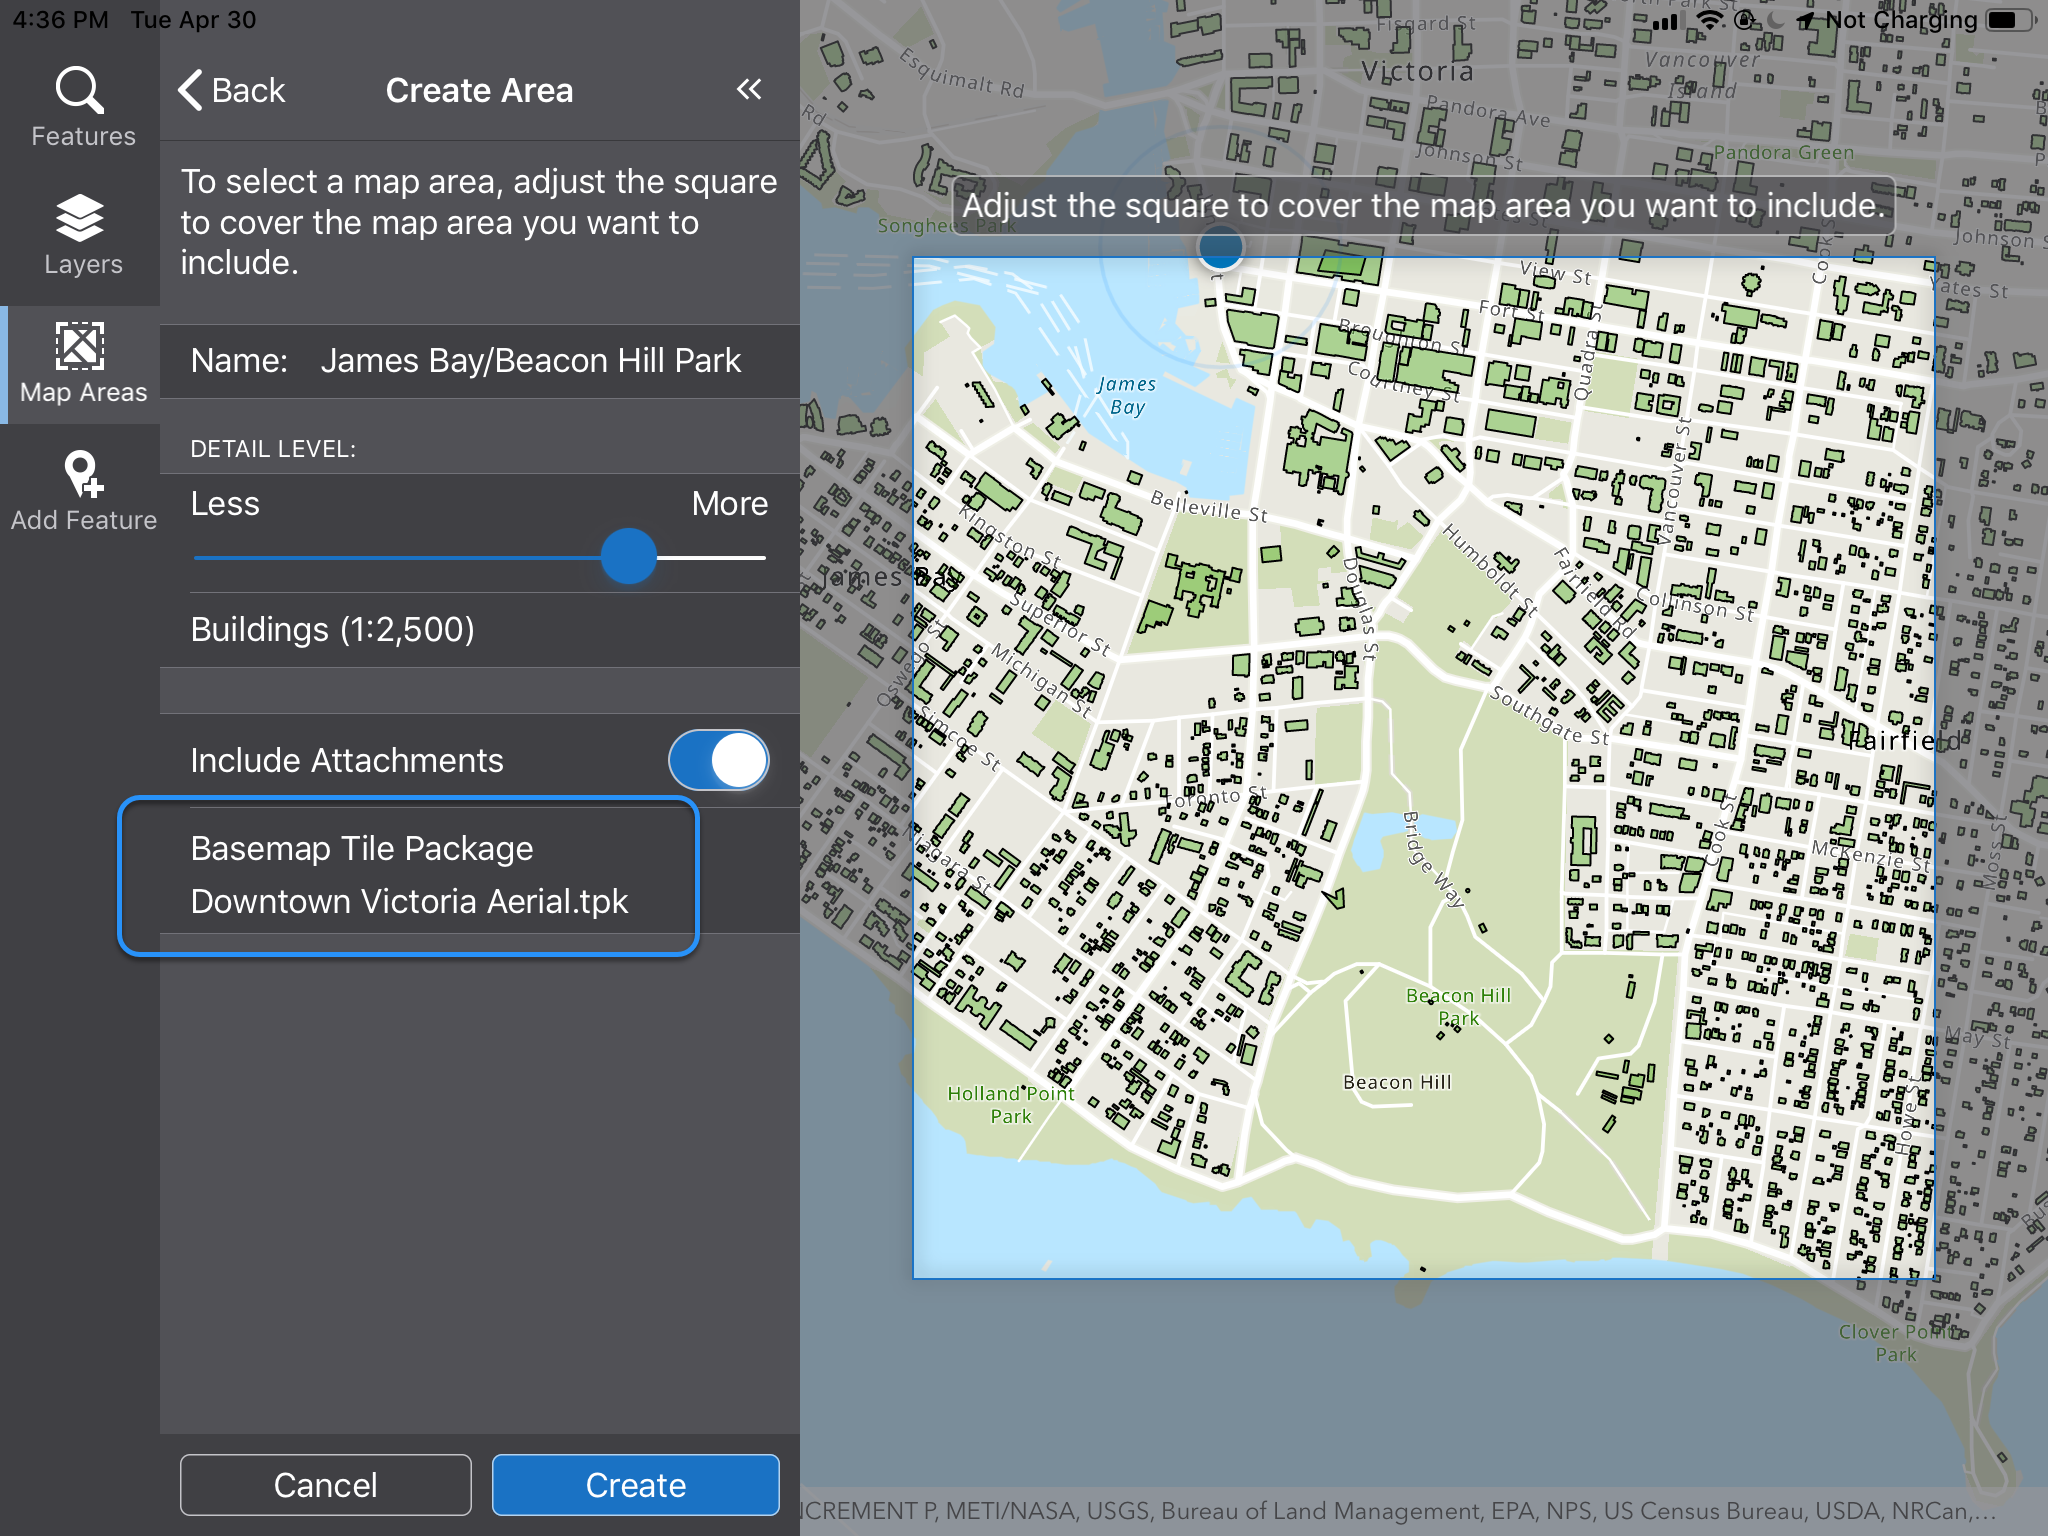
In the Name box, type in a name for your map area, for example, Inspection Area Feb 2019. This name will appear in the Map Areas list.
-
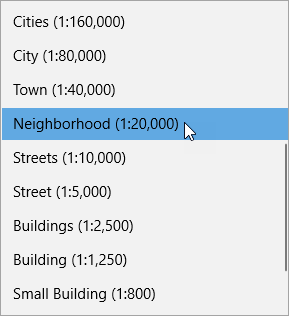
In the Detail Level section, move the slider to set the level of detail you want to be included in your map area.
The words indicate the detail you will be able to see if you select a particular level. For example, at Town (1:40,000), the towns in the area will be visible. The actual scale is given in brackets.
-
If you want to include any existing attachments in the Map Area, ensure that Include Attachments is on.
If there are a large number of attachments, the resulting map area will be larger and take longer to download. -
Click Create.
The new map area is listed in the Map Area panel for you to download.
The map area is not packaged up and created until you click Download.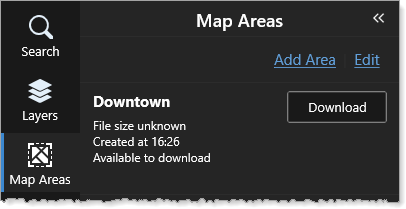
-
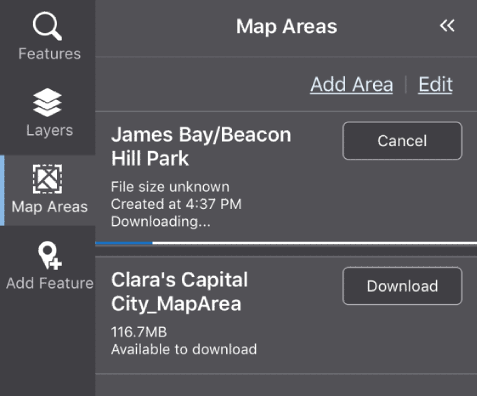
Click Download.
The map is first created and then it downloads and replaces the map.
Depending on the size, it may take a while for the map area to be created and downloaded.From this point, the map area interacts in exactly the same way as an online map but the data is stored on your device until you send it back after you reconnect.
To remove a custom map area:
-
In the Map Areas panel, click Deactivate if the map area has been activated.
You can only remove a deactivated map area. -
At the top of the Map Areas panel, click Edit.
A Remove Data button appears beside all the map areas in the list.
-
Click the Remove Data button when it appears.
The Remove Map Area confirmation dialog opens. If you click Yes, the map data is deleted but the map remains for you to download again.
-
To remove the map area completely, click Remove Map.

The confirmation message warns you that you will remove the map area completely.
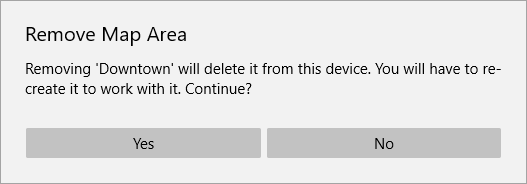
- If you are sure you want to delete the map area, click Yes.
Use Sideloaded Tile Packages (TPK/TPKX/VTPK) with Map Areas
If you want to use high-resolution tile packages with map areas while offline, you can sideload the TPK, TPKX or VTPK file to the devices you want to use in the field.
You can use sideloaded TPKs with a Pre-generated map area or create a Custom map area on the device. Pre-generated map areas and Custom map areas behave slightly differently when they interact with TPK files on the device.
- Pre-generated map area: When you are offline and you activate a map area defined in an ArcGIS web map, the TPK file is used automatically in place of the basemap. When you reconnect online, the basemap is used.
- Custom map area: When you create a Custom map area on a device that has several TPKs sideloaded onto it, you can select whichever TPK you want to use with your map area, or choose to use the default base map. When you go offline, the map area uses whichever TPK you selected, or the default base map if it was selected. You can use any TPK on the device that is the same spatial reference as the web map.
You sideload TPKs onto your device using the file system in the case of Windows and Android, or iTunes in the case of iOS devices. It is essential that you add the TPK file to the correct folder on each type of device because Mobile apps look for TPKs in those specific folders.
Windows Devices
Use the file manager on your computer to transfer the TPK to the following folder on your device:
%userprofile%\AppData\Local\Packages\[GeocortexMobileViewerAppName]\LocalState
Android Devices
Use the file manager on your computer to transfer the TPK to the following equivalent folder on your device:
[Root Path]/Android/data/geocortex.mobile.viewer.custom/files
On Android devices, the first part of this path varies according to the device.
iOS Devices
To sideload a file onto an iOS device:
-
Open iTunes.
-
Plug your device into a computer and in iTunes, and then click the device icon in the top left corner.
The panel on the left displays the Settings for the device.
-
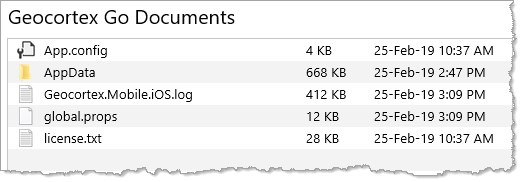
Click File Sharing, and then click one of the following:
-
For VertiGIS Studio Go, click VertiGIS Studio Go in the Apps box.

A list of the VertiGIS Studio Go Documents displays in the right-hand box.
-
For Custom apps, click the [app name] in the Apps box.
A list documents for your custom app displays.
-
-
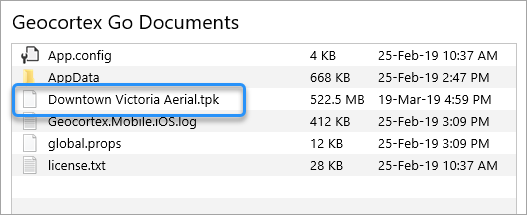
From your file system, drag the .TPK file and drop it into the Documents box.
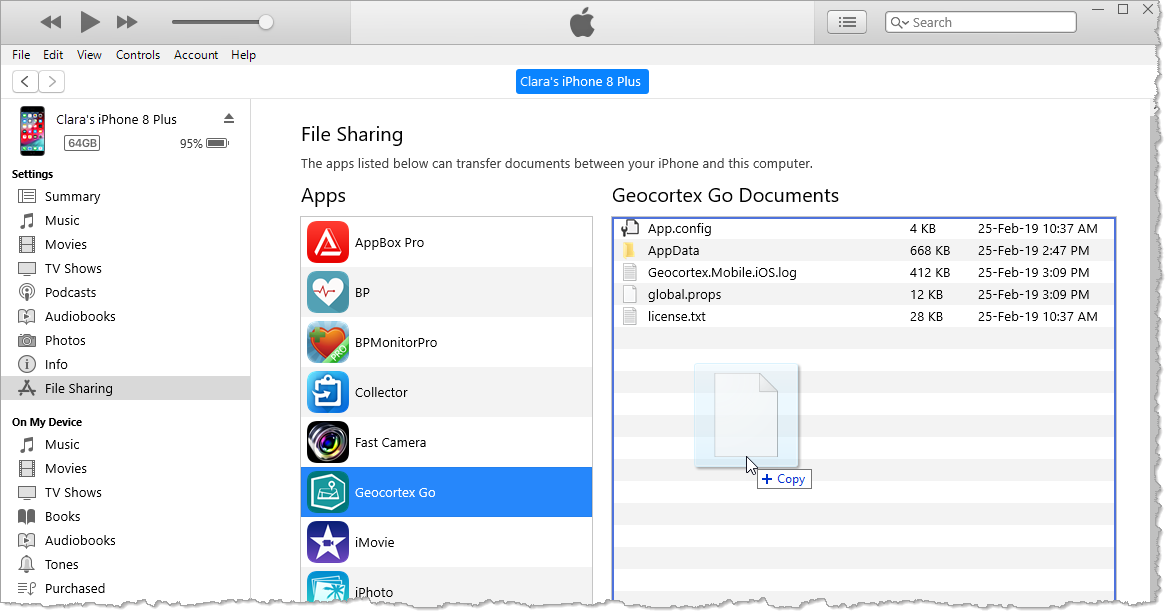
The status bar at the top of the window indicates that iTunes is copying the TPK file to the device.

Once the file is copied, it appears in the list of Documents.
Create a Custom Map Area with a TPK
Once you have sideloaded one or more TPKs to your device, you can use them to define Custom map areas that you can activate and use offline. Your device must also have either VertiGIS Studio Go or a Custom Mobile app on it.
To create a Custom Map Area with a TPK:
- On your device, open VertiGIS Studio Go or your Custom app.
-
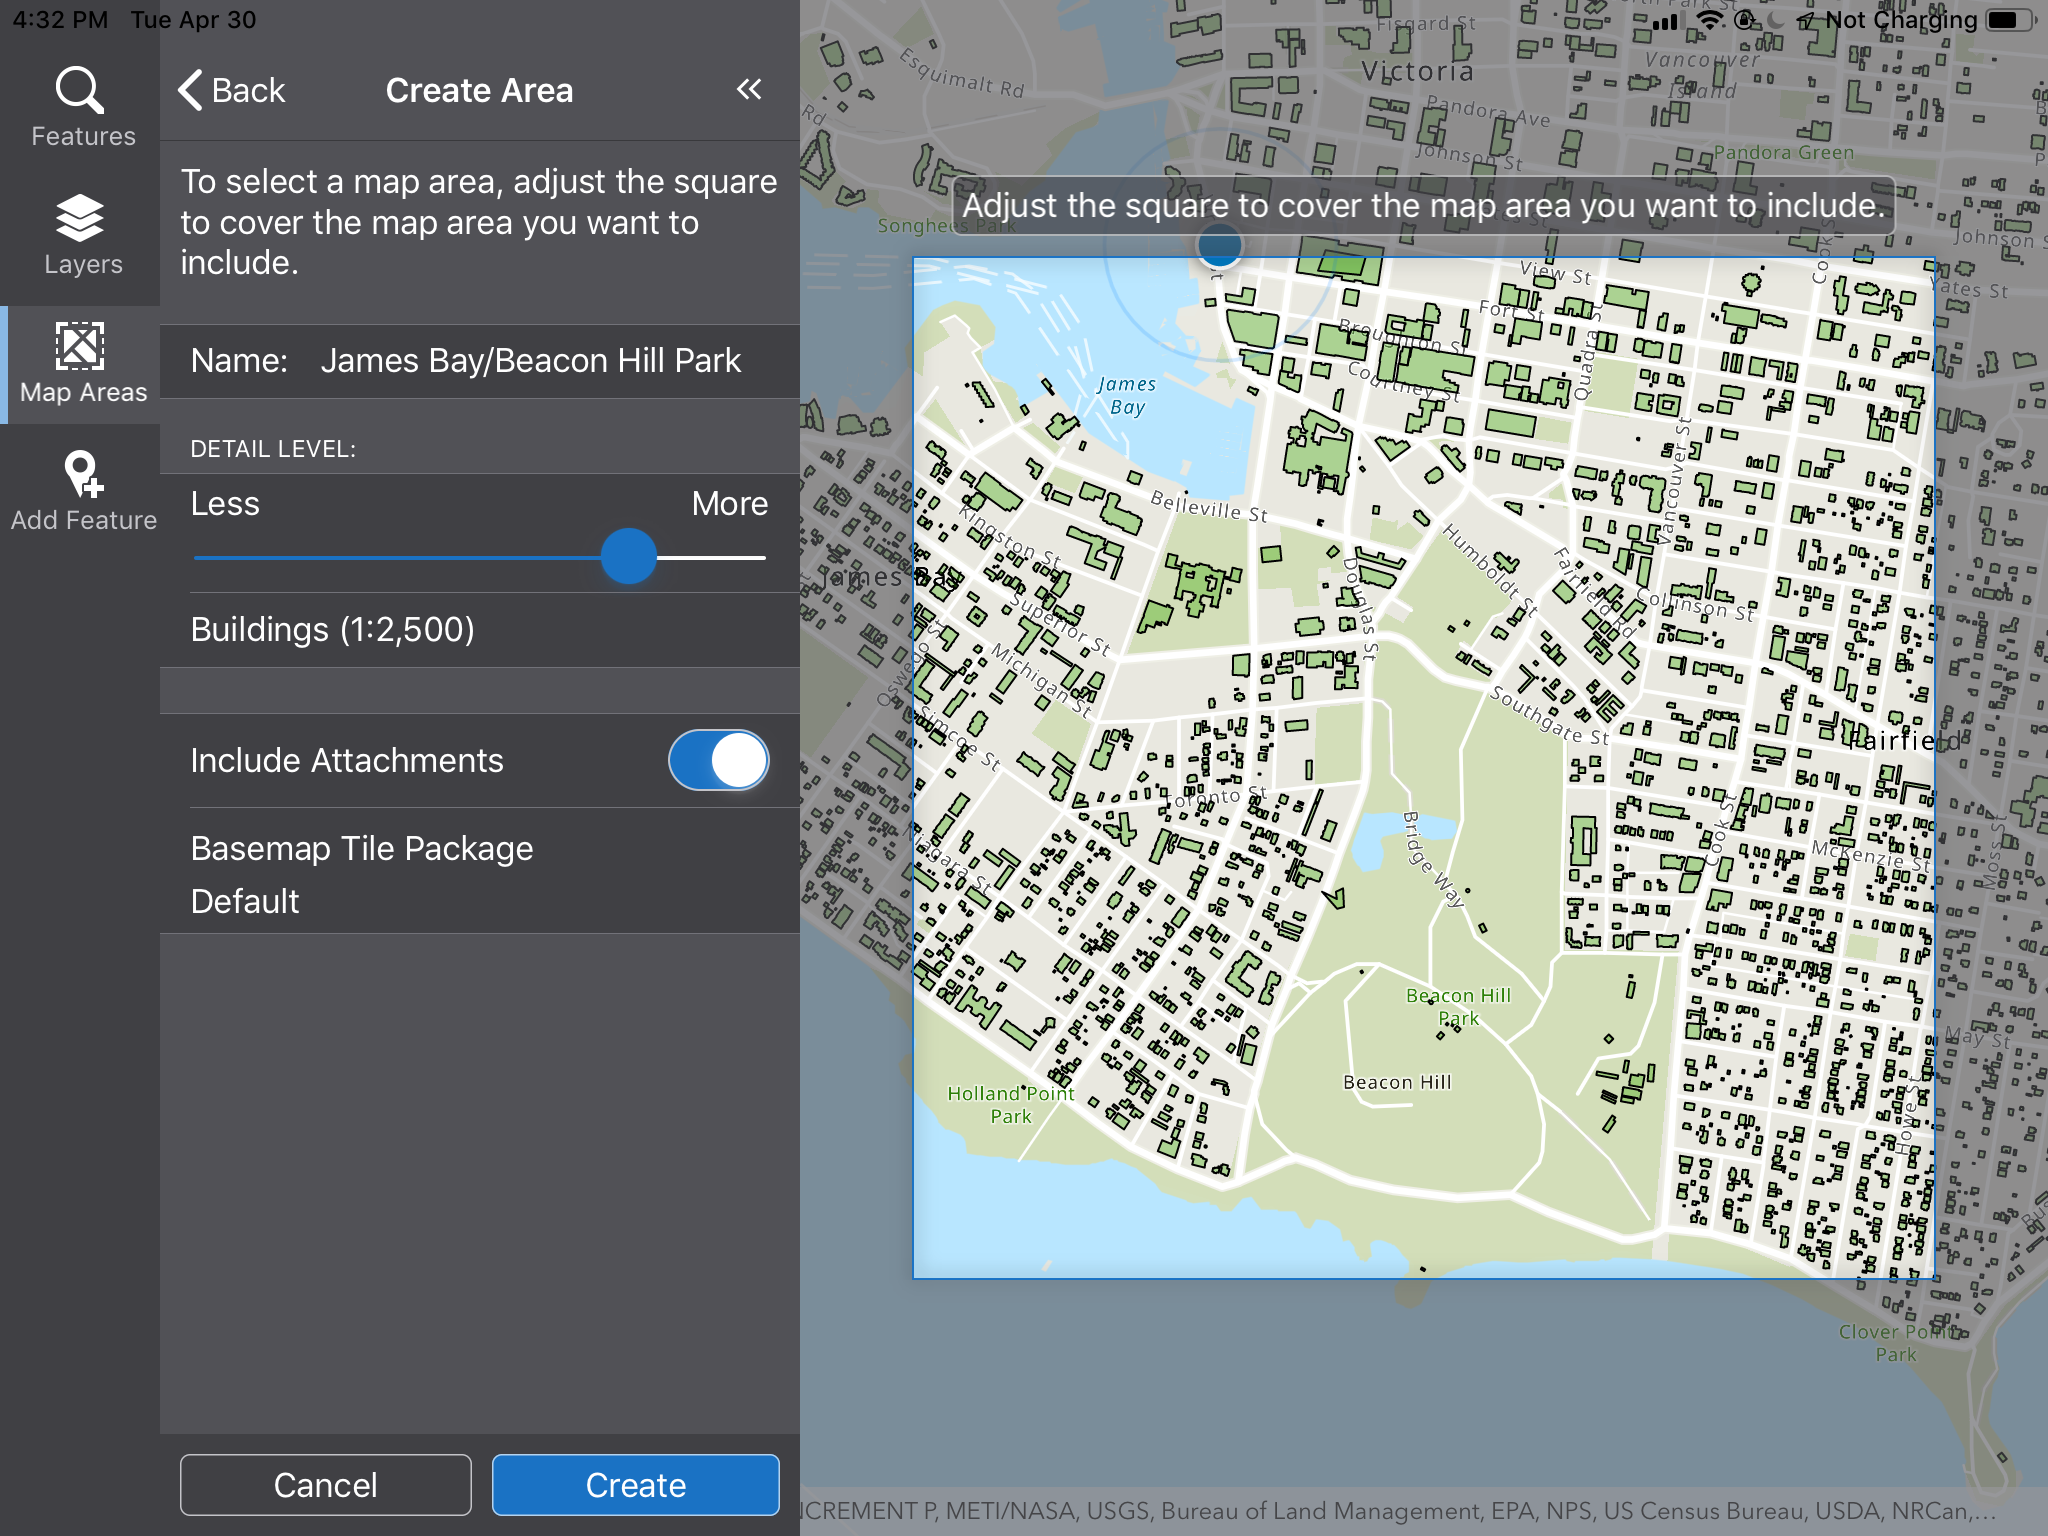
Click Map Areas on the toolbar, and then in the Map Areas panel, click Add Area.
The Create Area panel opens and a marquee appears on the map. The square marquee defines the area that will become your map area. You can pan or zoom or rotate the map to adjust the area that is within the map area box.
-
Adjust the map until the box contains the area you want included in your map area
-
In the Name box, type in the name you want to give this map area. This name will appear in the Map Areas panel.
-
Adjust the DETAIL LEVEL slider to include less or more detail in your map area. The words indicate what you will see when you zoom in to the map at the level of the most detail. For example, at the Neighbourhood level, you will see buildings and roads.
-
Leave the Include Attachments if you want any attachments on the map to be included in the map area.
-
Click the Basemap Tile Package Default area in the Create Area panel.
The selection box opens at the bottom of the screen.
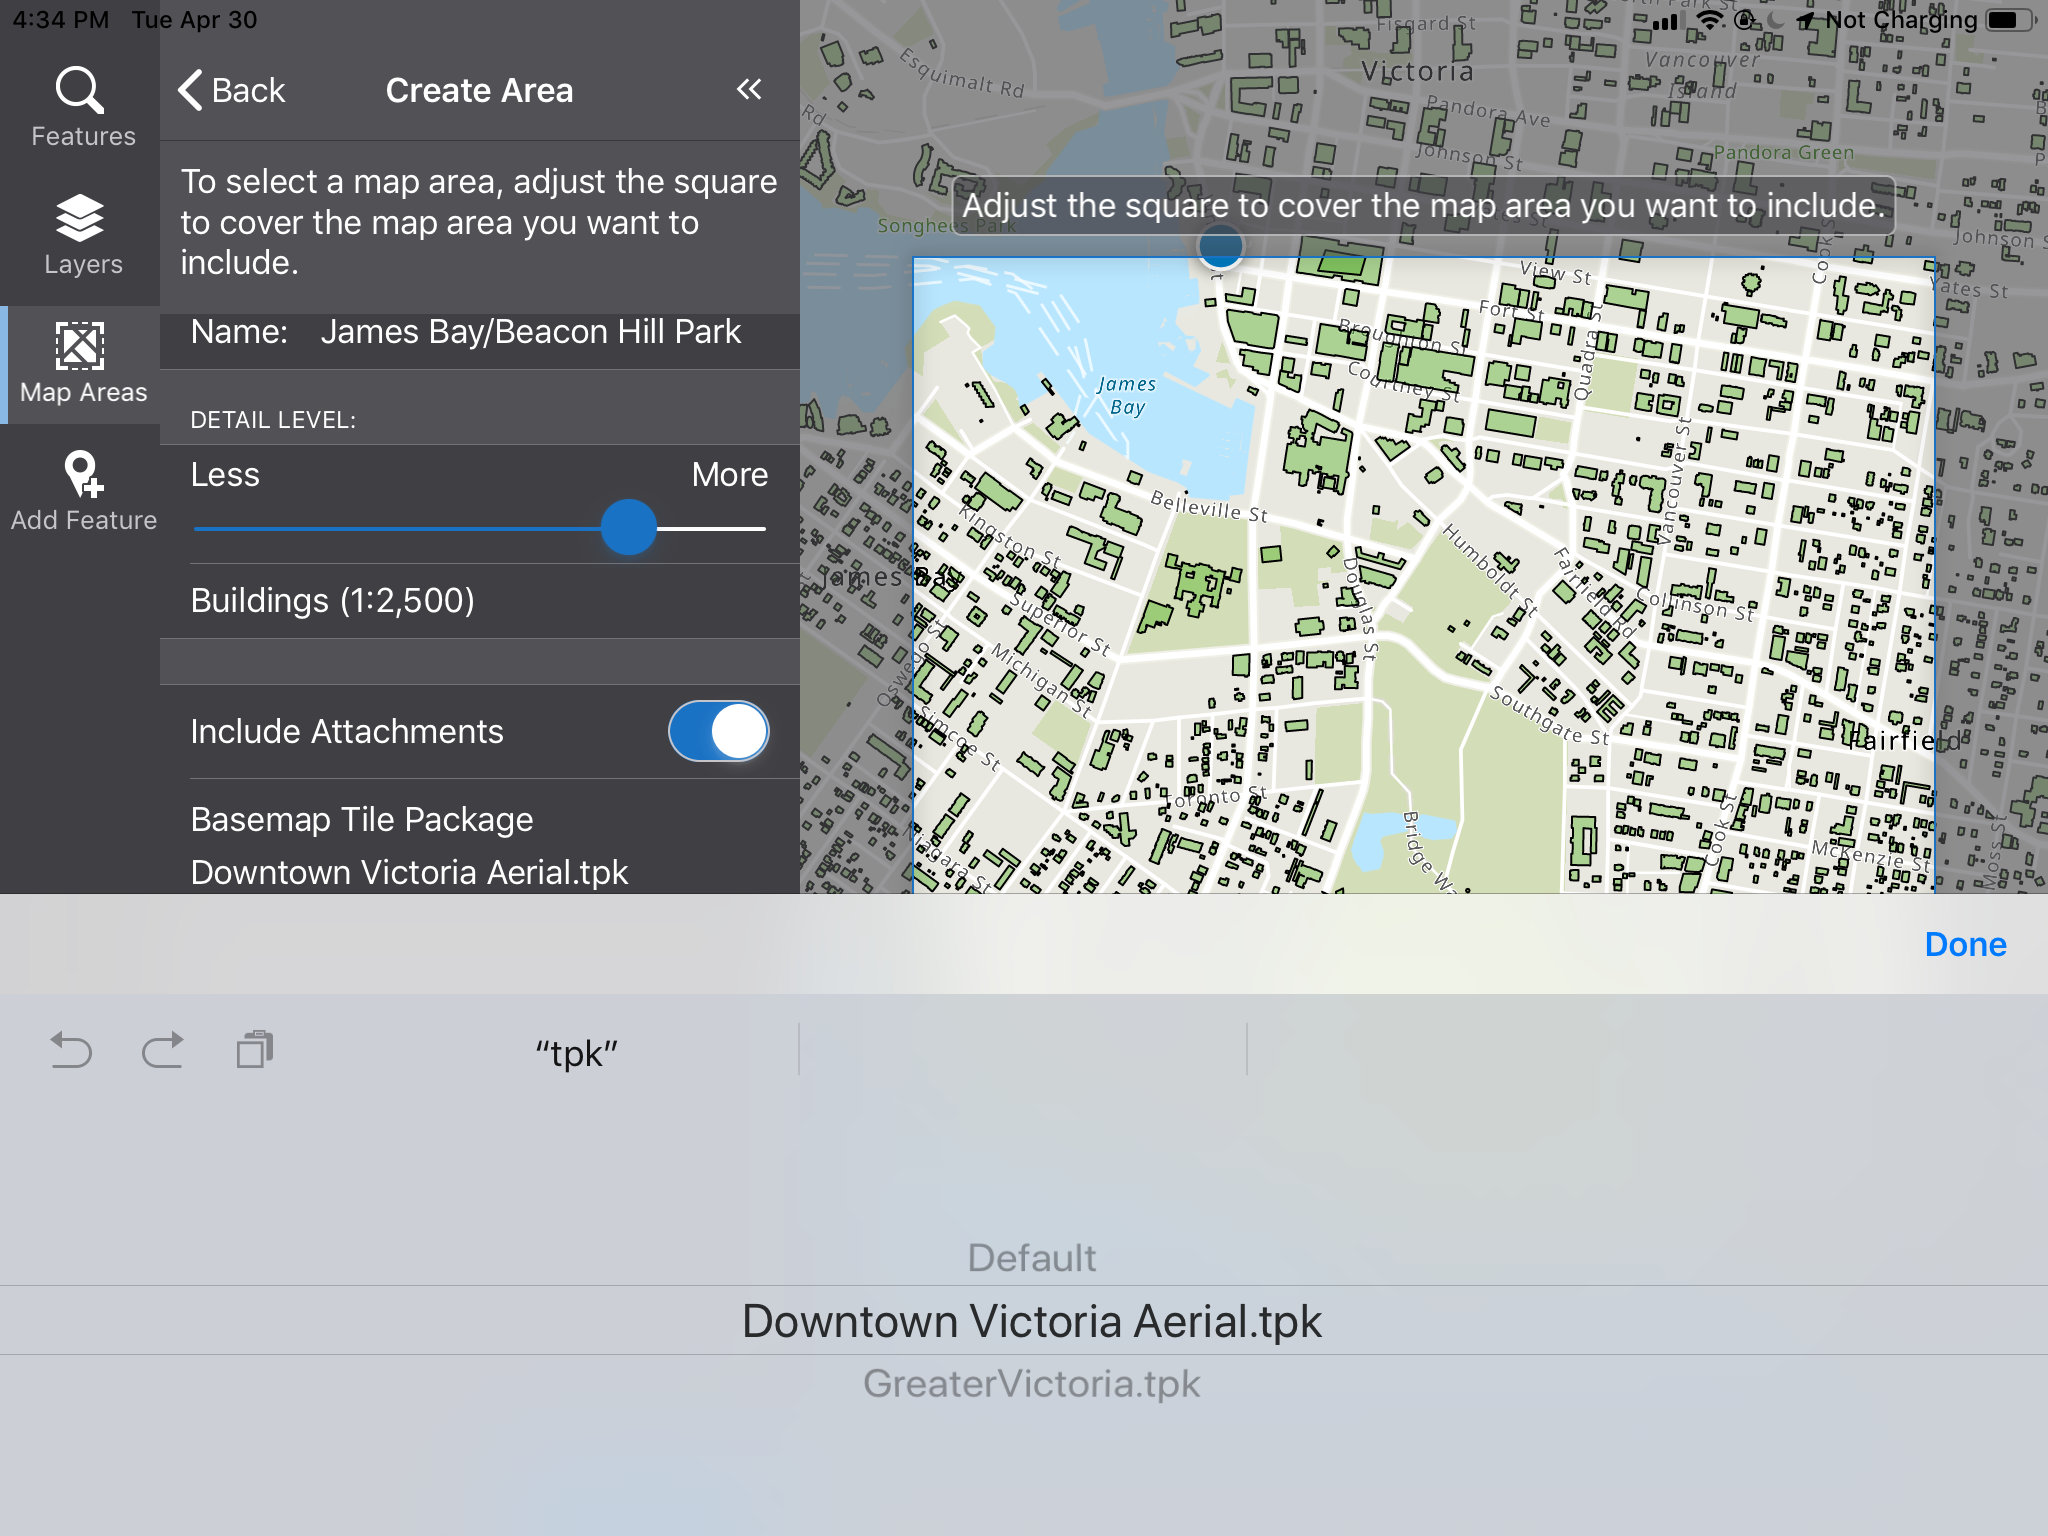
-
Scroll through the options until you have the tpk file you want to use within the lines, and then click Done.
(If you want to use the normal basemap, select Default.)
The name of the basemap is now listed in the panel.
-
Click Create.
The name of the new map area appears in the Map Areas panel for you to download.
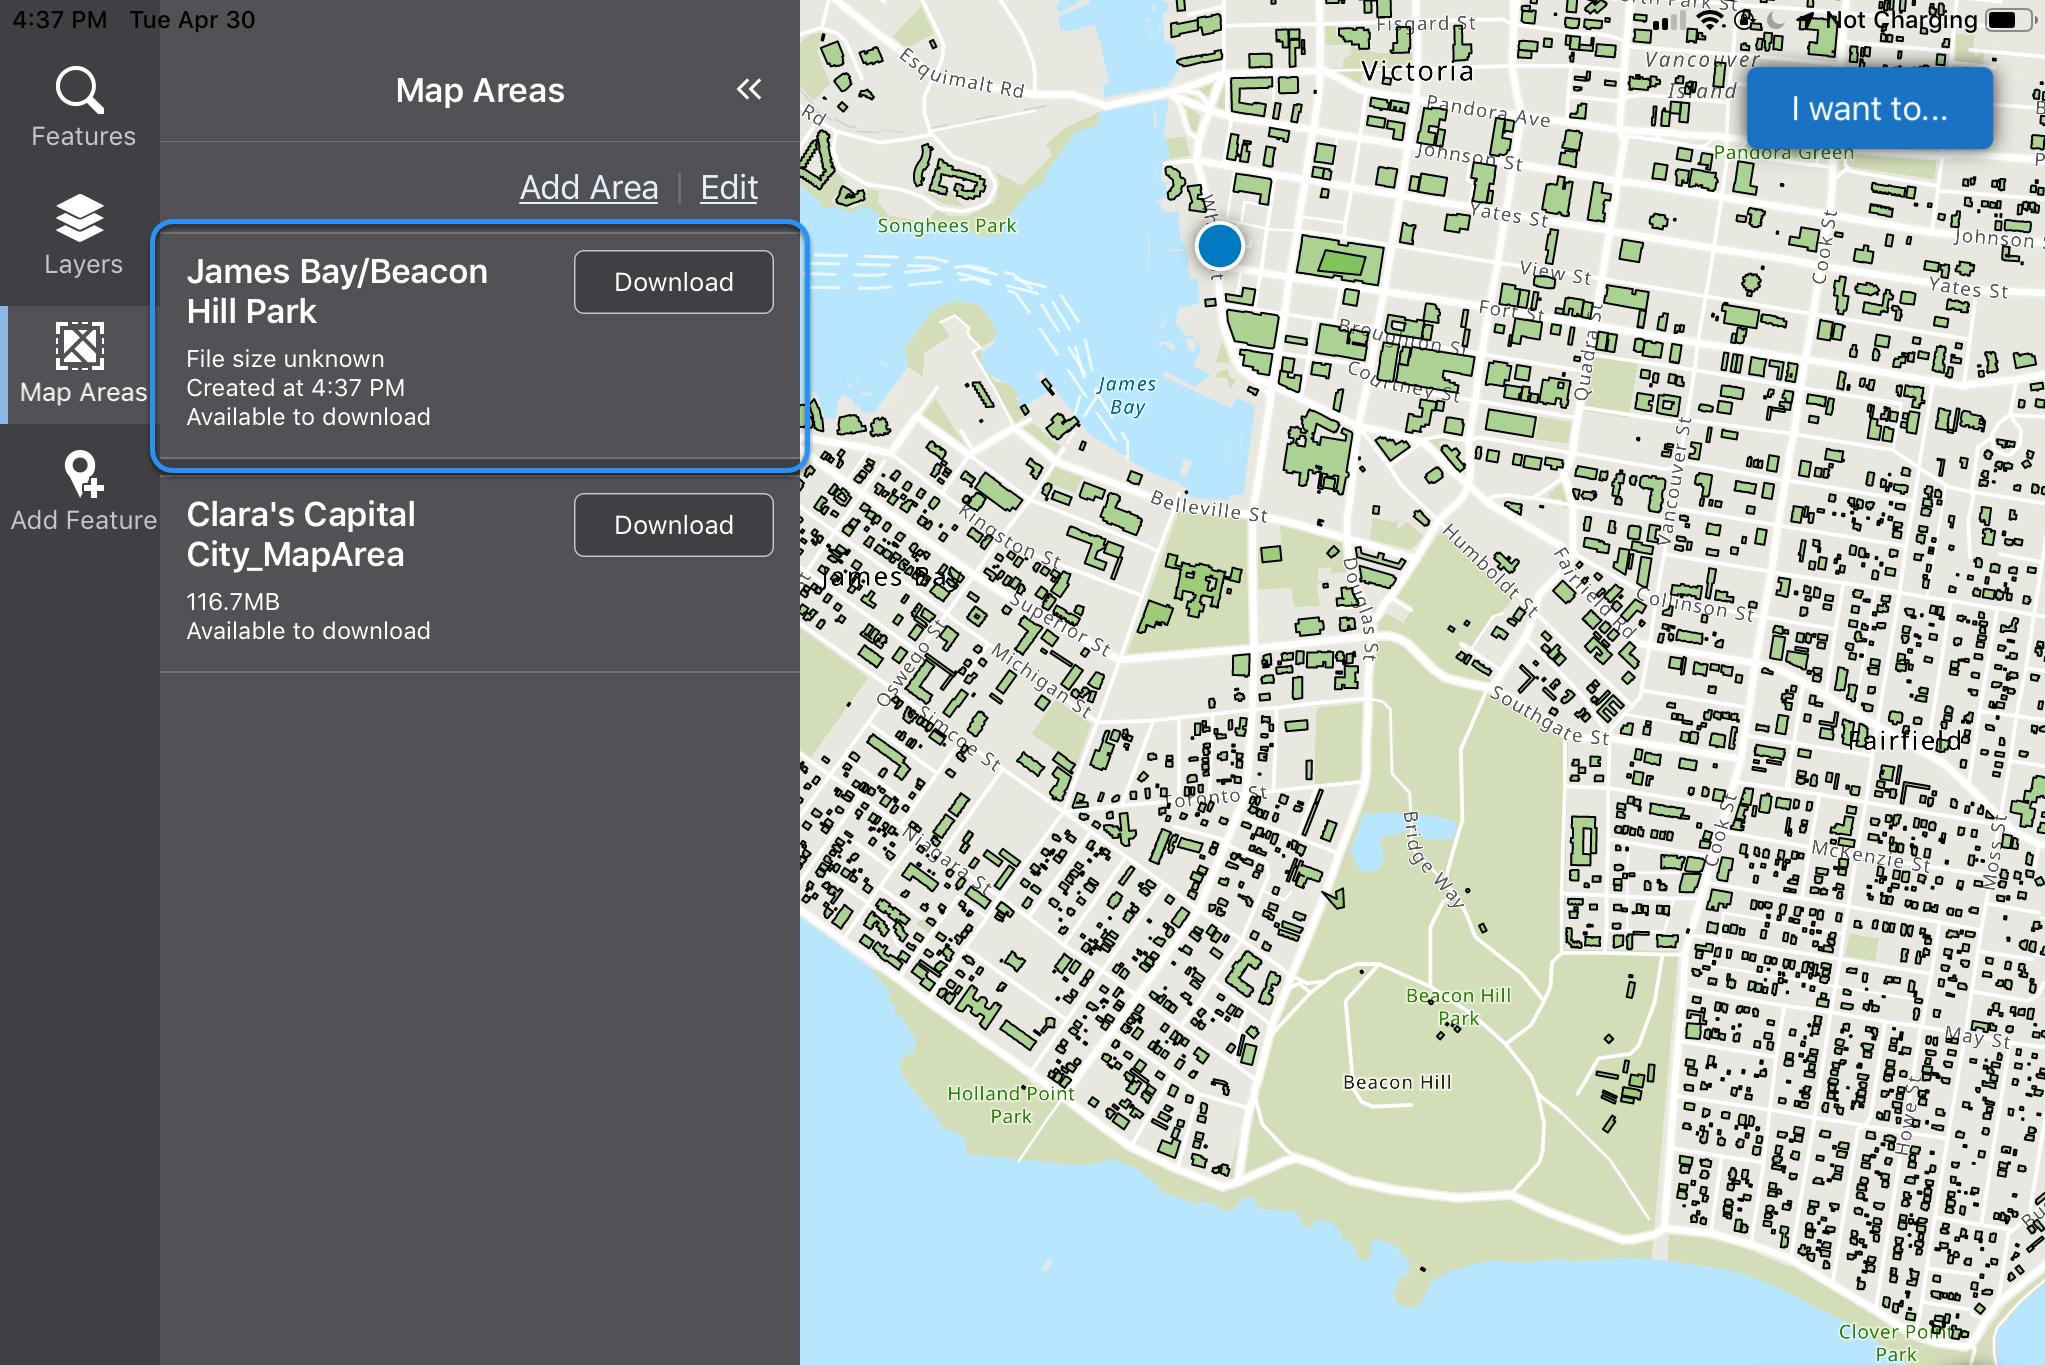
-
Click Download beside the new map area name.
A progress bar indicates that the map area is downloading. Depending on the size of the map area, the download can take a few minutes.
When the map has downloaded, you can take the device offline or use the map area while online.
-
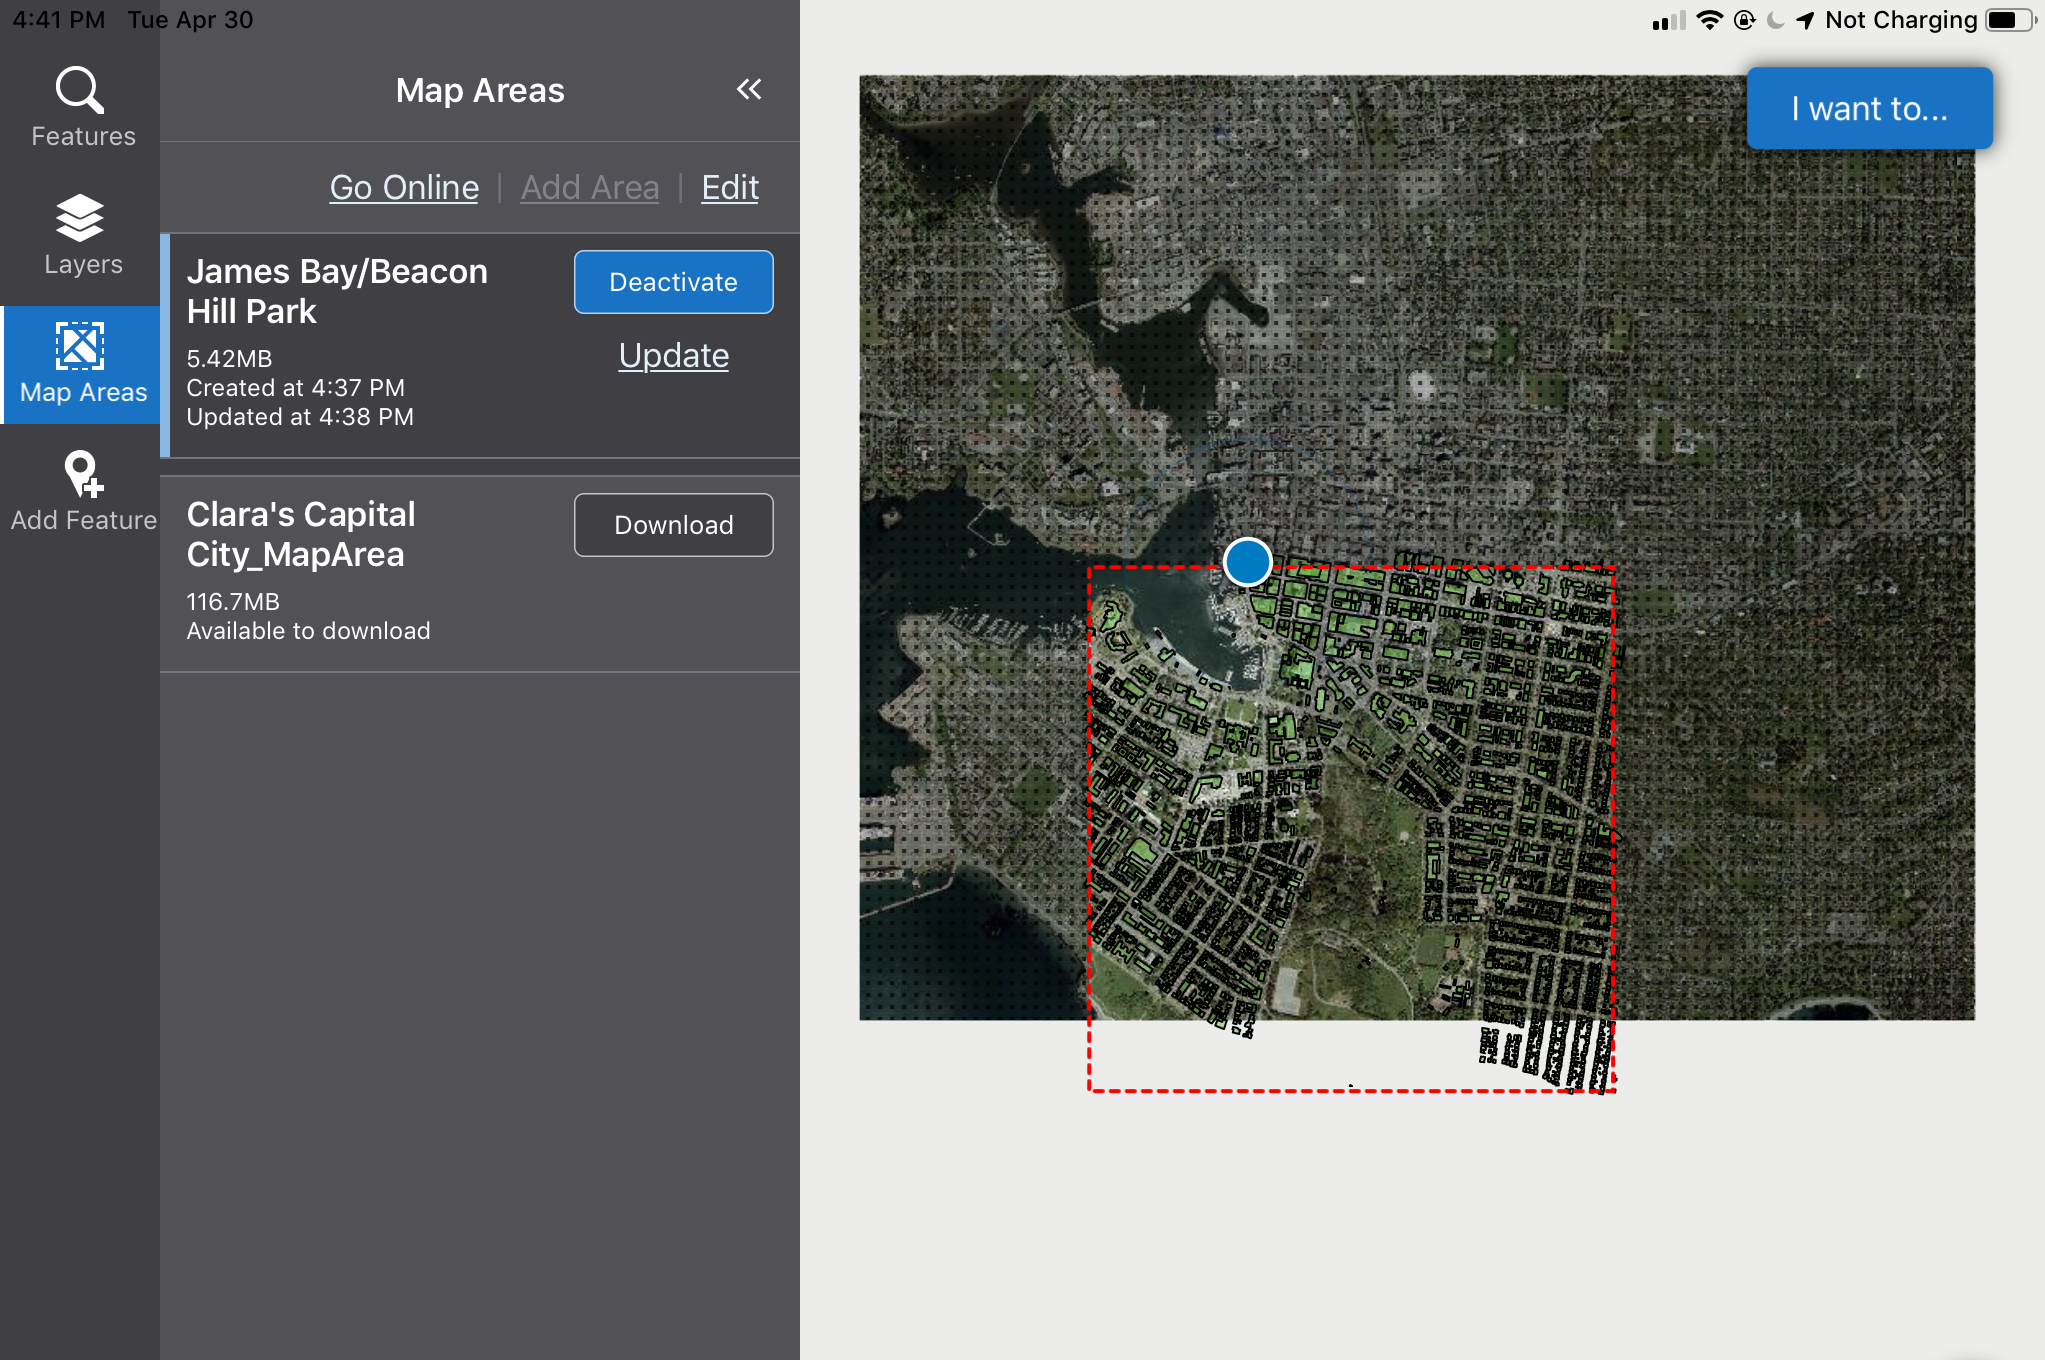
Click Activate.
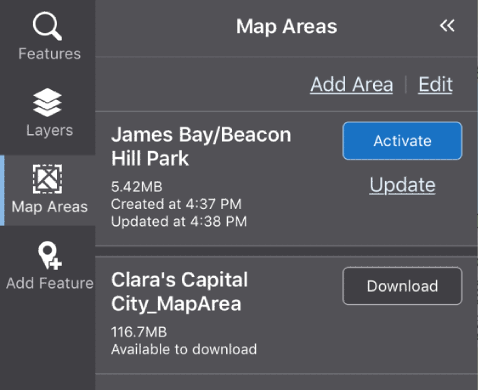
The default map is replaced with the TPK.
In the screen shot below, the map has been zoomed out to show the full TPK. The map area we defined is shown inside the red dotted box, which is indicating that there is a section of the map area that extends outside the bounds of the TPK at the bottom of the map. The area around the map area is grayed out to indicate that you are outside the defined map area.
In the screen shot below, the buildings layer on the map has been turned off. The map is zoomed in to the to show just how much detail is available using the high-definition TPK.