Configure the Picture Box Control
You can include images in ![]() .
.
Configure an Image
To configure an image:
-
Open the print template in Print Designer.
-
Drag
 to the desired location in the layout.
 -
Select the control and expand Actions in the Properties panel.
Alternatively, you can select the control on the design surface instead of from the drop-down list.
-
Image File Location: Configure one of the following settings to locate the image file:
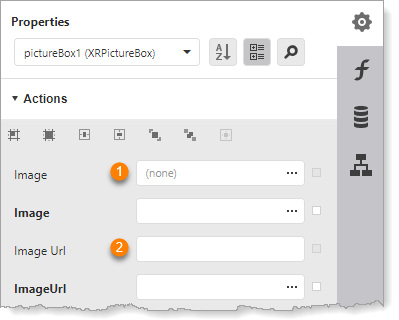
Settings to configure an image file's location

Select the image file from your workstation:
Click the
 icon in the Image box at to select the file in your workstation's file system.
 This option embeds a copy of the image in the
Because the image is embedded, any changes to the source file will not be reflected in the

Configure the image's URL:
In the Image URL box at
, type or paste the image's URL.The control on the design surface may not show exactly what the image will look like in the generated
The image file's location is the only required configuration. You can now preview the
-
Size of Image Within Control: (optional) Use either of the following methods to adjust the size of the image within the control:
-
In the Properties panel, expand Appearance | Padding and configure the Left, Right, Top, and Bottom settings in pixels.
-
In the Properties panel, expand Actions and select a method from the Sizing drop-down list to automatically adjust the image's size within the control.
-
-
Other Settings: (optional) Configure any other settings that you want. See the Picture Box Control documentation for help.
-
Click Preview
 to verify your configuration.
Use an Image as a Hyperlink
You can associate a hyperlink with an image by using the Navigation settings. This allows the user to click the image to point their browser at the specified destination. For example, you may want the user to be able to open your corporate website by clicking your company's logo.
To use an image as a hyperlink:
-
Add the image to the
-
Select the control and expand the Navigation section of the Properties panel.
Alternatively, you can select the control on the design surface instead of from the drop-down list.
-
In the Navigation URL box, type or paste the URL that you want the image to link to.
-
To test the link, preview the