Prepare the Printing Widget for Experience Builder
To use Experience Builder apps to host workflows, you must first prepare the widgets. You only need to do this one time, and then you can use the widgets in as many apps as you want.
VertiGIS Studio Printing supports two editions of Experience Builder. The way that you prepare the widgets depends on the edition of Experience Builder you use:
-
Experience Builder Enterprise Edition: If you have an on-premises portal and you want to use Experience Builder Enterprise Edition, you must register the widget with your portal.
-
Experience Builder Developer Edition: If you do not have an on-premises portal, or you specifically want to use Experience Builder Developer Edition, you must download the widgets and deploy them to your Experience Builder Developer Edition installation.
Follow the instructions for the edition of Experience Builder you use:
Register the Widgets with Experience Builder Enterprise Edition
To register a widget with Experience Builder Enterprise Edition, create an application item in your portal that points to the widget's manifest.json file.
After you have registered the widgets, share the widget items with other Printing authors in your organization. This allows them to configure their Experience Builder apps to run workflows. If the widgets are not shared, the other authors will not see the widgets in Experience Builder.
If you would like to host the widget on your own server download the vertigis-studio-printing-experience-builder-widget-ENTERPRISE.zip widget from here and follow these steps.
To register the Printing widgets with Experience Builder Enterprise Edition:
-
Sign in to Portal for ArcGIS as an administrator.
-
In Content, click Add Item and select Application. The New Item window opens.
-
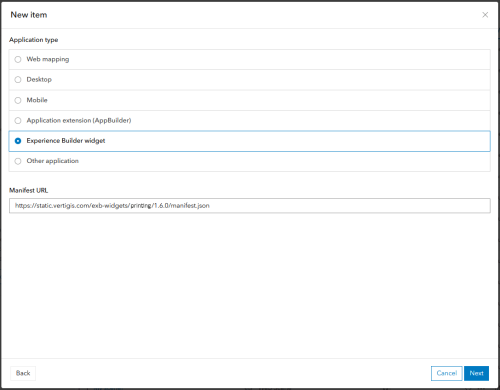
Set the Application Type to Experience Builder widget.
-
In the Manifest URL box, enter the URL to the
manifest.jsonfile for the widget you want to register.You can either use the copy of the
manifest.jsonfile in your local Printing deployment or, if your portal has Internet access, you can use the public copy:https://static.vertigis.com/exb-widgets/printing/[version]/manifest.jsonYou can find the public URL for the version you wish to use here

Example configuration for a Printing widget's manifest in Portal for ArcGIS
-
Click Next.
-
Enter a meaningful title in the Title box, for example:
VertiGIS Studio Printing -
Click Next.
Configure the item:
You should see a new item in your content list. You will see the widget in Experience Builder Enterprise Edition at the bottom of the widget panel under the Custom section.
Download and Deploy the Widget to Experience Builder Developer Edition
The VertiGIS Studio Printing widget allows you to use ArcGIS Experience Builder Developer Edition to host and run print templates.
To prepare the widget for Experience Builder, you first download the widget and then copy it to your Experience Builder installation.
This procedure assumes that you have already installed Experience Builder, which you can download here. Follow these instructions to install it.
To download and deploy the Printing widget:
-
Download the
vertigis-studio-printing-experience-builder-widget-DEVELOPER.zipwidget from here/. -
Locate the root of your Experience Builder installation in Windows Explorer.
By default, the root is calledArcGISExperienceBuilder. -
Extract the widget zip file to the root. The widget will automatically move to the correct folder location within your Experience Builder installation.
The widget is stored in the Experience Builder folder:
\[root]\client\your-extensions\widgets.- If the widget is 2.0 or later, proceed to step 4.
- If the widget is earlier than 2.0, proceed to step 5.
-
Navigate to the widget folder using the command
cd \[root]\client\your-extensions\widgets\printing, and runnpm ito install the widget dependencies. -
Restart the Experience Builder client and server services.
The Printing widget appears in the Experience Builder Widgets panel.If you see this error:
x failed to resolve only because it was resolved as fully specified, follow the instructions under theUpdate Webpacksection in theREADME.mdfile found in thevertigis-toolsfolder at the root of your project.
You will see the widget in Experience Builder Enterprise Edition at the bottom of the widget panel under the Custom section.