Host Reports in the Geocortex Viewer for HTML5
The method you use to configure an HTML5 viewer to host a report depends on the type of report:
-
Layer Reports: The Geocortex Viewer for HTML5 has a built-in Run a Report function that runs layer reports using the currently selected features to filter the data. To use the built-in Run a Report function, the report must be added to the layer in the Essentials site.
For information about creating layer reports, see Use the Current Features as Report Inputs.
-
Other Reports: Reports that do not operate on the currently selected features in a layer can be run from the I Want To menu, a context menu, the toolbar, or a hyperlink using the RunReportByUrl command. These reports are not added to a layer in the Essentials site and the user does not need to select features before running the report.
Configure an HTML5 Viewer to Host a Layer Report
To configure a Geocortex HTML5 viewer to host a layer report, you add the report to the Essentials site, specifically, to the layer that the report gets its data from. Users can then use the HTML5 Viewer's built-in Run a Report function to run the report. If the layer has multiple reports configured for it, the Run a Report function allows the user to select which report to run.
The Run a Report function is available in the Panel Actions menu ![]() and Feature Actions menu
and Feature Actions menu ![]() . In the Panel Actions menu, the Run a Report function operates on all the features in the selection set. Running the report from a particular feature's Feature Actions menu includes only that feature.
. In the Panel Actions menu, the Run a Report function operates on all the features in the selection set. Running the report from a particular feature's Feature Actions menu includes only that feature.
Note that the Run a Report function is only available in the viewer when one or more features are selected.
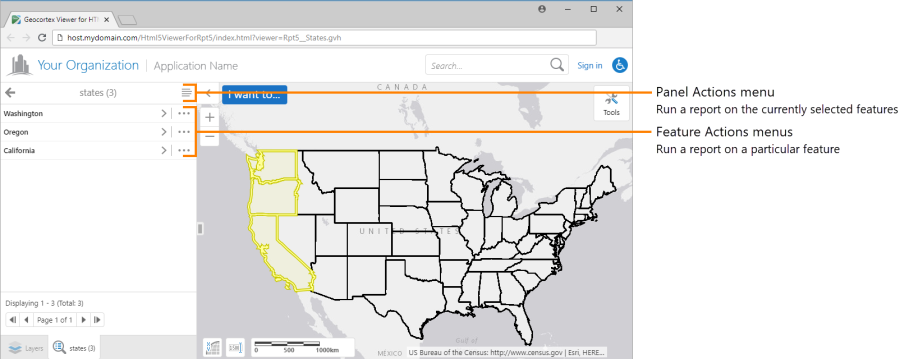
Locations of the menus that offer the Run a Report function
To configure a Geocortex HTML5 viewer to host a layer report:
-
Click Add .
The Create Wizard opens.
-
Click Next.
-
Click Next.
-
Type some text to search for the , for example, a word in the 's name.
Alternatively, copy the 's URL from the Info panel in and paste it in the search box.
-
Locate the and select it.
-
Click Finish.
The is added to the list of . Its type is ArcGIS Item.
-
Click Save Site.
Configure an HTML5 Viewer to Run a Report Using a Command
You can use the Geocortex Viewer for HTML5's RunReportByUrl command to run a VertiGIS Studio report from any context that is capable of running commands—the I Want To menu, context menus, the toolbar, and hyperlinks. This allows you to configure a viewer to run reports from locations that don't require the user to first select features.
For example, suppose you have a report that includes data for all the features in a layer. This report does not use a selection set, so there is no point in requiring the user to select features before running the report, like the Run a Report function requires. Instead, you could configure a Layer Actions context menu item to run the report. This is shown in the screen capture below. The user clicks the ![]() icon to open the Layer Actions menu (
icon to open the Layer Actions menu ( ) and then clicks the menu item to run the report (
 ).
).
Alternatively, if you have several reports that don't use a selection set, you could add a Run Reports tab to the toolbar and have a button for each report.
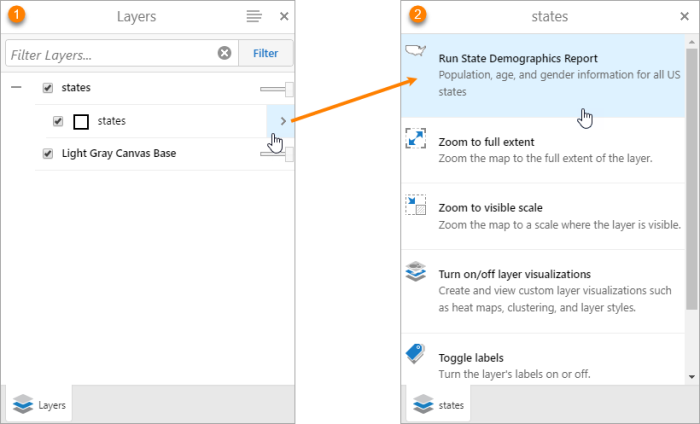
Example of a Layer Actions menu item that is configured to run a report
Instructions are given to configure the following viewer components to host reports:
Configure an I Want To Menu Item to Host a Report
To configure an I Want To menu item to host a report:
-
Edit the viewer in Geocortex Essentials Manager.
-
Click I Want To Menu in the side panel.
-
Select the Desktop, Tablet, or Handheld tab, or click Configure Simultaneously to add the menu item to all three user interfaces.
For more information, see Configure Multiple User Interfaces.
-
Add a new menu item.
-
Type the menu item's Text and Description.
-
In the Command box, type RunReportByUrl.
-
In the Command Parameter box, type or paste the report's URL.
A 's URL is the URL of the ArcGIS item. You can get the URL from ArcGIS or from . In , open the , click Info in the sidebar, and copy the URL from the URL box. If there is no URL box in the Info panel, save the . A does not have a URL until it has been saved.
-
Click OK.
-
Click Apply Changes.
-
Click Save Site.
You have completed the configuration. Users will be able to run the report from the I Want To menu.
Configure a Context Menu Item to Run a Report
To configure a context menu item to run a report:
-
Edit the viewer in Geocortex Essentials Manager.
-
Click Context Menus in the side panel.
-
Click the link for the context menu that you want to edit.
-
Select the Desktop, Tablet, or Handheld tab, or click Configure Simultaneously to add the menu item to all three user interfaces.
For more information, see Configure Multiple User Interfaces.
-
Add a new menu item.
-
In the Text box, type the menu item's text.
-
In the Command box, type RunReportByUrl.
-
In the Command Parameter box, type or paste the report's URL.
A 's URL is the URL of the ArcGIS item. You can get the URL from ArcGIS or from . In , open the , click Info in the sidebar, and copy the URL from the URL box. If there is no URL box in the Info panel, save the . A does not have a URL until it has been saved.
-
Click OK.
-
Click Apply Changes.
-
Click Save Site.
You have completed the configuration. Users will be able to run the report from the context menu.
Configure a Toolbar Button to Run a Report
To configure a toolbar button to run a report:
Step 1: Add a Report tab to the toolbar (optional)
This step creates a toolbar tab where you can place all the buttons that run reports that don't require a selection set. This is useful if the viewer will host many reports.
Toolbar tabs are available in tabbed toolbars only. The compact toolbar does not support tabs. For more information, see Toolbar in the Geocortex Viewer for HTML5 help.
-
Edit the viewer in Geocortex Essentials Manager.
-
Click Toolbar in the side panel.
-
Select the Desktop or Tablet tab, or click Configure Simultaneously to add the tab to both user interfaces.
For more information, see Configure Multiple User Interfaces.
-
Click Add Tab in the Configured Toolbar area.
-
Type the tab's text in the Display Name box, for example, Reports.
-
Click OK.
Step 2: Add a toolbar button that runs the report
Running a report requires a button, rather than a tool or toggle button. To add a button to the toolbar, you add an existing button and modify its configuration. For more information about buttons, see Toolbar in the Geocortex Viewer for HTML5 help.
-
Drag a button, for example
 Full Extent, from the Available Tools area to the desired position in the Configured Toolbar area.
If you created a Reports tab, place the button in the Reports tab. You can reposition toolbar items by dragging them.
-
Edit the button.
-
In the Name box, replace the existing name with a name for the report.
The name is used as the button's label.
-
In the Tooltip box, replace the existing tooltip with a brief description of the report.
-
In the Image URI box, replace the existing URI with the URI of the image you want to appear on the button.
-
In the Command box, enter RunReportByUrl.
-
In the Command Parameter box, type or paste the report's URL.
A 's URL is the URL of the ArcGIS item. You can get the URL from ArcGIS or from . In , open the , click Info in the sidebar, and copy the URL from the URL box. If there is no URL box in the Info panel, save the . A does not have a URL until it has been saved.
-
Click OK.
-
Click Apply Changes.
-
Click Save Site.
You have completed the configuration. Users will be able to run the report from the toolbar.