The Shared Projects component provides a straightforward method for sharing and managing projects.
When you create a Shared Project, the current state of your application is saved to a project file stored in your Shared Storage Service . You can then share the URL or QR code with specific users and groups for seamless collaboration and review. For example, you can share your app with a colleague and see real-time additions of their markups and comments.
The current app state captures the following data:
•Highlights
•User-uploaded data
•Current location on the map
•Layers
•Any drawings, measurements, markups
Project sharing and collaboration do not provide security. Any user who can access your application and the Shared Project component to save a project can also access, modify, and delete any project in the simple storage service (S3)-compatible data store. The Studio Web interface uses client-side information-hiding to make undesirable actions less accessible (for example, only the project creator can delete it). However, nothing prevents a user from using the storage credentials to access all content in the S3 storage.
To share a project:
1.Configure your Shared Storage Service.
2.Add the Shared Projects component to your layout.
3.Click the three-dot menu in the Shared Projects tab and select New to create a new Shared Project for your current app state.
Alternatively, you can create a new Shared Project from a project file on your local drive.
4.Enter the Project Settings. The fields are described in the table below.
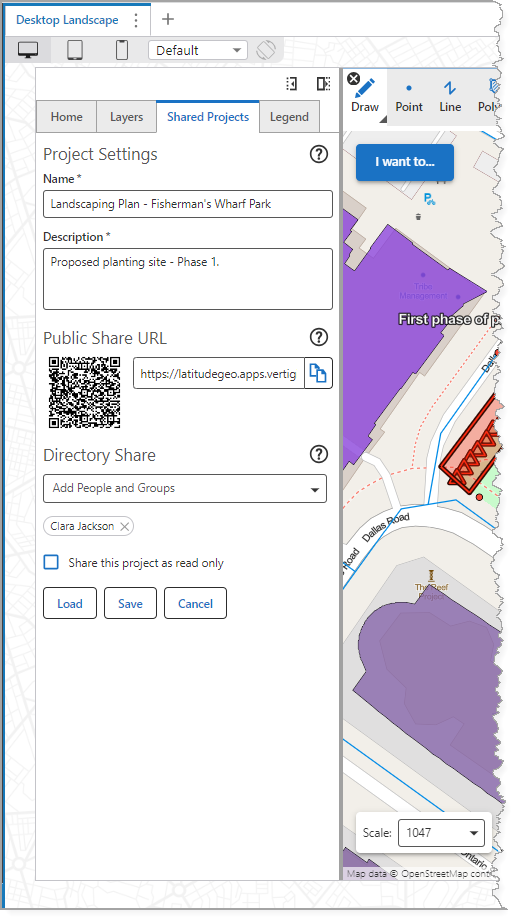
Field |
Description |
|---|---|
Name |
Enter a title for the project. |
Description |
Enter a brief summary for the project. |
Public Share URL |
Displays the QR code and URL for the project. You can share these with the user or group specified in the Directory Share, so they can access the project. |
Directory Share |
Choose the user or group with whom you want to share the QR code or URL to access the project. By default, a newly-created project is shared only with yourself. You can share the project with everyone by removing all share restrictions, including your own name. |
Share this Project as Read Only |
If enabled, the user(s) and group(s) with whom you shared the project can view it, but cannot make changes. |
5.Click Save.
Your project appears in the Shared Projects tab, along with any projects that others have shared with you.
Click Refine to access the parameters that allow you to filter and sort all shared projects.

6.Click three-dot menu for the project you want to share. The menu items are described in the table below.
Field |
Description |
|---|---|
Share |
Shows the link for the QR code and public share URL. |
Download |
Downloads the project to your local drive. |
Settings |
Opens the settings you configured when you created the project and allows you to edit them. |
Delete |
Permanently removes the project and its data. The project will not be available to anyone you shared it with or anyone who received the sharing link. The Delete button is only available to you if you created the Shared Project. |
7.Select Share to get the Public Share URL.
8.Send the Public Share URL to the user or group you specified in the Directory Share, so they can access the project.