To configure an Alarm for a resource group:
1.Open Settings and click a resource group.
2.Click the Alarms tab.
3.Click the down caret for a default alarm from the list to expand it.
4.Click Add Alarm Level to add a new state and threshold trigger.
5.Define the alarm by modifying the State, Operator, and Threshold (optionally Occurrences) fields, defined in the table below.
Field |
Description |
|---|---|
State |
The state of the alarm can be either Info, Warning, or Error. |
Operator |
Determines the logical comparison between the monitored metric and the threshold in the filter expression. |
Threshold |
This is the trigger point of the alarm. |
Occurrences |
This field will show for some alarms when appropriate for that resource. It works in conjunction with the Threshold field. If the Occurrences field exists, then the number of occurrences, as well as the Threshold values must be met to trigger an alarm. |
All resources in a resource group will inherit all alarms and their configuration from the Default Alarms configured for the resource group. You can override the Default Alarms for an individual resource as in the example below.
In this example, we configure an alarm that will trigger when a specific server in the Servers resource group is "not available".
To configure an alarm that triggers when a specific server is unavailable:
1.Open Settings and click the Servers resource group.
2.Click a specific server in the resource group.
3.In the Alarms tab, click the down caret for the Downtime panel.
4.Click Edit ( ![]() ) to rename the alarm to something such as 'Availability'.
) to rename the alarm to something such as 'Availability'.
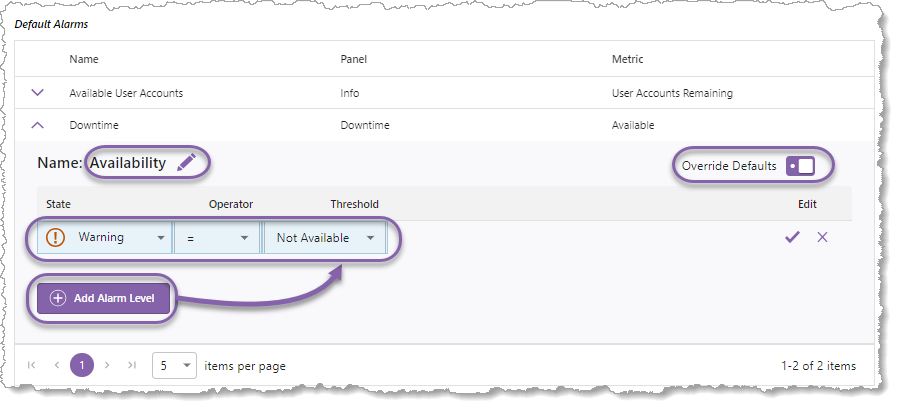
5.Enable the Override Defaults switch. This setting allows you to set alarms for specific resources. When setting alarms with the Override Defaults enabled, the alarm only affects the specific resource.
6.Ensure that the State field is set to 'Warning'.
7.Ensure the Operator field is set to '='.
8.Ensure the Threshold field is set to 'Not Available'.
9.Click the check icon ![]() to save the Alarm Level. The Alarm evaluates the new Alarm Level and sets its state accordingly.
to save the Alarm Level. The Alarm evaluates the new Alarm Level and sets its state accordingly.
10.See View Alarms.