Windows Server-side Tasks
Main Steps
The main server-side steps to prepare for installation of the Geocortex Mobile App Framework are:
-
Configure viewers to be available in the App.
If your App supports multiple viewers, you must configure which viewers are available in the App. This step does not apply to single-viewer Apps.
-
Configure offline maps and basemaps.
If you are going to support offline use of the App, you must configure the maps and basemaps that you want to be available offline. If you are not going to support offline use of the App, you can skip this step.
-
Create and deploy additional resources.
You only need to do this if you have resources that you want to make available to end users, for example, locale files.
-
Deploy the installation package to a server that end users have access to, and provide them with the package's location.
If you are responsible for installing and configuring the App on end user devices, you can skip this step. You only need to do this step if the end users themselves are going to download and install the App from a server.
If you experience an error when you try to use the Geocortex Mobile App Framework to access a Viewer hosted behind a firewall, see Unable to Load a Viewer Hosted Behind a Firewall.
Configure Viewers to be Available in the App
Configuring the availability of viewers applies to multi-viewer Apps only. If the Geocortex Mobile App Framework was installed using a single-viewer installation package, you do not need to configure viewer availability.
When the App is first installed, it only contains a sample viewer. You must make your viewers available to end users so they can download the viewers to their device. The downloaded viewer includes everything the user needs to take the App offline, such as the offline maps and basemaps (TPK files) you have configured.
There are several ways to make viewers available to end users:
-
Add Viewers to the App's Available Viewers List: Configure viewers to appear on the App's Available Viewers page. The Available Viewers page lists viewers that are available to download to the device. The end user selects a viewer from the list and clicks Save to download it. Once the viewer is downloaded, it appears on the Saved Viewers page instead of the Available Viewers page.
-
Download Viewers Automatically: Configure the viewer to download automatically when the user starts the App. The viewer appears on the App's Saved Viewers page.
-
Provide the Viewer's URL: Provide end users with the URL to launch the viewer in the App.
Add Viewers to the App's Available Viewers List
To add a viewer to the Available Viewers list:
-
In Geocortex Essentials Manager, edit the site that contains the viewer.
-
In the side panel, click Viewers, and then click the Edit icon
 beside the desired viewer.
 -
In the Viewer for HTML5 side panel, click Offline.
-
Select the Add to List of Available Viewers checkbox.
If the site is secured, the viewer will only appear in the Available Viewers list if the user has permission to access the viewer. For information on setting permissions on viewers,
-
Click Apply Changes.
-
Click Save Site.
To download the viewer to the device, the end user taps the viewer in the Available Viewers list, and then taps Save. The viewer appears on the Saved Viewers page.
Download Viewers Automatically
To configure a viewer to download automatically:
-
In Geocortex Essentials Manager, edit the site that contains the viewer.
-
In the side panel, click Viewers, then click the Edit icon
beside the desired viewer. -
In the Viewer for HTML5 side panel, click Offline.
-
Select the Add to List of Available Viewers checkbox.
-
Select the Automatically download checkbox.
If the site is secured, the viewer will only appear in the Available Viewers list if the user has permission to access the viewer. For information on setting permissions on viewers,
-
Click Apply Changes.
-
Click Save Site.
-
In the App, verify that the viewer appears on the Saved Viewers page.
The viewer automatically downloads to the user's device when the user starts the App. The viewer appears on the Saved Viewers page.
Provide the Viewer's URL
If the App is not yet registered with an Essentials instance, using the Launch in Geocortex Mobile App Framework link will register it.
To provide users with the URL to add the viewer:
-
In Geocortex Essentials Manager, edit the site that contains the viewer.
-
In the side panel, click Viewers.
-
Click Edit
beside the viewer. -
Right-click the Launch in Geocortex Mobile App Framework link and copy the link's URL.
-
Use one of the following methods to make the viewer available to end users:
-
Create a link or QR code that points to the URL. Publish the link or QR code to a website that end users have access to, or send the link or QR code in an email.
To add the viewer, users either scan the QR code, or open the email on the device and tap the link. The viewer appears on the Saved Viewers page.
-
Send users the URL.
To add the viewer, users type or paste the URL into the address bar of a web browser on the device. The viewer appears on the Saved Viewers page.
-
Configure Offline Maps and Basemaps for Windows
To allow end users to use the App offline, you must create the offline maps and basemaps that you want to be available offline. When you configure the offline map, you associate the offline basemap with the offline map. Usually, you configure the offline basemaps first, so they are available when you configure the offline map.
There are two types of offline basemap—pre-generated and custom. Typically, you create pre-generated offline basemaps for areas where you know that you have field workers working, and you use custom offline basemaps when you cannot predict what areas your users will need.
-
Pre-generated Offline Basemaps: The TPK files for pre-generated offline basemaps are created before the user downloads the offline map. They are stored on the Essentials server or other web server and downloaded or copied to the end user's device. A pre-generated offline basemap can be associated with multiple offline maps.
You cannot delete shared pre-generated TPK files when deleting a map—they must be deleted manually in
There are two ways to make pre-generated offline basemaps available to users:
-
Add a pre-generated offline basemap using the existing TPK file: Use this method if you already have a TPK file that you want to use.
When the end user downloads the offline map, the basemap downloads with it. Alternatively, the user can manually copy the TPK file to the device before downloading the offline map. In this case, the App detects that the TPK file is already on the device and does not download the basemap.
-
Add a pre-generated offline basemap and specify the map service to generate the TPK file: Use this method if you do not already have a TPK file, but you have access to a (local or online) ArcGIS tiled map service that supports the ExportTiles operation. You want to generate the TPK file and store it on the server for end users to download or copy to their device.
The TPK file is generated when you configure the offline basemap. The TPK file downloads to the end user's device with the offline map. Alternatively, the user can manually copy the TPK file to the device before downloading the offline map. In this case, the App detects that the TPK file is already on the device and does not download the basemap.
-
-
Configure a Custom Offline Basemap: Use this method when you do not know where the user will be working offline. The user must have access to a (local or online) ArcGIS tiled map service that supports the ExportTiles operation. Custom offline basemaps allow the user to generate the TPK file and store it on their device.
The TPK file for a custom offline basemap is generated the first time the end user synchronizes the associated offline map. The TPK is not copied to the Essentials server. A custom offline basemap can only be used by a single offline map.
After you have configured an offline basemap, you must configure an offline map. As part of the configuration, you will specify the offline basemaps that the offline map uses.
You must also provide a way for end users to download and use the offline maps and basemaps. For example, you could
If your site is secured and you do not allow anonymous access, users will have to sign in to use offline maps. You can allow anonymous users to see offline maps by changing the Data Store policy.
See also...
About Offline Maps and Basemaps
Add a Pre-generated Offline Basemap using an Existing TPK
To configure an existing TPK file:
-
In Geocortex Essentials Manager, edit the site you want to configure.
-
Click Offline in the side panel.
-
Click the Offline Basemaps tab.
-
Click Add Offline Basemap.
-
Select Use an existing TPK, and then click Next.
-
Select one of the following:
-
Use the URL of an existing TPK file available online:
In the TPK URL box, type the URL of the TPK file.
End users download the TPK directly from the specified server. The TPK is not copied to the Essentials server.
-
Use a TPK file already on the server:
From the TPK File drop-down list, select the TPK file on the server.
To appear in the TPK File drop-down list, the TPK file must be in the Essentials
TPKsfolder. In the default Essentials installation, theTPKsfolder is here:C:\Program Files (x86)\Latitude Geographics\Geocortex Essentials\Default\REST Elements\Sites\TPKs
-
-
Click Next.
-
In the Display Name box, type a display name for the offline basemap, and click Finish.
-
Click Save Site.
You can now add your pre-generated offline basemap to an offline map. When the end user downloads the offline map, the basemap downloads with it. Alternatively, the user can manually copy the TPK file to the device before downloading the offline map. In this case, the App detects that the TPK file is already on the device and does not download the basemap.
Add a Pre-generated Offline Basemap that Generates the TPK File
To use an ArcGIS tiled map service to generate the TPK file, the map service must support the ExportTiles operation.
To specify a map service to generate the TPK file:
-
In Geocortex Essentials Manager, edit the site you want to configure.
-
Click Offline in the side panel.
-
Click the Offline Basemaps tab.
-
Click Add Offline Basemap.
-
Select Use a map service supporting the ExportTiles operation to generate a TPK file, and click Next.
-
In the Map Service URL box, type the URL of the TPK file, and then click Next.
-
Click Extent, and pan and zoom the map to the extent you want to be available offline.
-
Click Max Resolution, and zoom the map to the maximum level of detail you want to be available offline.
-
Click Next.
-
In the Display Name box, type a display name for the offline basemap, and then click Finish.
The TPK file representing the basemap will start being generated. When it is completed, its Status changes to Ready. You do not need to wait for the TPK file to complete before moving to the next step.
The TPK file is written to the Essentials
TPKsfolder. In the default Essentials installation, theTPKsfolder is here:C:\Program Files (x86)\Latitude Geographics\Geocortex Essentials\Default\REST Elements\Sites\TPKs
-
Click Save Site.
You can now add your pre-generated offline basemap to an offline map. When the end user downloads the offline map, the basemap downloads with it. Alternatively, the user can manually copy the TPK file to the device before downloading the offline map. In this case, the App detects that the TPK file is already on the device and does not download the basemap.
Manually Copy an Existing TPK File to the Device
Normally, the TPK files of any pre-generated offline basemaps are automatically downloaded to the device when the user syncs an offline map that includes them. If a TPK file is very large and you do not want to download it this way, you can manually copy the TPK file to the device instead. For example, you could copy the TPK file to a thumb drive, and give the thumb drive to the end user to copy the file to their tablet.
When the end user downloads the offline map, the App detects that the TPK file is already on the device so it does not download the basemap.
To manually copy an existing TPK file to the device:
-
Copy the TPK file to the App data storage location on the device.
The default location is:
C:\Users\
MyUserName\Documents\Geocortex App DataReplace
MyUserNamewith your Windows user name. If you customized the data storage location, move the files to the custom location.
Configure a Custom Offline Basemap
Custom offline basemaps are based on basemaps that are configured on the Basemaps page in the site. To create a custom offline basemap from a particular basemap, choose one of the following that applies to you:
-
The basemap contains an ArcGIS tiled map service with the ExportTiles operation enabled: The map service creates the TPK file the first time the end user synchronizes the offline map. In this case, you do not need to configure anything—your basemap can be included in an offline map as a custom offline basemap.
-
The basemap contains an ArcGIS tiled map service you can configure: In this case, you can enable the ExportTiles operation following the instructions to "Allow clients to export cache tiles" in the Esri documentation.
-
You want to specify the ArcGIS tiled map service to create the TPK file: To specify the map service, configure the basemap's Export Tiles Override setting. The specified map service creates the TPK file, using its own data, the first time the end user synchronizes the offline map. The map service must support the ExportTiles operation.
You may want to use a map service that does not support the ExportTiles operation for online use, and a different service that does support ExportTiles for offline. For example, you could use one of the ArcGIS Online services that supports ExportTiles, like the World Topographic, Imagery, or Street Map services, to create the TPKs.
If you delete an offline map that contains a custom offline basemap, the custom offline basemap is also deleted.
To specify an ArcGIS tiled map service to use for a custom offline basemap:
-
In
-
In the list of basemaps, click the basemap that you want to edit, or hover the pointer over the basemap.
The management tools appear.
-
Click the Edit tool.
-
Set the Export Tiles Override setting to the URL of an ArcGIS tiled map service that supports the ExportTiles operation. For example:
http://
MyServer.com/arcgis/rest/services/MyMapService/MapServer -
Click OK.
-
Click Apply Changes.
-
Click Save Site.
You can now add your custom offline basemap to an offline map.
Create an Offline Map
There are two ways to create an offline map:
-
Configure the Offline Map in the Site: You can configure offline maps using Geocortex Essentials Manager. End users download the offline maps to the App.
-
Create the Offline Map in the App: End users can create offline maps in the App.
There are several steps to create an offline map, specifically: specify the extent and layers that will be available offline; add at least one offline basemap; and share the offline map with specific users or groups of users.
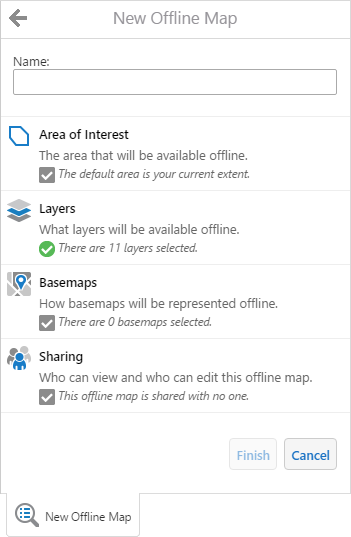
Panel to create a new offline map
Configure an Offline Map using Geocortex Essentials Manager
To configure an offline map in Geocortex Essentials Manager:
-
In
-
Click the Offline Maps tab.
-
Click New.
-
In the Name box, type a name for the offline map.
After typing a name for the offline map, you can click Finish at any time to accept the default settings for a new offline map. By default, the offline map's area of interest is set to the initial extent, all feature layers and attachments are included for offline use, no offline basemaps are included, and the offline map is not shared.
-
Click Area of Interest.
-
Select one of the selection tools, and then select the area of the map that you want to be available offline.
-
Click OK.
-
Click Layers.
-
Select the feature layers that you want to be available offline.
If you want to restrict the number of features of a layer, click
 to set a definition expression for the layer. This is equivalent to a WHERE clause in SQL. For example, TYPE = 'Residential'.
 -
If you want feature attachments to be included offline, select the Include Attachments checkbox.
-
Click OK.
-
Click Basemaps.
The Select Basemaps panel opens.

Example of the panel that allows you to select basemaps for an offline map
The Select Basemaps panel lists the basemaps that are configured on Manager's Basemaps page.
In the Select Basemaps panel:
-
The Pre-generated option only appears if there is at least one offline basemap. The drop-down list lists the offline basemaps that have been added to the site. For example, in the screen capture above, the Imagery basemap's drop-down list shows that the site has an offline basemap called GreaterVictoria.
-
The Custom option only appears if the basemap contains at least one map service that supports the ExportTiles operation, or you have configured the basemap's Export Tiles Override setting.
-
-
For each basemap, select one of the following:
-
None: If you do not want to use this basemap offline.
-
Pre-generated: If you want to use a pre-generated offline basemap from the Offline Basemaps page in Manager:
-
From the drop-down list, select the pre-generated offline basemap you want to use offline.
-
-
Custom: If you want to use a custom offline basemap from the Basemaps page in Manager:
-
Click Edit.
-
Use the slider to select the level of detail that you want to be available offline.
-
Click Done.
-
In the Days Between Refresh box, type the period of days to wait until the TPK file should regenerate when the user synchronizes the offline map.
If you create a custom offline basemap from a basemap that contains multiple tiled map services, the TPK is created from the topmost map service in the basemap—the other map services are omitted from the TPK. If you want to create the custom offline basemap from one of the other map services, set the basemap's Export Tiles Override setting to the map service that you want to use in the TPK.
-
-
-
Click OK.
-
Click Sharing.
-
To share the offline map with others:
-
If you want to share the offline map with a particular user, select Individuals from the drop-down list.
If you want to share the offline map with a group of users, select Groups from the drop-down list.
-
In the Search box, type the name of the user or group that you want to share with.
-
Click Add.
The user or group is added to the list of users and groups that have access to the offline map. By default, they have View access.
-
Select a sharing option:
-
None: If you do not want to share the offline map with this user or group.
-
View: If you want this user or group to be able to view the offline map, but not edit it.
-
Edit: If you want this user or group to be able to view and edit the offline map.
-
Repeat this step to share the offline map with as many users and groups as you want. Click OK when you are finished.
-
-
Click OK.
-
Click Finish.
Create an Offline Map in the App
To create an offline map in the App:
- Start the App and sign in.
-
Open the viewer that you want to add the offline map to.
-
If necessary, tap
 to open the toolbar.
 -
Tap Offline Maps
 .
. -
In the Offline Maps panel, tap the Panel Actions Menu button
 .
. -
Tap Manage
 .
. -
Tap New.
-
In the Name box, type a name for the offline map.
After typing a name for the offline map, you can tap Finish at any time to accept the default settings for a new offline map. By default, the offline map's area of interest is set to the initial extent, all feature layers and attachments are included for offline use, no offline basemaps are included, and the offline map is not shared.
-
Tap Area of Interest.
-
Select one of the selection tools, and then select the area of the map that you want to be available offline.
-
Tap OK.
-
Tap Layers.
-
Select the feature layers that you want to be available offline.
If you want to restrict the number of features of a layer, tap
to set a definition expression for the layer. This is equivalent to a WHERE clause in SQL. For example, TYPE = 'Residential'. -
If you want feature attachments to be included offline, select the Include Attachments checkbox.
-
Tap OK.
-
Tap Basemaps.
-
For each basemap that can be used offline, do one of the following:
-
None: Select None if you do not want to use this basemap offline.
-
Pre-generated:
-
Select Pre-generated.
-
Select the desired pre-generated offline basemap from the drop-down list.
-
-
Custom:
-
Select Custom.
-
Tap Edit.
-
Use the slider to select the level of detail that you want to be available offline.
-
Tap Done.
-
In the Days Between Refresh box, type the period of days to wait until the TPK file should regenerate after synchronizing the offline map.
-
-
-
Tap OK.
-
Tap Sharing.
-
To share the offline map with others:
-
If you want to share the offline map with a particular user, select Individuals from the drop-down list.
If you want to share the offline map with a group of users, select Groups from the drop-down list.
-
In the Search box, type the name of the user or group that you want to share with.
-
Tap Add.
The user or group is added to the list of users and groups that have access to the offline map. By default, they have View access.
-
Select a sharing option:
-
None: If you do not want to share the offline map with this user or group.
-
View: If you want this user or group to be able to view the offline map, but not edit it.
-
Edit: If you want this user or group to be able to view and edit the offline map.
-
Repeat this step to share the offline map with as many users and groups as you want. Tap OK when you are finished.
-
-
Tap OK.
-
Tap Finish.
Allow Anonymous Users to View Offline Maps
If your site is secured, by default end users who are not signed in cannot see offline maps in the App. You can allow anonymous users to view offline maps by changing the Data Store policy. Anonymous users cannot edit offline maps.
Allowing end users to view offline maps also allows them to view other Data Store documents, such as HTML5 Viewer projects. For more information,
To allow anonymous users to view offline maps:
-
In
-
Select Allow Public Read Access.
-
Click Apply Details.
Use an Offline Map in the App
To use an offline map, the user selects the map in the Offline Maps panel.
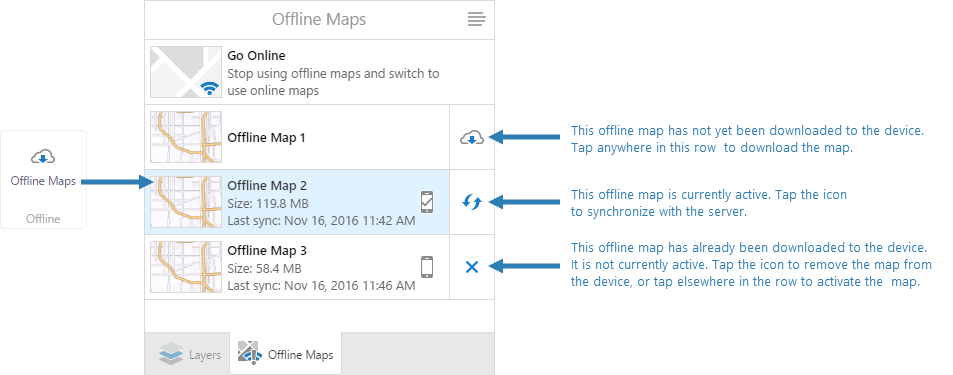
The Offline Maps tool (left) opens the Offline Maps panel in the App
To use an offline map in the App:
-
In the App, open a viewer for a site that contains offline maps.
-
If necessary, tap
 to open the toolbar.
 -
Tap the Offline Maps tool
.The Offline Maps panel opens.
-
Tap the offline map you want to use.
Offline maps that have not yet been downloaded are marked with a download icon
. -
If prompted to confirm you want to download the offline map, tap OK.
The offline map starts to download. After the offline map has finished downloading, it becomes active. If you want to return to only using online data, tap Go Online.
-
While your offline map is active, you can browse and edit features on the map even without network connectivity.
-
When you regain network connectivity, tap the offline map's Sync button
 .
.The synchronization process starts. When finished, your edits are synchronized with the server and your offline map is also updated.
To synchronize all the changes to any offline map, in the notification at the top of the screen, click Sync Now. This notification only appears when you have unsynchronized changes and network connectivity.
If one or more of your offline maps have not been synchronized for a week, the App displays a notification to allow you to synchronize all your offline maps, regardless of whether you have made any changes.
These notifications only appear within the viewer. They do not appear within the viewer selection screen in multi-viewer Apps.
If network connectivity is interrupted during synchronization of an offline map, you can resume synchronization when you regain network connectivity. To resume synchronization, select the offline map and tap
 . To delete the partially transferred data instead, tap Delete Data when the App informs you that synchronization failed.
Create and Deploy Additional Resources
Resources are additional assets used by a viewer to support your business goals. For example, the locale files that are used to
Resource URIs point to resource files. To make a resource available to end users, provide them with a link or QR code to the file. When a user taps the link or scans the QR code, the resource file is loaded onto the device. You can also remove resources that have been previously added to a device.
You do not need to use resource URIs to add tile package (TPK) files. Instead,
To allow end users to add a specific resource:
-
Put the resource file on a server that end users have access to.
-
Provide end users with a link or QR code that points to the following URL:
gcx://resource?action=download&url=[resource URL]
Be sure to replace
[resource URL]with the fully qualified URL of the resource file.
To allow end users to remove a specific resource:
-
Provide end users with a link or QR code that points to the following URL:
gcx://resource?action=remove&name=[file name]
Be sure to replace
[file name]with the name of the file that you want users to be able to remove.
See also...
Deploy the Installation Package
The Geocortex Mobile App Framework must be installed on each end user's device.
You can skip this step if you are responsible for installing the App on behalf of the end user, for example, if your organization provides devices to mobile workers. You only need to do this step if the end users themselves are going to download and install the App from a server.
To deploy the installation package:
-
If you unzipped the download package to customize it, re-zip the files.
-
Put the
For information on the web server's requirements, see
-
Provide end users with the location of the installation package so they can download it to their device.
What's next?