First-Time Translation using the Geocortex Language Tool
The process of translation using the Geocortex Language Tool revolves around the creation of language packs, which are XML files with a .lpx or .xap extension that contain strings in English side-by-side with the translated strings on one or more languages.
A language pack can contain any number of languages. If other languages exist in the language pack, and the application or viewer is opened by a browser with the default language set to one of those languages, the software displays automatically in the default language set in the browser.
Although all the languages are usually kept in a single LPX or XAP file, when you export the file to Excel, you only export a single language at a time in .xlsx format. Creating a single-language export file makes it possible to send files to different translators for each language. As each translated file returns, they are merged into the same LPX or XAP file and saved. When the browser default language settings are changed to the new language, the application/viewer searches the LPX or XAP file, and then automatically loads the strings for that language.
Geocortex Essentials
The process of translating the GUI strings from Manager involves two extra steps. You need to harvest the strings stored in the .dlls and .xml files, and then merge the strings into a language pack. The language pack has an .lpx extension. The strings for Geocortex Essentials can be found in the bin folder. The default location for the bin folder is:
C:\Program Files (x86)\Latitude Geographics\Geocortex Essentials\Default\REST Elements\Manager\bin
Once the strings are harvested and merged into an LPX file, they must be saved to the bin folder. Multiple languages can then be added to the LPX file. The strings for each separate language can be translated directly in the LPX file in the Language Tool or exported to an Excel spreadsheet and sent to a translator.
When each language is returned, the translated Excel spreadsheet is merged back into the same LPX file within the Language Tool.
If Manager opens in a browser with the new language set as its default language, Manager searches the LPX file in the bin folder for that language. If Manager finds the language, it loads those strings and opens showing the default language set in the browser.
Manager can keep track of multiple LPX files as long as all of them are kept in the bin folder where Manager looks for them.
Geocortex Viewer for Silverlight
For the Geocortex Viewer for Silverlight , the translation process is simplified by the fact that the viewer's strings are stored in a language pack already. In the case of the viewer, the language pack has a .xap file extension. Because the viewer strings are already in a language pack, they do not need to be harvested. The XAP file behaves exactly the same as an LPX file in the Language Tool.
The XAP file of a deployed viewer is found in the ClientBin folder. The default location for the XAP file is:
C:\inetpub\wwwroot\SilverlightViewer_4_10\ClientBin
The process for using a XAP file for translation is the same as for an LPX file excluding harvesting strings. Multiple languages are added to the XAP file, which can be translated in the Language Tool or exported to individual language Excel spreadsheets and sent for translation. The returned spreadsheets are merged back into the XAP file. When the viewer is opened in a browser with a default language that is not the invariant language, the viewer searches in the XAP file for that language. If it finds the language, the viewer loads showing the default language of the browser.
Create a Language Pack for Geocortex Essentials Manager
To translate Geocortex Essentials Manager, you need to first create a language pack (LPX file), harvest the strings from the application, and then merge the harvested strings into the language pack.
The Geocortex Viewer for Silverlight is deployed with an existing language pack (XAP file), so there no need to create a new one.
To create a language pack for Manager:
-
Open the Language Tool.
-
Click File | New.
A new language pack is created with the name
Untitled.lpx. -
Click Save As, and in the File name box, type in the name of the new LPX file.
-
Navigate to the
binfolder underLatitude GeographicsinProgram files (x86).The default location is:
C:\Program Files (x86)\Latitude Geographics\Geocortex Essentials\Default\REST Elements\Manager\bin
Do not create a folder within the
binfolder or Manager will not be able to locate the language pack. -
Click Save to save the LPX file in the
binfolder.
Harvest and Merge Manager's Strings
Once you have created an LPX file for Manager, you need to harvest the strings from the application and then merge the harvested strings into the LPX file.
To harvest application strings from Manager:
-
Open the Language Tool.
-
Click File | Harvest Application Strings.
-
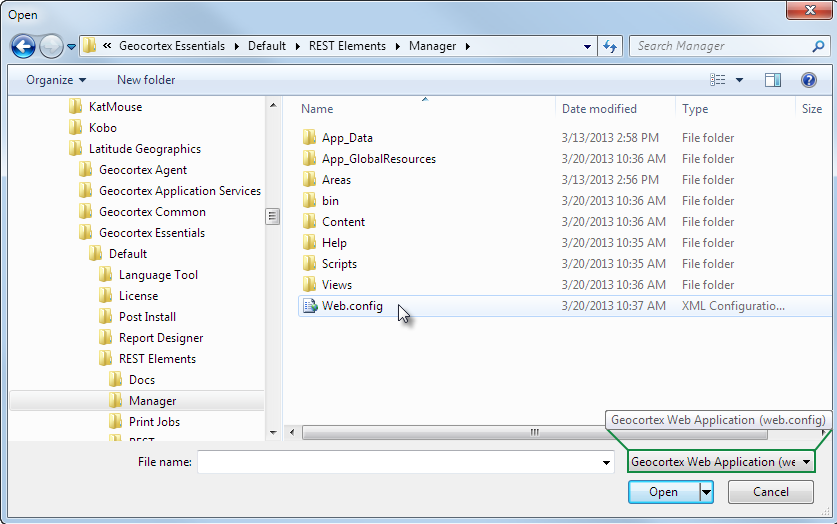
When the Open dialog displays, navigate to the folder containing Manager's
Web.configfile.By default, the
Web.configfile is located in:C:\Program Files (x86)\Latitude Geographics\Geocortex Essentials\Default\REST Elements\Manager
Notice that the button beside the File name box, prompts you to open the correct file based on the option you chose in step 2.
-
Select the Web.Config file, and then click Open.
The Language Tool harvests all the strings from files in the
binfolder, and then opens a tab beside the tab of the language pack (LPX file). The status bar displays the number of strings and files harvested.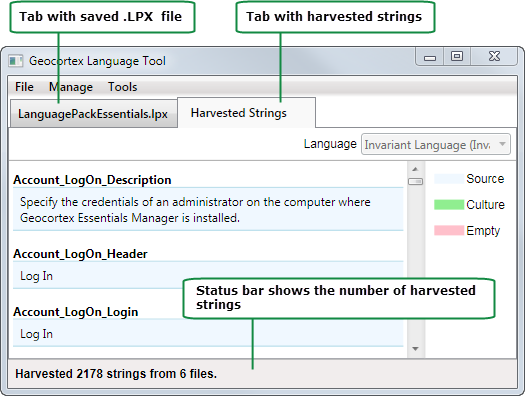
-
Click on the tab of the LPX file to activate it, as the strings are merged into this file.
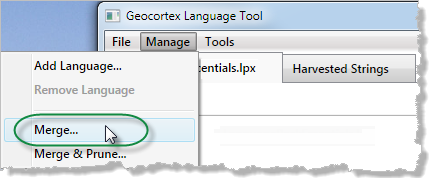
-
Click Manage | Merge.
-
In the Choose Language Pack dialog, from the Language Pack drop-down list, select Harvested Strings, and then click OK.
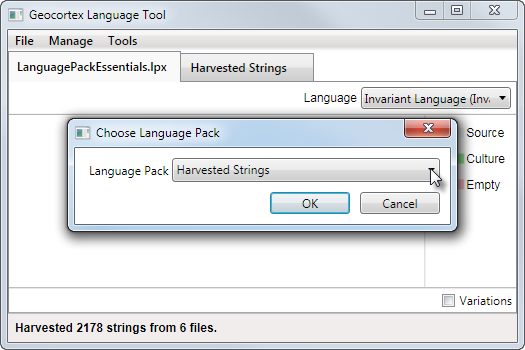
The harvested strings are merged into blue rows in the LPX file. The strings are in the Invariant Language - en-US.
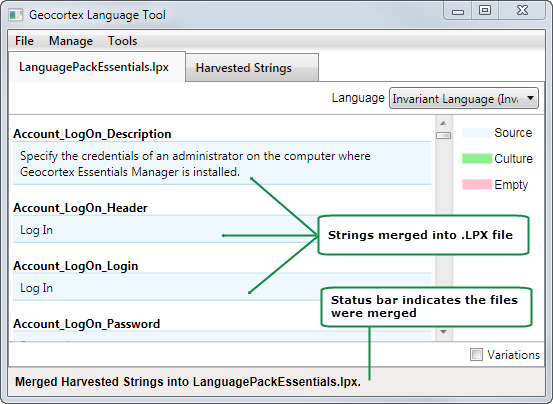
The status bar at the bottom of the dialog indicates that the harvested strings are merged into the LPX file. The LPX file is now ready to have languages added to it.
Add Target Languages to the Language Pack
After the language pack containing the harvested strings is created for Manager, the translation process is the same whether you are using a XAP file for a viewer or an LPX file for Manager. Both file types—LPX and XAP—are referred to as language packs. When it is first created, a language pack only contains the Invariant Language—en-US. Before you can translate the strings, you need to add the target language(s) to the language pack.
Even if you plan to export the file to Excel, you must add the language(s) to the language packs before you do so.
To add a language to a language pack:
-
In the Language Tool, open the language pack if it is not already open.
By default, LPX files for Manager are in:
C:\Program Files (x86)\Latitude Geographics\Geocortex Essentials\Default\REST Elements\Manager\bin
By default, XAP files for the Geocortex Viewer for Silverlight are in
C:\inetpub\wwwroot\SilverlightViewer_4_10\ClientBin
-
Click the tab that contains the language pack.
This ensures that the Manage and Add Language options are available.
-
Click Manage | Add Language.
-
In the Choose Language dialog box, click the Language drop-down list and select the target language.
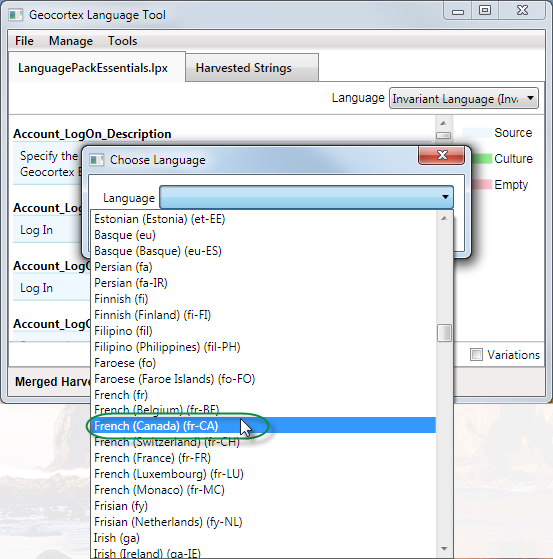
-
Click OK.
Lines appear beneath each string of the Invariant Language.
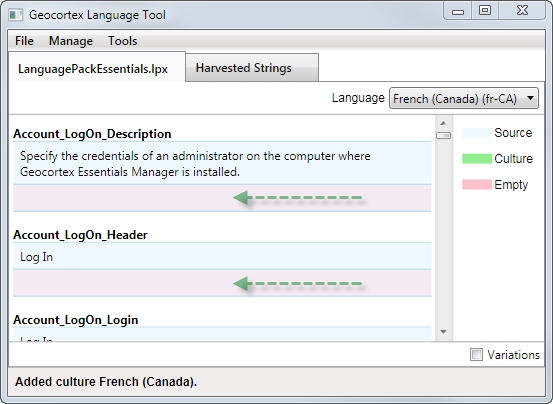
The pink rows are for the translated strings. You can translate strings by typing directly into these rows in the Language Tool or you can export them to an Excel spreadsheet to be sent for translation.
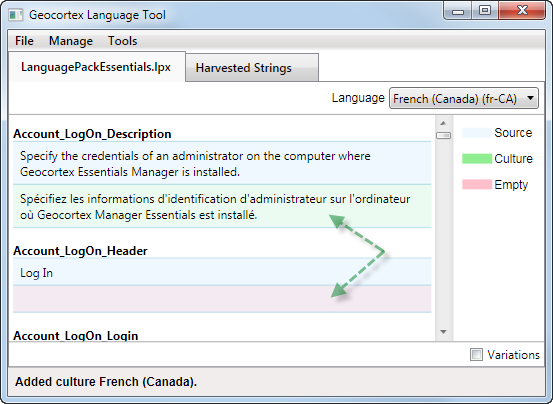
When you type or copy-and-paste a translated string into a pink row, it turns green to indicate that a translated string is present.
-
To add other languages, repeat steps 3 and 4 until you have added all the languages you require.
You view other languages by selecting them from the Language drop-down list. Only one language is listed at a time.
-
Click File | Save.
Change to a Right-to-Left Language in the Silverlight Viewer
If the target language is a right-to left language, then you need to change the configuration settings in the Viewer.Defaults.xml file in order for the viewer to display correctly. The direction of flow is set in the <Globals> element of the Viewer.Defaults.xml file using <Shell FlowDirection>.
Changing the language from right to left is done only in the Geocortex Viewer for Silverlight.
-
For left-to-right languages, use
<ShellFlowDirection Value="LeftToRight" /> -
For right-to-left languages, use
<ShellFlowDirection Value="RightToLeft" />
<Globals xmlns="http://www.geocortex.com/Viewer/Configuration/PreProcessor">
  <ShellFlowDirection Value="RightToLeft" />
</Globals>
Export a Language File to a Spreadsheet
Although you can translate strings directly in the Language Tool, it is more likely that you will send the strings to a translator or through a translation database. To separate the strings for a particular language from the language pack, you export it to an Excel spreadsheet that can be emailed or imported into translation software.
Once the strings in a particular spreadsheet are translated, it is imported back into the Language Tool and merged into the original LPX or XAP file.
Before you export a language to a spreadsheet, you must add that language to the language pack (LPX or XAP).
To export a language from a language pack to a spreadsheet:
-
Open the language pack in the Language Tool, and ensure that all the language is added to the file.
-
From the Language drop-down list, select the language you want to export.
-
Click File | Export Spreadsheet.
The suggested File name of the spreadsheet includes the language code of the language you selected.
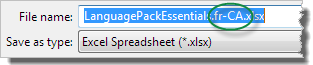
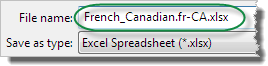
To make it easier to identify returned spreadsheets, you may want to rename the file:
-
To view the spreadsheet, open the file in Excel.
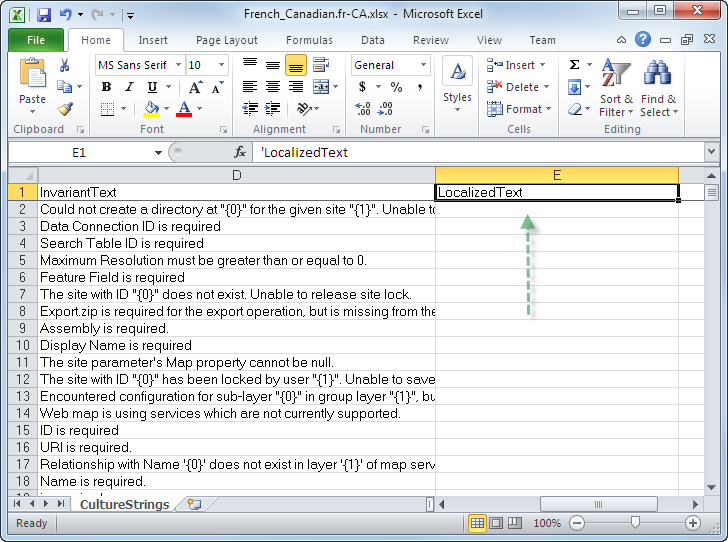
Spreadsheet with column for translation
The spreadsheet displays a list of each string with a Localized Text column for the translated strings. The translated strings should be inserted in this column for importation back into the application or the viewer.
Import the Translated Strings from a Spreadsheet
Once a language spreadsheet is translated, you can import it back into the language pack in the Language Tool. If the original language pack —LPX or XAP—is open in the Language Tool when you import the spreadsheet, the application recognizes the translated spreadsheet and displays the Merge dialog box so that you can incorporate the translated strings into the LPX file directly.
When you save the merged language pack, a browser with the target language set as the default, displays the translated strings in Manager.
To import and merge a language spreadsheet:
-
In the Language Tool, open the original LPX or XAP file that you used to export the spreadsheet.
The original spreadsheet already has the correct language added to it but you can use a new LPX or XAP file if you add the target language before you import the translated spreadsheet.

-
To import the translated spreadsheet, click File | Import Spreadsheet.
-
In the Open dialog, navigate to the location of the translated spreadsheet.
-
Select the spreadsheet, and then click Open.
If the original LPX file is open, you are prompted to merge the spreadsheet.
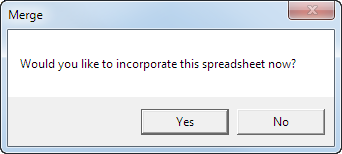
-
Click Yes to merge the translated strings into the original language pack.
The status bar indicates that the translated spreadsheet (
.xlsx) has been merged into the language pack (.lpxor.xap) but the translated language is not visible.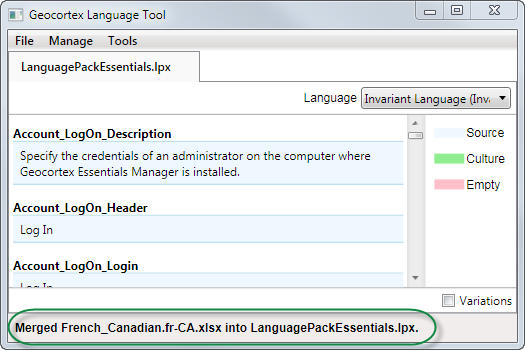
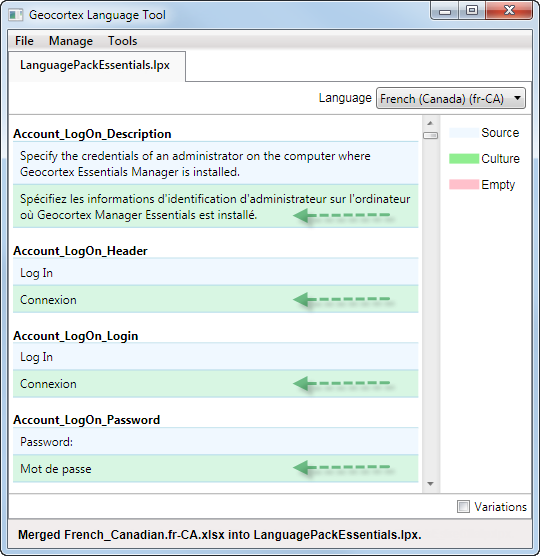
-
To view the translated strings, select the translated language from the Language drop-down list.
The pink empty rows have been replaced with green to indicate translated strings are present.
-
Click File | Save to save the translated LPX or XAP file.
It is important to save LPX files to the
binfolder of the correct instance of Manager as that is where the application looks for it.
It is important to save XAP files to theClientBinfolder of the correct instance of the Geocortex Viewer for Silverlight as that is where the viewer looks for it.
See also...
Change Language Settings for a Silverlight Viewer
Change to a Right-to-Left Language in the Silverlight Viewer
View the Translated Application
To see the translated version of Manager or the Geocortex Viewer for Silverlight, you need to change the default language of the browser to the target language. Alternatively, for the Silverlight Viewer only, you can set the language in the Viewer.html file.
The procedure to set the default language of browsers is different for each type of browser. In some cases, you first add the language, and then set it as the default or top language to use.
The links below give instructions for changing the default language settings of several browsers:
When you have changed the default settings of the browser to the target language and you refresh Manager or Geocortex Viewer for Silverlight, the translated strings replace the text in the application or viewer. You can then test the translated software.
See also...
Change Language Settings for a Silverlight Viewer
Change to a Right-to-Left Language in the Silverlight Viewer
Change Language Settings for a Silverlight Viewer
Before the viewer will display the new language, you need to change the language in the browser settings. Alternatively, for the Silverlight Viewer only, you can set the language in the Viewer.html file.
If you have the correct language selected in the browser settings, any changes saved directly to XAP file are visible as soon as you save the file in the Language Tool and refresh your browser.
The steps to change language settings are different for each browser. For instructions, refer to the browser's documentation.
When a list of language preferences is selected in the browser, it sends this list of languages with each content request so the server can decide how best to handle the request. If the content on the server is available in one of the languages in the list of language preferences, the content is displayed in that language.
Set the Language in the Viewer.html
The parameter for changing the language in the Viewer.html file is param name="uiculture" value="es-ES". The language is set using the two-letter language code for that language.
In this example, and the code snippet below, es-ES is the two-letter language code for Spanish. Replace the two-letter code for Spanish with the two-letter code of the language you want to display in your viewer.
Example Configuration
</head>
<body>
  <form id="form1" runat="server" style="height:100%; width: 100%;">
    <div id="silverlightControlHost">
      <object data="data:application/x-silverlight-2," type="application/x-silverlight-2" width="100%" height="100%">
        <param name="source" value="ClientBin/Geocortex.EssentialsSilverlightViewer.Viewer.xap"/>
        <param name="splashscreensource" value="ClientBin/SplashScreen.xaml"/>
        <param name="onSourceDownloadProgressChanged" value="onSourceDownloadProgressChanged" />
        <param name="onError" value="onSilverlightError" />
        <param name="onLoad" value="onSilverlightPluginLoaded" />
        <param name="background" value="white" />
        <param name="uiculture" value="es-ES" />
        <param name="minRuntimeVersion" value="4.0.50401.0" />
        <param name="autoUpgrade" value="true" />
        <param name="Windowless" value="false" />
        <a href="http://go.microsoft.com/fwlink/?LinkID=149156&v=4.0.50401.0" style="text-decoration:none">
        <img src="http://go.microsoft.com/fwlink/?LinkId=161376" alt="Get Microsoft Silverlight" style="border-style:none"/>
        </a>
      </object>
    <iframe id="_sl_historyFrame" style="visibility:hidden;height:0px;width:0px;border:0px">
    </iframe>
   </div>
  </form>
 </body>
</html>
When you change the language in the Viewer.html file, this changes the language for all the users of this site.