Data Connections
Data connections contain the information that Geocortex Essentials needs to connect to the data provider, execute commands, and retrieve data from external data sources. A data connection links Essentials to an RDBMS (relational database management system), such as SQL Server, Oracle, Excel spreadsheets, or Microsoft Access. Essentials uses ADO.NET providers to perform all linking operations.
Data connections enable the following functionality on your site:
-
Data Links: Data links associate data from an RDBMS to a layer and can be viewed from within selected feature's details.
-
Search Tables: Search tables allow users to use Global Search to find non-spatial data from an RDBMS.
You must configure a data connection if you want to use data links or search tables in your site. Data connections are configured on Manager's Data Connections page. To open the Data Connections page, edit the site and click Data Connections in the side panel.
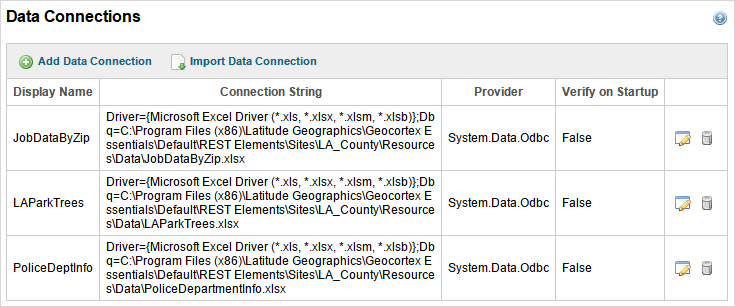
Data Connections listed on Manager's Data Connections page
Supported Data Providers
Essentials uses ADO.NET providers to perform all linking operations. While you can use an ADO.NET provider of your choice, Geocortex Essentials supports the following data providers:
-
ODBC connections to the following types of file:
-
Microsoft Excel (
.xls,.xlsx)The Excel file must:
-
Define a name for the range of all cells to use, including the column headings.
-
Avoid naming the cell range after a reserved keyword, such as
Database.
When you add a Data Link, the Data Table refers to this named cell range, not the worksheet name. An Excel file lacking the above may result in an error or missing column names in Essentials. To define a named cell range in Excel, see Define a name for a cell or cell range on a worksheet.
-
-
Comma-Separated Values (
.csv) -
Microsoft Access (
.mdb) -
dBase (
.db) -
OLE DB
-
-
Oracle Client
-
SQL Client
-
SQL Server CE
Connection Strings
The key piece of information to configure in a data connection is the connection string, which contains the information needed to create a connection to the data provider. The syntax of the connection string depends on which ADO.NET provider you use. Essentials attempts to connect using the connection string in the exact form that you configure it, without interpreting or parsing it. Therefore, it is important to consult the data provider's documentation to find out how to create the connection string. Another useful resource is The Connection String Reference at http://www.connectionstrings.com, which provides examples of the connection strings for numerous different providers.
To ensure you have entered the connection string correctly, use the Test Connection function provided by Geocortex Essentials Manager. When you click the Test button, Manager attempts to connect to the data provider using the connection string you have configured. If the connection is successfully established, Manager displays a Success message. If the connection fails, a Connection Failed message is displayed.
Impersonation in Data Connections
By default, Essentials accesses secured data sources using application credentials, which you configure in the connection string. Impersonation occurs when an application makes a request as a user instead of as the application—the application acts like the user.
You can configure Essentials to impersonate the connected user when connecting to a data connection. For Essentials to use impersonation:
-
The site must be secured using Integrated Windows Authentication and Windows impersonation must be enabled.
-
The external data source must be secured using Integrated Windows Authentication.
-
The connection string defined in the data connection must indicate that connections are to be made using Integrated Windows Authentication.
-
Impersonation must be enabled for the data connection.
To enable impersonation, edit the data connection and set Act Like to Connected Windows User.
Add a Data Connection
You can add the following types of data connection:
Add an ODBC Connection
ODBC connections are used to connect to file-based data providers. Geocortex Essentials supports the following file-based providers:
-
Microsoft Excel (
.xls,.xlsx) -
Comma-Separated Values (
.csv) -
Microsoft Access (
.mdb) -
dBase (
.db)
In order for Essentials to access an ODBC data file, the file must reside in your Sites folder or one of its subfolders. You can either copy the file to the Sites folder before you create the data connection, or you can use Manager's Upload function to copy the file over when you configure the connection.
When adding an ODBC connection, you are asked to choose between the Basic and Advanced methods of configuring the connection. If you choose the Basic option, Essentials creates the connection string for you. The Basic connection string uses the MS Access (*.mdb) driver. The DBQ is the path to the database file. When you use the Basic option, all you have to do is browse to the MDB file so Manager knows the path and file name to specify as the DBQ.
Choose the Advanced option if:
-
The connection is specified in a system DSN or file DSN.
-
You want to select a different ODBC driver.
-
You want to specify connection options in the connection string.
You can edit the connection string at any time after the data connection is created.
To add an ODBC connection:
-
In
-
Click Add Data Connection.
The Create Data Connection wizard opens.
-
Type a display name for the data connection.
-
Select ODBC as the data provider.
-
If you want Essentials to test the connection whenever the site loads, select the Verify on startup checkbox.
-
Click Next.
-
Configure the connection string:
The Basic option creates the connection string for you. Select the Advanced option if you want to select a particular driver, specify a DSN, or specify options in the connection string.
Basic
-
With Basic selected, select ODBC.
-
Click Next.
-
If the database file is already in the Sites folder, browse to the file and select it.
If the database file is located outside the Sites folder, upload the file.
-
Click Finish.
The wizard closes and the data connection appears on the Data Connections page.
Advanced
-
Select Advanced and follow the instructions that apply to you:
DSN
-
Select Choose a DSN, and then click Next.
-
Select the DSN from the list, and then click Finish.
The wizard closes and the data connection appears on the Data Connections page.
ODBC Driver
-
Select Choose an ODBC driver, and then click Next.
-
Select the driver from the list, and then click Next.
-
If the database file is already in the Sites folder, browse to the file and select it.
If the database file is located outside the Sites folder, upload the file.
-
Click Finish.
The wizard closes and the data connection appears on the Data Connections page.
Connection String
-
Select Specify a connection string, and then click Next.
-
Type in the connections string.
-
Test the connection.
-
Click Finish.
The wizard closes and the data connection appears on the Data Connections page.
-
-
-
Click Save Site.
Additional configuration settings are available once the data connection has been created. For information, see Edit a Data Connection.
Add an OLE DB Connection
To add an OLE DB data connection:
-
In
-
Click Add Data Connection.
The Create Data Connection wizard opens.
-
Type a display name for the data connection.
-
Select OLE DB as the data provider.
-
If you want Essentials to test the connection whenever the site loads, select the Verify on startup checkbox.
-
Click Next.
-
Type in the connection string.
-
Test the connection.
-
Click Finish.
The wizard closes and the data connection appears on the Data Connections page.
-
Click Save Site.
Additional configuration settings are available once the data connection has been created. For information, see Edit a Data Connection.
Add a SQL Client Connection
To add a SQL Client data connection:
-
In
-
Click Add Data Connection.
The Create Data Connection wizard opens.
-
Type a display name for the data connection.
-
Select SQL Client as the data provider.
-
If you want Essentials to test the connection whenever the site loads, select the Verify on startup checkbox.
-
Click Next.
-
Type the server name or click the Refresh Servers icon
 to select from a list of discovered servers.
 -
Select the authentication method:
-
Integrated Windows Authentication
-
SQL Server Authentication.
If you are using SQL Server Authentication, type the user name and password of a user configured in SQL Server.
-
-
Test the connection.
-
Click Finish.
The wizard closes and the data connection appears on the Data Connections page.
-
Click Save Site.
Additional configuration settings are available once the data connection has been created. For information, see Edit a Data Connection.
Add a SQL Server CE Connection
To add a SQL Server CE data connection:
-
In
-
Click Add Data Connection.
The Create Data Connection wizard opens.
-
Type a display name for the data connection.
-
Select SQL Server CE as the data provider.
-
If you want Essentials to test the connection whenever the site loads, select the Verify on startup checkbox.
-
Click Next.
-
Type in the connections string.
-
Test the connection.
-
Click Finish.
The wizard closes and the data connection appears on the Data Connections page.
-
Click Save Site.
Additional configuration settings are available once the data connection has been created. For information, see Edit a Data Connection.
Add an Oracle Client Connection
Before you can add an Oracle data connection, you must first have the Oracle Instant Client software installed on the server hosting Essentials.
To add an Oracle Client data connection:
-
In
-
Click Add Data Connection.
The Create Data Connection wizard opens.
-
Type a display name for the data connection.
-
Select Oracle Client as the data provider.
-
If you want Essentials to test the connection whenever the site loads, select the Verify on startup checkbox.
-
Click Next.
-
Configure the connection string:
The Basic option creates the connection string for you. Select the Advanced option if you want to manually specify a connection string.
Basic
-
Select Basic.
-
Enter at least the following:
-
Server name: The name or IP address of the machine running the Oracle database that you wish to connect to.
-
Instance: The name of the Oracle database instance to connect to.
-
User name: The name of the user to connect as.
-
Password: The password for that user.
You can also enter the port number that the Oracle server is listening on. If you do not specify a port, the default port of 1521 is used.
-
Advanced
-
Select Advanced.
-
Enter the full connection string to use for the connection. For example:
Data Source=[YourDataSource];User Id=[UserName];Password=[Password];
-
-
Test the connection.
-
Click Finish.
The wizard closes and the data connection appears on the Data Connections page.
-
Click Save Site.
Additional configuration settings are available once the data connection has been created. For information, see Edit a Data Connection.
Data Connection Settings
Data connections have the following settings:
-
Display Name: The data connection's display name.
-
Data Source Type: The data connection's provider name.
-
Connection String: The data connection's string.
The syntax of the connection string depends on which ADO.NET provider your data uses. For information, see Connection Strings.
-
Connection String Name: The name of the connection string. This setting is optional.
-
Test Connection on Startup: If this checkbox is selected, the data connection is tested on startup.
-
Act Like: Selects the impersonation behavior. For information, see Impersonation in Data Connections.
-
SQL Dialect: Select the SQL dialect used.
-
Error Action: Choose how to handle errors with the data connection.
Edit a Data Connection
To edit a data connection:
-
In
-
Click the Edit icon
 beside the data connection that you want to edit.
 -
Configure the data connection's settings.
-
Click Apply Changes.