The Layer List
The Layer List is a list of map services and layers, which is displayed in viewers.
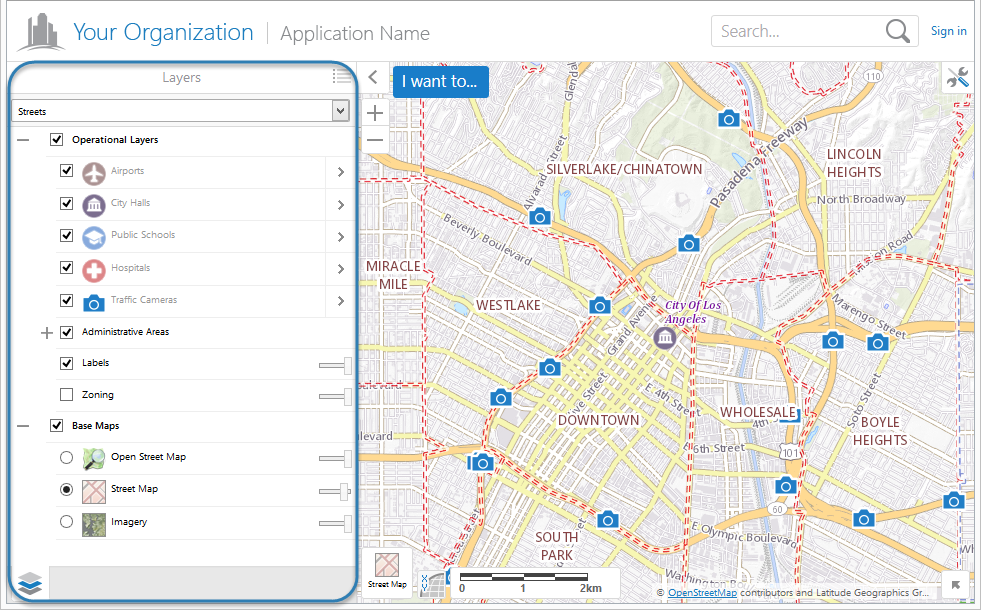
Example of the Layer List, shown in an HTML5 viewer
One of the main functions of the Layer List is to enable end users to turn layers on and off, in other words, control the visibility of layers. When a layer is turned off, it does not show on the map.
The Layer List also has other functions associated with it, like zooming the map to the layer's visible scale or adjusting the transparency of layers. The particular functions that are available for a particular layer depend on the type of layer.
You can configure settings for multiple layers at one time in the Layer List. See Batch Edit a Layer's Settings for information.
About Layer List Configuration
The Layer List is configurable. You can specify which map services and layers to include in the Layer List, organize them into folders, and reorder them. By default, the Layer List contains all of the map services that you have added to the map, in the same order that they appear on the Map page's Map Services tab.
Usually, when you add a new map service to the map, it automatically appears in the Layer List. If you have changed the order extensively, Manager may not know where to add the new map service. In this case, you can manually include the map service in the Layer List.
Behavior of Map Service Types in the Layer List
Some types of layers and map services look and behave differently in the Layer List than on the Map Services tab. It is important to understand the differences:
-
Dynamic Services: Dynamic map services appear as folders in the Layer List.
-
Tiled Services: By default, the layers in a tiled map service do not appear in the Layer List—only the map service appears. You can include the layers in the Layer List if you want. You can re-order tiled layers within the map service that they belong to. You cannot move the layers out of the map service.
You can add other items such as folders to a tiled map service.
-
Feature Layers: Only the layer component of a feature layer appears in the Layer List—the map service component does not appear in the Layer List. You cannot include the service component in the Layer List. This means that, to configure the service component, you must go to the Map Services tab.
-
Group Layers: Group layers appear as folders in the Layer List. You can move the group layer's sublayers out of the group layer's folder if you want, and you can move other items in.
-
Annotation Layers: Annotation layers look and behave the same in the Layer List as on the Map Services tab.
-
Raster Layers: Raster layers look and behave the same in the Layer List as on the Map Services tab.
-
Image Services: Image services look and behave the same in the Layer List as on the Map Services tab.
-
Web Tiled Layers: Web tiled layers look and behave the same in the Layer List as on the Map Services tab.
-
Bing Maps: Bing Maps look and behave the same in the Layer List as on the Map Services tab.
-
KML Layers: KML Layers look and behave the same in the Layer List as on the Map Services tab.
-
GeoRSS Layers: GeoRSS layers look and behave the same in the Layer List as on the Map Services tab.
You can configure different views of the Layer List called layer themes. For information, see Layer Themes.
Folders in the Layer List
Organizing layers into folders makes it easier for end users to find layers in the Layer List, especially if the Layer List is large. You can configure the contents of the Layer List from the Map page in Manager.
You can mix layers of different types and different map services within a single folder. You can nest folders within other folders, and you can configure folders to be hidden in the Layer List or be the folder where user-added layers are added.
A folder in the Layer List being edited on the Map page in Manager
In a viewer, folders look like any other item in the Layer List. Like layers and map services, folders have a visibility checkbox that the user can use to show and hide the folder's layers and map services on the map. You can configure a folder's default visibility in Manager, just as you would configure the default visibility for a layer or map service.
To appear in viewers, a folder must contain at least one item. If a folder is empty, viewers do not display the folder in the Layer List.
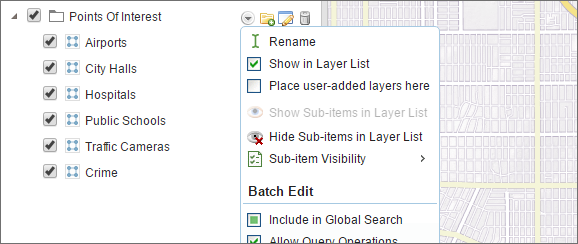
Folder Settings
Folders in the Layer List have the following settings:
-
Rename: Opens a dialog and allows you to rename an existing folder.
-
Show in Layer List: Select this checkbox to show the folder in the Layer List in viewers.
-
Place user-added layers here: Select this checkbox to show user-added layers in this folder when layers are added in the viewer. You can only configure this setting for one folder at a time.
We recommend that you only configure a visible, top-level folder to be where user-added layers are placed. This ensures that end users can find the list of user-added layers easily.
-
Show Sub-items in Layer List: Shows folder contents in the viewer.
-
Hide Sub-items in Layer List: Hides folder contents in the viewer.
-
Sub-item Visibility: Set how folder sub-items are visible in the viewer's Layer List. For example, if you select Only One Visible at a Time, only one layer can be selected and viewed at a time.

Sub-item visibility configured to Only One Visible at a Time (left) and Multiple Visible at a Time (right)
Configure the Layer List
You can customize the Layer List. Specifically, you can:
-
Configure which map services and layers appear in the Layer List.
-
Organize map services and layers into folders with meaningful names.
-
Change the order of map services and layers in the Layer List.
-
Change the display names of map services and layers.
-
Change the names of folders.
-
Configure a folder icon.
-
Configure whether more than one of a folder's items can be visible at a time.
-
Hide a folder's items, or hide the folder and its items.
If you are not satisfied with how you have customized the Layer List, you can reset the Layer List to its default configuration.
The Layer List is configured on the Layer List tab on Manager's Map page.
To navigate to the Layer List tab:
-
In
To customize the Layer List:
Exclude a Layer or Map Service from the Layer List
To exclude a layer or map service from the Layer List:
-
Click the Remove from Layer List icon
 next to the layer or map service.
You can re-include layers and map services that you have excluded from the Layer List.
Excluding a layer or map service from the Layer List does not remove it from the map.
Re-Include Layers that were Previously Excluded
-
Click the Include Layers and Map Services icon
 from Layer List toolbar on the Layer List tab.
 -
In the Excluded Items column, click and hold the item that you want to re-include in the Layer List.
Layers and map services that are already included in the Layer List appear gray in the Excluded Items column. A layer can only appear once in the Layer List.
-
Drag the item from the Excluded Items column to the Layer List column.
A guideline shows you where the item will be placed when you release the mouse button. If a guideline does not appear, you cannot place the item there.
-
When the guideline is in the desired position, release the mouse button.
-
Click Close when you are finished.
Change the Display Name for a Layer or Map Service
You can also rename layers and map services by clicking the drop-down menu icon ![]() for that item and clicking Rename.
for that item and clicking Rename.
To change the display name for a layer or map service:
-
Double-click the name of the layer or map service that you want to change.
-
Edit the name, or enter a new name.
-
Press the Enter key, or click away from the name.
Re-Order the Layer List
-
Click and hold a layer, map service, or folder that you want to move.
-
Drag the item to its new position.
A guideline shows you where the item will be placed when you release the mouse button. If a guideline does not appear, you cannot place the item there.
-
Release the mouse button.
Create a New Folder
-
Click Add Folder.
The Add Folder item appears in two locations on the Layer List tab. If you click Add Folder next to an existing item in the Layer List, the new folder is nested within that item. If you click the Add Folder button in the Layer List toolbar, the new folder is added to the root of the Layer List.
-
Enter a name for the folder.
-
Press the Enter key, or click away from the folder's name.
After you add a folder, you can drag it to a new position in the Layer List if you want.
Configure a Folder Icon
The icon that you configure appears to the left of the folder name in the Layer List.
-
Click Edit
 next to the folder.
 -
In the Folder Icon URI text field, enter the full path to the icon's image file, or click Browse to browse to the file.
-
Click Apply Changes.
-
Click Map in the side panel to return to the Layer List.
Place Items in a Folder
-
Click and hold a layer, map service, or folder that you want to place in a folder.
-
Drag the item to the folder and release the mouse button.
The Layer List prevents you from moving items to an invalid location.
Configure a Folder's Default Visibility
If you hide the folder in the Layer List, end users will not be able to change the folder's visibility.
-
Do one of the following:
-
To turn on the folder's default visibility, select the checkbox to the right of the folder in the Layer List.
-
To turn off the folder's by default, clear the checkbox to the right of the folder in the Layer List.
-
Configure the Visibility Behavior of a Folder's Items
This controls how many of the folder's items can be visible at one time.
-
Click the drop-down menu icon
 beside the folder.
 -
Select Sub-item Visibility.
-
Choose the behavior that you want:
-
Multiple Visible at a Time: The visibility of the folder items is controlled using checkboxes. This allows users to turn on as many of the folder's items as desired.
-
Only One Visible at a Time: The visibility of the folder items is controlled using radio buttons. Users can only turn on one item at a time.
If the folder contains items that belong to a basemap group and you set the behavior to Only One Visible at a Time, the slider will snap from one basemap to the next instead of transitioning smoothly.
-
Hide a Folder's Items in the Layer List
This controls whether the folder's items show in the Layer List. However, it does not affect the visibility of the items on the map.
When you hide a folder's items and at least one of the items has an opacity slider, then the folder will have an opacity slider that controls the opacity of the folder's items. The folder's opacity slider preserves the ratio of the opacities of the hidden items. For example, if the folder contains two layers, one with its opacity set to 25% and the other with its opacity set to 60%, decreasing the folder's opacity by 50% would decrease the opacity of the individual map services by 50% each, to 12.5% and 30% respectively.
-
Click the drop-down menu icon
beside the folder. -
Select Hide Sub-items in Layer List.
Hide a Folder and its Items in the Layer List
This controls whether the folder and its items show in the Layer List—it does not affect the visibility of the items on the map.
-
Click the drop-down menu icon
beside the folder. -
Select the Show in Layer List checkbox.
Expand/Collapse a Folder by Default
If a folder is expanded on the Layer List tab when you save the site, it will appear expanded in the viewer by default. If a folder is collapsed, it will appear collapsed by default.
-
Click the Expand icon
 to expand an individual folder.
 Click the Collapse icon
 to collapse an individual folder.
Alternatively, use the Expand icon
 and Collapse icon
  to show or hide all of the folders at one time.
Change a Folder's Name
You can also rename folders by opening the folder's drop-down menu ![]() and selecting Rename, or by editing the folder and changing the Display Name setting.
and selecting Rename, or by editing the folder and changing the Display Name setting.
-
Double-click the folder's name that you want to change.
-
Edit the name, or type a new name.
-
Press Enter, or click away from the name.
Remove a Folder and All of its Contents
-
Click Remove from Layer List
next to the folder. -
Select Remove Item and All Sub-Items.
Remove a Folder, but Keep its Contents
This moves the folder's items to the left one level and removes the folder.
-
Click Remove from Layer List
next to the folder. -
Select Remove Item and Keep Sub-Items.
Reset the Layer List
By default, the Layer List contains all the layers and map services that you have added to the map, in the same order that they appear on the Map Services tab. If you upgraded the site from an older version of Essentials, the default Layer List configuration is the configuration that was carried forward when you upgraded Essentials.
You don't need to reset the layer list to include any new layers added to your underlying map services, simply edit the site and include the new layers.
To reset the Layer List to its default configuration:
If you reset the Layer List, you will lose all the customization that you have done.
-
In
-
Click Reset
 at the top of the Layer List tab.
You are prompted to confirm.
-
Click OK.
-
Click Apply Changes.
See also...