Configure Layers
Ways to Configure a Layer's Settings
Manager offers several ways to configure a layer's settings:
-
Edit the layer: This method gives you access to all of the layer's settings.
-
Use the Layer's Drop-Down Menu: Use the layer's drop-down menu on the Layer List tab or the Map Services tab to configure settings for that layer. This method gives you access to a subset of the layer's settings. The particular settings depend on the type of layer.
-
Batch Edit the Layer's Settings: Use a folder or service's drop-down menu to edit the settings for all the layers in that folder or service. This method gives you access to a subset of layer settings, for multiple layers. The particular settings depend on the type of layer.
The different places in Manager where you can change settings are synchronized. If you change a setting in one place, it is automatically changed everywhere else that you can change it.
Edit a Layer
To edit a layer:
-
-
Click Map in the side panel.
-
Click the Map Services tab.
If the layer is in the Layer List, you can also edit the layer from the Layer List tab.
-
Click the Expand icon
 beside the map service that the layer belongs to.
The map service's layers show.
-
Locate the layer that you want to configure and click the Edit icon
 beside the layer.
Make sure you are editing a layer, not a map service. The tool tip should say Edit Layer.
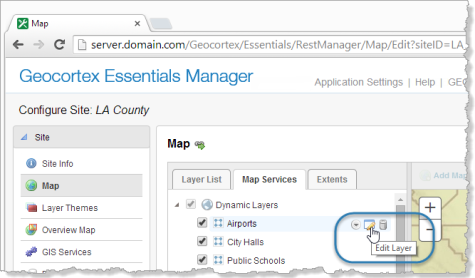
Edit Layer icon for the Airports layer
The layer opens for editing.
Layer settings are organized into tabs. The specific tabs and settings depend on the type of layer.
Use the Layer's Drop-Down Menu
To change the settings for a single layer using the layer's drop-down menu:
-
In
If the layer is in the Layer List, you can also use the layer's drop-down menu on the Layer List tab.
-
Position the pointer over the layer that you want to configure.
The management tools show.
-
Click the down arrow
 .
.The menu opens.
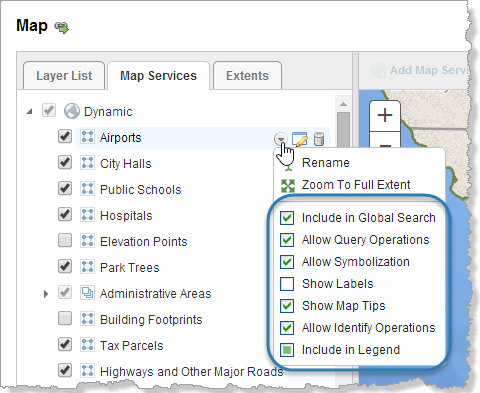
Settings for the Airports layer
-
Select or clear the checkbox beside the setting that you want to configure.
If the setting that you want to configure is not in the menu, you must edit the layer to configure that setting.
-
Repeat these steps to configure as many of the settings as you want.
-
Click Apply Changes.
Batch Edit a Layer's Settings
Batch editing enables you to configure settings for all the layers in a map service or folder at one time.
Batch Edit the Settings for All the Layers in a Map Service
Batch editing overwrites the existing configuration for every layer in the folder or service. The only way to restore the previous configuration after you click Apply Changes is to individually reconfigure each setting in each layer.
To batch edit the settings for all the layers in a map service:
-
In
-
Position the pointer over the map service whose layers you want to configure.
The management tools show.
-
Click the down arrow
.The menu opens.
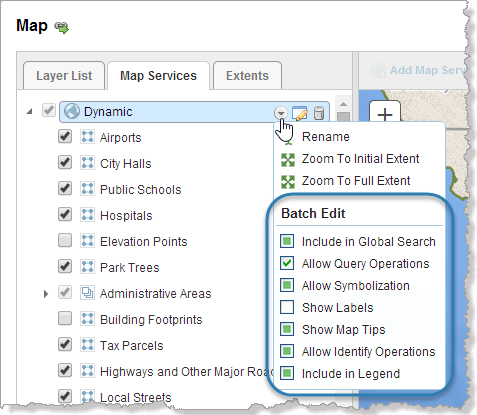
Common settings for all the layers in the Dynamic map service
A selected checkbox
 means that the setting is enabled for all the layers in the map service.
 A cleared checkbox
 means that the setting is disabled for all the layers.
 If the setting is enabled for some layers and disabled for others, the checkbox looks like this:
 .
. -
Select or clear the checkbox beside the setting that you want to configure.
-
Repeat these steps to configure as many of the settings as you want.
-
Click Apply Changes.
Batch Edit the Settings for All the Layers in a Folder
Batch editing overwrites the existing configuration for every layer in the folder or service. The only way to restore the previous configuration after you click Apply Changes is to individually reconfigure each setting in each layer.
To batch edit the settings for all the layers in a folder:
Batch editing applies to all the layers in the folder, regardless of how deeply nested the layers are.
-
In
-
Position the pointer over the folder whose layers you want to configure.
The management tools show.
-
Click the down arrow
.The menu opens.
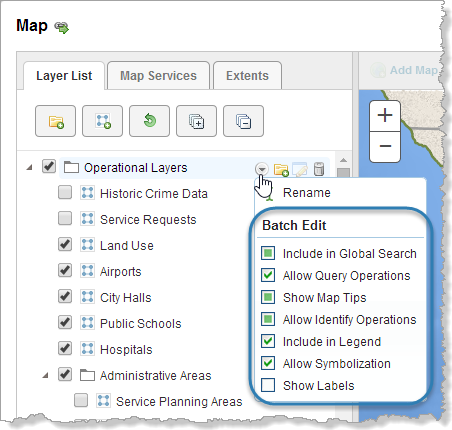
Common settings for all the layers in the Operational Layers folder
A selected checkbox
means that the setting is enabled for all the layers in the map service.A cleared checkbox
means that the setting is disabled for all the layers. If the setting is enabled for some layers and disabled for others, the checkbox looks like this:
. -
Select or clear the checkbox beside the setting that you want to configure.
-
Repeat these steps to configure as many of the settings as you want.
-
Click Apply Changes.
Layer Settings
To configure layer settings, use one of the methods described in Ways to Configure a Layer's Settings.
Layer settings are organized into tabs. The specific tabs that are available for a layer depend on the type of layer. To find out about the settings on a particular tab, click the tab's link in the list below. You can also configure the settings for group layers.
The layer tabs are:
-
Details Tab: See Details Tab for Layers.
-
Data Links Tab: See Data Links.
-
Relationships Tab: See Relationships.
-
Reports Tab: See Reporting.
-
Feature Maps Tab: See Feature Maps.
-
Layer Hyperlinks Tab: See Layer Hyperlinks.
-
Feature Hyperlinks Tab: See Feature Hyperlinks.
-
Fields Tab: See Fields.
-
Charts Tab: See Charting.
-
Styles Tab: See Symbolization.
-
Arcade Expressions Tab: See Arcade Expressions.
Details Tab for Layers
The specific settings that appear depend on the type of layer.
Layers have the following settings on the Details tab:
-
Map Service: The map service that the layer belongs to. When you add a map service to a site, all the map service's layers are added to the site.
-
Layer Name: The name of the layer in the map service. By default, this is the name used in Manager and in the viewer. You can override this name using the Display Name setting.
-
Layer ID: The layer's ID in the REST API. The ID is used to access the layer programmatically, for example, in a workflow, URL parameter, or custom-developed functionality.
-
Feature Type: The type of geometry that features in this layer have—polygon, polyline, or point.
-
Visible: When this checkbox is selected, the layer is initially turned on in the viewer, in other words, its visibility checkbox in the Layer List is selected. Users will be able to see the layer in the map image, provided the map is zoomed to a scale at which the layer's features can be seen. For example, parcels cannot be seen when the map is zoomed out very far, even though the Parcels layer is turned on.
A quicker method of setting a layer's default visibility uses the layer's visibility checkbox on Manager's Map page. See Configure a Layer's Default Visibility for instructions.
-
Display Name: The name to use for the layer in Manager and in the viewer. For example, a layer called ZIP in the map service could appear as Zip/Postal Code in Manager and the viewer.
If you leave the Display Name box blank, the name is inherited from the map service.
You can also define display names for a layer's fields.
-
Description: A description of the layer, to use as layer metadata. This overrides the layer description that is configured in the underlying map service, if there is one.
-
Dynamic Definition: The JSON code that identifies a dynamic layer and controls the appearance of the symbols that represent this layer on the map.
-
Layer Icon URI: The URI of the icon that is used to represent the layer in viewers. The icon appears in the feature details. The URI can contain client replacement tokens.
-
Style: The style to select for a WMS layer, if the layer has styles configured for it.
-
Feature Label: The text to display in the viewer to identify the feature. The feature label is used like a title—it appears at the top of feature details and in the title of map tips.
You can use field tokens in the Feature Label box. Click Edit to select from a list of available tokens.
You can also use HTML markup in the Feature Label.
-
Feature Description: The text to display in the list of search or identify results. The Feature Description box can contain HTML markup that contains field tokens, object tokens, and hyperlinked viewer commands. Click Edit to open a Rich Text Editor that creates HTML markup. See Feature Descriptions for more information.
-
Feature Long Description: The text to display in map tips and feature details. The Feature Long Description box can contain HTML markup that contains field tokens, object tokens, and hyperlinked viewer commands. Click Edit to open a Rich Text Editor that creates HTML markup. See Feature Descriptions for more information.
-
Feature Zoom Factor: (polygon and polyline layers only) The factor to zoom in by when the user zooms to a feature on this layer. The smaller the zoom factor, the closer in to the feature you zoom. The larger the number, the farther out from the feature you zoom. At a zoom factor of 1, the feature touches the edges of the map viewport.
-
Feature Zoom Scale: The scale to display the feature at when the user zooms to the feature. The scale is expressed as an integer, specifically, the scale's second term. For example, if you want the map to zoom to 1:20,000 when the user zooms to a feature on this layer, enter 20000 in the Feature Zoom Scale box.
For polygon and polyline layers, you can use the Feature Zoom Factor or the Feature Zoom Scale setting (or neither), but not both.
-
Feature Border Color: The border color used to highlight the features of a layer. The highlight outlines the feature on the map when the user hovers the pointer over the feature in the Results list, hovers the pointer over the feature on the map to display its map tip, or adds a feature to their selection.
You can enter a web color, a 6-digit hexadecimal color, or an 8-digit ARGB hexadecimal color with the alpha value at the beginning. For example, to make the fill blue, you can enter blue or #0000FF or #FF0000FF. This setting takes precedence over the viewer's highlight settings.
-
Feature Border Width: The width of the border of the highlight that outlines a feature on the map. Type in the number of pixels wide to display the polygon border or line width when a feature is highlighted. This setting takes precedence over the viewer's highlight settings.
-
Feature Fill Color: For polygon layers only. The fill color used to highlight the features of a layer. The highlight color that fills the feature on the map when the user hovers the pointer over the feature in the Results list, hovers the pointer over the feature on the map to display its map tip, or adds a feature to their selection. You can enter a web color, a 6-digit hexadecimal color, or an 8-digit ARGB hexadecimal color with the alpha value at the beginning. For example, to make the fill turquoise, you can enter turquoise or #40E0D0 or #FF40E0D0. This setting takes precedence over the viewer's highlight settings.
-
(Default) Data Provider: The (Default) Data Provider is the type of data provider that you use to store feature data. This setting is used by the viewer. It enables the Query Builder and Filter Builder to construct queries using the correct syntax for your data provider.
You can configure this setting at the site level, the map service level, or the layer level.
-
At the site and map service level, the setting is called Default Data Provider.
-
At the layer level, the setting is called Data Provider.
Map services inherit the setting from the site, and layers inherit the setting from the map service that they belong to, or from the site if the setting is not configured at the map service level. For example, if all the site's services use the same data provider to store their feature data, you could configure the Default Data Provider at the site level. The map services and layers inherit the configuration. This saves you from having to configure the setting for every map service and layer in the site.
By default, the provider is Default. The Default provider uses the ANSI SQL default syntax. If the Default provider does not work in your system, delete Default from the Default Data Provider box to open a drop-down list of providers.
If the type of provider that you use appears in the list, select the provider. The Query and Filter Builders will use the well-known syntax for the provider that you select. If your provider does not appear in the list, re-enter Default in the Default Data Provider box, and configure the viewer's QueryBuilder Module.
If the map service only has one layer, the Default Data Provider setting is not available at the map service level. For example, feature services do not have a Default Data Provider setting, but feature layers do.
-
-
Include in Legend: When this checkbox is selected, the layer appears in the legend in print templates. If you do not want this layer included in print template legends, clear the Include in Legend checkbox. By default, layers are included in print template legends.
You can also configure this setting from the layer's
 drop-down menu on the Map page's Map Services tab. To open the Map page, click Map in the sidebar.
 -
Show Labels: When this checkbox is selected, the layer's labels show on the map, provided the layer has labels defined and enabled in the map service. If you do not want the labels to show, clear the Show Labels checkbox.
-
Include in Global Search: When this checkbox is selected, the attributes of features in this layer are searched during global searches. If you do not want this layer's features to be searched when a global search is performed, clear the Include in Global Search checkbox. By default, layers are not included in global search operations.
You can also configure this setting from the layer's
drop-down menu on the Map page's Map Services tab. To open the Map page, click Map in the sidebar. -
Allow Identify Operations: When this checkbox is selected, features in this layer can be identified. If you do not want the user to be able to identify features in this layer, clear the Allow Identify Operations checkbox. By default, identify operations are not allowed.
You can also configure this setting from the layer's
drop-down menu on the Map page's Map Services tab. To open the Map page, click Map in the sidebar. -
Allow Query Operations: When this checkbox is selected, the attributes of the layer’s features are searched during queries. If you do not want this layer's features to be searched when a query is performed, clear the Allow Query Operations checkbox. By default, layers are included in query operations.
-
Allow Symbolization: When this checkbox is selected, users can symbolize the layer in the viewer. If you do not want users to be able to symbolize the layer, clear the Allow Symbolization checkbox.
You can set a default value for all the dynamic layers in this map service by configuring the Default Allow Symbolization setting on the map service's Details tab. To open the map service's Details tab, edit the map service.
To save configuration effort, first set the Default Allow Symbolization setting to the value most of the dynamic layers in this map service will have. Then you only need to configure the Allow Symbolization setting for the remaining dynamic layers.
-
Show Map Tips: When this checkbox is selected, map tips are enabled for this layer. You can also configure this setting from the layer's
drop-down menu on the Map page's Map Services tab. For information about additional map tips configuration, see Map Tips. -
Filter Workflow URI (static layers only): The URI of a workflow for filtering the layer's features. Use this setting to configure a layer filter workflow for a static layer. For dynamic layers, configure the layer filter workflow at the map service level. See Filter a Layer's Features for more information.
-
Features Can be Copied to Edit Layer (Silverlight Viewer only): Select this checkbox if you want to allow features from this layer to be copied to the edit layer; otherwise, clear this checkbox. For more information about the editing tools, download the Geocortex Viewer for Silverlight Administrator and Developer Guide from the VertiGIS Studio Support.
-
Allow Snapping: Select this checkbox if you want to allow snapping for features in this layer.
-
Snapping Enabled: Select this checkbox if you want snapping to apply to features in this layer by default.
Settings for Group Layers
The settings described below apply to the group layer only, not its sublayers. The settings for sublayers are the same as for other layers.
Group layers have the following settings:
-
Display Name: The name to use for the group layer in Manager and in the viewer. For example, a layer named "Streams” in the map service could appear as "Streams and Rivers" in Manager and the viewer.
If you leave the Display Name box blank, the name is inherited from the map service.
-
Map Service: (information only) The type of map service that the group layer belongs to.
-
Layer Name: (information only) The layer's name that is defined in the underlying map service.
-
Layer ID: (information only) The layer's ID in the REST API.
-
Layer Icon URI: The URI of the icon that is used to represent the group layer in viewers. The icon appears in the feature details. The URI can contain client replacement tokens.
Configure a Layer's Default Visibility
A layer's visibility setting controls whether the layer is initially turned on in the Layer List when the end user launches a viewer. A layer must be turned on in the Layer List for the user to be able to see the layer on the map. The layer only shows on the map if it is visible at the initial extent's zoom level. The user may have to zoom the map in or out to see the layer's features.
If you include a layer in the Layer List, the end user can change the layer's visibility. See Configure the Layer List for instructions.
To configure a layer's default visibility:
-
In
You cannot change the default visibility of group layers on the Map Services tab. Instead, click the Layer List tab and set the default visibility for the group layer's folder. You can set the default visibility for the group layer's sublayers on either tab.
For layers other than group layers, if the layer is included in the Layer List, you can also configure the layer's visibility on the Layer List tab, or you can edit the layer and set the Visible setting on the Details tab. When you change the visibility in one place, the change is reflected in the other places.
-
Configure the visibility:
-
On: To configure the layer to be turned on initially, select the checkbox to the left of the layer's name.
-
Off: To configure the layer to be turned off initially, clear the checkbox to the left of the layer's name.
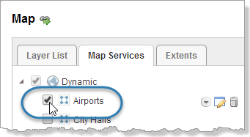
Set the initial visibility for the Airports layer
-
-
Click Apply Changes.
See Also...