Quick Start for Administrators
The Quick Start for Administrators describes two different ways to get started with Essentials:
-
Create and View a Simple Site: Create and deploy a simple web mapping application in Essentials.
-
Explore a Sample Site: Use the sample site that ships with Essentials to see how particular features are configured and then launch the viewer to see what the features look like to the end user.
These two approaches demonstrate different aspects of Essentials, so you may want to do both parts of the Quick Start. They are independent of each other, so the order that you do them does not matter.
The Quick Start uses public map services that are available on the Internet. This means that you can do the Quick Start without publishing any services yourself—all you need is an Internet connection.
Create your First Site
This part of the Quick Start shows you how to create and deploy a simple web mapping application in Geocortex Essentials. The site that you create will reference the ArcGIS Online web map of your choice. When you have finished, you can launch the application in a browser, navigate the map, identify and search for features, create markup, export the map, and more.
You can create the Quick Start site as a temporary practice site and delete it later, or you can use the site as the basis for a site that you plan to develop. You can expand and modify the site configuration at any time. This includes changing the map services and web maps that the site uses.
If you encounter a problem creating your site, refer to Manager's log files for possible causes. See File and Folder Locations for information on where to find the log files.
Create the Site
Creating a site in Essentials gives you a ready-to-use configuration for a web mapping application.
To create a site:
-
Launch Geocortex Essentials Manager. Follow the instructions that apply to you:
-
Windows Server 2012 or Windows 8, and Newer Versions:
On the Start screen, type Geocortex, and then click Geocortex Essentials Manager.
-
Windows Server 2008 or Windows 7:
In the Start menu, select All Programs | Latitude Geographics | Geocortex Essentials [Version] [Instance] | Geocortex Essentials Manager.
[Version] is the Essentials version number. [Instance] is the instance name, if Essentials is installed as a named instance. The default installation does not have an instance name.
Do not have more than one instance of Manager open at the same time.
-
-
If you are prompted to sign in, enter your user name and password.
Depending on how Essentials is configured in the Post Installer, you either sign in using an ArcGIS account or a Windows account.
-
Click the Sites tab. If a site is open for editing, click Save Site, and then click Close Site.
The Sites tab displays site names in a List View format or a Tiled View format.
-
Click Add New Site.
-
Type a display name for your site, for example Quick Start, and then click Next.
-
Select Reference a web map from ArcGIS Online or Portal for ArcGIS, and then click Next.
-
Type a search term, for example, hurricane.
The search results start to display while you are typing the search term.
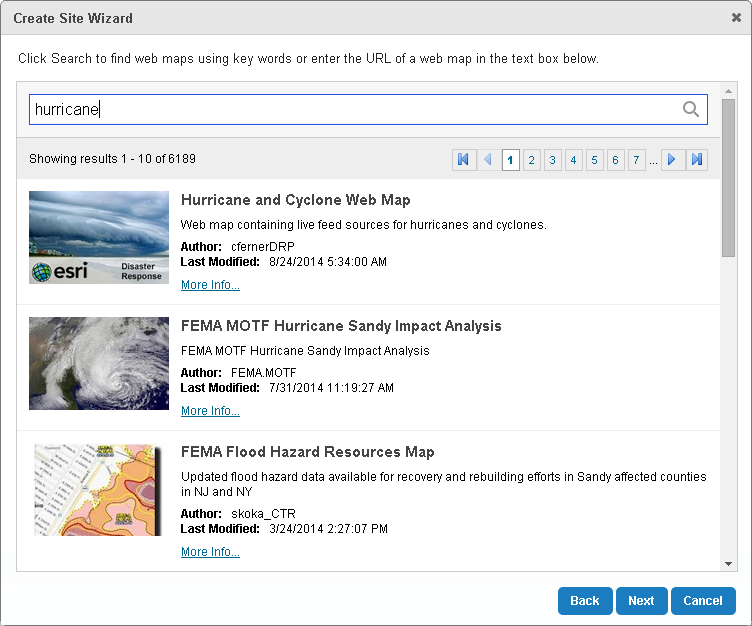
Search ArcGIS Online from Manager
-
Select one of the search results, and then click Next.
The wizard displays a success message when it connects to the web map.
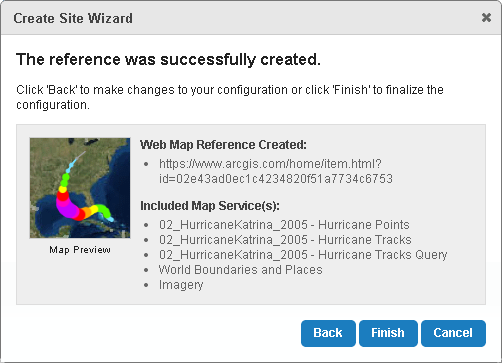
The final panel summarizes the web map's services
-
Click Finish.
You have successfully created a site. Manager's Map page opens.
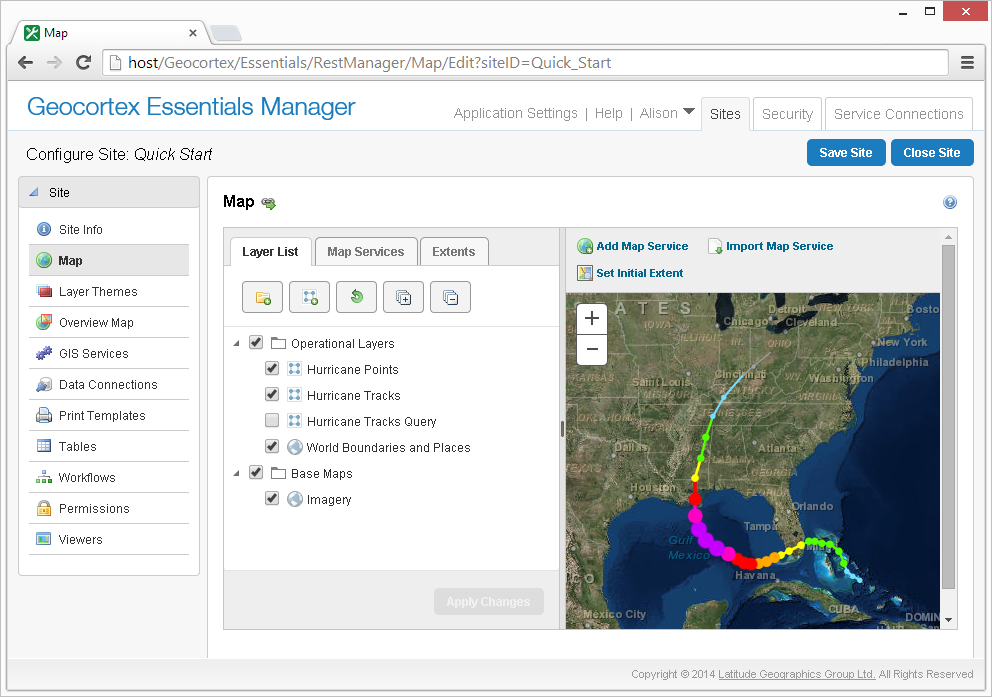
New site open for editing at the Map page
Add a Viewer
Viewers are the web applications that end users run to interact with the site and its map. Viewers use the configuration defined in the site. This section describes adding a Geocortex Viewer for HTML5 to the site.
Viewer Prerequisites
If a viewer template has been installed, then you can bypass this section and go to Add a Viewer to the Site. If a viewer template has not been installed, complete the following tasks described in the Geocortex Essentials Installation Help:
- Follow the instructions to download the (Undefined variable: GE.Geocortex) Viewer for HTML5 in Download Geocortex Essentials.
- Install a Viewer Template.
After completing these tasks, you can add a Viewer to the site.
Add a Viewer to the Site
To add a viewer:
-
If your Manager session has timed out, re-open Manager and make sure the site is open for editing.
-
In Manager's side panel, click Viewers.
The Viewers page opens.
-
Click Add Viewer.
-
In the Display Name box, type a name for the viewer.
Names can have spaces and special characters in them.
-
In the Template box, select the desired viewer template.
The Template box only lists viewer templates that are installed.
-
Click OK.
You have successfully created a viewer. The Viewer Info page opens.
Launch the Viewer
You are now ready to launch the viewer in a web browser. This enables you to see and interact with the map and the other out-of-the-box features that are preconfigured in the site.
To launch the viewer:
-
Use one of the following procedures to launch a viewer from Manager:
-
On the Viewer Info Page:
Click the Launch in Browser hyperlink in the Launch Links area.
-
On the Viewers Page:
Click the viewer's hyperlink in the Launch URL column.
-
In the Site List:
Click the viewer's hyperlink in the Site Summary. To show the Site Summary, click the down arrow
 beside the site's name in Tiled View. In List View, click the plus sign
  .
.
The viewer opens in a new browser tab.
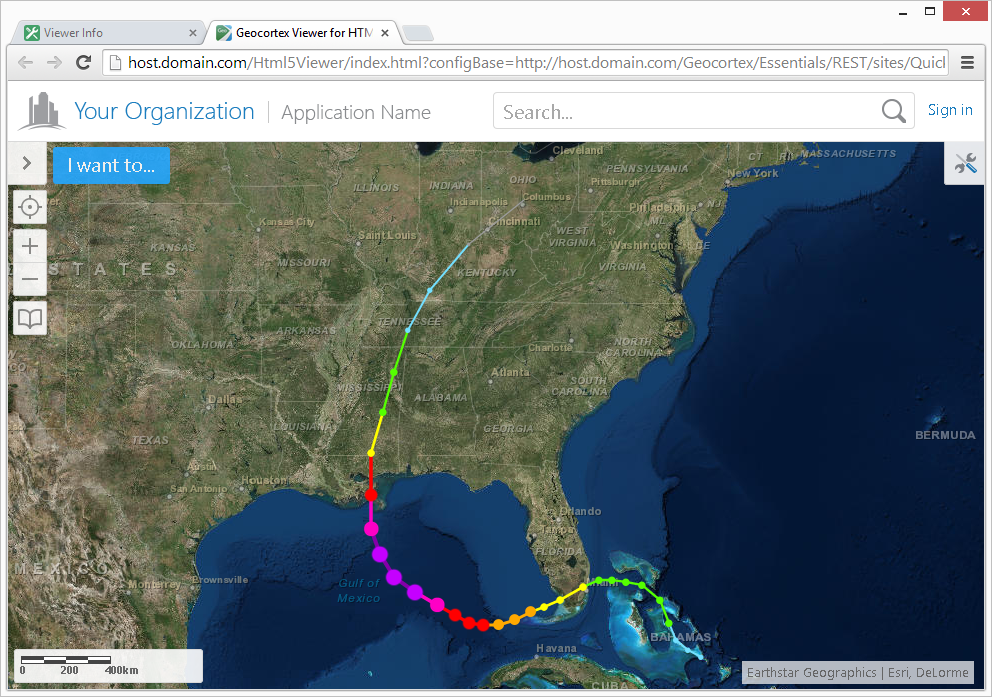
The new site in an HTML5 viewer
-
If you added an HTML5 viewer that you want to use in a production system, you must set up a proxy page.
Explore a Sample Site
One way to learn about Essentials is to experiment with an existing site. The LA County sample site that ships with Essentials gives you a place to start.
The LA County site includes examples of many Essentials features, such as different service types, print templates, workflows, and more. Use the LA County site to see how particular features are configured, and then launch a viewer to see what the features look like to the end user.
After you have explored the LA County site's default configuration, try modifying the configuration. Each time you make some modifications, save the site and refresh the viewer so you can see the effect of your changes in the viewer.
Deploy a Sample Site
A sample site is only available in Manager if it has been deployed. To deploy a sample site, copy the site's folder from the Sample Sites folder to the Sites folder.
To deploy a sample site:
-
In the file system, navigate to the
REST Elementsfolder.By default, the
REST Elementsfolder is in:Program Files (x86)/Latitude Geographics/Geocortex Essentials/[instance]/
replace
[instance]with the name of the Essentials instance if you have given it a name. If you have not renamed the Essentials instance, it is referred to asDefault.The
REST Elementsfolder contains aSitesfolder and aSample Sitesfolder.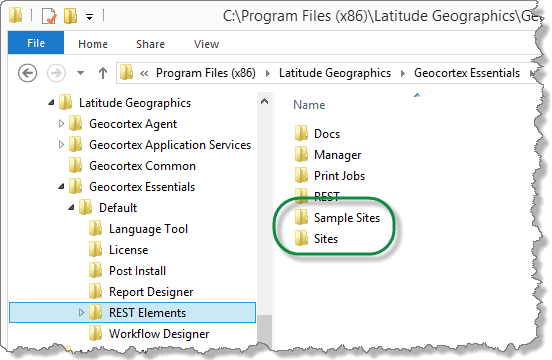
Sample Sites folder and Sites folder in the default installation
-
Open the
Sample Sitesfolder. -
Copy the
LA_Countyfolder from theSample Sitesfolder to theSitesfolder.You have now deployed the LA County sample site.
Explore a Sample Site's Configuration
Editing a site in Manager enables you to explore the site's configuration.
To explore a sample site's configuration:
-
Launch Geocortex Essentials Manager:
-
Windows Server 2012 or Windows 8, and Newer Versions:
On the Start screen, type Geocortex, and then click Geocortex Essentials Manager.
-
Windows Server 2008 or Windows 7:
In the Start menu, select All Programs | Latitude Geographics | Geocortex Essentials [Version] [Instance] | Geocortex Essentials Manager.
[Version] is the Essentials version number. [Instance] is the instance name, if Essentials is installed as a named instance. The default installation does not have an instance name.
-
-
If you are prompted to sign in, enter your user name and password.
Depending on how Essentials is configured in the Post Installer, you either sign in using an ArcGIS account or a Windows account.
-
Click the Sites tab.
-
If you are editing a site, click Close Site.
-
Click the link in the List View or Tiled View for the site that you want to edit.
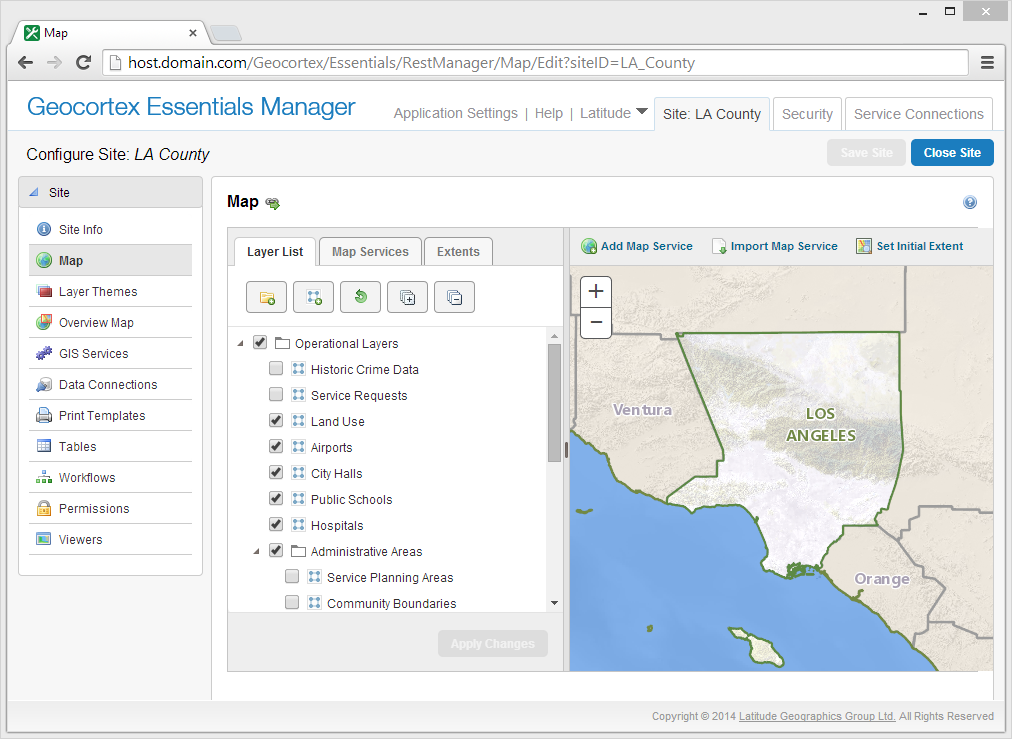
Example of a sample site that is open for editing in Manager
-
Click items in Manager's side panel to go to different pages of the site's configuration.
To see the configuration for an individual component or feature, click the Edit icon
 beside the component or feature.
Launch a Sample Site's Viewer
The information in this section assumes that you completed the tasks in Viewer Prerequisites.
To launch a sample site's viewer:
-
In Manager's side panel, click Viewers.
The Viewers page lists the viewers that are configured for the sample site.
-
Click the Launch URL hyperlink for the viewer that you want to launch.
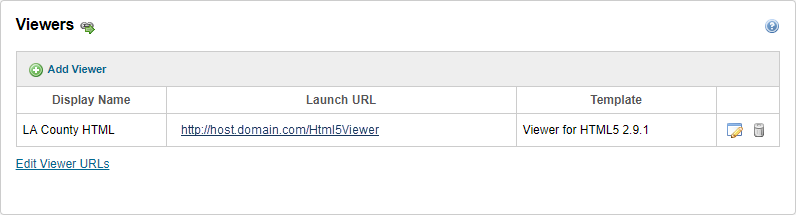
Launch link for the HTML5 viewer called LA_HTML
The viewer opens in a new browser window or tab. You can now explore the sample site in the viewer.
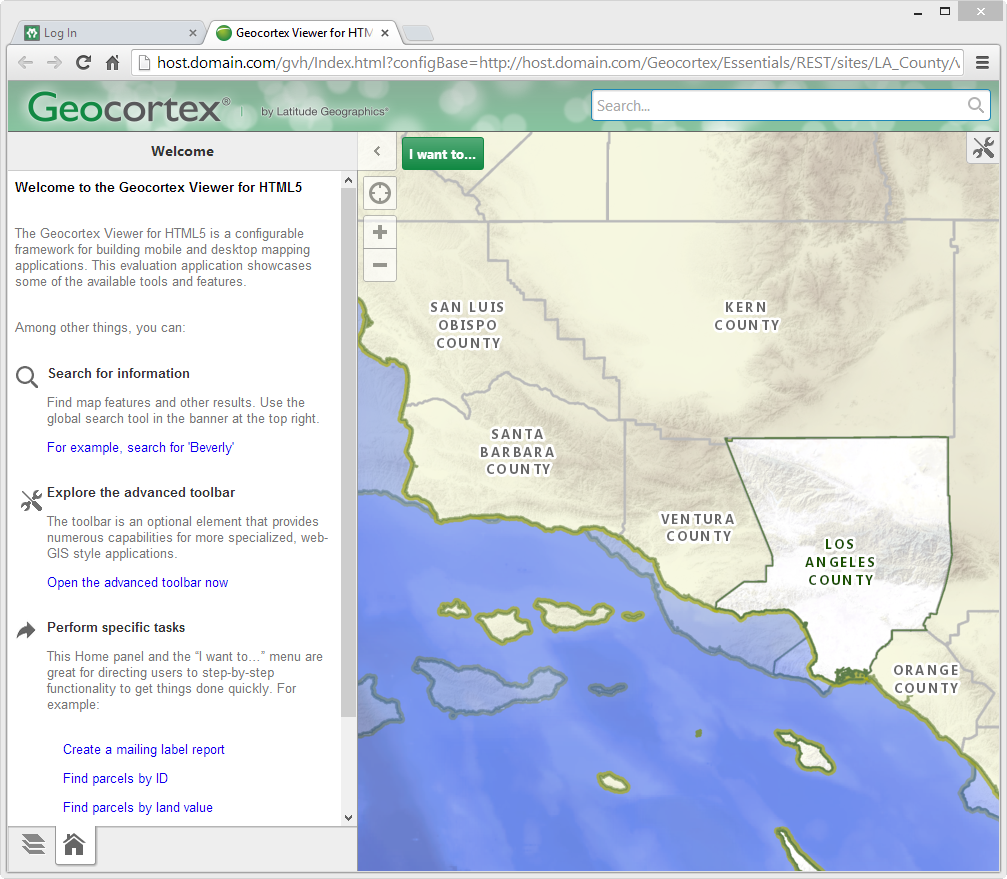
Example of a sample site in a viewer
After the Quick Start
After you have finished the Quick Start, we recommend that you add service connections for the services that you use frequently. For example, if your organization runs ArcGIS Server, add a service connection for the ArcGIS Server catalog.
Service connections enable you to search for services to add to sites. If a service is secured, you must add a service connection before you can search for the service or add the service to the map. Service connections also serve as bookmarks to your favorite services and catalogs.
For more information, see Service Connections.