You can configure result actions to run from the feature Details panel.
The feature Details panel opens when you:
•Search on a feature. From the list of search results, you select a feature to see more information about it.
•Click a single feature to identify it. Information about that feature displays with result action icons at the top of the panel. If you have a long list of result actions, the first four actions show in the panel as white buttons. result actions lower in the list, show as black buttons with a white border.
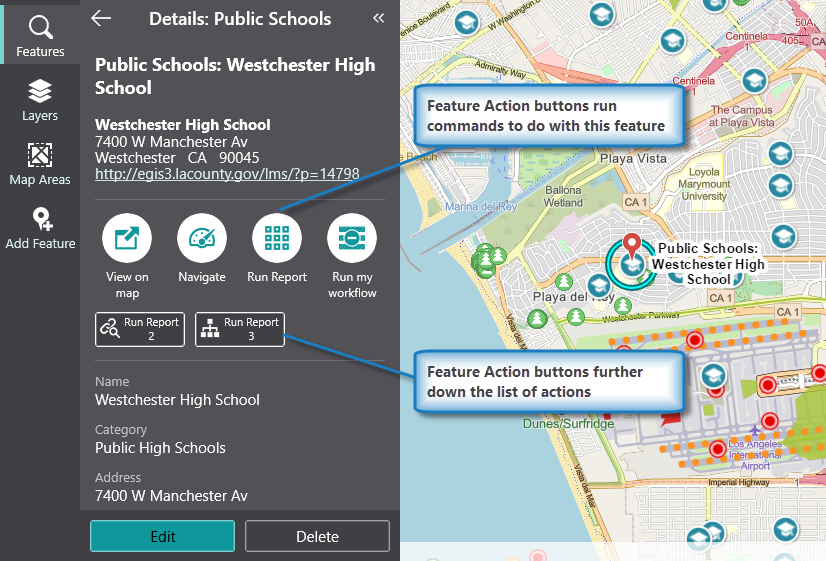
Details panel displaying information about a single feature selected on the map
Add or Edit Result Actions
You can configure result actions at multiple levels. You can configure a result action to act globally on all the features and all the layers of a map, or to act locally on the features of a single layer. In both cases, the steps to add or edit a result action are the same, but you add the result action in a specific place within Mobile Designer.
To add:
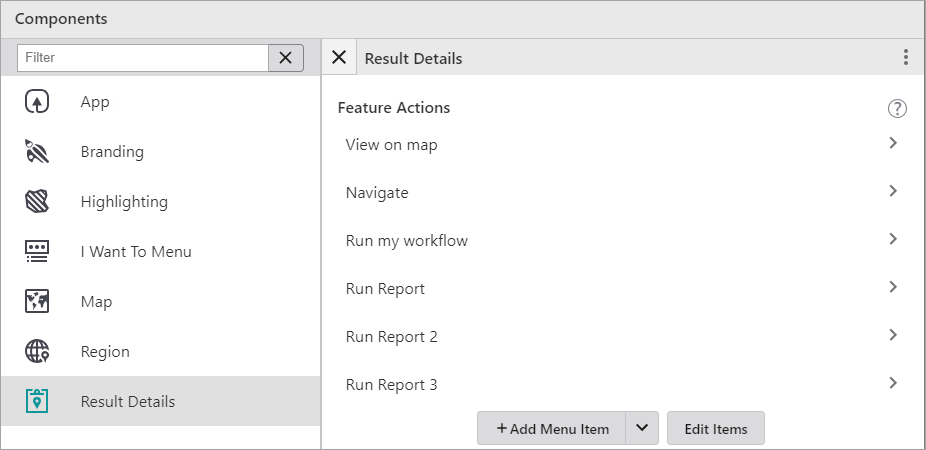
•Global Result Actions: From the Components panel, select Result Details. In the Result Details panel, click +Add Menu Item.
•Local Result Actions: From the Components panel, select Map, and then click a Layer Extension.
In the layer panel, below the Field Extensions list, is the Result Actions section. Click +Add Menu Item.
The instructions below describe how to add or edit global result actions. The instructions are the same for local result actions although they take place in the Map Components area of Mobile Designer.
To add a Result Action menu item:
1.In Mobile Designer, in the Components panel, click Result Details.
2.In the Result Actions section, click +Add Menu Item.
A window appears that lets you select a command or workflow.
3.Click one of the following tabs as appropriate:
•Commands: Select the command you want to run, and click Select.
•Workflows: Select the workflow you want to run, and click Select. Alternatively, to create a new Workflow, click Create a new Workflow. After adding the workflow, you can set its Title and Icon.
4.Click the new menu item to edit it.
5.In the Menu Item panel, type in the Title of this result action as it you want it to appear in the feature Details panel.
6.Select an Icon to represent this result action in the Details panel.
Use the filter to find an icon that represents an idea. For example, type in "zoom" to see icons that represent zooming in or out.
The first four result actions in the list you add, appear as round buttons with the icon in the middle and the title under it the button.

Subsequent result actions appear as a square button with the icon on the left and title on the right.

7.Select the Command you want to run for this result action.
To select the command you want, click the box that contains the current command followed by ![]() . The list of available commands depends on the context of the component.
. The list of available commands depends on the context of the component.
Some commands have additional settings you can configure.
To turn your command into a custom command, click ![]() . A code box appears in which you can manually edit the JSON code for the command. Turning your command into a custom command is a one-way operation.
. A code box appears in which you can manually edit the JSON code for the command. Turning your command into a custom command is a one-way operation.
To run multiple commands, click ![]() and, in the code box, type a sequence of commands in JSON format. While editing the custom command in the code box, press CTRL+Space to access code suggestions.
and, in the code box, type a sequence of commands in JSON format. While editing the custom command in the code box, press CTRL+Space to access code suggestions.
For example, the following custom command zooms to the current feature and temporarily highlights it.
[
"map.zoom-to-features",
"highlights.pulse"
]
The above example demonstrates how to pass the current context - the current feature - as an argument into the map.zoom-to-features operation. The returned value of map.zoom-to-features, which is the same set of features, is then automatically passed into the next command, highlights.pulse.
Once you have added the Result Action, the icon and title appear as a button in the feature Details panel where you can click it to run the result action.
In Mobile Designer, the result action appears in the Result Details panel in the list of Result Actions, where you can rearrange their order, edit, or delete them.
To change the order of Result Actions in the Details panel:
If you have more than a single result action, you can change the order they appear on the feature Details panel.
1.In the Components panel, click Result Details.
2.In the Result Details panel, in the Result Actions section, click Edit Items.
3.To re-order the result actions, click Edit Items, and then drag the feature items up or down in the list.

4.When you have the order you want, click Done.
5.Click File > Save.
To edit a Result Action:
1.In the Components panel, click Result Details.
2.In the Result Details panel, in the Result Actions section, click the result action you want to edit.
The Menu Item panel opens.
3.Do any of the following:
•Title: Type in a new title for the result action.
•Icon: Select a new icon or click Clear Icon to delete the icon completely.
•Command: Enter a new command, or change the code of the existing command.
4.Click File > Save.
To remove a Result Action:
1.In the Components panel, click Result Details.
2.In the Result Details panel, in the Result Actions section, click Edit Items.
3.Click the Delete icon  beside the Result Action you want to delete.
4.Click File > Save.