You can edit any of the existing options on the existing I Want To menu, as well as add other options to the menu, including adding workflows or other commands to run. You can also add a divider between the menu items to divide them into groups.
To define the I Want To Menu:
1.In the Components panel, click I Want To Menu ![]() .
.
The Menu panel opens and lists the existing menu items that you can edit.
You can also rearrange the order of the menu items, delete them, add a new menu item, or add a divider between them.
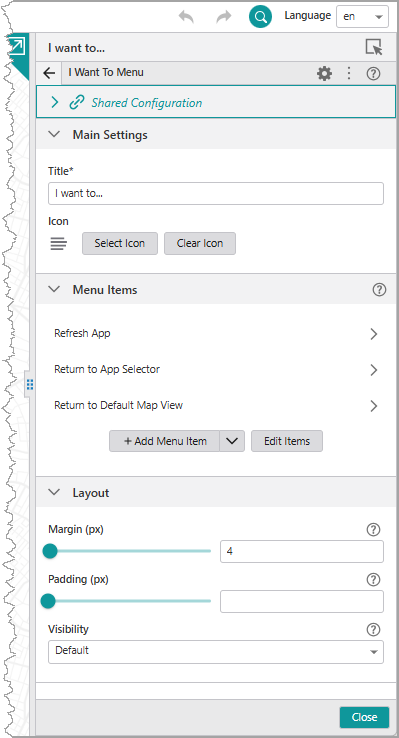
2.To change the title of the I Want To menu itself, click inside the Title box and type in the new title.
3.To edit an existing menu item, click the menu item to open its Menu Item panel.
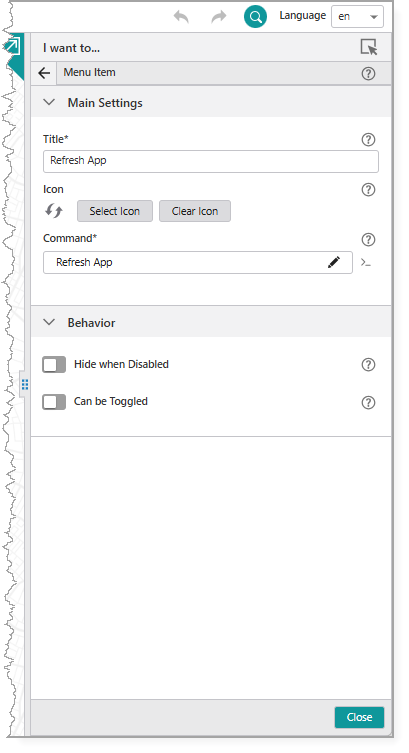
4.Edit any of the following settings:
•Title: Type in the text of the menu item as you want it to appear on the I Want To menu.
•Icon: Click Select Icon to change the icon associated with this menu item. The new icon appears beside the button and beside the menu item in the I Want To menu.
To help you find icons that represent an action, use the Filter and type in a meaning, for example, "zoom". The icons refresh to show you appropriate icons for the word.
•If you do not want to have an icon beside the menu item at all, click Clear Icon.
•Command: The command to run when a user taps the menu item. A command is an action the app should perform.
To select the command you want, click the box that contains the current command followed by ![]() . The list of available commands depends on the context of the component.
. The list of available commands depends on the context of the component.
Some commands have additional settings you can configure.
To turn your command into a custom command, click ![]() . A code box appears in which you can manually edit the JSON code for the command. Turning your command into a custom command is a one-way operation.
. A code box appears in which you can manually edit the JSON code for the command. Turning your command into a custom command is a one-way operation.
To run multiple commands, click ![]() and, in the code box, type a sequence of commands in JSON format. While editing the custom command in the code box, press CTRL+Space to access code suggestions.
and, in the code box, type a sequence of commands in JSON format. While editing the custom command in the code box, press CTRL+Space to access code suggestions.
For example, the following custom command uses the map.zoom-to-viewpoint command and adds the ability to zoom to a specific point on the map.
[
{
"name": "map.zoom-to-viewpoint",
"arguments": {
"viewpoint": {
"targetGeometry": {
"xmin": "-13727411.901",
"ymin": "6183163.201",
"xmax": "-13726074.253",
"ymax": "6181204.502",
"spatialReference": {
"wkid": 102100,
"latestWkid": 3857
}
}
}
}
}
]
•Hide when Disabled: Click the slider to hide this menu item when it is disabled rather than have it grayed out.
5.Click File > Save.
When you refresh the VertiGIS Studio Go app, the new menu item has been added to the I Want To menu and you can click it to run the command or workflow, for example, remove highlights if they are obscuring what you want to see on the map.
To add an I Want To menu item:
1.In the Menu panel, click +Add Menu Item.
A window appears that lets you select a command or workflow.
2.Click one of the following tabs as appropriate:
•Commands: Select the command you want to run, and click Select.
•Workflows: Select the workflow you want to run, and click Select. Alternatively, to create a new Workflow, click Create a new Workflow. After adding the workflow, you can set its Title and Icon.
3.Click the new menu item to edit it.
The same settings appear as those for editing an existing menu item.
4.Configure the settings you want to apply to this menu Item.
5.Click File > Save.
To add a divider between menu items:
1.In the Menu panel, beside +Add Menu Item, click ![]() , and then click Add Divider.
, and then click Add Divider.
The divider appears as a gray line at the bottom of menu item list.
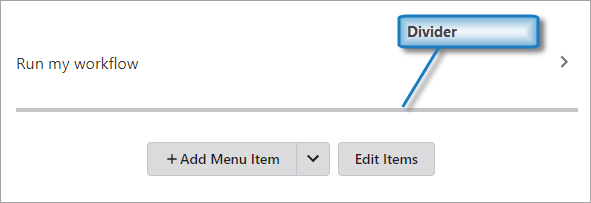
2.Click Edit Items.
Icons appear before and after the gray line to indicate that you can move or delete it.
3.Click and drag the divider into position between the menu items.
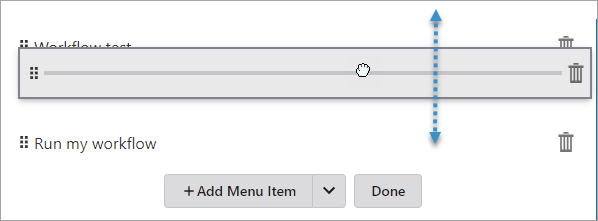
4.Click Done.
To reorder an I Want To menu item:
1.In the Components panel, select I Want To Menu.
2.In the Menu panel, click Edit Items.
3.Drag the menu item up or down to the position you want it to occupy on the I Want To menu.
4.Click Done.
To delete an I Want To a menu item:
1.In the Components panel, select I Want To Menu.
2.In the Menu panel, click Edit Items.
3.Click the Delete icon  .
.
4.Click Done.
You can change any menu item on the I Want To menu or the title of the I Want To menu itself. You can also add custom items to the menu or delete those you do not want.
Main Settings
•Title: Type in a new title for the I Want To menu itself.
•Icon: To select an icon to represent the component, click Select Icon, click the desired icon and click OK. To remove the icon, click Clear Icon.
Menu Items
•Click a menu item or the arrow ![]() to open an existing menu item. You can set the following:
to open an existing menu item. You can set the following:
•Title: Change the name of the menu item to what you want it to be in the I Want To menu.
•Icon: Replace the existing icon with a different one. The new icon will appear beside the text of that item in the I Want To menu. If you do not want an icon, click Clear Icon.
•Command: The command to run when a user taps the menu item. A command is an action the app should perform.
•Hide when Disabled: Select this option if you want the menu item to disappear rather than appear disabled, if it cannot be used for any reason.
To add a menu item:
1.In the Components panel, select I want to....
2.In the Menu panel, click +Add Menu Item.
3.To add a divider between menu items, click ![]() beside +Add Menu Item, and then click Add Divider.
beside +Add Menu Item, and then click Add Divider.
4.To position the divider, click Edit Items, drag the divider into place, and then click Done.
5.A window appears that lets you select a command or workflow.
6.Click one of the following tabs as appropriate:
•Commands: Select the command you want to run, and click Select.
•Workflows: Select the workflow you want to run, and click Select. Alternatively, to create a new Workflow, click Create a new Workflow. After adding the workflow, you can set its Title and Icon.
7.Click the new menu item to edit it.
8.In the Menu Item panel, set the following:
•Title: Type in a title for this menu item as it will appear in the I Want To menu. For example, Switch to Results Table.
•Description: Type an explanation of what this menu item will do when you click it. For example, Switches to viewing search results in a table.
•Icon: To select an icon to represent this menu item, click Select Icon, click the desired icon and click OK. You do not need to have an icon, you can just have words to represent the menu item. To remove the icon, click Clear Icon.
•Command: The command to run when a user taps the menu item. A command is an action the app should perform.
To select the command you want, click the box that contains the current command followed by ![]() . The list of available commands depends on the context of the component.
. The list of available commands depends on the context of the component.
Some commands have additional settings you can configure.
To turn your command into a custom command, click ![]() . A code box appears in which you can manually edit the JSON code for the command. Turning your command into a custom command is a one-way operation.
. A code box appears in which you can manually edit the JSON code for the command. Turning your command into a custom command is a one-way operation.
To run multiple commands, click ![]() and, in the code box, type a sequence of commands in JSON format. While editing the custom command in the code box, press CTRL+Space to access code suggestions.
and, in the code box, type a sequence of commands in JSON format. While editing the custom command in the code box, press CTRL+Space to access code suggestions.
For example, the following custom command uses the map.zoom-to-viewpoint command and adds the ability to zoom to a specific point on the map.
[
{
"name": "map.zoom-to-viewpoint",
"arguments": {
"viewpoint": {
"targetGeometry": {
"xmin": "-13727411.901",
"ymin": "6183163.201",
"xmax": "-13726074.253",
"ymax": "6181204.502",
"spatialReference": {
"wkid": 102100,
"latestWkid": 3857
}
}
}
}
}
]
•Hide when Disabled: Whether to hide the menu item when the command cannot be executed.
•Can be Toggled: Whether the menu item can be toggled between two states. If the menu item can be toggled, you can specify the behavior of the menu item for both states as well as whether the menu item is toggled by default.
Layout
•Slot: The location of this component within its parent component, assuming the parent component has slots. The possible values depend on the parent component's slots.
•Margin (px): The margin space around the component in pixels.
•Initially Hidden: Specifies whether or not the component is initially hidden when the app loads. If selected, the component remains hidden unless activated, for example, by the Show command.