Configure a Feature Map Control
A feature map is an map image that shows a particular feature. The feature is centered and highlighted on the feature map.
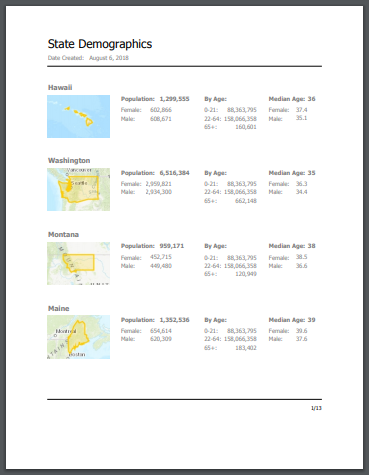
Example report showing feature maps
Feature maps are used in reports to provide context. Typically, you configure a feature map to show enough of the surrounding area that the user can locate the feature in the context of a larger map.
Feature maps work for ArcGIS data sources only. The features must have geometries so VertiGIS Studio Reporting can generate the map image for each feature.
To add a feature map to a report, drag an XRFeaturePictureBox control ![]() to the design surface. When you configure the control, specify an ArcGIS web map to show the feature on. You can use any web map that you have access to, whether you authored it or it is shared with you. To ensure that the feature is accurately rendered, VertiGIS Studio Reporting projects the feature to the web map's spatial reference at run time if necessary.
to the design surface. When you configure the control, specify an ArcGIS web map to show the feature on. You can use any web map that you have access to, whether you authored it or it is shared with you. To ensure that the feature is accurately rendered, VertiGIS Studio Reporting projects the feature to the web map's spatial reference at run time if necessary.
If the web map is secured, the end user must have access privileges. Otherwise, the feature map will be blank in the generated report. Similarly, the end user must have access to any federated layers in the web map, or those layers will be excluded from the feature map in the generated report.
You may want to create a dedicated web map to use in a report's feature maps. This ensures that the web map does not change during the lifetime of the report. If the web map changes, the feature maps may no longer show what you originally intended them to show.
To create a dedicated web map, you typically add a basemap, the layer that the features belong to, and any other layers that are relevant. For example, for a feature map that shows pipeline segments, you might also include layers for reservoirs and pump houses.
If you do not specify a web map when you configure a feature map, the default web map is used.

Default web map used with feature maps
Configure a Feature Map
If you are going to create a dedicated web map to use in a feature map, create the web map first so it is available when you configure the feature map. If you use on-premises Reporting, create the web map in Portal for ArcGIS. If you use cloud Reporting, create the web map in ArcGIS Online.
To configure a feature map:
-
Open the report in Report Designer.
-
Drag an XRFeaturePictureBox control
 to the design surface.
You do not need to configure any settings for the feature map to work. You can now preview the report if you want. The feature map will use the default web map.
-
Click Properties
 to open the Properties panel, select the control from the Properties drop-down list, and expand Actions.
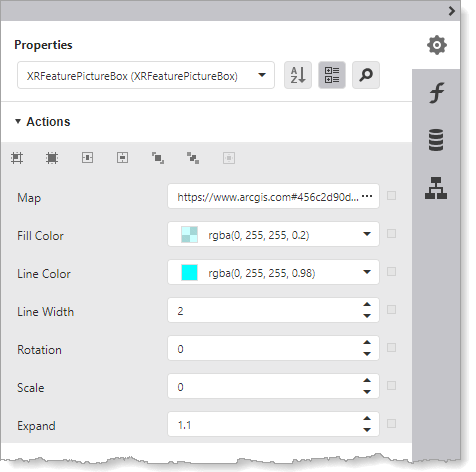
Actions settings, showing their default values
-
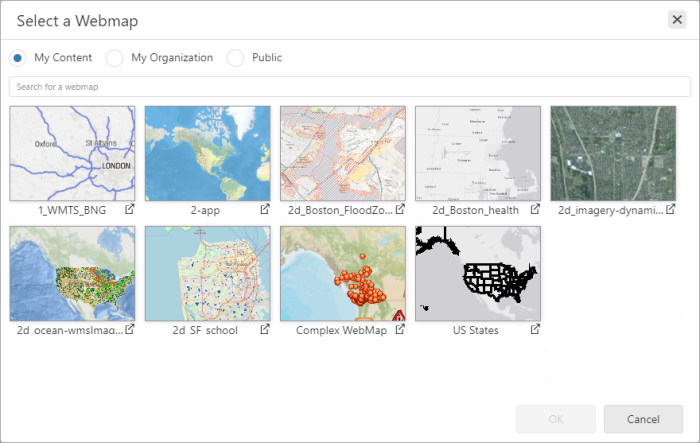
Web Map: Specify the ArcGIS web map that you want to show the features on:
-
In the Map box, click the
 icon.
icon.You are prompted to select a web map.
-
Select the web map that you want to use and click OK.
The URL for the map's ArcGIS item shows in the Properties panel.
-
-
Feature Highlighting: Configure the appearance of the feature in the feature map:
-
Fill Color: Open the Fill Color drop-down panel and select the color and transparency to fill the feature.
-
Line Color: Open the Line Color drop-down panel and select the color and transparency to outline the feature.
-
Line Width: Enter the line width in pixels.
-
-
Rotation: Enter the amount to rotate the map clockwise in degrees. The default Rotation, 0, shows North at the top of the map. When Rotation is 90, West shows at the top.
-
Scale, Expand: The Scale and Expand settings control the size of the region that is shown by the feature map. If both settings are configured, the Scale setting is used.
-
Scale: The Scale setting controls the scale to show the map. Use the Scale setting for point geometries and for situations in which a particular scale is required, such as regulatory reports.
-
Expand: The Expand setting controls how much area surrounding the feature shows in the feature map. At the default value, 1.1, the feature map is 110% of the feature's extent; at 2.1, the feature map is 210% of the feature's extent; and so on. Note that the percentage will vary slightly for tiled map services.
The Expand setting does not work for point geometries.
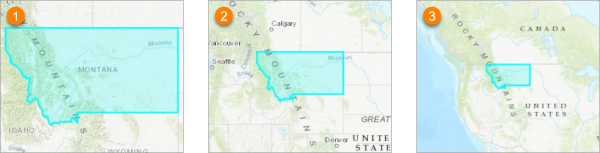
Effect of setting Expand to 1.1 (
 ), 2.1 (
 ), and 4.1 (
 )
)
-
-
Other Settings: Configure any other properties that you want. See the documentation for the Feature Picture Box Control for more information.
-
Click Preview
 to verify your configuration.