Use the Current Features as Report Inputs
A common use for reporting in web maps is for the user to select some features on the map or in search results, and then run a report on the selected features. A report that operates on the currently selected features is called a layer report.
Layer reports take ArcGIS feature IDs as inputs. When an end user runs a layer report from a host application, VertiGIS Studio Reporting gets the feature IDs for the currently selected features and queries the service for records with a matching ID. The result is a report that includes data for just those features in the current selection set.
When you preview a report that takes feature IDs as input, there is no selection set for the report to use as input. In this case, the Preview prompts you to enter the feature IDs to use as inputs. You can configure default values so you don't have to re-enter the feature IDs every time you preview the report.
Similarly, if you use VertiGIS Studio workflows to run layer reports, you will have to supply the feature IDs for the report to operate on when you preview the report. In this case, you configure the workflow that runs the report to pass the feature IDs to the report. For more information, see Run Reports from VertiGIS Studio Workflows.
In ArcGIS, feature IDs are stored in a field of type esriFieldTypeOID. Often the field is called OBJECTID, but the name of the field can vary from service to service.
To configure a report to take inputs, you place a parameterized condition on the query. The main steps to do this are as follows:
-
Add the report parameter.
The report parameter must be a MultiValue parameter of type Number (32 bit integer) called
FeatureIds. -
Add a parameterized filter condition to the query:
-
Add a filter condition to the query that has the following form:
Layer.Feature-ID-field is any of Query-parameter
where:
-
Layeris the name of the layer being queried. -
Feature-ID-fieldis the name of the field that contains the feature ID, for example, OBJECTID. -
Query-parameteris the name of the query parameter that you will create.
For example:
easements.OBJECTID is any of idsFromClient
-
-
Bind the
FeatureIdsreport parameter to the query parameter.
-
The procedure below provides instructions for configuring an existing report to take feature IDs as inputs. To try it yourself, follow the tutorial in Create Reports.
To create a new report that operates on the current selection set, use the Layer Report template. The Layer Report template creates the report parameter and parameterized filter condition for you.
Configure an Existing Report to Take Feature IDs as Inputs
To configure an existing report to take inputs:
This procedure shows you how to adapt an existing report to take inputs. It assumes that the report is already created.
Step 1: Add the report parameter
-
In the Field List
 , click
  Parameters to show the management buttons.
 -
Click Add parameter
 .
. A new parameter is added.
-
Click Edit
 to edit the parameter.
 -
Configure the parameter's properties:
-
In the Name box, type the following name for the parameter:
FeatureIds The report parameter must be called
FeatureIds. This is the name that the client application looks for when the report runs. -
Select the MultiValue checkbox.
Multi-value parameters take one or more values as inputs.
-
Select Number (32 bit integer) from the Type drop-down list.
Esri feature IDs are 32-bit integers.
-
If you want to add default values, click Value to show the plus sign, click the plus sign, and enter a feature ID that you want to use as a default value. Repeat this step for each default value that you want to configure.
Default values are helpful while you are designing a report, because you can preview the report as many times as you want without having to enter feature IDs every time.
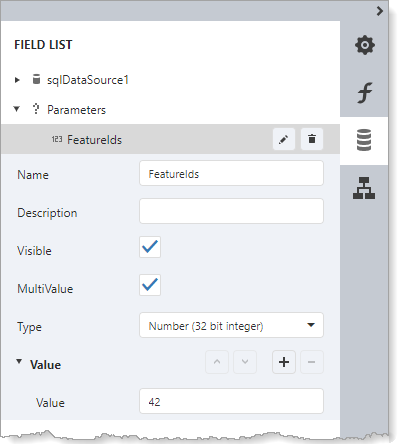
Report parameter with one default feature ID, configured to take multiple feature IDs
-
Step 2: Add a parameterized filter condition to the query
-
In the Field List
, expand the data source. -
Click the table to show the management buttons.
-
Click Edit Query
to open the SQL Data Source Wizard. -
Click Run Query Builder.
-
Add the filter condition to the query:
-
In the Query Properties panel, click the
 icon in the Filter box to open the Filter Editor.
 -
Add a condition using the desired mode:
-
Default Mode:
-
Click the plus icon beside the And operator and select Add condition.
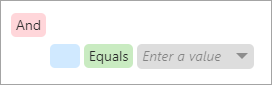
New condition, ready to be configured
-
Click the blue box, expand the layer, and select the feature ID field. It is usually named some variation of OBJECTID.
-
Click the green box and select Is any of.
-
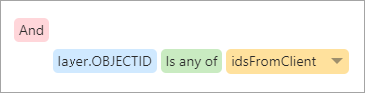
Create a query parameter:
-
Click the arrow
 in the gray Enter a value box and select Parameter.
The box turns yellow and says Create new parameter.
-
Click the yellow box and select Create new parameter.
-
Type a name for the parameter, for example,
idsFromClient.
-
-
Click away from the condition.
The filter expression looks similar to this in the default mode:
Filter condition for feature ID inputs
-
Select the Advanced Mode checkbox to show the filter expression.
The expression should look similar to this:

If the query parameter,
idsFromClient, is missing, type it in.
-
-
Advanced Mode:
-
Select the Advanced Mode checkbox to show the input area.
-
Type a filter expression similar to the following:
[layer.OBJECTID] In(?idsFromClient)
where:
-
layeris the name of the layer being queried. -
OBJECTIDis the name of the field that contains the feature ID. -
idsFromClientis the name of the query parameter that you created.
-
-
-
-
Click Save.
The filter expression appears in the Filter box in the Query Properties panel.
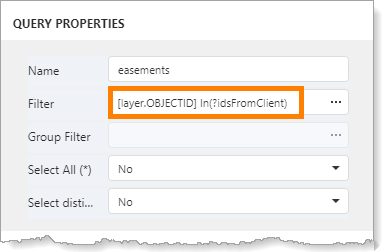
Configured query filter
Do not attempt to preview the results yet. The filter expression includes a query parameter that does not yet have a value, so the query will fail.
-
-
Click OK to close the Query Builder.
-
Click Next.
-
Bind the
FeatureIdsreport parameter to the query parameter:-
Expand the
idsFromClientquery parameter. -
Set Type to Expression.
-
Click the
icon in the Value box to open the Expression Editor. -
Expand
Parameters.These are the report parameters.
-
Double-click the
FeatureIdsparameter, shown at in the screen capture.
The Expression Editor will build the expression and display it, shown at
 . The expression is
 [Parameters.FeatureIds].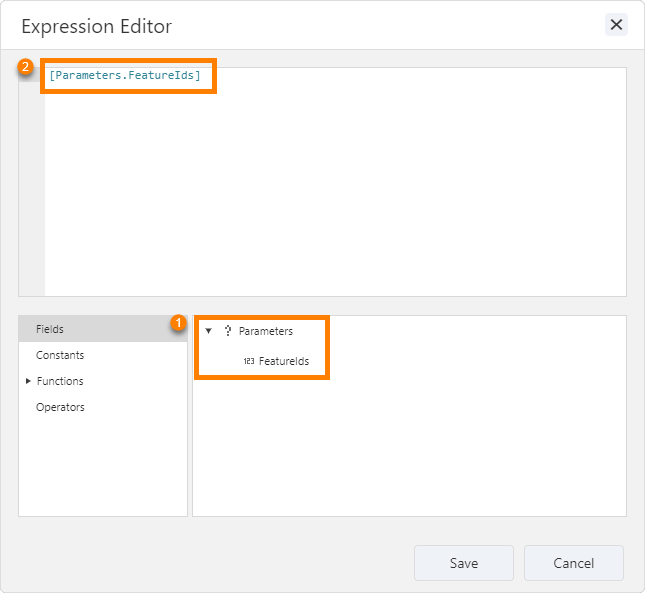
Expression that accesses the
FeatureIdsreport parameter -
Click Save.
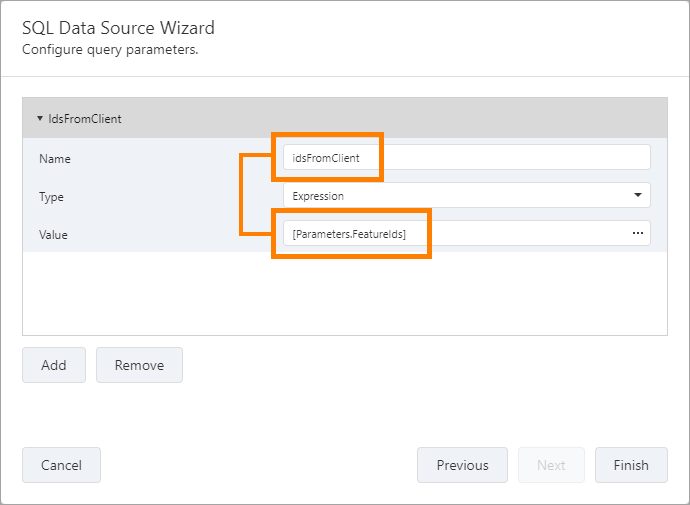
FeatureIdsreport parameter bound toidsFromClientquery parameter
-
-
Click Finish to close the SQL Data Source Wizard.
-
Press Ctrl+S to save the report.
-
To test the report inputs, click Preview
 , enter the desired feature IDs, and then click OK.