Configure a Form
To configure a form, there are three main steps and an optional step:
-
Add a form to a workflow
-
Add form elements
-
Rearrange form elements
-
Configure events (optional)
Add a Form to a Workflow
The steps to add a form to a workflow are as follows:
-
Add a Display Form activity
-
Connect the Display Form to the flowchart
-
Configure the form's settings.
Add Form Elements
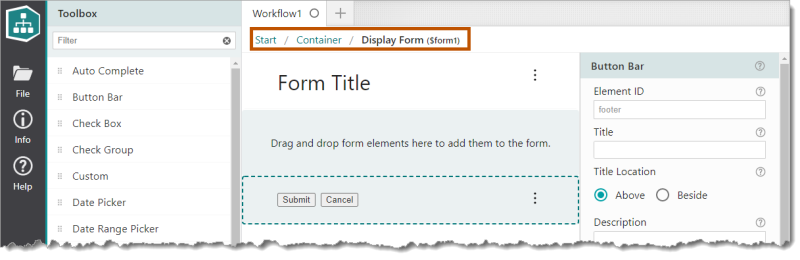
Every Display Form activity has a form associated with it. Double-click a Display Form activity in the flowchart to open the form in the built-in Form Designer.
![]()
New form in the Form Designer, showing  the Toolbox of form elements,
  the form's Layout panel, and
  the selected element's properties
Once the Form Designer has been opened, the following steps allow you to add form elements to the form:
-
Drag a form element from the Toolbox and drop it in the Layout panel, anywhere between the Header and Footer elements.
The Form Designer shows the elements in the order they will appear when the workflow runs. You can drag the elements within the Form Designer to re-order them.
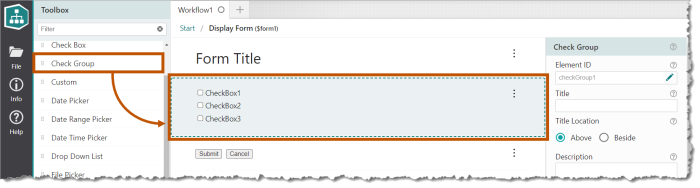
The Check Group form element dropped onto the form's Layout panel -
Click the form element to select it.
The element's properties show on the right side of the interface in the Properties panel.
-
Configure the element's properties in the Properties panel. Take special note of Title Location and Orientation fields.
For information about the properties for a particular form element, refer to the Form Element Reference.
-
After entering a title in the Title field, choose an option for Title Location, Above (default) or Beside. Choosing the Beside option places the title to the left of the element.
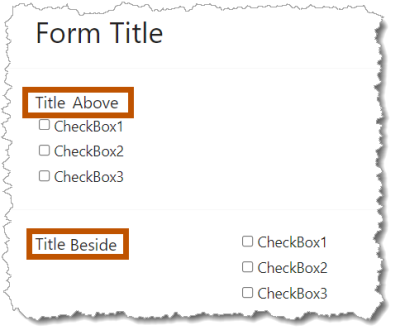
Element title example showing the Above and Beside options
-
Some elements have an Orientation option, Vertical (default) or Horizontal. Choosing the Horizontal option lays the element's items (such as checkboxes) out horizontally.

Element orientation example showing Vertical and Horizontal options
-
Note that initially, a form has two elements:
-
Header: The Header element optionally shows the form's title.
-
Footer: The Footer element has buttons (typically Submit and Cancel) that the user can click to complete the form.
The Footer element is actually a special instance of the Button Bar form element.
You can close a form programmatically using the Complete Form activity.
The header and footer are automatically displayed at the top and bottom of the form respectively
Rearrange Form Elements
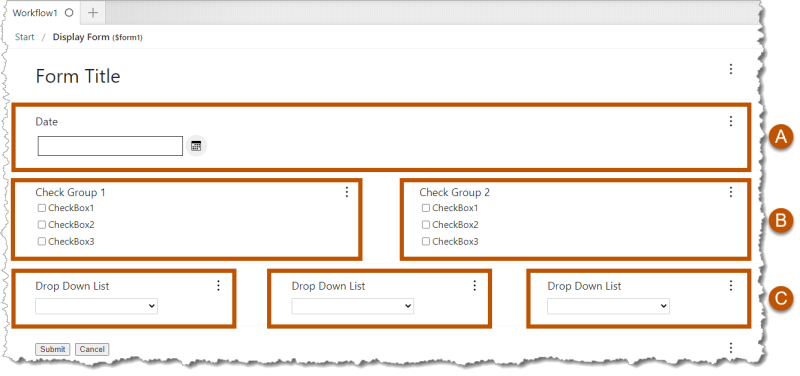
If there are multiple elements, configure each element's layout by dragging it to the desired location within the Layout panel. Elements can be positioned above, below, or beside other elements.
Layout examples, showing
 one element on a single line,
 two elements on a single line, and
 three elements on a single line
Although a form can contain many elements positioned beside each other on a single line, it is not recommended to place more than 3 elements on a single line.
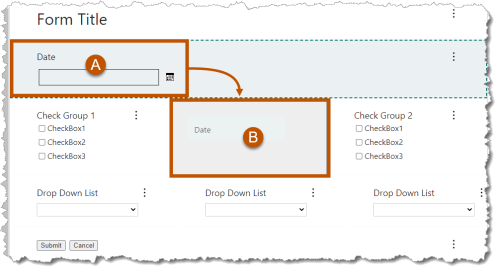
For example, to move the Date Picker form element from point to point between two Check Groups, follow these steps:
-
Left-click and drag the Date Picker element (
). -
Hover over the desired location (
) and a rectangle will appear showing the nearest potential drop location. -
Once the mouse is hovering over the potential location, the rectangle will turn dark gray. At this point, you may drop the element.

Example showing the Date Picker element being relocated to a position between two Check Groups
Configure Events (Subworkflows) - Optional
Every form element has associated events that can act as a trigger for a subworkflow. For instance, the Button Bar form element has three (3) associated events: Load, Click, and Submit. Any of the associated events can trigger a subworkflow. In this example, if a subworkflow was configured for the Click event, then that subworkflow would run once a button on the Button Bar was clicked.
The main steps to create and configure a subworkflow are:
-
Click the form element in the Form Designer to open the element's Properties panel.
-
Scroll to the bottom of the Properties panel to the Events section.
-
Expand the Events section by clicking the down caret.
-
Select from the list of events by clicking Add. This opens a new subworkflow in the Workflow Designer.
-
Configure the subworkflow as you would a regular workflow.
Create a Subworkflow Example
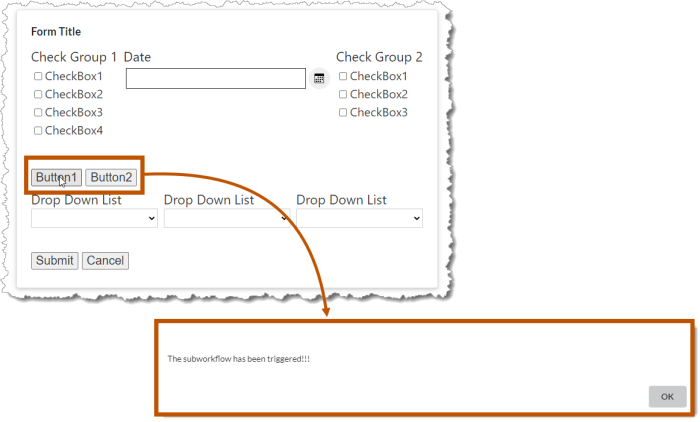
In this example, you will create a subworkflow that shows an alert when a button is clicked:
-
While in the Form Designer, add the Button Bar element.
-
Click the Button Bar element to open the Properties panel.
-
Scroll to the Events section, locate the Click event, and click Add.
-
When the subworkflow opens, add the Alert element.
-
In the Alert Property Panel > Inputs > Text field, add "The subworkflow has been triggered!!!"
When you run the workflow and click a button on the Button Bar, the Alert is shown.
Exit the Form Designer
The breadcrumbs at the top of the Form Designer show the Display Form activity's location within the workflow. Click any link in the breadcrumbs to exit the Form Designer. To return to the main workflow, click Start in the breadcrumbs or press Ctrl + Alt + Home.
Breadcrumbs in the Form Designer