Host and Run Workflows in the Geocortex Viewer for HTML5
Before you attempt to run a workflow from an HTML5 viewer, make sure the viewer is ready to run workflows:
-
If you are using an on-premises installation of VertiGIS Studio Workflow, you must adapt each viewer that hosts VertiGIS Studio workflows to point to your installation. See Adapt a Geocortex Viewer for HTML5 to Work with On-Premises Workflow.
-
To run workflows, VertiGIS Studio Workflow must be enabled in the viewer. Workflow is enabled by default in viewers created in Geocortex Viewer for HTML5 version 2.9 and newer.
To check whether Workflow is enabled, edit the viewer in Geocortex Essentials Manager and click Workflow in the side panel. The Enabled checkbox should be selected.
Host and Run your First Workflow
There are several ways to host a workflow in an HTML5 viewer. The most common is the I Want To menu. The procedure below shows you how to configure the I Want To menu to host and run a workflow.
To use the I Want To menu to host and run a workflow:
Step 1: Configure the menu item
-
Edit the viewer in Geocortex Essentials Manager.
-
Click I Want To Menu in the side panel.
-
Add a new menu item.
-
In the Text box, type the menu item's text.
-
In the Command box, type RunWorkflowByUrl.
-
In the Command Parameter box, type or paste the workflow's URL.
You can get the URL from VertiGIS Studio Workflow Designer or from ArcGIS:
-
VertiGIS Studio Workflow Designer: In VertiGIS Studio Workflow Designer, open the workflow, click Info in the sidebar, and copy the URL from the URL box.
If there is no URL box in the Info panel, save the workflow. A workflow does not have a URL until it has been saved.
-
ArcGIS: In ArcGIS, go to your Content page and click the workflow to open its details. Copy the URL from your browser's address bar.
-
-
Click OK.
-
Click Apply Changes.
-
Click Save Site.
Step 2: Run the workflow
-
Launch the viewer in your browser.
-
Click I Want To.
-
Click the menu item that runs the workflow.
The workflow runs.
Recommended Hosting Methods
The Geocortex Viewer for HTML5 offers several methods of hosting workflows:
It is possible to place an exported client workflow in a virtual directory and run the workflow by its URL. You cannot run server workflows this way.
The recommended hosting method depends on the inputs that the workflow takes. Workflow inputs are values that the host application passes to the workflow for the workflow to operate on. For more information, see Workflow Inputs.
The following recommendations prevent the situation in which the user has to select a feature or map location to run a workflow that doesn't require a feature or map location:
-
No Inputs: If the workflow does not take inputs, use the I Want To menu or toolbar to run the workflow.
-
Design-Time Inputs Only: If the workflow takes design-time inputs but not run-time inputs, use the I Want To menu or toolbar to run the workflow.
-
Run-Time Inputs: If the workflow takes run-time inputs and possibly also design-time inputs, use a hyperlink or context menu to run the workflow.
Two commonly used context menus are the following:
-
Feature Actions Menu: The Feature Actions menu passes the feature selected or identified by the user. The Feature Actions menu can also pass design-time inputs.
-
Map Context Menu: The Map Context menu passes the map location (point geometry) clicked by the user to open the Map Context menu. The Map Context menu can also pass design-time inputs.
The I Want To menu and toolbar cannot pass run-time inputs.
-
To run the workflow, the user selects the menu item or clicks the button or hyperlink.
Viewer Commands that Run Workflows
The menu item, toolbar button, or hyperlink that you configure uses an HTML5 Viewer command to run the workflow. The command that you use depends on whether the workflow takes inputs or not:
-
No Inputs: To run a workflow that does not take inputs from the viewer, use the RunWorkflowByUrl command. This command takes the workflow's URL as a parameter.
-
Inputs: To run a workflow that takes inputs from the viewer, use the RunWorkflowByUrlAndInputs command in a menu item, toolbar button, or hyperlink. This command takes the workflow's URL and one or more inputs as parameters.
Configuration Summary
This section summarizes the commands and command parameters for the recommended hosting methods. If you are comfortable configuring menus and hyperlinks in HTML5 viewers, this may be all the information you need to configure an HTML5 host viewer. For additional information, see:
-
Use the I Want To Menu to Host and Run a Workflow With Design-Time Inputs
-
Use the Toolbar to Host and Run a Workflow with Design-Time Inputs
-
Use a Context Menu Item to Host and Run a Workflow with Inputs
For information about accessing a workflow's inputs in the workflow, see Use a Workflow's Inputs in the Workflow.
Summary of recommended methods to configure an HTML5 viewer to run a workflow
|
Inputs |
Method |
Configuration |
|---|---|---|
|
No inputs |
I Want To menu Toolbar |
Command: Command Parameter: The workflow's URL Example: |
|
Design-time inputs only |
I Want To menu Toolbar |
Command: Command Parameter *: Example: |
|
Run-time inputs and possibly design-time inputs |
Context menu |
Command: RunWorkflowByUrlAndInputs Command Parameter *: Example: |
|
Hyperlink |
Command: Syntax *: Example: |
* Notation: In the table, items that are bold and capitalized will be replaced with your values, for example, INPUT1. Items that are bold and lower case, like input names, can optionally be replaced, for example, input1.
See also...
Use the I Want To Menu to Host and Run a Workflow With Design-Time Inputs
To use the I Want To menu to host and run a workflow with design-time inputs:
Step 1: Configure the menu item
-
Edit the viewer in Geocortex Essentials Manager.
-
Click I Want To Menu in the side panel.
-
Add a new menu item.
-
In the Text box, type the menu item's text.
-
In the Command box, type RunWorkflowByUrlAndInputs.
-
In the Command Parameter box, enter an object with the workflow's URL and inputs, for example:
{ "url": "WORKFLOW_URL", "mystring": "THIS IS MY STRING", "mynumber": 123456 }You can get the workflow's URL from VertiGIS Studio Workflow Designer or from ArcGIS:
-
VertiGIS Studio Workflow Designer: In VertiGIS Studio Workflow Designer, open the workflow, click Info in the sidebar, and copy the URL from the URL box.
If there is no URL box in the Info panel, save the workflow. A workflow does not have a URL until it has been saved.
-
ArcGIS: In ArcGIS, go to your Content page and click the workflow to open its details. Copy the URL from your browser's address bar.
-
-
Click OK.
-
Click Apply Changes.
-
Click Save Site.
Step 2: Run the workflow
-
Launch the viewer in your browser.
-
Click I Want To.
-
Click the menu item that runs the workflow.
Use the Toolbar to Host and Run a Workflow with Design-Time Inputs
To use the toolbar to host and run a workflow with design-time inputs:
Step 1: Configure the tool
-
Edit the viewer in Geocortex Essentials Manager.
-
Click Toolbar in the side panel.
-
Add a new button, like the Home button.
-
Edit the button.
-
In the Name box, type the text to use for the button.
-
In the Command box, type RunWorkflowByUrlAndInputs.
-
In the Command Parameter box, enter an object with the workflow's URL and inputs, for example:
{ "url": "WORKFLOW_URL", "mystring": "THIS IS MY STRING", "mynumber": 123456 }You can get the workflow's URL from VertiGIS Studio Workflow Designer or from ArcGIS:
-
VertiGIS Studio Workflow Designer: In VertiGIS Studio Workflow Designer, open the workflow, click Info in the sidebar, and copy the URL from the URL box.
If there is no URL box in the Info panel, save the workflow. A workflow does not have a URL until it has been saved.
-
ArcGIS: In ArcGIS, go to your Content page and click the workflow to open its details. Copy the URL from your browser's address bar.
-
-
Click OK.
-
Click Apply Changes.
-
Click Save Site.
Step 2: Run the workflow
-
Launch the viewer in your browser.
-
Open the toolbar.
-
Click the tool that runs the workflow.
Use a Hyperlink to Host and Run a Workflow with Inputs
You can configure hyperlinks to run workflows that take run-time inputs. Hyperlinks can also pass design-time inputs.
Hyperlinks are configured in feature descriptions. Depending on how you configure the viewer, feature descriptions can appear in map tips, search and identify results, and feature details.
To include a hyperlink in a layer's feature descriptions, you add an HTML anchor element (<a>) to the Feature Description or Feature Long Description setting, whichever you use for feature descriptions. These settings allow you to embed Viewer commands in hyperlinks, in this case, the RunWorkflowByUrlAndInputs command.
Hyperlink Syntax
The syntax for a hyperlink that runs a workflow with inputs is as follows:
<a href="command:RunWorkflowByUrlAndInputs?url=WORKFLOW_URL&input1=INPUT1&input2=INPUT2&input3=INPUT3...">LINK_TEXT</a>
The URL parameters specify the following:
-
URL: The URL parameter specifies the URL of the workflow that the hyperlink runs. Replace
WORKFLOW_URLwith the URL of your workflow. The URL must be URL encoded. You can copy the (unencoded) URL from the Info panel in Workflow Designer or from the ArcGIS item where the workflow is saved. -
Link Text:
LINK_TEXTis the hyperlink's text. -
Inputs: The
inputi=INPUTiparameters specify the workflow's design-time and run-time inputs:-
Design-Time Inputs: In this case,
INPUTiis a literal. For example, a hyperlink could pass a literal string using this syntax:<a href="command:RunWorkflowByUrlAndInputs?url=WORKFLOW_URL&input1=INPUT1&input2=INPUT2&input3=INPUT3...">LINK_TEXT</a>
-
Run-Time Inputs: In this case,
INPUTiis a replacement token. The most commonly used replacement tokens are object tokens and field tokens:-
{$Graphic} Object Token: To pass in the currently selected Esri Graphic object:
<a href="command:RunWorkflowByUrlAndInputs?url=WORKFLOW_URL&graphic={$Graphic}">LINK_TEXT</a> -
{$Geomtery} Object Token: To pass in the geometry of the currently selected Esri Graphic object:
<a href="command:RunWorkflowByUrlAndInputs?url=WORKFLOW_URL&geometry={$Geometry}">LINK_TEXT</a> -
{$Feature} Object Token: To pass in the current Geocortex feature:
<a href="command:RunWorkflowByUrlAndInputs?url=WORKFLOW_URL&feature={$Feature}">LINK_TEXT</a> -
Field Token: Passes in field values. For example, to pass in the value of the PID (parcel ID) field of the current feature, use the Field token {PID}:
<a href="command:RunWorkflowByUrlAndInputs?url=WORKFLOW_URL&parcelId={PID}">LINK_TEXT</a>
-
-
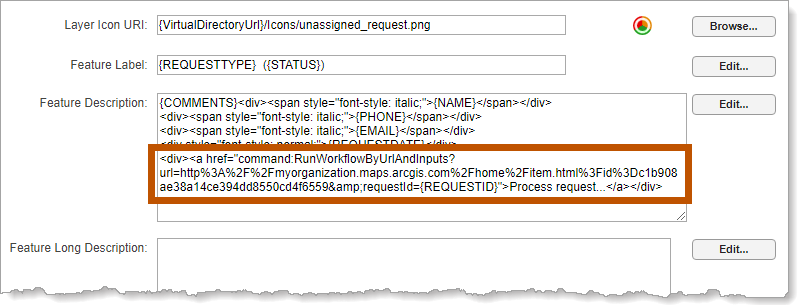
Example configuration of a hyperlink that runs a workflow with one input, requestId, that uses a Field token
Configure the Hyperlink and Run the Workflow
To use a hyperlink to host and run a workflow that takes inputs:
Step 1: Configure the hyperlink
-
Edit the layer in Geocortex Essentials Manager.
-
On the Details tab, add an HTML anchor element like the following to the Feature Description or Feature Long Description setting, whichever you are using for feature descriptions:
-
Get the workflow's URL:
-
VertiGIS Studio Workflow Designer: In VertiGIS Studio Workflow Designer, open the workflow, click Info in the sidebar, and copy the URL from the URL box.
If there is no URL box in the Info panel, save the workflow. A workflow does not have a URL until it has been saved.
-
ArcGIS: In ArcGIS, go to your Content page and click the workflow to open its details. Copy the URL from your browser's address bar.
-
-
URL encode the URL.
For example, this URL:
https://myorganization.maps.arcgis.com/home/item.html?id=0bfb2c0c6201474b80c7f88b82152613
would be encoded as:
https%3A%2F%2Fmyorganization.maps.arcgis.com%2Fhome%2Fitem.html%3Fid%3D0bfb2c0c6201474b80c7f88b82152613
An easy way to URL encode a workflow's URL is to use a free, online URL encoder.
-
Replace
WORKFLOW_URLin the anchor element with the URL-encoded URL. -
Replace
INPUT1with the value of the first input, specified as a literal or as a replacement token. -
If you want, replace
input1with a descriptive name.You will use the name to access the workflow's inputs from within the workflow.
-
Replace additional inputs in the anchor element as needed, or remove them. Remove the extra ampersands (
&) as well. -
Replace
LINK_TEXTwith the text that you want to appear in the viewer. -
Click Apply Changes.
-
Click Save Site.
<a href="command:RunWorkflowByUrlAndInputs?url=WORKFLOW_URL&input1=INPUT1&input2=INPUT2&input3=INPUT3...">LINK_TEXT</a>
Step 2: Run the workflow
-
Launch the viewer in your browser.
-
To show the hyperlink, select a feature on the layer that has the hyperlink in its feature description.
Feature descriptions can appear in map tips, search and identify results, and feature details.
If you do not see the hyperlink, make sure you are showing the correct setting (Feature Description or Feature Long Description) in the context where you selected the feature. See Map Tips Settings, Results List Settings, and Feature Details Settings.
-
Click the hyperlink to run the workflow.
Use a Context Menu Item to Host and Run a Workflow with Inputs
You can configure context menus to run workflows that take run-time inputs. Context menus can also pass design-time inputs.
Each context menu's location in the viewer is associated with a particular type of data. For example, the Feature Actions menu appears in the Feature Details panel, which is associated with a particular feature. Similarly, the Map Context menu is associated with a particular point on the map.
You can pass the data associated with a context menu to a workflow using the {{context}} token. In the Feature Actions menu, the {{{context}} token passes the feature. In the Map Context menu, the {{context}} token passes the geometry for the point on the map.
Command Parameter Syntax
Workflow inputs are defined in the menu item's Command Parameter setting. The inputs can be literals (design-time inputs) or the {{context}} token (run-time input).
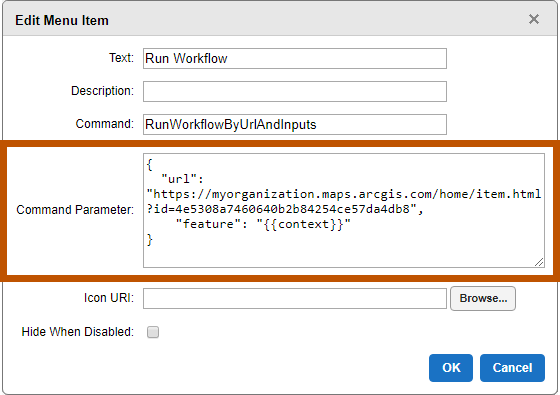
Example command parameter for a context menu item
The command parameter has the following syntax:
{
    "url": "WORKFLOW_URL",
    "input1": INPUT1,
    "input2": INPUT2,
    "input3": INPUT3,
    ...
}
The command parameter specifies the following:
-
URL: The
"url": "WORKFLOW_URL"key/value pair specifies the URL of the workflow that the menu item runs. ReplaceWORKFLOW_URLwith the URL of your workflow. You can copy the URL from the Info panel in Workflow Designer or from the ArcGIS item where the workflow is saved. -
Inputs: The
inputi=INPUTiparameters specify the workflow's design-time and run-time inputs:-
Design-Time Inputs: In this case,
INPUTiis a literal. For example, a context menu could pass a string and number using this syntax:{ "url": "WORKFLOW_URL", "mystring": "THIS IS MY STRING", "mynumber": 123456 } -
Run-Time Inputs: In this case,
INPUTiis the{{context}}token. The type of data that the{{context}}token passes depends on the menu that uses it. For example:-
Feature Actions Menu: When the
{{context}}token is used in a Feature Actions menu, it passes a feature. For example:{ "url": "WORKFLOW_URL", "feature": "{{context}}" } -
Map Context Menu: When the
{{context}}token is used in the Map Context menu, it passes the map location (point geometry) that the user clicked to open the Map Context menu. For example:{ "url": "WORKFLOW_URL", "point": "{{context}}" }
-
-
Configure the Context Menu and Run the Workflow
To use a context menu item to host and run a workflow that takes inputs:
Step 1: Configure the context menu
-
Edit the viewer in Geocortex Essentials Manager.
-
Click Context Menus in the side panel.
-
Click the link for the context menu that you want to edit.
-
Select the Desktop, Tablet, or Handheld tab, or click Configure Simultaneously to add the menu item to all three user interfaces.
For more information, see Configure Multiple User Interfaces.
-
Add a new menu item.
-
In the Text box, type the menu item's text.
-
In the Command box, type RunWorkflowByUrlAndInputs.
-
In the Command Parameter box, enter a parameter like the following:
{"url": "WORKFLOW_URL", "input1": INPUT1} -
Replace
WORKFLOW_URLwith the workflow's URL.You can get the URL from VertiGIS Studio Workflow Designer or from ArcGIS:
-
VertiGIS Studio Workflow Designer: In VertiGIS Studio Workflow Designer, open the workflow, click Info in the sidebar, and copy the URL from the URL box.
If there is no URL box in the Info panel, save the workflow. A workflow does not have a URL until it has been saved.
-
ArcGIS: In ArcGIS, go to your Content page and click the workflow to open its details. Copy the URL from your browser's address bar.
-
-
Replace
INPUT1with the value of the first input, specified as a literal or as the{{context}}token. -
Replace
input1with a descriptive name.You will use the name to access the workflow's input from within the workflow.
Camel case is recommended, for example,
myDescriptiveName. -
Insert additional inputs as needed. Use commas to separate the inputs.
For example:
{ "url": "WORKFLOW_URL", "input1": INPUT1, "input2": INPUT2, "input3": INPUT3 } -
Click OK.
-
Click Apply Changes.
-
Click Save Site.
Step 2: Run the workflow
-
Launch the viewer in your browser.
-
Open the context menu.
For instructions on opening the different types of context menu, see Types of Context Menu.
-
Click the menu item that runs the workflow.