There are two types of workflows:
▪Client Workflows: Client workflows run in a client application (the host application). Most workflows are client workflows.
▪Server Workflows: Server workflows run on the VertiGIS Studio Workflow server. They are used to perform server-side operations, like querying databases.
Server workflows are available in on-premises Workflow only. If you use on-premises Workflow, you must specify the type of workflow—client or server—when you create a new workflow. Specifying a server workflow filters the Toolbox to show only activities that work in server workflows.
When you create a client workflow, you select the types of host applications that will run the workflow. This filters the Toolbox to show only those activities that work in your chosen host applications, preventing you from accidentally adding an activity that one or more of the host applications don't support.
You can view a workflow's host applications at any time on the Deployment panel. To open the Deployment panel, click Info in the sidebar and then click Deployment.
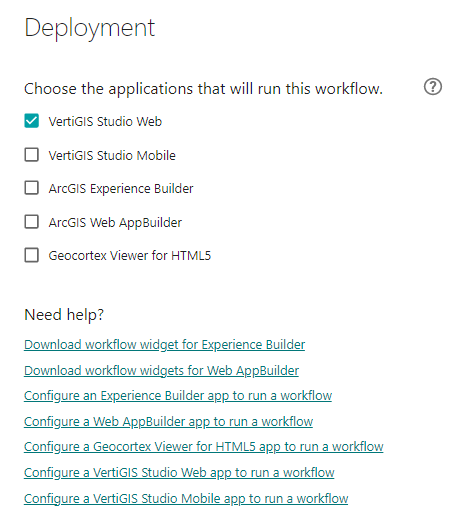
Deployment panel for a client workflow
See also...
Methods to Create a Workflow
There are several methods to create a new workflow:
▪Dashboard: The Dashboard opens when you open Workflow Designer or, if Designer is already open, when you close all the workflows. The Dashboard contains templates to create blank workflows.
 |
Create a Blank Server Workflow: (on-premises Workflow only) To create a blank server workflow, click the Server Only Workflow template. |
 |
Create a Blank Client Workflow: To create a blank client workflow that will run in the specified host application(s), click one of the predefined client templates. For example, to create a blank client workflow that will run in VertiGIS Studio Web, click the Workflow for VertiGIS Studio Web template. |
 |
Create a Blank Client Workflow with a Custom Set of Host Applications: Click Choose Environments to create a blank client workflow and select the host applications the workflow will run in. For example, to create a blank client workflow that will run in VertiGIS Studio Web and the Geocortex Viewer for HTML5, click Choose Environments, select the VertiGIS Studio Web and Geocortex Viewer for HTML5 checkboxes, and then click Create. |
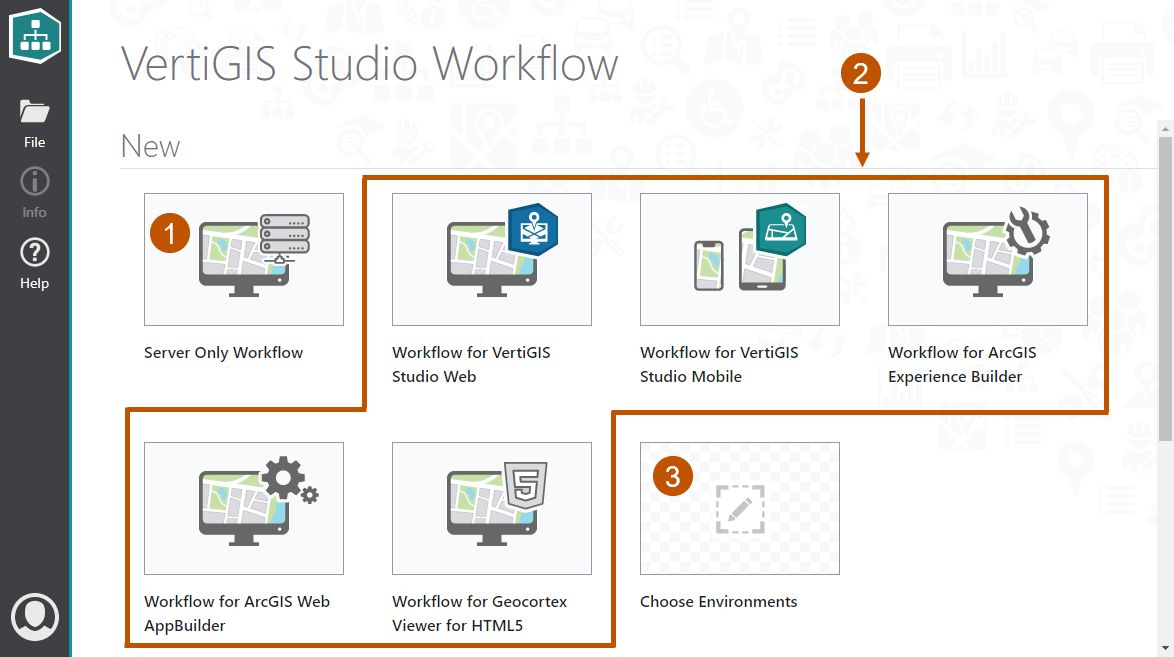
The Dashboard, shown in on-premises Workflow Designer
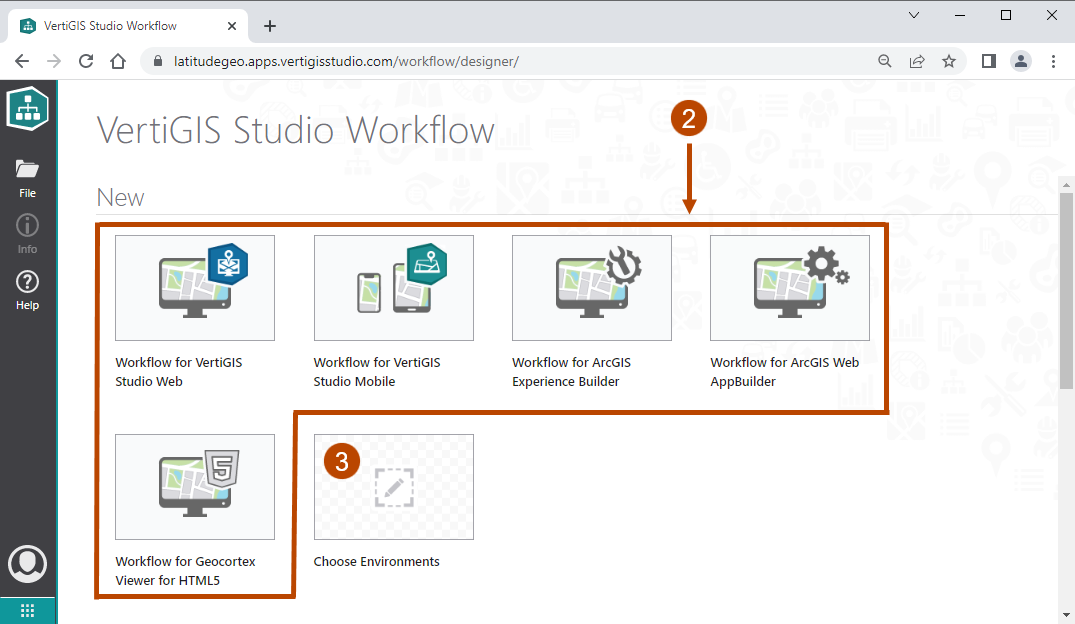
The Dashboard, shown in cloud Workflow Designer
▪File Menu:
•Create a Blank Client Workflow:
1.Click File | New, select Blank Workflow, and then click Create.
The New Workflow dialog box opens.
2.In on-premises Workflow, make sure Client Workflow is selected.
3.Select the checkbox for each host application that will run the workflow.
4.Click Create.
The dialog box closes and the new workflow opens in Designer.
•Create a Blank Server Workflow: (on-premises Workflow only)
1.Click File | New, select Blank Workflow, and then click Create.
The New Workflow dialog box opens.
2.Select Server Workflow.
3.Click Create.
The dialog box closes and the new workflow opens in Designer.
•Create a Workflow Based on a Sample: Workflow Designer provides a selection of sample workflows that perform common tasks, like buffering a geometry or looping through the features in a feature set.
To base a new workflow on a sample:
1.Click File | New, select a sample, and then click Create.
A copy of the sample opens in Designer.
2.For a client workflow, click Info | Deployment and select the checkbox for each host application that will run the workflow. Click the design surface to close the panel.
•Create a Workflow Based on an Existing Workflow:
1.Click File | Open, locate and select the workflow you want to base the new workflow on, and then click Open.
The workflow opens.
2.Click File | Save As, type a title for the new workflow, and then click Save.
The new workflow opens in Designer.
3.For a client workflow, click Info | Deployment and select the checkbox for each host application that will run the workflow. Click the design surface to close the panel.
▪New Tab: Any time you have at least one workflow open in Designer, you can create a new workflow by creating a new tab:
•Click the tab with the plus sign on it  .
.
The New Workflow dialog box opens.
•If you use on-premises Workflow, select the type of workflow, Client Workflow or Server Workflow.
•For a client workflow, select the checkbox for each host application that will run the workflow.
•Click Create.
The dialog box closes and the new workflow opens on a new tab.
If you use VertiGIS Studio Web or VertiGIS Studio Mobile to host and run workflows, you can create workflows from Web Designer or Mobile Designer using templates provided by the host applications. For information, see Create Workflows in VertiGIS Studio Web and VertiGIS Studio Mobile.
You can modify the type of workflow (client or server) and host applications at any time in the Deployment panel. To open the Deployment panel, click Info in the sidebar and then click Deployment. For information about moving a workflow to a different environment, see Run a Workflow in Different Environments.
Main Steps to Create a Workflow
The main steps to create a workflow in Workflow Designer are as follows:
Create a Workflow
To create a workflow:
Step 1: Create a new workflow
Create a new workflow using any of the methods to create a new workflow.
Build the workflow by adding, connecting, and configuring activities:
▪Add Activities: To add an activity, locate the activity in the Toolbox and drag it to the design surface.
To find a particular activity, type part of the activity's name in the Filter box at the top of the Toolbox. The Toolbox will show only those activities that match what you type.
▪Connect Activities: Connect activities into a flowchart. To connect two activities, drag a connector handle from the first activity to the following activity. To show an activity's handles, hover over the activity.
Dropping an activity on the last activity in the workflow automatically connects the two activities.
▪Configure Activities: To configure an activity, select the activity on the design surface to show its properties. Modify the properties as desired. Click on the design surface to close the properties.
Once you have built the workflow, you can run the workflow in VertiGIS Studio Workflow's test environment, the Sandbox.
The first time you save a workflow, VertiGIS Studio Workflow creates an item for the workflow in your ArcGIS Content area. You can open a workflow's item in ArcGIS by clicking Info | View in Workflow Designer.
1.Save the workflow: Click File | Save As or File | Save, or press Ctrl+S.
2.Enter a title for the workflow item.
The workflow's title in Workflow Designer is the same as the item's title in ArcGIS.
3.Click OK.
Change a Client Workflow's Host Applications
When you create a new client workflow, you specify the types of client applications that will host the workflow. Providing this information allows Workflow Designer to tailor the authoring experience. In particular, the Toolbox only shows activities that work in your chosen host applications. For example, if you specify that the workflow will run in VertiGIS Studio Web, the Toolbox will only show activities that work in VertiGIS Studio Web. This prevents you from accidentally using an activity that VertiGIS Studio Web does not support.
You can change a workflow's host applications at any time on the Deployment panel. For example, you might want to switch to a different type of host application, or you might want to support an additional type of host application.
Changing a workflow's host applications can break the workflow. If you have already added activities to the workflow, you may have to modify the workflow to make it work in the new environment. For information, see Adapt a Workflow to a New Environment.
To change a workflow's host applications:
1.In Workflow Designer, open the workflow whose deployment settings you want to change.
2.Click Info in the sidebar.
The info panel opens.
3.Click Deployment to open the Deployment panel.
4.Select the checkbox for each application you will use to run workflows. Clear all the other checkboxes.
5.Click the design surface to close the panel.
The Toolbox is filtered to only show activities that work in your chosen environments.
Change the Type of a Workflow
Changing the type of workflow applies to on-premises Workflow only.
You can change the type (client or server) of an existing workflow at any time on the Info panel.
Changing the type of a workflow can break the workflow. If you have already added activities to the workflow, you may have to modify the workflow to make it work. For information, see Adapt a Workflow to a New Environment.
To change the type of a workflow:
1.In Workflow Designer, open the workflow whose type you want to change.
2.Click Info in the sidebar. The info panel opens.
3.Select the workflow type.
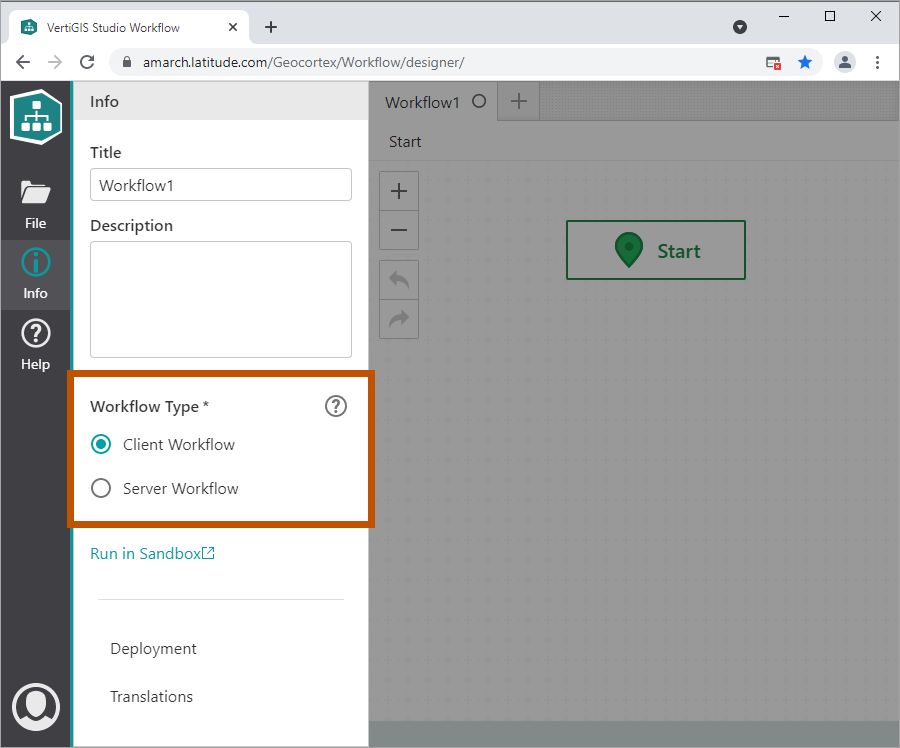
Info panel, showing the workflow type
4.Click the design surface to close the panel.