Configure Geometry Filters
VertiGIS Studio Access Control provides geometry filters that let you specify which geographic data your users can see in your GIS applications.
For example, you might want to:
- Let all users view a layer and its fields, but allow them to only see features within a certain geographic area.
- Let a group of users view a layer and its fields, but restrict an individual user's access so that they only see the areas they need to work with.
Geometry filters control which features are visible and editable but do not enforce spatial constraints. Users can create new features or modify existing features that may break the defined geometry filter conditions.
Before You Begin
Before you begin creating geometry filters, note the following:
- Geometry filters apply to both editable and visible layers.
- Geometry filters are applied to a specific user or group of users. To add a filter, you must know the name of the user or group.
- To configure access using geometry filters, you must be using ArcGIS Server and the protected services must be published from ArcGIS Pro rather than from ArcMap. Your ArcGIS Server must also have the Geometry Service enabled. If you are applying geometry filters to public services, the Geometry Service must also be publicly available.
Add Geometry Filters
The following procedure shows how to add a geometry filter for a user or group.
To add a geometry filter
-
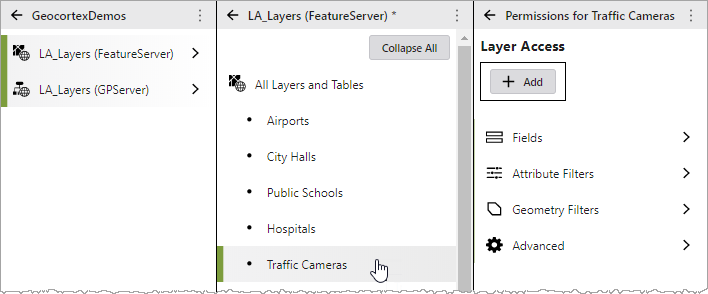
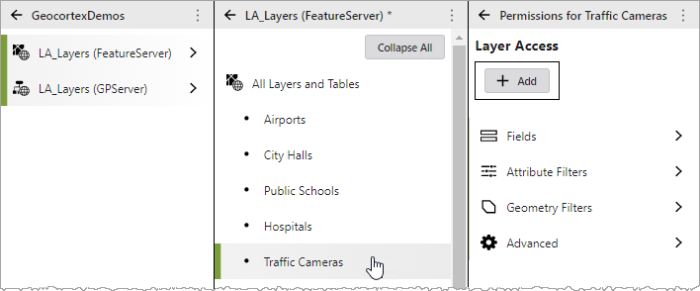
In the Access Control Designer, drill down and select the service layer on which you want to apply the filter. (See Add Layer Permissions, steps 1- 2.)
-
In the Permissions for Layer Name panel, click Geometry Filters. The Geometry Filters for Layer Name panel opens.
-
If geometry filters have been defined for the selected layer, you will see them listed.
-
If geometry filters have not been defined for the selected layer, you will only see the Add button.
-
-
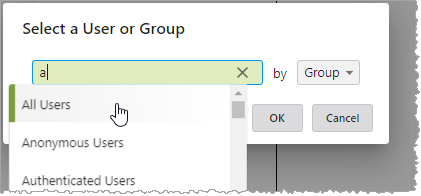
In the Geometry Filters for Layer Name panel, click Add. The Select a User or Group dialog box opens.
-
In the Select a User or Group dialog box, in the drop-down list on the right, choose whether to search by Group or by User.
Start typing the name of the group/user into the text box, and then select from the drop-down list that displays.
-
In the Filters table, click Select a geometry.
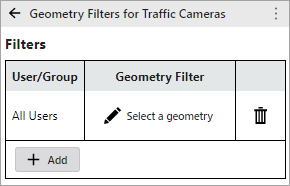
The Select Geometry window opens.
-
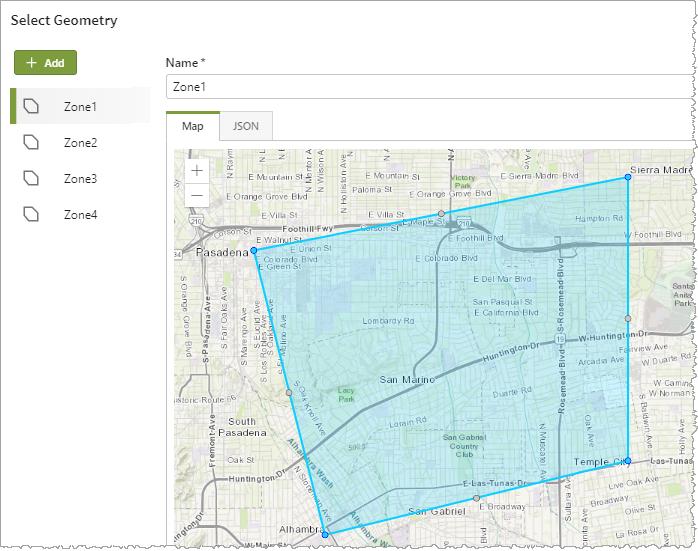
In the Select Geometry window, any existing geometries are listed. You can choose an existing geometry to apply the filter to, or create a new geometry.
-
To choose an existing geometry: Locate the geometry in the list and select it.
The geometry displays on the map.
-
To create a new geometry:
-
Click Add.
-
Type a name for the geometry.
-
On the map, click and drag to draw the geometry.
-
Double-click to complete the shape.
-
Click Save.
-
-
-
Click OK.
If you configure multiple geometry filters for the same user or group, the filters are not merged. Instead, inheritance rules apply and the highest precedence filter is used. For details, see Combining permissions and filters.
Delete Geometry Filters and Geometries
The following steps show how to delete geometry filters and geometries created in Access Control.
-
In the Access Control Designer, drill down and select the service layer containing the filter or geometry you want to delete. (See Add Layer Permissions, steps 1- 2.)
-
In the Permissions for Layer Name panel, click Geometry Filters. The Geometry Filters for Layer Name panel opens.
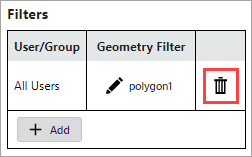
All geometry filters currently defined for the selected layer are listed.
-
To delete a filter, click its Delete button.
- or -
To delete the entire geometry, click on the geometry name to open the Select Geometry window.
At the bottom of the Select Geometry window, click Delete and then click OK.
Edit Geometries
The following steps show how to edit geometries created in Access Control.
-
In the Access Control Designer, drill down and select the service layer containing the filter or geometry you want to edit. (See Add Layer Permissions, steps 1- 2.)
-
In the Permissions for Layer Name panel, click Geometry Filters. The Geometry Filters for Layer Name panel opens.
All geometry filters currently defined for the selected layer are listed.
-
To edit a geometry, click on it.
-
On the map, click and drag the geometry's vertices to reconfigure its shape.
-
Click OK.