One-Time Setup
Access Control is installed on premises. Depending on your deployment, you may need to install it on more than one machine. This topic provides background information that will help you determine how to set up Access Control for your organization.
Components
Access Control has the following components:
-
Proxy: The Proxy controls access to your ArcGIS services at run time.
-
Designer: The Designer is the configuration component. It is used to configure permissions and filters.
-
Post Installer: The Post Installer is used to configure the installation, including the Proxy and Designer components.
Deployment
Every Access Control deployment must have at least one Proxy and at least one Designer.
The simplest deployment has both the Proxy and Designer on the same machine as the Web Adaptor. ArcGIS Server can be on the same machine as the Web Adaptor or on a different machine.
The recommended, and most common, deployment of Access Control requires ArcGIS Server to use the ArcGIS Web Adaptor. However, other deployments are also supported. For details, see Reverse Proxy and/or Load Balancer Deployments.
In the following diagram, the arrow indicates that the Designer is able to configure that Proxy.

Proxy and Designer on the Web Adaptor machine (local Designer)
The Proxy must be on the Web Adaptor machine, but the Designer can be on any machine, provided the Designer has access to the Proxy.
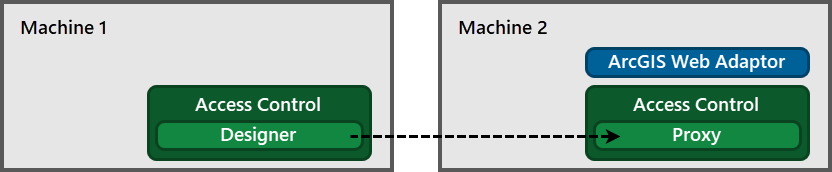
Designer on a different machine than the Proxy (remote Designer)
If you have multiple Web Adaptors on different machines, each Web Adaptor machine must have the Proxy. One way to do this is to use the local Designer for each Proxy.

Multiple Web Adaptors on different machines, each with its own Proxy and local Designer
If you have multiple Web Adaptors on the same machine, you can use one Proxy for them all.
You can use a single Designer to configure multiple Proxy components.

One Designer that serves as both a local Designer and a remote Designer
If you use other Geocortex products, such as VertiGIS Studio Workflow or VertiGIS Studio Mobile, you may want to put the Designer components for the different products on the same machine. You can then use the Designer to configure all the Proxy components.
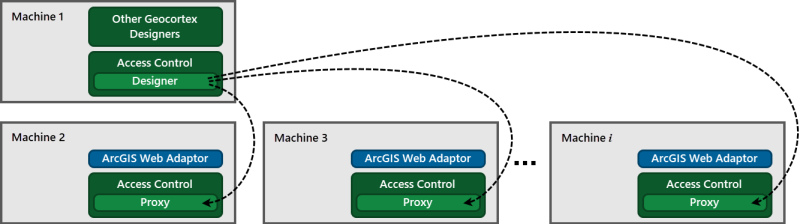
Standalone Designer on the same machine as other Geocortex designers
You can combine any of the illustrated deployment scenarios to suit your needs.
Summary of Deployment Guidelines
-
Every Access Control deployment must have at least one Designer and Proxy.
-
The Proxy must be installed and configured on the same machine as the Web Adaptor that it proxies.
ArcGIS Server can be on the same machine as the Web Adaptor and Proxy, or on a different machine.
-
You must protect your ArcGIS Server site with firewalls that secure access to ports 6080 and 6443.
For details, see the following ArcGIS Server documentation: Firewalls and ArcGIS Server.
-
Every Web Adaptor machine must have its own Proxy.
-
Every Proxy must be associated with a Designer, either on the same machine (local Designer) or on a different machine (remote Designer).
-
You can use the same Designer for multiple Proxy components.
Reverse Proxy and/or Load Balancer Deployments
While the most common deployment of Access Control includes an ArcGIS Web Adaptor, other deployments are also supported.
In a typical ArcGIS deployment that does not use a Web Adaptor, a reverse proxy and/or load balancer directs traffic to the backend ports 6080/6443 of ArcGIS Server
To configure a reverse proxy and/or load balancer, without an ArcGIS Web Adaptor:
-
Install VertiGIS Studio Access Control on each ArcGIS Server machine, following the instructions provided on the Install Access Control page.
Typically, Access Control is installed on the backend ArcGIS Server machine. However, you can install it on a separate server if you prefer.
-
Run the Post Installer:
-
Follow the instructions provided on the Configure Post-Installation Settings page.
-
On the Components panel, follow the procedure for the Use the Access Control proxy without a Web Adaptor option.
-
-
Configure your reverse proxy/load balancer to route traffic to Access Control on port 5080.
There are two ways to do this, depending on your reverse proxy/load balancer software:
-
Route traffic to Access Control as a forwarding proxy. (This is how the Web Adaptor forwards requests to Access Control).
-
Route traffic to Access Control as a typical HTTP request.
An incoming request to
https://<external-address>/arcgisshould be routed tohttp://<accesscontrol-server>:5080/https://<arcgis-server>:6443/arcgis/This request does the following:
-
Targets Access Control at
http://<accesscontrol-server>:5080. -
Passes in the specified ArcGIS URL
https://<arcgis-server>:6443/arcgis/as the path portion of the URL.
-
-
-
To allow the backend ArcGIS Server to correctly provide absolute URLs in responses correctly:
-
The routed request must also add an X-Forwarded-Request-Context header with a value of the external address (
https://<external-address>/arcgis).You can omit this step if you configure your reverse proxy to rewrite URLs in responses.
-
-
To allow a reverse proxy to route traffic to Access Control, you must configure VertiGIS Studio Access Control to listen on an external host name. By default, Access Control listens for inbound requests on localhost only.
-
On the machine running Access Control, open a command prompt as an administrator.
-
Change the directory to
C:\Program Files\VertiGIS\VertiGIS Studio Access Control\dist\bin -
Run the command
nssm edit geocortexaccesscontrolA service editor application opens.
-
Locate the Environment tab (you may need to scroll to the right) and select it.
-
Add
APP_HOST=<accesscontrol-server>to the list of environment variables.Be sure to use your own host name.
-
To save your changes, click the Edit service button.
-
Open the Windows services.msc dialog and restart the VertiGIS Studio Access Control service.
-
About Installation
The installer installs the following components:
- Proxy
- Designer
- Post Installer
You cannot install a subset of Access Control's components. You will use the Post Installer to specify which component(s) you want to use.
Depending on your deployment, you may have to install Access Control on more than one machine. You must use the same version of Access Control on each machine.
Installation of VertiGIS Studio Access Control disables the ArcGIS SOAP API.
Where to Install Access Control
-
Install Access Control on the same machine as each Web Adaptor that you want to proxy.
If a machine has more than one Web Adaptor that you want to proxy, install Access Control once. Configure the Web Adaptors separately by running the Post Installer once for each Web Adaptor.
-
Install Access Control on each machine where you want to have the Designer but not the Proxy.
About Post Installation
To use the Proxy and Designer, you must configure them in the Post Installer. Depending on your deployment, an installation may not need to use both the Proxy and Designer. The Post Installer allows you to specify which component(s) you want to use—the Proxy, the Designer, or both. The panels that you configure in the Post Installer depend on which components you will use:

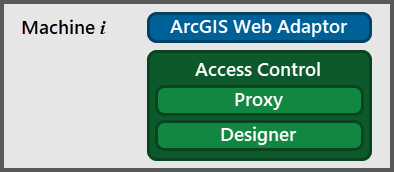
|
Machine with both the Proxy and Designer |
Designer and Proxy: To use both the Designer and the Proxy, configure the following panels in the Post Installer:
|

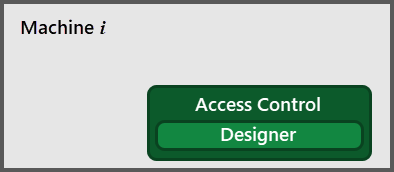
|
Machine with the Designer but not the Proxy |
Designer Only: To use the Designer but not the Proxy, configure these panels in the Post Installer:
|

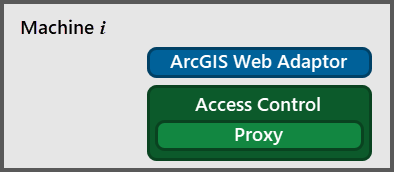
|
Machine with the Proxy but not the Designer |
Proxy Only: To use the Proxy but not the Designer, configure the following panels in the Post Installer:
|