Feature Editing
End users can add and modify map features. As an administrator, you control the user's editing experience through various modules and settings.
If you have purchased Geocortex Mobile App Framework, end users do not need network connectivity to add or modify features—they can do their editing when the viewer is offline and then sync their changes back to the server when they go online again.
Enable Editing on an ArcGIS Feature Layer
Editing features from an HTML5 viewer is controlled by the Editing Module. In order for features to be editable, they must belong to a feature layer with editing enabled from ArcGIS Server. For information on setting edit privileges on feature layers, see ArcGIS's documentation: Allow others to alter hosted feature layers.
Once editing is turned on in ArcGIS Online, users can perform the following functions in a viewer:
-
Add new features to a layer
-
Edit feature details
-
Edit a feature's geometry
-
Remove a feature
To edit related features from ArcGIS Tables, you must also add the tables in Geocortex Essentials Manager. For more information, see ArcGIS Tables in the Essentials documentation.
Configure Editing
In Manager, you can configure whether users are allowed to snap to features and whether snapping is the default behavior.
Configure Snapping
To configure snapping for an editable layer:
-
Go to the Map page of Manager.
-
Click the Layer List tab.
-
Click the Edit icon
 next to the layer you want to configure.
 -
On the Details tab, locate the Editing section.
-
Select or clear the following checkboxes:
-
Allow Snapping: To allow users to snap to features, select this checkbox.
-
Snapping Enabled: To enable snapping by default for features in this layer, select this checkbox.
The Features Copyable to Edit Layer checkbox is not configurable for HTML5 viewers.
-
-
Click Apply Changes.
User Interface
Users can create, modify, and remove features directly on the map. The viewer provides various user interface elements that initiate edit commands. While the following overview of user interface elements is not exhaustive, it offers an introduction to the scope of editing functionality.
Create a New Feature
To add a new feature to a layer, users can locate the layer they want to add to in the Layer List and click the ![]() Layer Actions icon. If a layer is editable, the Create New Feature action is at the top of the available layer actions.
Layer Actions icon. If a layer is editable, the Create New Feature action is at the top of the available layer actions.
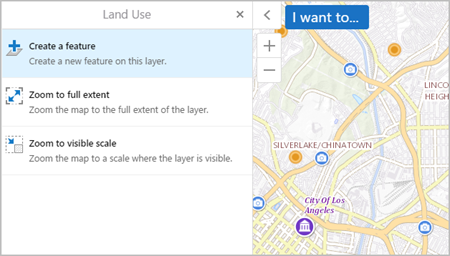
You can also configure your toolbar with the Create New Feature tool. When the user clicks the Create New Feature tool, they are presented with a list of editable layers that they can create a feature for.
Users can add new features with the Create New Feature tool. Ensure both Create New Feature and CreateNewFeatureControlRegion are included in your configured toolbar. When the user selects the Create New Feature tool, they are presented with a list of editable layers that they can create a feature for.
![]()
Create New Feature tool
For more information see Editing Module.
Add a Geometry
During the feature creation process, the user can add the feature's geometry to the map. The type of geometry depends on the feature layer and could be a point, line, or polygon.
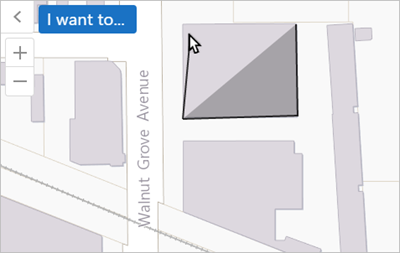
Add geometry to the map
Once geometry is added, the user can add any feature attributes provided by the selected layer.
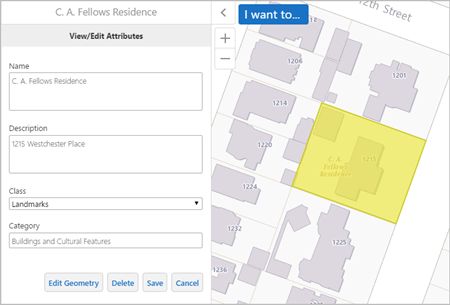
View/Edit Attributes panel.
Once a feature is ready, the user clicks the Save button to send changes to the server.
Edit a Feature
If a feature already exists, the user can click the Edit Feature link on the feature's map tip.
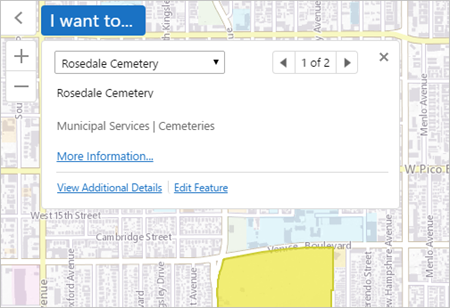
Map tip for an editable layer with an Edit Feature link
Alternatively, the Edit Feature action appears in the list of available actions in the feature details view. To see the list of available actions, users can open the panel actions menu by clicking the Panel Actions icon ![]() .
.
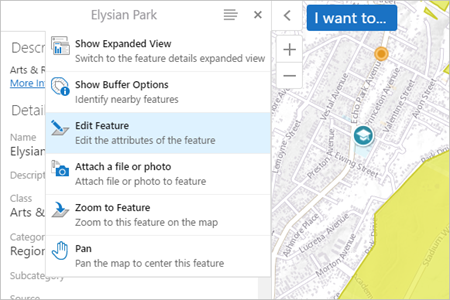
Edit Feature action in a list of available actions.
The user can also edit a feature's geometry by clicking the Edit Geometry button while editing a feature. This activates a geometry editing tools on the map which you can use to adjust existing geometry. The type of geometry depends on the feature layer and could be a point, line, or polygon.
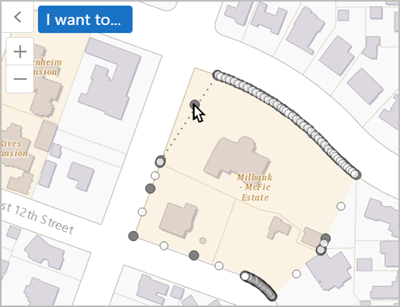
Edit existing polygon geometry
Once a feature has been edited, the user clicks the Save button to send changes to the server.
Delete a Feature
To delete a feature, the user clicks the Edit Feature link, scrolls to the bottom of the Edit/View Attributes view, and then clicks the Delete icon. This removes the feature from the map as well as from the server.
Create New Related Feature
To create a new related feature in an ArcGIS Table, while viewing the feature for which you want to create a related feature, click ![]() Create A New Related Feature. Fill in the desired attributes, and click Save.
Create A New Related Feature. Fill in the desired attributes, and click Save.
Edit Related Feature
To edit a related feature from an ArcGIS Table, while viewing the feature that contains the related feature you want to edit, click the related feature, click the ![]() Panel Actions menu, and select
Panel Actions menu, and select ![]() Edit Feature. Modify the desired attributes, and click Save.
Edit Feature. Modify the desired attributes, and click Save.
Advanced Editing
The following functions are available for editing polyline and polygon features:
-
Create a Single Feature by Combining Two or More Features Using the Union Operation
-
Create Multiple Features from a Single Feature Using the Cut Operation
The union and cut operations are available only for polylines and polygons on editable feature layers.
Create a Single Feature by Combining Two or More Features Using the Union Operation
The union operation combines multiple features into a single feature. The user designates one of the features as the master feature during the union operation. This master feature retains its original feature attributes, but it absorbs the geometry of the other features. Note that the union of features involves a delete operation. When this occurs, any link to a related feature might break. For further information, see Origin and destination classes on the Esri ArcMap site.
By default, a single feature can be created from a maximum of 10 features with the union operation. This maximum can be adjusted if necessary. See Change the Maximum Number of Features for the Union or Cut Operations for further information.
To create a single feature from multiple features:
Polygons are used in the following description to illustrate the union operation.
-
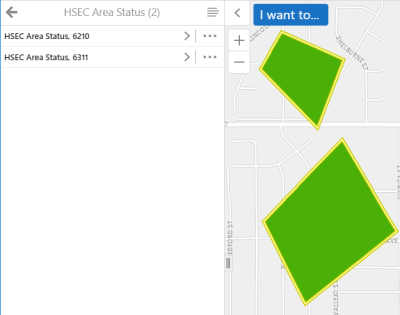
Perform an identify action on the polygon features that you want to include in a union operation.
The identified features are listed in the Results List panel. If the features are summarized in groups, click a summarized item to view the list of the individual features.
- Remove any features that you do not want to include in the union operation by clicking the Feature Actions menu
 for the respective features and then clicking Remove from Results.
 -
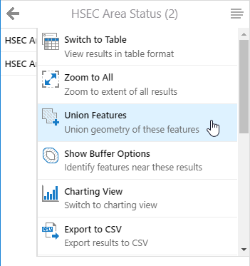
Click the Panel Actions menu
 .
.A menu of actions that apply to the features in the list opens.
-
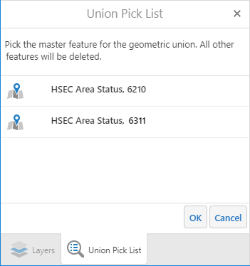
Click Union Features to activate the operation.
The Union Pick List for the features opens in the side panel. The description directs the user to pick a feature to be the master feature for the union operation. It also indicates that the remaining features will be deleted. If the number of features selected exceeds the union limit, a message to that effect opens and instructs the user to remove some features from the Results List and try again.
-
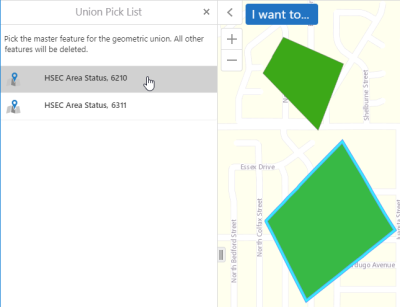
Click the feature in the list that you want to designate as the master feature.
The feature is highlighted with a blue border. This feature will be populated with the attributes of the selected feature.
-
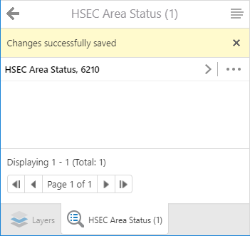
Click OK to complete the union operation.
Create Multiple Features from a Single Feature Using the Cut Operation
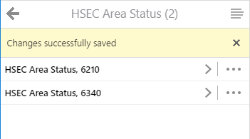
The cut operation separates a feature into one or more child features. The user designates the master feature from among all of the features created during the cut operation. The master feature retains its original attributes. The child features are assigned new object IDs but the remaining attributes are blank. The geometries of the child features contain the same data as the master feature.
By default, the maximum number of child features that can be created with a single cut operation is 10. This maximum can be adjusted if necessary. See Change the Maximum Number of Features for the Union or Cut Operations for further information.
To create child features from a single feature:
Polygons are used in the following description to illustrate the cut operation.
-
Perform an identify action on the polygon features that you want to cut.
The identified features are listed in the Results List panel. If the features are summarized in groups, click a summarized item to view the list of the individual features.
-
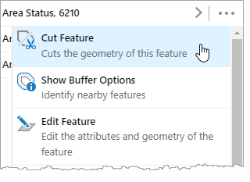
Click the Feature Actions menu
for one of the features.A menu of actions that apply to the feature opens.
-
Click Cut Feature to activate the operation.
The Cut Pick List for the feature opens in the side panel and the description indicates that items will populate the list after a valid cut operation.
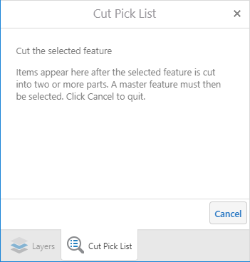
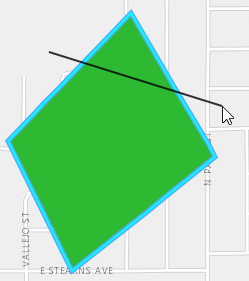
The map display area zooms in to the feature, it is highlighted with a blue border, and a message instructs the user to draw a cut line through the polygon.

-
Click once, drag the pointer to draw the cut line, then double-click to complete the operation.
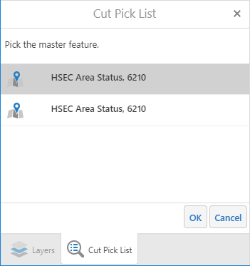
The Cut Pick List is populated with the number of features that will be created. If the number of child features that would be created exceeds the cut limit, a message indicates that the feature cannot be cut, and the cut operation should be tried again. Similarly, if the drawn line does not cut through the polygon, the cut operation cannot be completed and the cut operation should be tried again.

-
Click the child feature in the list that you want to designate as the master feature to inherit the feature attributes of the original feature.
-
Click OK to apply the feature attributes to the selected feature and to distinguish the remaining child features in the list.
Change the Maximum Number of Features for the Union or Cut Operations
By default, the union and cut operations apply to a maximum of 10 features, respectively.
To change the limit for the union and/or the cut operations, add the unionLimit property and the cutLimit property to the configuration settings for the Editing module.
{
	"moduleName": "Editing",
	"moduleType": "geocortex.essentialsHtmlViewer.mapping.modules.editing.EditingModule",
	"configuration": {
	"unionLimit": 15,
	"cutLimit": 15,
	...
}
See also...