Project Module
Projects allow end users to save the state of the viewer, share the saved viewer state, and reload it later. The ability to share projects makes them a valuable collaboration tool. For example, a user could open the viewer, pan to a location, add markup, and then save the project. The user can then share the project with colleagues so they can load the project, see the user's changes, and add their own changes.
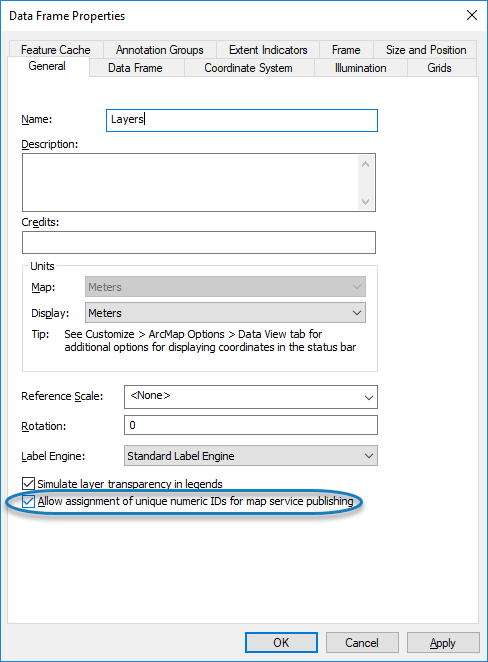
For saved projects to preserve settings such as layer visibility, your map document (.mxd file) must assign unique IDs for map service publishing. To do so, open your map document in ArcMap, right-click the map, select Data Frame Properties, select Allow assignment of unique numeric IDs for map service publishing, save and publish the map service.
Projects belong to the site of the viewer that created the project. A user cannot create a project in one viewer and then load the project in a viewer that belongs to a different site. If the site has more than one HTML5 viewer, a project can be created in one HTML5 viewer and loaded in the site's other HTML5 viewers.
HTML5 Viewer projects require Geocortex Essentials version 4.5 or newer.
Projects are saved on the server, in the Geocortex Data Store. Geocortex Essentials Manager provides an interface to the Data Store that administrators can use to manage projects. For information, see Geocortex Data Store.
What Projects Save
When you save a project, the following aspects of the viewer's state are saved:
|
|
Instead of saving the map extent, the project saves the map's center point. This preserves the scale level when the project is loaded into a map viewport that has different dimensions than the original viewport.
A bookmark is not restored from a project if a bookmark with the same name already exists in the user's personal bookmarks. This ensures that a user's personal bookmarks are not overwritten by project bookmarks.
Project bookmarks are not saved with the user's personal bookmarks. Project bookmarks are available only while the project is loaded.
Project Tools
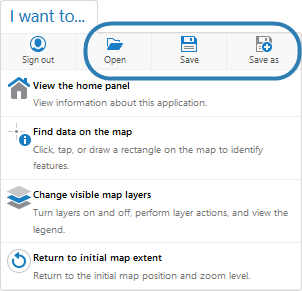
By default, the I Want To menu's Global menu has tools for working with projects, shown in the image below.
|
Project tools, shown in the Desktop interface |
Open - Open the Projects panel. The Projects panel lists the projects that this user is allowed to load. The user clicks a project in the list to load the project. This restores the viewer state that is saved in the project. |
|
Save - If a project is currently loaded and the user has the necessary privileges, update the project with the current viewer state. Otherwise, create a new project using the name and description entered by the user. |
|
|
Save as - Create a new project using the name and description entered by the user. |
You can also add the project tools to the tabbed toolbar. In the list of available tools, you can find Open, Save, and Save as tools in the Global Tasks tool group. If you configure the viewer to use the Full GIS Toolbar, then users can access the project tools on the toolbar's File tab. For more information about toolbar configuration, see Toolbar.
Creating Projects
The user must be signed in to the viewer to create a project.
To create a project, the user opens the I Want To menu and selects Save. The Save Project panel appears, where the user enters a unique name and optional description, and then chooses Save to create the project.
Alternatively, the user can click Save as instead of Save, provided a project is not currently loaded. If a project is already loaded, the Save function saves the loaded project instead of creating a new one.
Loading Projects
The user does not need to be signed in to load a project. However, this requires additional configuration in Manager. For information about allowing access to "Everyone (no sign-in required)", see Access Privileges and Guest Links.
To load a project, the user opens the I Want To menu and selects Open to open the Projects panel. The user can then select a project from the projects list.
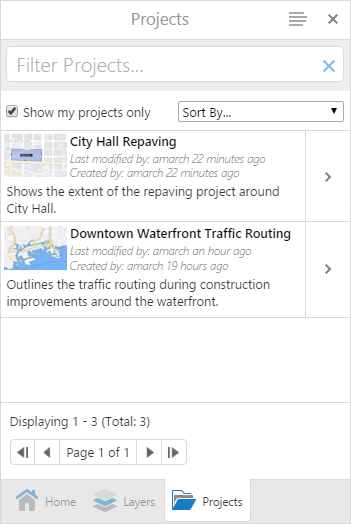
Projects panel, showing two projects
Project Ownership
To create a project, the user must be signed in to the viewer. Users who access the viewer under Anonymous Access cannot create projects.
The user who creates a project is the project's owner. Project owners have full access to the project:
-
Share Project: By default, a project can be seen only by the project's owner. The project's owner can share the project with other users, so that they can see the project on the Projects panel and load the project.
-
Update Project: The project's owner can update the viewer state that is saved in the project.
-
Update Project Details: The project's owner can change the project details, such as the project name.
-
Delete Project: The project's owner can delete the project.
You can change a project's owner in Manager. For instructions, see Geocortex Data Store.
By default, only the project owner can see the project. It does not appear in the Projects panel for other users. The project owner can share the project with other users from the Share Project panel.
The project owner can open the Share Project panel at any time by following the steps below:
-
Open the I Want To menu, and select Open.
-
Use the
 Action icon beside the project that you want to share.
 -
Select
 Share.
The Share Project panel opens.
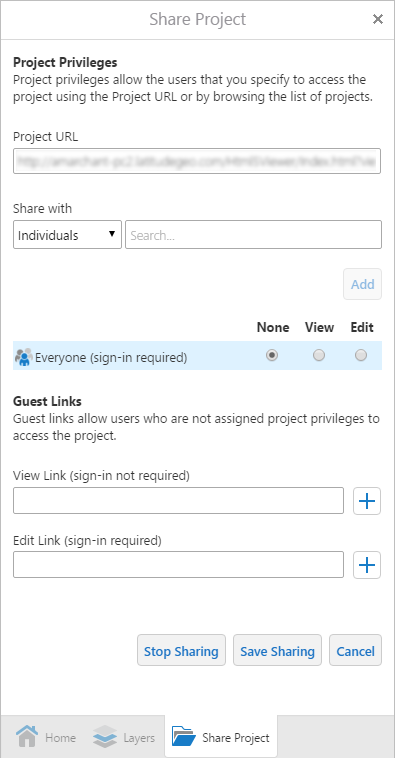
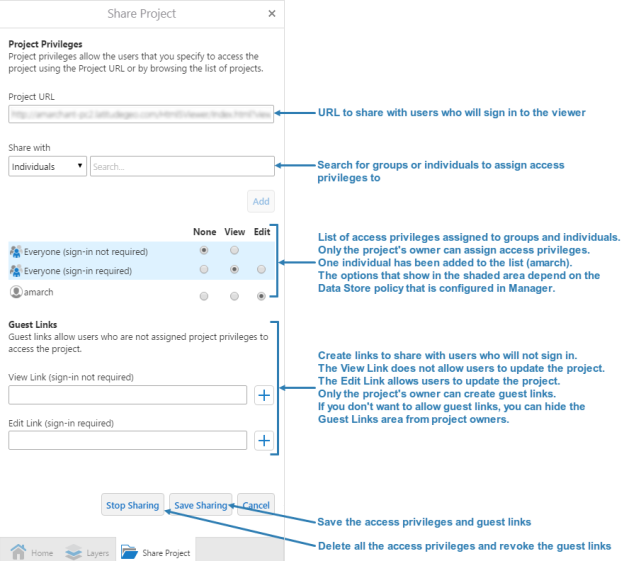
Default appearance of the Share Project panel
Other users can also open a project's Share Project panel using the steps above. However, unless they are the project owner, the access privileges and guest links are not visible.
The method that the owner uses to share a project with other users depends on whether the users will sign in to the viewer or not:
-
Access Privileges: Share projects with users who can sign in to the viewer. To share the project, the owner sends the Project URL to the users, or the users browse for the project in the viewer.
-
Guest Links: Share projects with users who cannot not sign in to the viewer (for example, temporary contractors that have not been added to your security provider). To share the project, the owner sends a guest link to the users.
Access privileges and guest links do not allow users to bypass site security. Site security is enforced no matter what method is used to share a project.
Configuring access privileges does not have any effect on the permissions that are configured in the site.
The project's owner can assign access privileges to other users and groups of users. For example, if the project owner signs in to the viewer using ArcGIS Online credentials, then the owner can assign access privileges to ArcGIS Online users and groups. Similarly, if the owner signs in using Identity Server, then the owner can assign privileges to Identity Server users.
The owner can assign access privileges to:
-
Everyone (sign-in not required): Share the project with everyone. This allows anyone who can access the viewer, including users who access the viewer using Anonymous Access, to load the project. Users do not have to sign in—the project is public.
This setting is only available in the viewer if the Geocortex Data Store is configured to Allow Public Read Access. For information, see Geocortex Data Store.
-
Everyone (sign-in required): Share the project with all signed-in users. This allows anyone who can sign in to the viewer using any of the enabled security providers to access the project. Anonymous users cannot see or load the project.
For example, suppose you have configured the site to allow sign-in using ArcGIS Online or Windows credentials, and you also allow Anonymous Access. A project's owner gives Everyone (sign-in required) the Edit privilege. Any user who can sign in to the viewer using ArcGIS Online or Windows credentials can load and update the project. Anonymous users cannot see or load the project.
-
Groups: Share the project with specific groups of users.
The project's owner can search for groups to assign access privileges to. Searching for groups searches the security provider that the project's owner signed in with. For example, if the owner signs in with Windows Authentication, Active Directory groups are searched.
To remove a group from the list, the project's owner selects the None option for that group and chooses Save Sharing.
-
Individuals: Share the project with individual users.
The project's owner can search for individuals. Searching for individual users searches the security provider that the project's owner signed in with. For example, if the owner signs in with Portal for ArcGIS, Portal for ArcGIS users are searched.
To remove an individual user from the list, the project's owner selects the None option for that user and chooses Save Sharing.
The access privileges are:
-
None: Users cannot see the project in the Projects panel and they cannot load the project.
If the project's owner selects None for a specific group or user, the group or user is crossed out in the Share Project panel. When the owner chooses Save Sharing, the group or user is removed form the list. Selecting the None option does not remove Everyone (sign-in not required) or Everyone (sign-in required) from the list.
The View privilege takes precedence over None, and the Edit privilege takes precedence over the View privilege. If more than one access privilege applies to a particular user or group, the highest privilege applies. For example, if a particular user has None privilege and they belong to a group that has Edit privilege, the user will be able to edit the project.
-
View: Users with the View privilege can see the project in the Projects panel and load the project. They can also open the Share Project panel, but they can only see the Project URL. The access privileges and guest links are hidden, and they cannot update the project details or delete the project.
-
Edit: Users with the Edit privilege can see the project in the Projects panel, load the project, and update the project. They can also open the Share Project panel, but they can only see the Project URL. The access privileges and guest links are hidden, and they cannot update the project details or delete the project.
A project's owner can create guest links (URLs) that enable other users to launch the viewer and load the project. There are two types of guest link:
-
View Link: The View Link allows users to load the project. Users cannot update the project, update the project details, or delete the project.
If the Data Store policy is Deny Public Read Access, users must sign in to load the project. The other policies allow users to load the project using a View link without signing in. For more information, see Effect of Data Store Policies on Projects.
-
Edit Link: The Edit Link allows users to load the project and also update the project. Users cannot change the project details or delete the project.
If the Data Store policy is Allow Public Read Access and Public Edit Links, users do not have to sign in to edit the project. The other policies require users to sign in to edit the project. For more information, see Effect of Data Store Policies on Projects.
To share guest links with users who are not signed in, you need to configure the Geocortex Data Store to Allow Public Read Access. For information, see Geocortex Data Store.
We recommend that you only share guest links, especially the Edit guest link, when you have no other option.
To create a guest link, the project's owner clicks the Add Link tool ![]() for the desired type of guest link and then clicks Save Sharing.
The owner then sends the link (URL) to the user. Once a project owner has shared a guest link with a user, the user can share the link with other people.
for the desired type of guest link and then clicks Save Sharing.
The owner then sends the link (URL) to the user. Once a project owner has shared a guest link with a user, the user can share the link with other people.
The project's owner can revoke guest links so the links no longer work. To revoke a guest link, the owner clicks the Remove Link tool ![]() for the desired type of link, and then clicks Save Sharing. This removes the guest links from the Share Project panel and stops them from working. After the owner removes a guest link, users can no longer use the guest link to launch the viewer or load the project.
for the desired type of link, and then clicks Save Sharing. This removes the guest links from the Share Project panel and stops them from working. After the owner removes a guest link, users can no longer use the guest link to launch the viewer or load the project.
Removing a guest link does not stop user sessions that are already in progress. However, if the user used an Edit link, they lose the ability to update the project as soon as the owner removes the link. The owner can create a new View link or Edit link using the Add Link tool ![]() .
.
Once a project owner has removed a guest link and clicked Save Sharing, there is no way to make the link work again. Clicking the Add Link tool does not restore the old guest link—it creates an entirely new link.
Effect of Data Store Policies on Projects
The Data Store policy that is configured in Manager determines whether the guest links require users to sign in. The following table summarizes how the different policies affect sign-in using guest links.
Effect of Data Store Policy on Guest Link Sign-in
|
Data Store Policy |
View Links |
Edit Links |
|---|---|---|
|
Deny Public Read Access |
Requires sign-in |
Requires sign-in |
|
Allow Public Read Access |
Does not require sign-in |
Requires sign-in |
|
Allow Public Read Access and Public Edit Links |
Does not require sign-in |
Does not require sign-in |
If you change the Data Store policy, existing links will behave according to the new policy, not the policy that was in effect when the link was created. For example, if you change the policy form Deny Public Read Access to Allow Public Read Access, existing View links will no longer require users to sign in.
For more information, see Data Store Policies.
Sharing Panel Summary
Summary of Share Project panel options for the project's owner
Example: Use a Project to Collaborate
Taylor and Bill are working on development plans for an industrial site that their company is developing. To start the planning, Bill marks up a site map with notes and ideas. First he signs in to the viewer, searches for the parcel, and zooms the map to it. Then he draws some areas of interest, which he annotates using the Text tool. He also makes some preliminary measurements using the measurement tools. When he is satisfied that he has done everything he wants, he creates a project (I Want To | Save as), which he names Site Plan. In the confirmation dialog box, he clicks Share to open the Share Project panel.
To share the project with Taylor, Bill searches for Taylor's name and adds it to the list of users and groups. He sets Taylor's access privilege to Edit so Taylor can make changes and update the project. Bill also searches for his assistant, Marcus, and gives him View privilege. Finally, Bill copies the Project URL and emails it to Taylor and Marcus. He clicks Save Sharing and closes the Share Project panel.
At this point, Bill realizes that he has forgotten a particular measurement. He selects the measurement tool, adds the missing measurement, and updates the project (I Want To | Save). When his colleagues open the project, they will see the most recent version of the project, which contains Bill's final measurement.
When Taylor receives the email with the project URL, she copies the URL to her browser's address bar and presses Enter. She signs in to the viewer when prompted and the project loads. The map and the saved markup load. Taylor reviews Bill's notes and markup. After reviewing Bill's work, Taylor edits some of Bill's markup, adds some new markup, and saves the project. She then sends Bill and Marcus an email telling them that she has updated the project.
Marcus signs in to the viewer and opens the Projects panel (I Want To | Open). He clears the Show my projects only filter so he can see projects created by other users for which he has access. He sees a project called Site Plan and opens the project. Because Taylor has already updated the project, Marcus sees the current version of the project, with Taylor's changes. He reviews what Bill and Taylor have done and adds some markup of his own to the map, but he cannot update the project because he only has View privilege. To keep a copy with his markup, he clicks Save and creates a new project.
When Bill receives Taylor's email, he reloads the project to review Taylor's markup. Bill and Taylor continue to collaborate on the site plan by marking up the map and updating the project. Marcus stays up to date on the planning by viewing the project after changes have been made.
Project Commands and Events
The Project Module provides commands and events that you can use to work with projects programmatically. The commands and their related events are listed below. All the project commands can be used in hyperlinks, menus, toolbar tools, and workflows. For more information about commands and events, refer to Viewer Commands and Events.
-
SaveAsProject: Displays the user interface to fill in the details about a new project. The viewer raises aProjectSavingEventwhen saving begins, and aProjectSavedEventwhen saving completes successfully. If saving fails, the viewer raises aProjectErrorEvent. -
SaveProject: Updates the viewer state in the currently loaded project, or, if a project is not currently loaded, displays the user interface to fill in details about the new project. The viewer raises aProjectSavingEventwhen saving begins, and aProjectSavedEventwhen saving completes successfully. If saving fails, the viewer raises aProjectErrorEvent. -
ShowShareProject: Displays the user interface for sharing the specified project. -
ShowProjects: Displays the user interface for browsing and loading projects. -
RefreshProjectsList: Refreshes the list of projects that the user can browse and load. -
LoadProject: Loads the specified project in the viewer. The viewer raises aProjectLoadingEventwhen loading begins, and aProjectLoadedEventwhen loading completes successfully. If loading fails, the viewer raises aProjectErrorEvent. -
ShowProjectEditor: Shows the user interface for editing the details for the specified project. The viewer raises aProjectEditorFinishedEventwhen editing completes. -
DeleteProject: Deletes the specified project. The viewer raises aProjectDeletingEventwhen deletion begins, and aProjectDeletedEventwhen the project is successfully deleted. If deletion fails, the viewer raises aProjectErrorEvent.
Configuration Properties
Module
No configuration properties
Views
-
ProjectActionsView: This view shows options for managing and sharing projects.-
menuId: The ID of the menu to show in this view. The default isProjectActions. By default,ProjectActionshas three menu items: Share, Edit Details, and Delete. The menu itself is configured in the Menu Module.
-
-
ProjectEditorView: This view shows the interface for editing a project's details.No
configurationproperties -
ProjectStatusView: This view shows a status indicator when a project is loading or being saved.No
configurationproperties -
ProjectsView: This view shows the Projects panel, which lists the projects that the user has access to.No
configurationproperties -
ShareProjectView: This view shows the Share Project panel, which allows the project's owner to assign access privileges and create guest links.No
configurationproperties
View Models
-
ProjectActionsViewModel: This view model is used byProjectActionsView.No
configurationproperties -
ProjectEditorViewModel: This view model is used byProjectEditorView.No
configurationproperties -
ProjectStatusViewModel: This view model is used byProjectStatusView.-
showUrlOnSave: When this property istrue, the project's URL shows in the confirmation dialog box that displays when a project is saved. If you do not want the confirmation dialog box to show the project's URL, setshowUrlOnSavetofalse.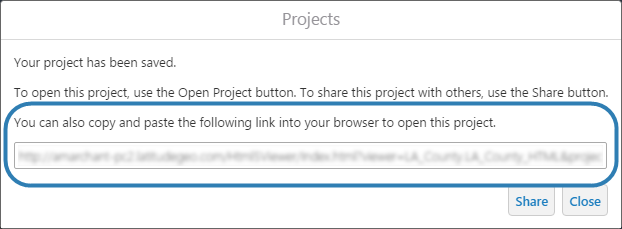
Confirmation dialog box showing the content that is controlled by the showUrlOnSave property
-
-
ProjectsViewModel: This view model is used byProjectsView.-
defaultThumbnail: The thumbnail image to show for this project on the Projects panel if the project's thumbnail fails. The default isResources/Images/Icons/map-no-preview-70x50.png. -
minimumFilterDelay: The number of milliseconds to wait after the user stops typing in the Filter Projects box before starting to filter. The default is300. The Filter Projects box is on the Projects panel.
-
-
ShareProjectViewModel: This view model is used byShareProjectView.-
confirmSharedPublicly: When this property istrue, a confirmation prompt displays when the user sets Everyone (sign-in not required) to View or enables a guest link that does not require sign-in, and clicks Save. If you do not want the viewer to prompt for confirmation, setconfirmProjectViewModeltofalse. The default istrue. -
showGuestLinks: When this property istrue, the Guest Links area shows on the Share Project panel for project owners. If you do not want the Guest Links area to show, setshowGuestLinkstofalse.
-