About Viewer Configuration
There are two ways to configure an HTML5 Viewer:
-
Geocortex Essentials Manager: (recommended) Many viewer settings can be configured using Geocortex Essentials Manager, provided you install the HTML5 Viewer's Management Pack. Changing viewer settings in Manager writes the changes to the viewer's configuration files. For more information, see About Configuration Using Manager.
-
Configuration Files: All of a viewer's settings can be configured by manually editing the viewer's configuration files. For more information, see About Editing Configuration Files.
Manual configuration is prone to error. If you introduce an error into a configuration file, the viewer may not run.
Configuring a viewer in Manager has advantages. In addition to providing an easy-to-use interface, Manager enables you to configure all three configuration files simultaneously, so they stay synchronized with each other.
For some features, you can do some of the configuration in Manager and more advanced configuration in the configuration files, as long as you do not do them at the same time. This offers the convenience of configuring in Manager when possible, and configuring manually only when a setting is not available in Manager.
Before you edit a viewer configuration file, you must close or sign out of Geocortex Essentials Manager. If you run Manager at the same time that you edit a configuration file, you risk losing or corrupting the viewer configuration.
Viewer Configuration Files
Each HTML5 viewer has three configuration files, one for each class of device that can run the viewer:
-
Desktop.json.js: For running the viewer on desktop computers. -
Tablet.json.js: For running the viewer on tablets. -
Handheld.json.js: For running the viewer on handheld devices like smartphones.
By using multiple configuration files, the Geocortex Viewer for HTML5 is able to support multiple device types in a single web application. At run time, the viewer's default home page, Index.html, automatically detects the type of device being used and redirects the browser to the appropriate layout.
A viewer's configuration files control which modules, views, and view models to load, and how to arrange them. This determines which features and functions are available in the viewer, the behavior, and much of the look and feel. HTML5 viewers also have some application-wide settings.
Configuration files are usually kept in the application's Config subfolder. If you are not sure where configuration files are located, see File and Folder Locations.
About Configuration Using Manager
Configure Multiple User Interfaces
The Geocortex Viewer for HTML5 is designed to work on different device types—desktop computers, tablets, and handheld devices like smartphones. The way the viewer does this is by allowing you to configure multiple user interfaces, one for each device type. The configurations for the different user interfaces are in separate files. Each device type has different user interface requirements, which are captured in the configuration file for that device type.
When you configure a particular aspect of an HTML5 viewer in Manager, you can choose between configuring all three interfaces together, or configuring them separately. Configuring the interfaces separately allows you to make them different from each other. Configuring them together makes their configurable settings identical.
In Manager, HTML5 Viewer configuration is divided into pages of related settings—I Want To menu settings, look and feel settings, and so on. The decision to configure the user interfaces together or separately only affects the settings on the current page. This means you can configure the interfaces together on one page but individually on another page. For example, you might want to always use the same banner (configure the interfaces together on Manager's Look and Feel page), but have a different I Want To menu for handheld devices (configure the interfaces separately on Manager's I Want To Menu page).
The issue of configuring the interfaces together or separately does not apply to the Viewer Info page—the Viewer Info page contains metadata about the viewer, not viewer settings.
Configure Together or Separately?
Before you configure the settings on a viewer configuration page in Geocortex Essentials Manager, consider whether the settings will be the same for Desktop, Tablet, and Handheld interfaces:
-
If you are not sure, keep the settings the same by configuring the interfaces together—you can always configure them separately later without losing any changes you have made.
It is always safe to switch from configuring the user interfaces together to configuring them separately—you never lose any changes.
-
If you are sure you want the settings on the Application page to be different for one or more of the interfaces, click the Configure Individually hyperlink. You can switch back to configuring the interfaces together at any time, but you may lose some of the changes you have made.
If you have configured the interfaces separately on a particular page in Manager, and then you change back to configuring the interfaces together, Manager prompts you to select which configuration you want to keep—you will lose any variations that exist in the other two interfaces.
Change How you Configure the Interfaces
By default, the three interfaces—Desktop, Tablet, and Handheld—are configured together. In this case, there is only one tab on a viewer configuration page in Manager, and the settings on the tab apply to all the interfaces.
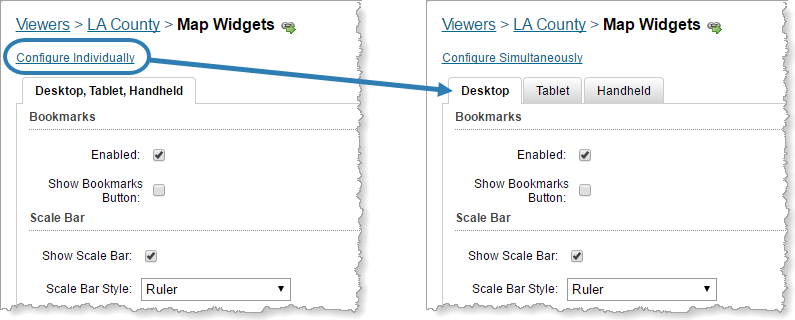
Click Configure Individually to show separate tabs for the different interfaces
To change between configuring the interfaces together and configuring them separately:
-
Click the Configure Individually hyperlink above the tab.
A separate tab for each interface displays: Desktop, Tablet and Handheld. The hyperlink changes to say Configure Simultaneously.
If you are configuring the user interfaces individually, remember to click Apply Changes or Save Site before leaving a tab—otherwise, you will lose your changes.
-
To return to configuring the interfaces together, click Configure Simultaneously.
You are prompted to select the interface whose configuration you want to keep.
Any changes that you made to the other two configurations will be lost.
-
Select the interface whose configuration you want to keep from the drop-down list.
-
Click OK.
The tabs are combined into one tab, and the configurations for the current page's settings are made the same.
Configure User Interface Text
The HTML5 Viewer's user interface text is stored in language files that contain a list of text keys and their values. Text keys are symbolic names for the text strings that appear in a viewer. To display user interface text, the viewer looks up the key in the appropriate language file for the browser's locale and displays the text that is assigned to that key. For example, the key for the title that appears at the top of the I Want To menu is called @language-menu-title. The key's default value is I want to....
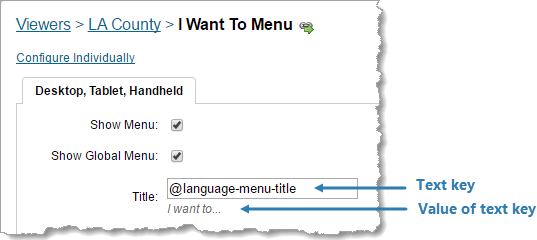
Example of a text key shown in Manager
When you configure user interface text in Manager, there are two ways that you can specify the text—enter the text key or enter the text itself. If your viewer is only going to be available in one language, you can type in the text directly. However, if you are going to make your viewer available in more than one language, you must use text keys instead of literal text. You must also create a language file for each language you are supporting. For more information, see Geocortex Viewer for HTML5 Translation.
When you are entering a text key in Manager, start typing to open a drop-down list of text keys that match what you are typing. Text keys always begin with the "@" character. Type @ to see the complete list of keys in the drop-down list.
We recommend always using text keys instead of literal text.
Use the Live Preview
The live preview runs your viewer within a simulated desktop, tablet, or handheld device. To run the current configuration, you must click Apply Changes, but you do not need to save the site. This enables you to test your configuration before you save the site.
You can use the viewer the same way in the live preview as in a browser—you can navigate the map, use menus and tools, perform searches, run workflows, and so on.
To open the live preview, click Apply Changes, and then click one of the Preview links at the bottom of any HTML5 Viewer page in Manager. Use the links at the top of the live preview to switch between previews for the different device types.
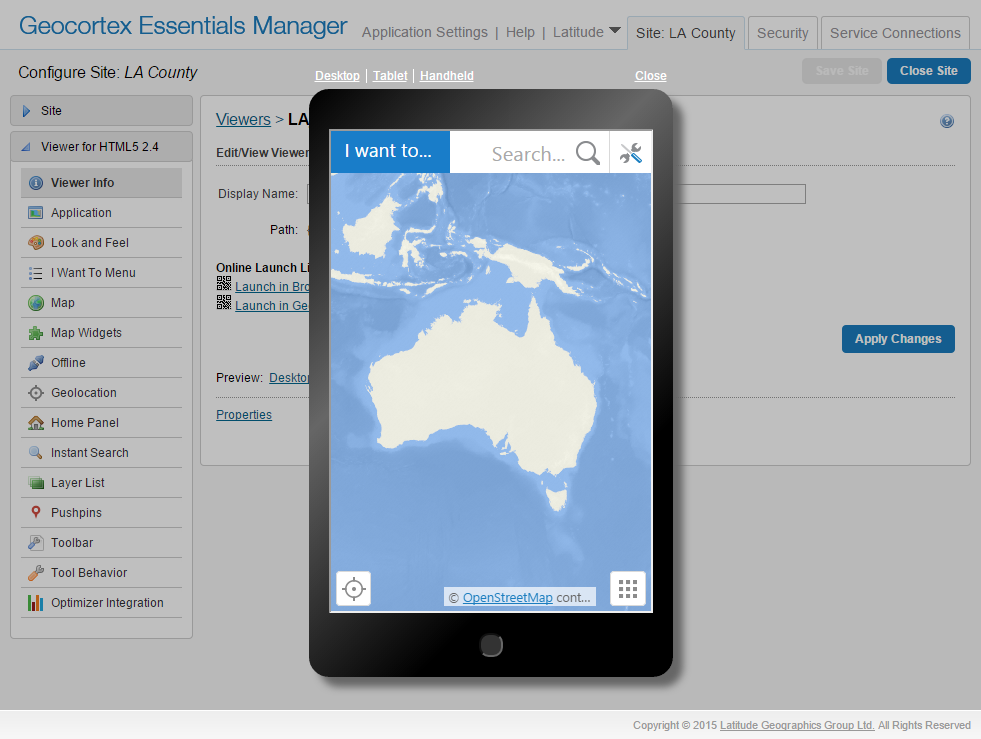
Example of a live preview for the Handheld interface
Verify your Configuration
When configuring a viewer, it is recommended that you verify the configuration frequently. Before verifying, apply your changes and save the site.
To verify your configuration changes:
-
If you have not yet launched the viewer, edit the viewer in Manager, click Viewer Info in the side panel, and then click a launch link.
If you have already launched the viewer, reload the page in your browser.
-
Navigate to the part of the viewer you want to verify.
-
Test any new tools or functions you have added.
About Editing Configuration Files
Structure of Configuration Files
The main sections in an HTML5 Viewer configuration file are listed below, in the order that they appear in a viewer's configuration files. Most of the configuration that is done in configuration files changes the properties of modules and their associated views and view models.
-
version: The version of the HTML5 Viewer that the configuration file is intended to work with. The version is for information only. The version is automatically updated when you upgrade to a newer version of the Viewer.Attempting to run the viewer with a different version of the configuration files gives unpredictable results.
-
viewerId: The unique ID that identifies this viewer. -
application: Application-wide settings such as the location of the proxy page. See Application-Wide Settings in the Configuration Files for more information. -
defaultLibraryId: The library where the application looks for a compiled resource, if a library is not specified in the request. See Libraries for information. -
libraries: An array containing the libraries that make up the application. See Libraries for information. -
modules: An array of modules in the application.-
views: An array containing the module's views. -
viewModels: An array containing the module's view models for information.
See Modules, Views, and View Models for information.
-
-
widgets: An array of widgets used by the viewer. A widget is a view component, such as a checkbox form item, that can be re-used across modules.
Libraries
A library is a collection of code, CSS, and HTML files that are combined into a single JavaScript file. A library's contents implement modules, views, and view models. The libraries section of a configuration file lists the libraries that are included in the application.
Each library has an ID and URI. When an HTML5 viewer is launched, the configured libraries are downloaded from their URIs. This downloads all the modules contained in the libraries (and the module's views and view models).
All compiled resources are keyed with the library ID. When a programmatic request is made for a resource, the request can specify the library that contains the requested resource. If the request does not include a library ID, the requested resource is assumed to be in the default library. The default library is configured in the defaultLibraryId property.
Location-specific resources are also keyed with the library ID. The libraries section in a configuration file relates language tags (for example, en-US for US English) to their locale-specific resource files.
Modules, Views, and View Models
Modules
Modules implement the underlying processes that make the viewer act in response to user actions and input—the "business logic" of the viewer. You can think of modules as corresponding to HTML5 Viewer features.
Modules are loosely coupled to other modules—technically, they are independent of each other, but in practice a module may require another module to be useful. For example, to make the Identify feature (Identify Module) available to users, you need to supply a means for users to indicate when they want to perform an identify operation—perhaps a tool in the toolbar (Toolbar Module), an item in the I Want To menu (IWantToMenu Module), or a workflow (Workflow Module).
The modules section of a configuration file lists the modules used by the viewer for that configuration file's user interface—Desktop, Tablet, or Handheld. Each module is loaded from the library that the module belongs to.
Most modules have one or more views. Views implement user interface elements. Modules can have any number of configured views associated with them. Configured views are ready to be displayed whenever their target regions become available. Modules can also programmatically create views (and view models) on the fly.
Most modules have one or more view models. View models mediate between modules and views, exposing properties, commands, and other aspects of modules so they can be used in views. Modules can have any number of configured view models. Modules can also programmatically create view models (and views) on the fly.
JSON File Format
The information in HTML5 Viewer configuration files is written in JSON, a lightweight, easy-to-read syntax for storing and exchanging data. JSON syntax is very simple:
-
Objects are contained within curly brackets { }.
-
Arrays are contained within square brackets [ ].
-
Data is name/value pairs, where the name and value are both enclosed in double quotation marks. The name and value are separated by a colon.
In the following example,
moduleNameis the name andVisualizationis the value:"moduleName": "Visualization"
-
Data is separated by commas. The last data item in an object or array does not have a comma after it.
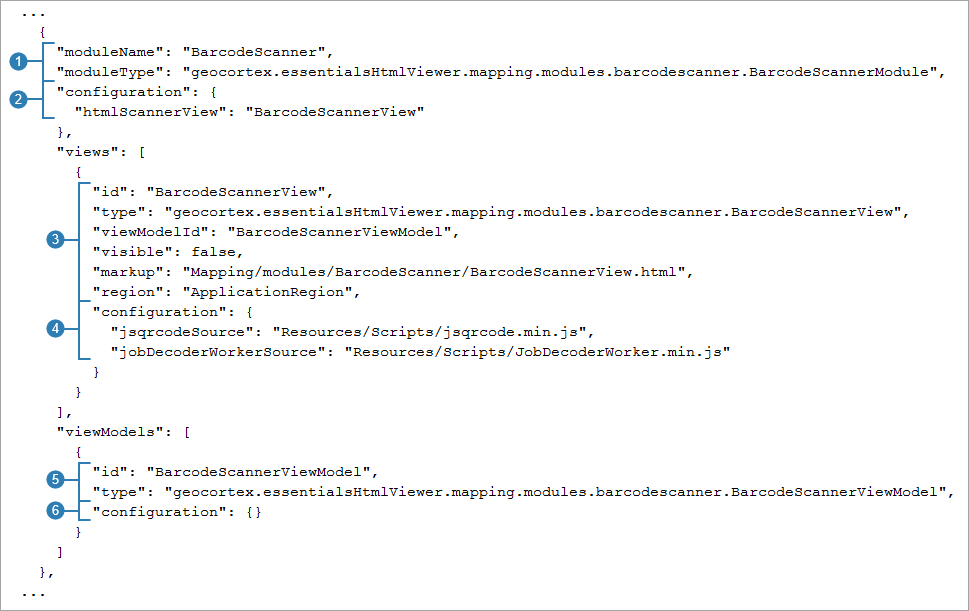
The figure below shows an example of the JSON for a module, taken from an HTML5 viewer configuration file. Note that the module's views and view models are contained within the module object.
General Method to Edit Configuration Files
The most common way to modify a viewer's configuration files involves changing module-specific configuration properties ( ,
,  , and
, and  in the figure below). You may also want to change some of the properties that all modules, views, and view models have in common (
 ,
,  , and
, and  in the figure below). For example, you might want to change the region where a view is hosted (
region property) or set the view's initial visibility (visible property). For most properties, all you have to do is replace the existing value with the new value.
- Settings that are common to all modules - For information, see Common Settings for Modules, Views, and View Models.
- Module-specific settings - For information, refer to the module's documentation. To locate the module's documentation, refer to the Modules section in this help system's table of contents—it lists all the modules that ship with the Geocortex Viewer for HTML5.
- Settings that are common to all views - For information, see Common Settings for Modules, Views, and View Models.
- View-specific settings - For information, refer to the module's documentation. To locate the module's documentation, refer to the Modules section in this help system's table of contents—it lists all the modules that ship with the Geocortex Viewer for HTML5.
- Settings that are common to all view models - For information, see Common Settings for Modules, Views, and View Models.
- View model-specific settings - For information, refer to the documentation for the module that the view model belongs to. To locate the module's documentation, refer to the Modules section in this help system's table of contents—it lists all the modules that ship with the Geocortex Viewer for HTML5.
The HTML5 Viewer's default configuration files include configuration for every module, view, and view model available in the software. This means that, to you add something to the configuration, you can pattern it after something that already exists. For a property that is an array, such as the items in the I Want To menu, you can add an item by copying and pasting an existing array item, adding a separating comma if necessary, and changing the properties. When you copy the array item, make sure you copy everything from the item's opening curly bracket "{" to its closing bracket "}" inclusive. To delete an item from an array, delete the entire item—delete everything from the item's opening curly bracket "{" to its closing bracket "}" inclusive, and the separating comma, if there is one.
Make sure every item in the array has a comma after it, except the last item.
Manually Modify a Module's Configuration
To manually modify a module's configuration:
-
Run a text editor or an XML editor as an administrator and open one of the configuration files.
Configuration files are usually kept in the application's
Configsubfolder. See File and Folder Locations for the default location. -
Search for the module you want to modify by name.
The following figure shows the overall structure of a configuration file. Modules appear between libraries and widgets. The modules appear in alphabetical order within the
modulesarray. To find out the names of modules, refer to the Modules section in this help system's table of contents—it lists all the modules that ship with the Geocortex Viewer for HTML5.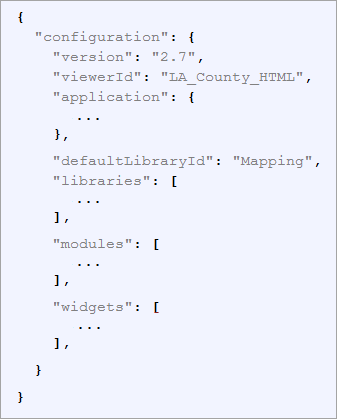
High-level structure of a configuration file
-
Locate the properties you want to change.
Make sure you are looking in the correct part of the module's configuration—module, view, or view model.
-
Replace the existing values with the new values.
-
Save the configuration file.
-
To verify your changes, launch the viewer using the appropriate configuration—Desktop, Tablet, or Handheld.
If the viewer is already open, you can simply refresh the viewer.
-
Repeat this procedure for each configuration file.
Application-Wide Settings in the Configuration Files
Some of the settings in the application section of a configuration file can be configured using Manager. For instructions, see Application-Wide Settings.
The application section of a configuration file contains application-wide settings. Some of the properties are present in the factory configuration files. Other properties are added by Manager when you configure the viewer's site.
The application section can have the following properties:
-
proxyUri:The URI to the proxy page, if you are using one. By default, the proxy URI is set to the ASP.NET proxy page that ships with the HTML5 Viewer,proxy.ashx?. The default URI is terminated with a question mark because the viewer attaches parameters to the URI. The question mark is optional—the viewer will add the question mark if necessary.If you do not want to use a proxy page, clear the Proxy URI setting. In Manager, go to the viewer's Application page and remove
proxy.ashx?from the Proxy URI box. Alternatively, edit the configuration files directly and make theproxyUrisetting's value empty:"proxyUri": ""
For instructions on setting up a proxy page, see Set Up a Proxy Page for the HTML5 Viewer.
-
allowUnsafeContent:When this property is set tofalse, the viewer does not interpret HTML markup in feature data—the viewer displays the actual, uninterpreted markup, not what the markup represents. It does this by escaping the HTML tags and quotation marks. For example, instead of resolving an anchor tag, the viewer displays the tag itself, so users see something like<a href="http://server.domain.com/content">in the viewer.If you do not trust the data in your site's layers, make sure
allowUnsafeContentis set tofalse. For example, if you use one or more map services that are publicly available on the Internet, you have no control over the data so you may not fully trust it. This is particularly true for KML and GeoRSS layers.By default,
allowUnsafeContentisfalse.When
allowUnsafeContentis set totrue, the viewer interprets HTML markup in feature data. This is useful if you know that the layer's features contain HTML in one or more attributes, and you trust the data.Note that
allowUnsafeContentonly affects HTML markup in feature data—it does not affect URLs in feature data. HTML5 viewers always examine feature data for URLs that could point to malicious content, regardless of whetherallowUnsafeContentistrueorfalse. For more information, see Protection from Malicious Code. -
deferredModuleLoading:When this property is set totrue, modules with adeferLoadingproperty set totrueload as needed instead of loading when the viewer starts. When this property is set tofalse, the viewer loads all modules when starting, as it did in versions prior to 2.11. By default, this property is set totrue. -
OfflineStorageSpaceMb: Controls the requested amount of available persistent storage for browsers that support the file system API. This setting does not apply to the Geocortex Mobile App Framework.This setting has limited usefulness, as the file system API is currently only supported by Chrome and Opera, is no longer being maintained, and support may be dropped in future versions.
-
geometryServiceUrl:The URI of the geometry service to use for projection and other geometry operations. The HTML5 Viewer's Geolocation feature uses the geometry service specified here to project the user's location from latitude/longitude coordinates to map coordinates.As of version 2.5, the
geometryServiceUrlproperty of the HTML5 Viewer has been deprecated. Instead, configure the geometry service in the site. If configured, the geometry service in the site overrides the one configured in the viewer's configuration files. -
mobileMode:To specify this viewer should operate in mobile mode, set totrue; otherwise, set tofalse. In the Handheld interface, the default istrue. In the Desktop and Tablet interfaces, this property is omitted (and thereforefalse) by default. -
oAuth2ClientId:The App ID of the ArcGIS Online application that the viewer uses to access private ArcGIS Online content. When you configure a site to access private ArcGIS Online content, Essentials adds the App ID to the viewer's configuration files. This improves the performance of viewer loading.For more information, see Choose a Method to Sign In to Manager.
-
datumTransforms:An array of datum transformations to use in operations that require projection, such as geocoding, measurement, and buffering.This feature requires a geometry service from ArcGIS Server 10.3 or newer, including ArcGIS Enterprise 10.5. The geometry service is configured in the site.
The HTML5 Viewer has several built-in datum transformations:
-
RD New (28992)
-
British National Grid (27700)
-
Czech S-JTSK(102067)
When you configure one or more
datumTransforms, the viewer does not use the built-in datum transformations—the built-in transformations are only used ifdatumTransformsis empty.A
datumTransformsitem has the properties listed below. To specify a datum transformation using the well-known ID (WKID), configuretransformWkid,fromWkid, andtoWkid. To use the well-known text (WKT) instead of the WKID, configuretransformWkt,fromWkt, andtoWkt.-
transformWkid: The WKID of the datum transform to use. -
transformWkt: The WKT of the datum transform to use. This is ignored iftransformWkidis also specified. -
fromWkid: The WKID of the spatial reference to project from. -
fromWkt: The WKT of the spatial reference to project from. This is ignored iffromWkidis also specified. -
toWkid: The WKID of the spatial reference to project to. -
toWkt: The WKT of the spatial reference to project to. This is ignored iftoWkidis also specified.
You only need to configure a datum transformation in one direction—the viewer will perform a backwards transformation when necessary. For example, if you configure a transformation from WKID 28992 to WKID 4326, the viewer can also perform a transformation from WKID 4326 to WKID 28992.
For a list of transformation WKIDs, refer to Esri's ArcGIS Geographic and Vertical Transformation Tables.
-
See also...