Viewer Upgrading
Upgrading installs the same components in the same location as the existing installation.
You can upgrade Essentials and the HTML5 Viewer independently—you can upgrade only Essentials, or only the Viewer, or both Essentials and the Viewer. To use certain features, you may have to upgrade both Essentials and the viewers.
For best results, we recommend upgrading both Essentials and the HTML5 Viewer.
To find out the Essentials version that Geocortex Viewer for HTML5 4.14.0 works with best, see Geocortex Essentials Requirements.
Usually, viewers are upwardly compatible—after you upgrade the software, your viewers still work. Occasionally, improvements to the software break upward compatibility. In this case, you may have to perform some additional steps to complete the upgrade. For information, see HTML5 Viewer Versions that Require Additional Steps.
Upgrade Methods
The method that you use to upgrade a viewer depends on how you installed the viewer:
-
Installed a Viewer Template: You can use the Essentials Post Installer and Essentials Manager to upgrade the viewer.
Follow the instructions in Upgrade the Viewer Using the Post Installer.
-
Installed Manually: If you installed the viewer by dropping it directly into a web server, you must upgrade it manually—back up and remove the old viewer, install the new viewer, and then manually copy over any changes from the backup files to the new files.
Follow the instructions in Upgrade the Viewer Manually. This upgrade procedure retains the manual nature of your deployment.
Upgrade the Viewer Using the Post Installer
If you installed a viewer framework manually, you cannot use this method to upgrade the viewer. See Upgrade the Viewer Manually.
Upgrading the template removes the old template. This means that the viewers are unusable between the time you upgrade the template and the time you upgrade the configured viewers—they cannot be launched or edited during this time.
Step 1: Before You Begin
-
Download the Geocortex Viewer for HTML5 installation package for the version of the HTML5 Viewer that you want to upgrade to.
For instructions, see Download the Geocortex Viewer for HTML5.
-
Read HTML5 Viewer Versions that Require Additional Steps to find out if you need to perform any additional steps as part of the upgrade.
Sometimes you must perform additional steps before you upgrade the Viewer, so it is important to read this section before you begin the upgrade.
-
Based on what you read for the previous step, perform any additional steps that must be done before you begin the upgrade.
If you customized the viewer by modifying its CSS files, be sure to back up the files before upgrading to version 2.10 or newer. Customized viewer CSS files should be located in a
Resources\Styles\Customdirectory to ensure that they are not overwritten during an upgrade. For more detailed information, see Customizing the Viewer in the Shells module description in the Geocortex Viewer for HTML5 Help.
Step 2: Upgrade the Viewer Template
To upgrade a viewer template, you use the Post Installer's Upgrade function. The Upgrade function partially automates the process of upgrading the viewer files that are deployed to the web server.
When you upgrade a viewer, you want to take advantage of the new features and improvements that the new template offers. At the same time, you want to preserve any changes that you have made to the viewer, such as customizations to HTML, CSS, JavaScript, or image files. The Upgrade function examines each file in your existing viewer so your customizations can be preserved:
-
Installed File Not Customized: Viewer files that you have not customized are replaced when you upgrade. This means that you benefit from any changes that have been made in the new versions of these files.
-
Installed File Customized, Unchanged in New Template: If you have modified a viewer file, but the file has not changed in the new release, then the installed version of the file is preserved. This preserves your customization.
-
Installed File Customized, Changed in New Template: If you have modified a viewer file and the file has changed in the new release, the Upgrade function allows you to decide how to upgrade the file—keep the installed file, replace the installed file with the new version of the file, or merge the two versions together.
If the server has WinMerge installed, the Upgrade function uses WinMerge to show a side-by-side comparison of the two versions of the file. You can use WinMerge's merge functions to selectively merge the differences. If WinMerge is not installed, you must merge the files manually, by editing them and copying over the changes.
WinMerge is not installed with Essentials. If you want to use WinMerge to compare and merge files, you must install WinMerge before you perform the upgrade. You can download WinMerge for free from
http://winmerge.org/. -
New Custom Files: If you have added new files to the viewer, upgrading preserves them. For example, if you have created custom modules, the files that implement the modules are not affected by upgrading—they remain in the same location, with the same names, as before the upgrade.
By default, the Upgrade function deploys the upgrade to the same location as the existing viewer. Deploying to the same location ensures that the viewer's URLs stay the same, so you do not need to update the launch links and URLs that you provide to users. You can change the location if you want. If you deploy the viewer to a different location, you will have to update the launch links and URLs that you provide to users.
The Upgrade function creates a backup of the existing viewer.
Upgrading a viewer template removes the existing template.
-
In the Post Installer, click Configure Viewer Templates in the side panel.
-
In the Installed Templates area, click the template that you want to upgrade.
The template management buttons show.
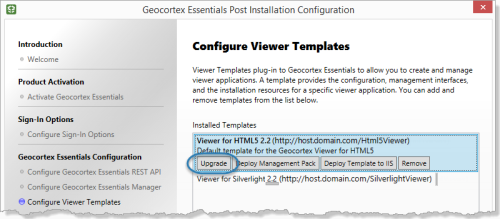
Location of the Upgrade button for upgrading a viewer template
-
Click Upgrade.
-
Browse to the location where you extracted the installation package.
If a dialog box appears that says "If you have deployed a viewer for this template, please select its location in the next step. If not, just press Cancel." and you have previously deployed a viewer for the template you are attempting to upgrade, click OK and browse to the deployed viewer. By default, this will be inside the
C:\inetpub\wwwroot\folder. -
Select the template file,
Geocortex.Essentials.HTML5Viewer.Template.[version].vte, and then click Open.The Upgrade Template dialog box opens.
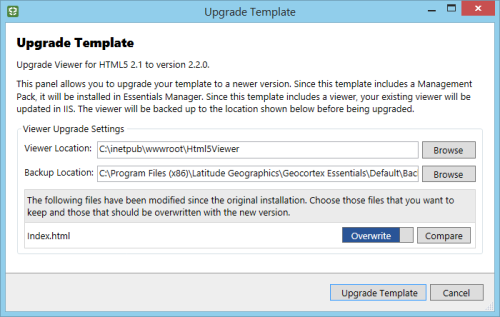
Example of the Upgrade Template dialog box
-
Viewer Location: If the folder location given in the Viewer Location box is not where you want to deploy the upgrade, click Browse, select the folder where you want to deploy the upgrade, and then click OK.
By default, the Viewer Location box shows the location where the viewer was installed. If you moved the viewer after installing it, you will have to change the location.
-
Backup Location: If you want to change the folder where the upgrader puts the backup of the old viewer, click Browse, select the folder where you want to put the backup, and then click OK.
-
Modified Files: If there are modified files, review each file and indicate whether you want to keep the existing version of the file or overwrite the existing file with the new version.
A file appears in the list only if there are software updates in the new version of the file, and you have customized the existing version of the file. This step gives you the opportunity to merge your modifications into the new file before the upgrader overwrites the installed file, thus preserving your customization.
Alternatively, you could merge the software updates into the existing file and use the Keep Existing action. The easiest approach is to merge into whichever file has the most changes.
-
Merge your modifications to the new file using one of the following methods:
-
If you have WinMerge installed, click the Compare button to review the differences between the two files in WinMerge, and then use WinMerge's Merge function to merge your customization into the new file. Save your merges.
-
If you do not have WinMerge installed, perform your merges manually by copying and pasting your customizations into the new file using a text editor. Save the file.
-
-
In the Post Installer, set the file's action to Overwrite
 .
.Overwrite replaces the installed version of the file with the new version.
To change the action from Keep Existing to Overwrite, click the Keep Existing button
 . .
. .
-
-
Click Upgrade Template.
The old template is removed and the new template is installed.
-
When the success message displays, click OK.
The Upgrade Template dialog box closes. You have completed the template upgrade.
You are now ready to upgrade the viewers that are configured in your sites. Click Finish and follow the prompts to close the Post Installer.
Step 3: Upgrade your Configured Viewers
After you upgrade the viewer template, you must upgrade the viewers that are configured in your sites. You cannot run or edit the viewers until you have upgraded them to use the new template.
Geocortex Essentials Manager has an Upgrade Viewers function that enables you to upgrade all your configured viewers with a single click. Alternatively, you can upgrade viewers individually.
You can Upgrade all of your Configured Viewers at One Time or Upgrade a Single Viewer.
Upgrade all of your Configured Viewers at One Time
To upgrade all of your configured viewers at one time:
-
Do one of the following:
If Manager is Closed
-
Launch Manager.
You will be prompted to upgrade your viewers.
If Manager is Open
-
In
-
Click the Upgrade Viewers hyperlink on the Sites tab.
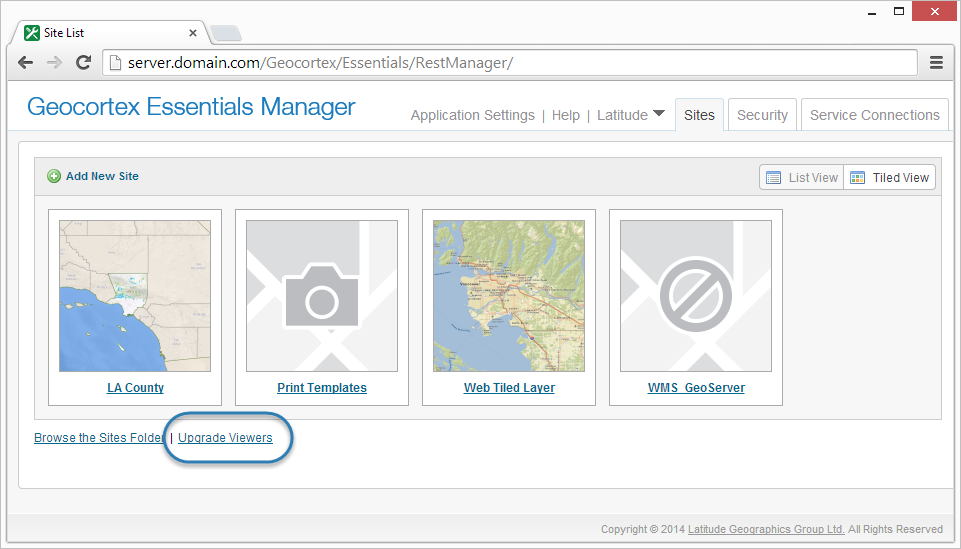
Location of the Upgrade Viewers hyperlink
-
-
Make sure the
If you click Cancel instead of OK, you can upgrade the viewers later using the Upgrade Viewers hyperlink on the Sites tab.
-
When the Done message shows, click Close.
The Upgrade Viewers dialog box closes. You have completed upgrading your
Upgrade a Single Viewer
-
If Manager is closed, launch Manager and click Cancel when you are prompted to upgrade your viewers.
-
When you are ready to upgrade a viewer, edit the viewer.
You will be prompted to upgrade the viewer.
-
Click Upgrade.
Manager upgrades the viewer.
Step 4: Perform Additional Steps
-
If you have additional steps to perform after upgrading, do them now.
Upgrade the Viewer Manually
The following instructions upgrade a manual installation of the Geocortex Viewer for HTML5. The instructions given here retain the manual nature of your deployment—this procedure does not integrate your viewers with Essentials.
To upgrade a manual installation of the HTML5 Viewer:
-
Download the installation package for the new version of the viewer.
Follow the instructions in Download the Geocortex Viewer for HTML5.
-
Create a backup of your existing Viewer by copying the deployment folder to a safe location.
By default, the HTML5 Viewer is deployed to the following folder:
C:\inetpub\wwwroot\Html5Viewer
-
Remove the current Viewer application from IIS:
-
Launch Internet Information Services (IIS) Manager.
-
In the Connections panel, expand the hierarchy and select the website where the HTML5 Viewer is deployed.
By default, the Viewer is deployed to the Default Web Site.
-
In the Actions panel, click View Applications.
-
Right-click the HTML5 Viewer's application and select Remove.
-
When you are prompted to confirm, click OK.
-
Close IIS Manager.
-
-
In the file system, delete the contents of the deployment folder.
-
Extract the files from
Viewer.zipto the deployment folder.Viewer.zipis provided in the installation package. -
Update the
siteUrielement in all three viewer configuration files to point to the correct site.For instructions, see Point a Manually Installed Viewer to Your Site.
-
Manually copy any configuration changes from your files in the backed up copy of the
Resources\Config\folder to the upgradedResources\Config\configuration files.Because the structure of the JSON configuration changes in new versions of the viewer, you should not overwrite the entire configuration file. Use a tool like WinMerge to detect your custom configuration and changes to the configuration file structure.
-
Test the configuration files by launching each layout in a browser.
For instructions, see Launch a Manually Installed Viewer.
-
Manually add any changes you made to your viewer's
Index.html,Handheld.html,Tablet.html, and any other host files. -
If you changed any other viewer files, such as CSS, JavaScript, or image files, copy the changes from the backup files to the new deployment.
-
Copy any other required resources from your backed up
Resources\subfolders to the newly deployedResources\subfolders. -
Save the files and test them.
HTML5 Viewer Versions that Require Additional Steps
The viewer upgrade process replaces the viewer's Framework.js file with a new, secure version. After you have upgraded the viewer using the Post Installer, you may have to perform one of the following tasks to complete a successful upgrade to Geocortex Viewer for HTML5 4.14.0:
Upgrading from the following versions of the Geocortex Viewer for HTML5 may require additional steps:
-
Versions Older than 2.6: Upgrade currency formatting in charts.
-
Versions Older than 2.5: Upgrade custom offline content.
-
Versions Older than 2.4: Update viewer URLs and configure trusted domains.
Upgrade the HTML5 Viewer from Version 2.5.2 or Older
Starting in Geocortex Viewer for HTML5 2.6, you can configure the currency type when you select the Currency format for the chart's category, series source, and series aggregator. By default, the currency type is based on the location of the Essentials server. For example, if the server is in the USA, the currency type is US dollars.
If a chart's data is stored in a different currency than the currency of your server's locale, you must edit the chart and set the three new Currency settings to the correct currency type. This ensures that the viewer interprets the chart's data correctly. For information on setting the Currency format for a chart's category, see Category Setup (Horizontal Axis). For information on setting the Currency format for a series source and series aggregator, see Series Setup (Vertical Axis).
Upgrade the HTML5 Viewer from Version 2.4.1 or Older
As of version 2.5, the Geocortex Viewer for HTML5 cache manifest no longer exists. Instead, all content within the following folders will be made available offline in the Geocortex Mobile App Framework:
-
The folder where the Viewer is hosted.
In the default HTML5 Viewer deployment, the Viewer is hosted here:
C:\inetpub\wwwroot\Html5Viewer\
-
The viewer's virtual directory.
In the default installation, the virtual directory for an HTML5 viewer is here:
C:\Program Files (x86)\Latitude Geographics\Geocortex Essentials\Default\REST Elements\Sites\
MySite\Viewers\MyViewer\VirtualDirectorywhere
MySiteandMyViewerare your site name and viewer name.
If you have customized your cache manifest file, ensure all of your content is within these two folders so it will be available in the Geocortex Mobile App Framework. The existing cache manifest is located in the viewer's virtual directory at:
Resources\Config\CacheManifestConfig.xml
After you have ensured all of your content has been made available, we recommend that you delete the CacheManifestConfig.xml file for each viewer.
We recommend that you delete all .manifest.xml files from the virtual directory for each of your viewers. For example:
C:\Program Files (x86)\Latitude Geographics\Geocortex Essentials\Default\REST Elements\Sites\MySite\Viewers\MyViewer\VirtualDirectory\MyViewer.manifest.xml
Upgrade the HTML5 Viewer from Version 2.3.3 or Older
This section applies to you only if you are upgrading from a version of the viewer older than 2.4 and you have not performed the steps for Geocortex Viewer for HTML5 Security Update 2015-03-26.
You may have to perform one of the following steps to complete a successful upgrade to Geocortex Viewer for HTML5 4.14.0. Perform the step after you have upgraded the viewer. The viewer upgrade process replaces the viewer's Framework.js file with a new, secure version.
The steps are:
-
Viewer Configuration is on the Same Domain as Essentials: If you use the
configBaseparameter in your viewer URLs, update the URLs to use fully qualified domain names.If you have not updated your viewer URLs, the URLs may not work in HTML5 viewers version 2.4 or newer. Follow the instructions in Load Configuration from the Same Domain.
-
Viewer Configuration is on a Different Domain than Essentials: If you use CORS to allow cross-origin resource sharing between Essentials and your viewers, configure the viewers' trusted domains.
If you have not configured trusted domains for your viewers, the viewers may not work in version 2.4 or newer. Follow the instructions in Load Configuration from Another Domain.
Load Configuration from the Same Domain
HTML5 viewers 2.4 and newer do not load configuration files that are hosted on the same domain as Essentials if the URLs have different origins. For example, the following URL fails to launch an HTML5 viewer version 2.4 because the viewer's configured domain, https://myserver, does not match the configuration's domain, https://myserver.mydomain.com, even though they map to the same machine:
https://myserver/Html5Viewer/Index.html?configBase=https://myserver.domain.com/Geocortex/Essentials/...
If your environment is configured to produce URLs with two or more domains that do not match, you must update the URLs's configuration to work with new versions of the HTML5 viewer. We recommend that you use fully qualified domain names in your URLs, even if you do not use CORS or a proxy.
If your Essentials installation is configured for CORS, or your server is behind a reverse proxy, you must update the configuration. See Set Up Cross-Origin Resource Sharing (CORS) and Run Essentials Behind a Reverse Proxy.
You can configure the URLs that viewers and REST endpoints use from the viewer's RestManagerAppSettings.xml file and Essentials' web.config file. Configuring these URLs also updates the viewer launch links that appear in Manager.
To update the viewer launch links in Manager:
-
Run an XML editor or text editor as an administrator.
You can use Notepad, a text editor included with Windows.
-
Update the HTML5 viewer's base launch link:
-
Open the
RestManagerAppSettings.xmlfile in the editor.For a typical Essentials installation, the file is located here:
C:\Program Files (x86)\Latitude Geographics\Geocortex Essentials\[instance]\REST Elements\Manager\App_Data\RestManagerAppSettings.xml
-
Within the viewer's
ViewerFrameworkelement, update theUrlattribute to use a fully qualified domain name. For example:<ViewerFramework ProductID="..." TemplateID="Html5Viewer_4_14" Url="http://myserver.mydomain.com/Html5Viewer" /> -
Save the file.
-
-
Update the Essentials URL:
-
Open Manager's
web.configfile in the editor.For a typical Essentials installation, the file is located here:
C:\Program Files (x86)\Latitude Geographics\Geocortex Essentials\Default\REST Elements\Manager\web.config
-
Within the
appSettingselement, find theaddelement for theEssentialsUrlkey. -
Update the
valueattribute to use a fully qualified domain, for example:<add key="EssentialsUrl" value="http://myserver.mydomain.com/Geocortex/Essentials/REST/sites" />
-
Save the file.
-
Load Configuration from Another Domain
Starting in version 2.4, if you configured cross-origin resource sharing (CORS) in Essentials, you must configure the viewer with a trusted domain where Essentials is hosted. The trusted domains list is configured in each of a viewer's host files (Index.html, Handheld.html, and Tablet.html). You must configure the trusted domains for each viewer. For instructions, see Configure Your Essentials Domain in Your Viewers .
Roll Back a Viewer that was Upgraded Using Essentials
If you upgraded a viewer using Essentials, and then decide that you want to roll back to the older version, follow the instructions below to remove the new version and restore the old version.
The following instructions do not apply to manually installed Viewers.
Viewer Backups
To restore a viewer, you must have a copy of the folder where the viewer was deployed in the web server. If you upgraded the viewer using the Post Installer's Upgrade function, a backup is made automatically. For an instance of Essentials called Default, viewer backups created by the Upgrade function are in the following folder:
C:\Program Files (x86)\Latitude Geographics\Geocortex Essentials\Default\Backups
When the Post Installer's Upgrade function is used to upgrade a HTML5 viewer, a site's old configuration settings get backed up as well. You can find the configuration settings for the old viewer at this location:
C:\Program Files (x86)\Latitude Geographics\Geocortex Essentials\Default\REST Elements\Sites\Your Site\Viewer\VirtualDirectory\Resources\Config\Default
The backup configurations have the file extension .backup.YYYYMMDD, where YYYYMMDD is the date that the backup was made.
Compatibility Issues
A minor release may introduce breaking changes in the configuration settings. Incompatible configuration is automatically fixed by the software during the upgrade process, but it must be manually fixed if you are downgrading. To test your site's configuration for backwards compatibility, we recommend that you install both versions of the viewer, attempt to view your site through both of them, and compare the configuration settings side by side.
You can use a tool like DiffChecker.com to visualize the configuration changes.
Restore the Viewer
To restore a previous version of the viewer:
-
In the file system, locate the folder that contains the backup of the viewer that you want to restore.
If you upgraded the viewer using the Post Installer's Upgrade function, the backups are in the following folder:
C:\Program Files (x86)\Latitude Geographics\Geocortex Essentials\Default\Backups
The folder
Defaultname may be different depending on the name of your instance of Essentials. -
Download the old template from the VertiGIS Studio Support.
See Download the Geocortex Viewer for HTML5 for instructions.
-
Launch the Post Installer.
-
Windows Server 2012 or Windows 8, and Newer Versions:
On the Start menu, type Post Install, and then click Post Installer.
-
Windows Server 2008 or Windows 7:
In the Start menu, click All Programs | VertiGIS | Geocortex Essentials [Version] [Instance] | Post Installer.
[Version] is the Essentials version number. [Instance] is the instance name, if Essentials is installed as a
-
-
Select Configure Viewer Templates in the side panel.
-
In the Installed Templates area, click the template that you want to roll back.
The template's management buttons display.
-
Click Remove, and then click Yes to confirm.
The removed viewer remains in the IIS
webrootfolder after this operation. If you wish to deploy to the same folder, you can go into the file system and manually rename or remove the viewer folder. -
Install the old template.
See Install the Viewer Framework Using a Viewer Template for instructions.
-
Copy the backup of the old viewer to the folder in the web server where you just deployed the viewer template.
-
Reload Manager and navigate to the Viewers page.
-
Ensure the viewer Launch URL matches the name of the folder where you just deployed the viewer template.
If you deployed the old template to the same folder, the viewer may still reference the deleted template. In this case, the viewer does not display a Launch URL. To change the template that the viewer references, click Edit
 next to the viewer and point the viewer to your preferred viewer template.
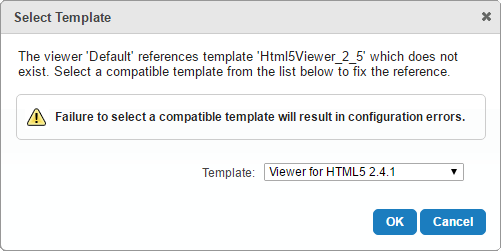
Select Template dialog box
-
Revert to your site's backed up viewer configuration files.
If you upgraded your viewer template using the upgrader in the Post-Installation Configuration, the old versions of your viewer configuration files are backed up in the configuration folder. For a typical installation of Essentials, you can locate the configuration folder at this location:
C:\Program Files (x86)\Latitude Geographics\Geocortex Essentials\Default\REST Elements\Sites\Your Site\Viewer\VirtualDirectory\Resources\Config\Default
The backup configurations have the file extension
.backup.YYYYMMDD, whereYYYYMMDDis the date that the backup was made.-
Move any active
.json.jsconfiguration files to another folder on your system for safe keeping.This may include files with
Preview.json.jsin the file name. -
Remove the
.backup.YYYYMMDDsuffix from the remaining files.For more information, see Viewer Backups.
-
-
Open the viewer in a web browser and verify that it works.
Troubleshooting
If your rolled-back viewer does not open or states that the viewer configuration is invalid or malformed, we recommend examining the configuration of the viewer and a backup configuration of the site before it had been upgraded. If you upgraded an HTML viewer template using the Post Installer's Upgrade function, you can compare your new configuration with the backup copies of your old configuration files. See Viewer Backups for information.
You can also generate a new viewer using the template that has just been installed. If the new viewer launches properly and the old one does not, compare the two viewer configurations to determine what the problem is. You can use a tool like DiffChecker.com to visualize the configuration changes.