Fields
Fields store feature attributes. For example, a Highways layer might have fields for the highway's name, shape, and ID attributes. This means that every feature in the Highways layer has a field for its name, a field for its shape, and a field for its ID.
Essentials allows you to configure settings for individual fields, including the field's visibility, whether the field can be searched by Global Search, how to format numeric and date fields in the viewer, and more.
In order to configure the settings for a particular field, you must first add the field to the list of fields that you want to configure individually. You can also batch configure <all other fields>—the fields that you have not added.
You can configure the order that fields appear in HTML5 viewers. This means that you can put the most important fields at the top in feature details, so users immediately see the most important fields. In addition, you can filter the fields that appear in the viewer.
Add a Field
In order to configure an individual field's settings or re-order the field, you must first add the field. The fields that you do not add can be configured as a batch.
To add a field:
-
In
 next to the layer.
 -
Click the Fields tab.
-
Add the field:
-
To add one or more fields, select the fields in the Excluded Fields column, and then click the Include button
 that is between the two columns.
 To select multiple fields, hold the Ctrl key down while you select the fields.
-
To remove fields that have been added, select the fields in the Included Fields column, and then click the Exclude button
 that is between the two columns.
You can also exclude fields after you close the Add/Remove Fields dialog box by clicking the Remove icon
 beside the field that you want to exclude.
 -
Click OK.
The Fields tab lists the fields that you have added. The <all other fields> item is at the top of the list. The <all other fields> item enables you to change the settings for the fields that you have not added.
-
Click Submit Field Changes.
You can now individually re-order and change the settings of any added field, and batch change the settings of the excluded fields.
Configure an Individual Field's Settings
The procedure to configure a field's settings gives you access to all of the field's settings. Several settings can also be modified by clicking the icon beside the field. When a setting is disabled, its icon either has a red X on it ![]() or it is grayed out
or it is grayed out ![]() .
.
|
|

|
Include in Global Search - The field is searched when the user performs a global search. |

|
Visible - The field is shown in the feature details. You can apply permissions so the field is visible to some users but hidden from other users. Permissions override the Visible setting. If you assign one or more permissions to a particular user, the user’s permission setting for the field determines whether the user can see the field. The Visible setting only applies to users with no assigned permissions. |
|

|
Can Symbolize Class Breaks - (dynamic layers only) End users can symbolize attributes on the map based on numeric ranges. |
|

|
Can Symbolize Unique Values - (dynamic layers only) End users can symbolize attributes on the map based on value from a set of predefined values. |
|

|
Edit - Edit the field's settings. This gives you access to all the field's settings. |
|
|
|
Remove - Remove the field from the list of added fields, in other words, exclude the field. You can add it back at any time using the Add/Remove Fields function. |

Shortcut icons for configuring fields
To configure a field's settings:
-
In
next to the layer. -
Click the Fields tab.
-
If you have not yet added the field, add the field now.
Adding a field enables you to re-order the field and configure the field's settings separately from the other fields in the layer.
-
Use the shortcut icons to change settings, or click the Edit icon
beside the field that you want to edit. Editing the field gives you access to additional settings.
-
Change the field's settings as desired.
-
Click OK.
-
Click Submit Field Changes.
-
Click Save Site.
Field Settings
Fields have the following settings:
-
Display Name: The name to use for the attribute in the viewer. The Display Name setting provides a way to define an alias that end users see. For example, a field named "ZIP” in the map service could appear as the "Zip or Postal Code" attribute in the viewer.
If you leave the Display Name box blank, the name is inherited from the map service.
-
Visible: When visibility is turned on, the attribute shows in the feature details. For example, in the following image, a school's Name, Category, and address-related fields are visible, but other fields like Enrollment are not visible.

Visible fields listed in a feature’s details
If you turn off visibility, the attribute is hidden from end users, and queries performed by the Essentials Query Builder do not search the field. By default, fields are visible.
You can apply permissions to the field so the attribute is visible to some users but not to other users. Permissions override the Visible setting. If you assign one or more permissions to a particular user, the user’s permission setting for the field determines whether the user can see the field. The Visible setting only applies to users with no assigned permissions.
-
Include in Global Search: If Include in Global Search is turned on, the field is searched when the user performs a global search. By default, fields are searchable. If you turn off this setting, global searches skip this field.
Global Search is independent of field visibility. You can search for fields that are not visible, and fields that are not visible can appear in the feature details.
-
Can Symbolize Class Breaks (Silverlight Viewer only): When this setting is enabled, the end user can symbolize dynamic layer attributes on the map based on numeric ranges. For example, the user could symbolize population ranges on a Population layer.
For the Geocortex Viewer for HTML5, attribute-based symbology is always available as long as symbology is enabled for the layer.
-
Can Symbolize Unique Values (Silverlight Viewer only): When this setting is enabled, the end user can symbolize dynamic layer attributes that get their value from a set of predefined values. For example, the user could symbolize schools based on their level—elementary, middle, or high school.
For the Geocortex Viewer for HTML5, attribute-based symbology is always available as long as symbology is enabled for the layer.
-
Hyperlink Label: If the field contains only a hyperlink (no text), viewers display the text specified in the Hyperlink Label box instead of the URL. This is particularly useful for long URLs. If you want viewers to display the URL, leave the box blank.
-
Number Format: (numeric fields only) (does not apply to GeoRSS layers) The format to use to display the field's value in HTML5 viewers.
You can configure the format at the map service level, the layer level, and the field level. The default value, Default, inherits the formatting from a higher level. If all three levels are set to Default, fixed-point formatting with up to four decimal digits is used.
-
Currency: (applies to the Currency and Accounting number formats only) The currency type of the stored data. For example, if the stored data is in euros, enter EUR. The default is USD (US Dollars). To see a complete list of currency codes, delete the default currency type—a drop-down list of currency codes will open. To find out what the codes stand for, refer to this list of ISO 4217 currency codes.
-
Decimal Places: The number of decimal digits to display in viewers. To display integers, enter 0. Alternatively, leave the Decimal Places setting blank to display up to four decimal digits (Number, Fixed-point, and Percentage formats) or the conventional number of decimal digits for the specified currency (Currency and Accounting formats).
-
Custom Number Format: The custom format string that you want to use to format numbers in the viewer. Essentials supports custom format strings based on the .NET Framework Custom Numeric Format Strings. Do not put quotation marks around the custom format string.
-
-
Date Format: (date/time fields only) (does not apply to GeoRSS layers) The format to use to display the field in the viewer.
-
Custom Date Format: The custom format string that you want to use to format dates in the viewer. For formatting instructions, see Format Date/Time Fields. Do not put quotation marks around the custom format string.
-
-
Show Code Fields from Coded Domains: This setting applies only to legacy Silverlight viewers and HTML5 viewers 2.5.2 or older, from sites that have the Geocortex Services Enhancement Proxy configured.
Batch Configure Excluded Fields
In addition to configuring individual fields that you have added, you can configure the remaining fields as a batch. The <all other fields> item at the top of the list on the layer's Fields tab is used for this purpose.
For example, in the screen capture below, the layer has four fields that are configured individually. The remaining fields are visible but not searchable, and they cannot be symbolized using class breaks or unique values.
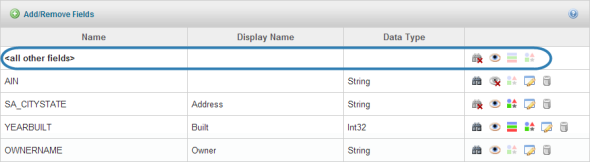
Example of the list of fields on a layer's Fields tab, showing the <all other fields> item
To change the settings of the fields that are not added:
-
In
next to the layer. -
Click the Fields tab.
-
To prevent excluded fields from being searched as part of a global search, disable
 the Include in Global Search icon beside <all other fields>.
 -
To prevent the excluded fields from showing in the viewer, disable
 the Visible icon beside <all other fields>.
 -
To prevent the end user from symbolizing the excluded fields using class breaks, disable
 the Can Symbolize Class Breaks icon beside <all other fields>.
 -
To prevent the end user from symbolizing the excluded fields using unique values, disable
 the Can Symbolize Unique Values icon beside <all other fields>.
 -
Click Submit Field Changes.
-
Click Save Site.
Change the Order of Fields
You can configure the order that fields appear in viewers. This means that you can put the most important fields at the top in feature details, so users immediately see the most important fields. Re-ordering fields does not affect the fields in the underlying layer.
Note that the custom order is not reflected on Manager's Fields tab.
To configure the order that a layer's fields appear in viewers:
-
In
next to the layer. -
Click the Fields tab.
-
Add the fields that you want to re-order.
Adding a field enables you to re-order the field and configure the field's settings separately from the other fields in the layer.
-
To add one or more fields, select the fields in the Excluded Fields column, and then click the Include button
that is between the two columns. To select multiple fields, hold the Ctrl key down while you select the fields.
-
To remove fields that have been added, select the fields in the Included Fields column, and then click the Exclude button
that is between the two columns.You can also exclude fields after you close the Add/Remove Fields dialog box by clicking the Remove icon
beside the field that you want to exclude. -
Click OK.
The Fields tab lists the fields that you have added. The <all other fields> item is at the top of the list. The <all other fields> item enables you to change the settings for the fields that you have not added.
-
Click Submit Field Changes.
You can now individually re-order and change the settings of any added field, and batch change the settings of the excluded fields.
-
Click
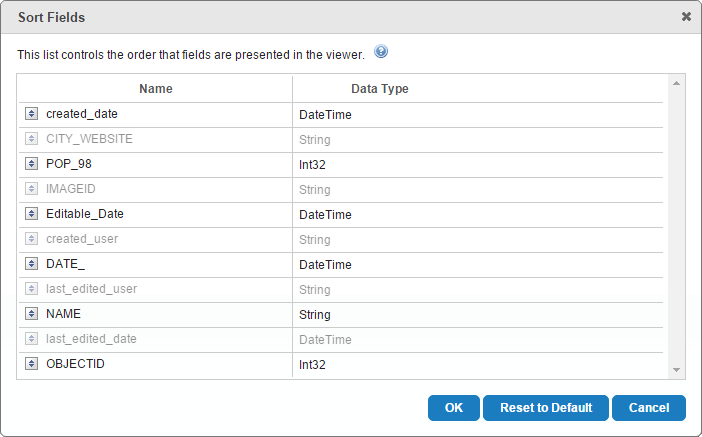
 Sort Fields.
The Sort Fields dialog box opens. The Sort Fields dialog box lists all the fields in the layer. Fields that have been added appear in black and can be re-ordered. If the field name is gray, the field has not been added and cannot be re-ordered.
-
To change the position of a field in the list, drag the row and drop it in its new position.
-
Continue to drag and drop fields until the list is sorted the way you want it.
While you are reordering the fields, if you want to return the fields to the order in the underlying layer, click Reset to Default.
-
When the fields are in the order that you want, click OK.
The fields will display in the configured order in viewers.
-
Click Save Site.
Reset the Field Order
To reset the field order to the order defined in the underlying layer:
-
In
next to the layer. -
Click the Fields tab.
-
Click Sort Fields
. -
Click Reset to Default.
-
Click OK.
-
Click Save Site.
Control the Visibility of Fields
You can control the visibility of fields in the HTML5 Viewer by applying permissions to override the default visibility. This allows you to show a field to some users and hide it from other users. For example, if you want User1 to be able to see a particular field, but you want to hide the field from User2, give User1 Allow permission for that field and give User2 Deny permission.
Permissions override the Visible setting. If you assign permissions to a particular user, the field’s permission setting—not the Visible setting—determines whether the user can see the field. The Visible setting only applies to users that have not been assigned permissions. For example, suppose you assign permissions to User1 and User2, but not to User3. The assigned permissions determine whether User1 and User2 can see the field, but the Visible setting determines whether User3 can see the field.
For permissions to work, your site must be secured. For information, see Security.
To apply permissions to a field:
-
In
next to the layer. -
Click the Fields tab.
-
Add the field if you have not already added it.
-
Click Permissions in Manager's side panel.
-
Select a user or role that you want to configure the visibility for.
-
In the Permissions hierarchy, locate the field that you want to hide.
-
Click the permission icon for the field.
Clicking the icon cycles the value from Inherit
 , to Deny
  , to Allow
  , and then back to Inherit again.
For example, if you do not want the field to be visible for the user or role that you selected, set the permission to Deny
. -
Repeat these steps for each user and role where you want to control the visibility of the field.
-
Click Apply Changes.
-
Click Save Site.