Manage the Essentials Web Components
Essentials has three web applications that run on the server. These web applications must be deployed to Internet Information Services (IIS). The web applications are:
-
Geocortex Essentials REST API: This application is called REST in IIS.
-
Geocortex Essentials Manager: This application is called RestManager in IIS.
-
Identity Server: This application is called IdentityServer in IIS.
You may also have viewer applications in IIS. This section does not discuss viewers. See Manage Viewer Templates.
You can use the Post Installer to perform the deployment. The first time that you run the Post Installer in a new Essentials installation, the Post Installer deploys the web applications to IIS. After that, the Post Installer redeploys the web applications if necessary, for example, if you have changed the configuration. The actual deployment occurs when you click Finish in the Post Installer.
You must always click Finish in the Post Installer after installing or upgrading Essentials, even if you have not changed the configuration. The Post Installer performs a number of other functions besides deploying the web applications when you click Finish.
To deploy a web application, the Post Installer creates the specified virtual directory and application pool in IIS and adds the Essentials web application to the specified IIS website.
Most installations can use the default configuration. One exception is Essentials hosting services that support multiple domains with multiple websites in each domain (multihoming). In this case, you will need to change the configuration. Similarly, if you are running multiple instances of Essentials on a server, you will want to change the configuration.
We recommend that you use the default configuration if you can.
The Post Installer keeps a list of hosts for each IIS website that contains an Essentials web application. You must configure the host names that browsers and other web applications will use to access the Essentials web applications.
See also...
Run Essentials Behind a Reverse Proxy
Web Components
Application Pools
The Post Installer creates the application pools that are required to run the Essentials web applications. By default, the application pools are:
-
Essentials REST API:
EssentialsAppPool4 -
Manager:
EssentialsAdministrationAppPool4 -
Identity Server:
IdentityServerAppPool
Starting in Essentials 4.1, the default application pools use the built-in IIS identity, ApplicationPoolIdentity. Older versions of Essentials created local users for the application pools. Upgrading Essentials does not update the identities. To update an application pool's identity, open the application pool's Advanced Settings in IIS Manager, expand Process Model, and edit the Identity setting. Afterwards, re-run the Post Installer and click Finish.
Before version 3.6, the Essentials web applications ran in 32-bit application pools in Classic mode. When you upgrade Essentials, the existing application pools continue to be used. If you upgrade from a version of Essentials that is older than 3.6, we recommend that you use 64‑bit Integrated application pools unless you have a specific reason to use some other mode.
We recommend that you use the default application pools and identities for whichever version of Essentials you are running.
IIS Virtual Directories
The Post Installer creates the virtual directories for the Essentials web applications. The default virtual directories are:
-
Essentials REST API:
/Geocortex/Essentials/REST -
Manager:
/Geocortex/Essentials/RestManager -
Identity Server:
/Geocortex/IdentityServer
The virtual directories that host the Essentials web applications cannot coincide with physical locations that already exist or are reserved. For example, if your website is at C:\gis and you want to use /MyEssentials/Web as the virtual directory, C:\gis\MyEssentials\Web must either be non-existent or empty. For this reason, a virtual directory cannot refer to existing applications or another virtual directory. This restriction means you cannot use the root of the website as the virtual directory for an Essentials web application.
If you need to create a new virtual directory for one or more of the Essentials web applications, you can use the Post Installer to create the virtual directory—you do not need to go into IIS Manager to create a custom virtual directory.
Websites
By default, the Essentials web applications use IIS's Default Web Site. If you want to use a custom website for an Essentials web application, you must first create the website in IIS Manager and assign the host names. To change the remaining configuration, you can either use the Post Installer or IIS Manager. If you use IIS Manager, you must run the Post Installer afterward and click Finish. Running the Post Installer keeps the IIS and Post Installer configurations synchronized with each other, so changes in one are reflected in the other.
Change the Web Component Configuration for Essentials
You only need to configure the settings in the Post Installer's Configure Essentials panel if you want to change how the Essentials web application is deployed in IIS. If you are happy with the default configuration, you can skip this procedure.
To change the IIS settings for Essentials:
-
Click Configure Essentials REST API in the side panel.
-
Website: To change the website where Essentials is deployed:
-
Create and configure the website in IIS.
-
On the Configure Essentials REST API panel of the Post Installer, select the website from the Select Web Site drop-down list.
If you ever use IIS Manager instead of the Post Installer to change the website's bindings, re-run the Post Installer and click Finish to keep the IIS and Post Installer configurations synchronized with each other.
-
-
Application Pool: We recommend that you use the default application pool.
-
Virtual Directory: To change the virtual directory that Essentials uses, type the virtual directory's path in the Select Virtual Directory box.
-
Click Finish.
The Post Installer updates the IIS configuration for the Essentials REST web application.
Change the Web Component Configuration for Essentials Manager
This section applies only to the server that Manager is installed on.
You only need to configure the settings in the Configure Essentials Manager panel if you want to change how the Manager web application is deployed in IIS. If you are happy with the default configuration, you can skip this procedure.
To change the IIS settings for Essentials Manager:
-
Click Configure Essentials Manager in the side panel.
The Configure Essentials Manager panel displays.
-
Website: To change the website where Manager is deployed:
-
Create and configure the website in IIS.
-
On the Configure Essentials Manager panel of the Post Installer, select the website from the Select Web Site drop-down list.
If you ever use IIS Manager instead of the Post Installer to change the website's bindings, re-run the Post Installer and click Finish to keep the IIS and Post Installer configurations synchronized with each other.
-
-
Application Pool: We recommend that you use the default application pool.
-
Virtual Directory: To change the virtual directory that Manager uses, type the virtual directory's path in the Select Virtual Directory box.
-
Click Finish.
The Post Installer updates the IIS configuration for the Essentials RestManager web application.
Change the Web Component Configuration for Identity Server
You only need to configure the settings in the Configure Identity Server panel if you want to change how the Identity Server web application is deployed in IIS.
To change the IIS settings for Identity Server:
-
Click Configure Identity Server in the side panel.
-
Website: To change the website where Identity Server is deployed:
-
Create and configure the website in IIS.
-
On the Configure Identity Server panel of the Post Installer, select the website from the Select Web Site drop-down list.
If you ever use IIS Manager instead of the Post Installer to change the website's bindings, re-run the Post Installer and click Finish to keep the IIS and Post Installer configurations synchronized with each other.
-
-
Application Pool: We recommend that you use the default application pool.
-
Virtual Directory: To change the virtual directory that Identity Server uses, type the virtual directory's path in the Select Virtual Directory box.
-
Require SSL: When the Require SSL setting is turned on, applications must use the HTTPS protocol to communicate with Geocortex Identity Server. By default, SSL is required.
If there is a message beside the Require SSL checkbox that says that the website does not support SSL, you must bind Identity Server's website to HTTPS in IIS.
We recommend that you do not turn off the requirement for SSL.
-
Click Finish.
The Post Installer updates the IIS configuration for the IdentityServer web application.
Hosts
In the context of Essentials, hosts are the contact points for browsers and other web applications to reach the Essentials web applications. When you first set up an Essentials system, one of the decisions that you make is what host names you will use in URLs that access the REST API and Manager. For example, in https://map.mydomain.com/Geocortex/Essentials/REST/, the host name is map.mydomain.com. The host names themselves are defined in different places—in website bindings in IIS, or in network appliances like firewalls, proxies, and load balancers. The computer name can also be used as a host name.
You must configure host names in the Post Installer. The Essentials web applications use the host names to assemble return URLs. In some cases, incoming communications have the return URL attached. In other cases, the URL has been removed by a network appliance. In this case, Essentials must assemble the return URL.
The Post Installer keeps a list of hosts for each website that contains an Essentials web application. In the default configuration, the web applications all belong to the same website—the Default Web Site. In this case, the Post Installer only keeps one list of hosts, which all three of the Essentials web applications use.
If you use the default configuration to deploy the Essentials web applications, the list initially contains two host names, where machine-name is the name of the computer that the Post Installer runs on:
-
machine-name.domain.com -
machine-name
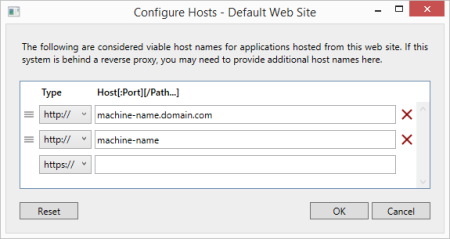
Example of the default hosts list
The list should include exactly those host names that you want users and applications to use to access the Essentials web applications. If your system uses different internal and external host names, make sure that the list includes both. Do not add extra host names to the list. If you do not want to use the default host names, remove them from the list.
Essentials processes the hosts list starting from the top and working down. This means that the list's order can affect how Essentials assembles return URLs. As a general rule, put your preferred host names higher in the list. If you want to allow host names that are not fully qualified, place the short name above the fully qualified name in the list.
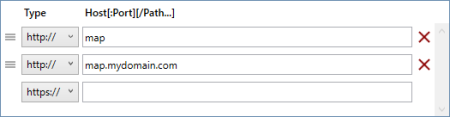
Short host name positioned above the fully qualified host name
If you want Essentials to accept both HTTP and HTTPS without upgrading HTTP to HTTPS, configure both versions of the host name and make sure that the HTTP version is higher in the list than the HTTPS version. However, HTTPS protects data exchanged between Essentials and users and we recommend upgrading to use HTTPS.

Place HTTP above HTTPS to allow both without upgrading HTTP
Configure Hosts
To add host names to a website's list of hosts:
-
Open the list of hosts for the desired website:
-
REST API: To configure the host names for the website that the REST API uses, click Configure Geocortex Essentials REST API in the Post Installer's side panel, and then click Hosts.
-
Manager: To configure the host names for the website that Manager uses, click Configure Geocortex Essentials Manager in the Post Installer's side panel, and then click Hosts.
Essentials uses Windows Authentication by default and may require the computer name as a host name to allow an administrator to log in on the server.
-
Identity Server: To configure the host names for the website that Identity Server uses, click Configure Geocortex Identity Server in the Post Installer's side panel, and then click Hosts.
If any two of the web applications use the same website, you can access the list of hosts from either panel—there is only one list of hosts for a particular website.
-
-
Add Hosts:
-
In the blank box at the bottom of the list, copy or type the host name that you want to add.
If you are not using the default port (port 80 for HTTP, port 443 for HTTPS), make sure to include the port, for example,
host.domain.com:7777. -
Click the down arrow
 in the Type box and select the protocol—http:// or https://.
If you want Essentials to accept both HTTP and HTTPS, without upgrading HTTP to HTTPS, add both versions of the URL and make sure that the HTTP version is higher in the list than the HTTPS version. However, HTTPS protects data exchanged between Essentials and users and we recommend upgrading to use HTTPS.
-
Continue adding host names until you have added all the names that you want to allow.
-
-
Remove Hosts:
-
If you do not want to allow a default host name, click the Remove tool
 beside the name to remove it.
-
-
Order the List:
-
Click
 beside a host name that you want to move and drag the name to its new position in the list.
 -
Continue dragging and dropping host names until the list is ordered the way that you want it.
-
-
Click OK.