Arguments and Variables
Arguments supply a workflow or activity with inputs and provide access to its outputs.
A variable is a storage area in memory for holding data that you will need later in the activity or workflow. In Geocortex workflows, variables are used as activity arguments, to pass values from one activity to another.
Arguments and variables have a data type which determines what kinds of values it can store. For example, a variable might take date/time values, while another variable might take integer values.
Variables
A variable is a storage area in memory for holding data that you will need later.
Variables have a data type that determines the type of values that the variable can have, such as string (text), double (number), or Boolean (true/false value).
You can think of variables as shipping crates that store reusable data. If you think of the variables in your workflow as a set of shipping crates, the name is the label that identifies a particular crate and allows you to find and identify what is inside. The value is like an item that you place inside the crate. The variable's data type is like the size and shape of the crate. The data type determines what kind of items the crate can contain.
Variables are used in Geocortex workflows to pass values from one activity to another, that is, they are used as activity arguments. For example, you could use a variable to pass user input gathered on the client to a server-side activity to be operated on.
Scope
The scope of a variable in a Geocortex workflow defines the parts of the workflow in which the variable can operate. All variables in a workflow have scope.
The scope defines the lifetime of the variable during the execution of the workflow. When activities that are outside the scope of the variable execute, the variable does not exist. For example, a variable whose scope is a Flowchart activity exists only while the Flowchart activity is executing. All the activities in the Flowchart activity have access to the variable.
Set the scope of a variable to be as narrow as possible. Using a narrow scope improves performance and keeps your workflow organized.
Variable Names
Every variable must have name that is unique within its scope. When you use a variable, you refer to it by its name.
Give your variables meaningful names that reflect the variable's function. This makes your workflow easier to understand and maintain.
We recommend that you follow the Visual Basic Naming Conventions to name your variables.
Create a Variable
To create a variable:
-
Use one of the following methods to open the Variables tab:
-
Right-click anywhere within the workflow in the design area and select Create Variable.
-
Click the Variables link at the bottom of the design area.
-
Press F3 on your keyboard.
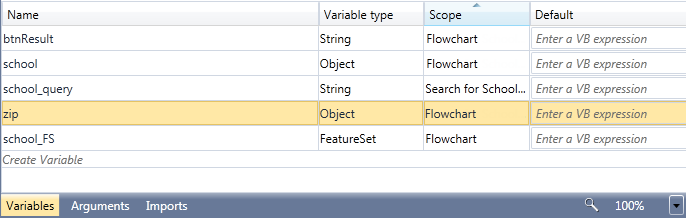
Variables tab with several kinds of variable types
-
-
Click Create Variable and type a name for the variable.
Use a name that is meaningful and associated with the variable's function.
-
Click the Variable Type cell and select a data type from the drop-down list.
The data type of a variable (Variable type) must be compatible with the data type of the argument you wish to use it with, to function correctly. Certain form elements of workflows use specific data types for their arguments. Usually, you can find out which data type the argument requires by hovering over the argument field and reading its tool tip.
-
If the data type you need is not in the Variable type drop-down list, click Browse for Types at the bottom of the list to open the Browse and Select a .Net Type window, where you can locate additional namespaces containing other data types.
-
To set the Scope of the variable, click the Scope cell and select which activity the variable will operate within.
The Scope drop-down list contains a list of the activities within the current workflow that you can set as the scope for the variable. If you change the name of an activity, the name automatically changes in this drop-down list as well.
-
If you want to assign the variable a default value, click in the Default cell and enter the value.
For example, if the variable will be used to store user input from a form, you may want to enter a default value so that there is a value in the field in case the user does not enter a value.
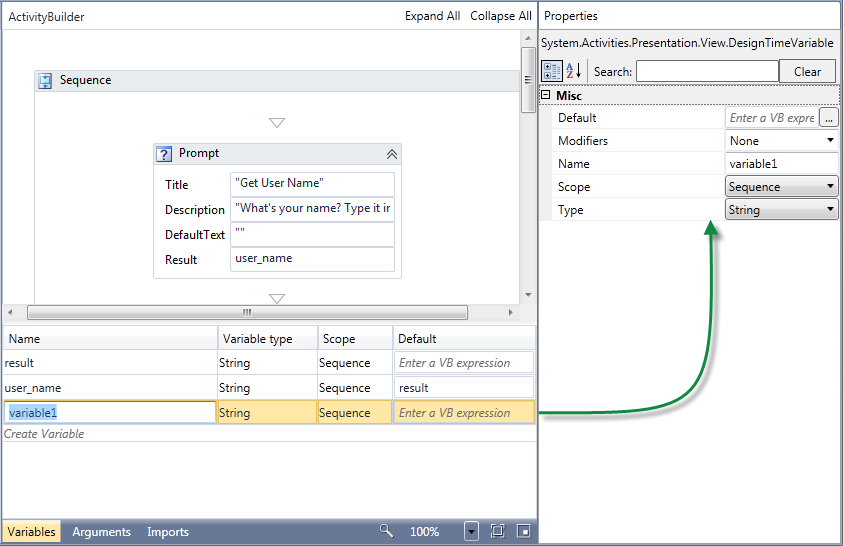
New variable on the Variables tab and in the Properties pane
Delete a Variable
To delete a variable:
-
To open the Variables tab, click Variables at the bottom of the design area.
-
Select the table row that contains the variable you want to delete. Be sure to select the entire row.
-
Press Delete on the keyboard.
Arguments
Arguments determine which way the data flows in an activity or an entire workflow. They supply a workflow or activity with inputs or provide access to its outputs.
Each argument has a direction:
-
In Arguments: Bring values into the workflow or activity when it begins executing.
-
Out Arguments: Contain the results of the activity or workflow when it finishes executing.
-
In/Out Arguments: Bring values into the workflow or activity when it begins executing and contain the results when it finishes executing.
Arguments have a data type that determines the type of values that the argument can have, such as string (text), double (number), or Boolean (true/false value).
Activity Arguments
Arguments are defined within each activity. You use arguments to control the flow of data into and out of the activity. The primary way to define an argument is to reference a variable or use an expression. You define most arguments in the properties of an activity in the Properties pane. Variables may be assigned to activity output arguments in order to store the results of execution of the activity.
You can add expressions that represent literal values or use a variable name to reference a variable. For example, an In argument may reference a variable email address, so emailAddressVar is the variable defined in the workflow.
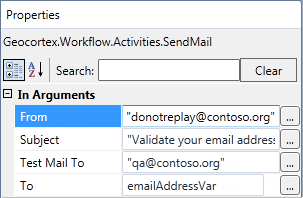
Configuring an argument in the Properties pane
The data type of a variable (Variable type) must be compatible with the data type of the argument you wish to use it with, to function correctly. Certain form elements of workflows use specific data types for their arguments. Usually, you can find out which data type the argument requires by hovering over the argument field and reading its tool tip.
Workflow Input Arguments
Workflow arguments control the flow of data into the workflow. For example, you could define an argument that loads data into your workflow when it begins.
You can configure input values for In arguments and In/Out arguments in Geocortex Essentials Manager.
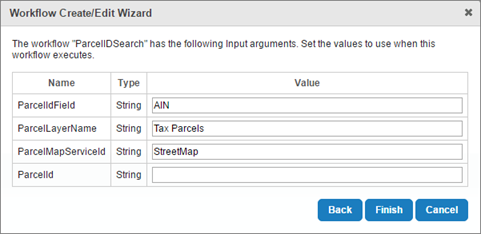
The Workflow Create/Edit Wizard in Essentials Manager
Example
The workflow used in this example is available in the LA County sample site that ships with Geocortex Essentials. If you want to follow along with the example, copy the LA County folder from the Sample Sites folder to the Sites folder to deploy the site. By default, these folders are in:
Program Files (x86)/VertiGIS/Geocortex Essentials/[instance]/REST Elements
where [instance] is the name of the Geocortex Essentials instance.
In this example, we have a workflow that searches for our Tax Parcels layer for tax parcel IDs. The workflow has four input arguments that require a string as a value. We have already created the arguments in the workflow.
Although each of the arguments expects a string value, the strings we provide each argument function differently in the workflow. Let's go through how each argument functions one by one. The workflow's arguments are:
-
ParcelMapServiceId: TheParcelMapServiceIdargument is used in the workflow's SelectFeatures activity. The argument appears in the Map Service Id activity property, which asks for the ID of the map service to use. Our Tax Parcels layer belongs to the map service StreetMap, so our input argument should be set toStreetMap. -
ParcelLayerName: TheParcelLayerNameargument is used in the workflow's SelectFeatures activity. The argument appears in the Layer Name activity property, which asks for the Geocortex layer this feature set is related to. The layer name is Tax Parcels, so our input argument should be set toTax Parcels. -
ParcelId: We do not want to assign a default value for theParcelId. This argument is used for user input in the viewer and lets users search for a specific parcel ID themselves. This becomes more clear as we see how theParcelIdFieldargument functions. -
ParcelIdField: TheParcelIdFieldrequires the field name associated with parcel IDs. In our Tax Parcels layer, the field associated with parcel IDs is called AIN (short for Assessor's Identification Number).
In the workflow, the ParcelIdField is used in a QueryTask activity with the label Query Parcel Layer.
The argument ParcelIdField appears in the Where activity property, which calls for an SQL WHERE clause. Here is the full WHERE clause:
ParcelIdField + " LIKE '" + ParcelId + "%'"
This WHERE clause looks for parcel IDs that are like the ID input by the user. We need to set ParcelIdField to AIN so it can actually find similar parcel IDs.
When configured correctly, the workflow would run a query like this:
AIN LIKE '"100963%'
This query returns a list of parcel IDs like the ParcelId argument input by the user.
See also...
Configure Workflow Input Arguments
Create an Argument
When you create an argument, you give it a name, and select a data type that is appropriate for the value that will be assigned to it. You also set the scope—the parts of the workflow this particular variable will function within. You can also give the variable a default value if you want to or if your workflow requires it.
To create an argument:
-
Click the Arguments link at the bottom of the design area.

Arguments tab with one argument
-
Click Create Argument and type a name for the argument.
Give your arguments meaningful names that reflect the argument's function. This makes your workflow easier to understand and maintain.
-
Click the Argument Type cell and select a data type from the drop-down list.
-
If the data type you need is not in the Argument type drop-down list, click Browse for Types at the bottom of the list to open the Browse and Select a .Net Type window, where you can locate additional namespaces containing other data types.
-
If you want to configure a default value for an input argument, do one of the following:
-
If the default value applies to all the sites that will use the workflow, click in the Default cell and enter the value.
For example, you might want to configure the default spatial reference for the workflow to use.
-
If the default value is different for the different sites that will use the workflow, follow the instructions in Workflow Input Arguments.
You cannot assign a default value to an output argument.
-
See also...
Expressions
Expressions are program statements that combine literal values and variables using operators. You use expressions in your workflow to perform a manipulation or calculation based on data. You can use expressions in setting values for activity and workflow input arguments or to define conditions on activities like the While or If activities.
Expressions can be a literal string, a conditional statement, or an expression that concatenates several strings or calls a method. The table below includes a small sampling of the types of expression you can use when defining arguments in the Workflow Designer.
Expressions are written using Visual Basic syntax. This means that:
-
Capitalization does not matter.
-
Comparison is performed using a single equals sign "=" instead of “==”.
-
Boolean operators are the words "And" and "Or" instead of the symbols "&&" and "||".
If you enter an invalid expression in a text box, the error icon ![]() displays. You can hover your mouse over the error icon to see more information about the error. Note that compiler error messages are written for programmers. Non-programmers may find them hard to understand. For an explanation of some common compiler errors, see Compiler Errors.
displays. You can hover your mouse over the error icon to see more information about the error. Note that compiler error messages are written for programmers. Non-programmers may find them hard to understand. For an explanation of some common compiler errors, see Compiler Errors.
Example Expressions
|
Expression |
Expression Type |
|---|---|
|
"hello world" |
Literal string value. |
|
10 |
Literal Int32 value. |
|
System.String.Concat("hello",","world") |
Imperative method invocation. |
|
"hello" & "world" |
Visual Basic expression. |
|
argInputString |
Argument reference (argument name). |
|
varResult |
Variable reference (variable name). |
|
"hello:" & argInputString |
Literals and arguments/variables mixed. |
Data Types
The data type of an argument or variable determines what kinds of values it can store. For example, a variable might take date/time values, while another variable might take integer values.
You must specify the data type for each argument and variable in a workflow. Arguments can only work with variables that have the same data type.
When you create an argument or variable in Essentials Workflow Designer, you must specify its data type. Essentials Workflow Designer provides drop-down lists of common data types that you can select from. If the data type you want is not listed, you can browse for data types, including data types that from namespaces that you have imported.
See also...
Select a Data Type
The Type drop-down lists that appear in various places in Workflow Designer, already contain several types that are frequently used in web GIS applications.
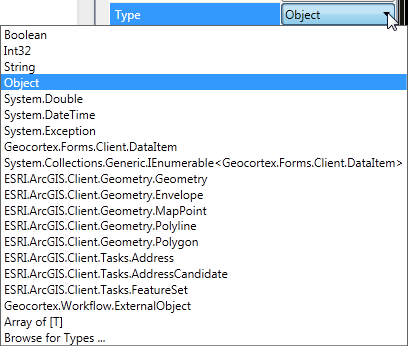
Type drop-down list in the Properties pane
To select a data type:
-
In any of the Type drop-down lists, select the Browse for Types option at the bottom of the list.
The Browse and Select a .Net Type window displays a complete list of .NET assemblies. The list contains all the loaded Microsoft, Geocortex, Esri, and third-party assemblies. You can click the arrows to expand the tree and see other levels.

Browse and Select a .Net Type
-
Select the type you want to import and click OK.
The type is added to the drop-down list where you can select it.
Import a Namespace
The Imports tab is beside the Variables and Arguments tabs at the bottom of the design area. The Imports tab contains a configurable list of the most commonly used namespaces for use in web GIS applications.
The .NET Framework uses namespaces to organize classes and create globally unique types. When you import these .NET namespaces, you gain the ability to use the unique types they contain.
In order to use a specific type in a workflow, you must be able to uniquely reference that type. There are two ways to do this:
-
Use the fully qualified name of the type.
-
Import the namespace that contains the type and then use the short name of the type.
If you import the namespace, it provides a shortcut so you don’t need to specify fully qualified type names. Fully qualified type names are not usually required for simple types (primitives), such as Boolean values and numbers.
Example: Create a new MapPoint object from Esri’s WPF API
Option 1: Reference the type using the fully qualified type name:
New ESRI.ArcGIS.Client.Geometry.MapPoint(1.0, 1.0)
Option 2: Import the ESRI.ArcGIS.Client.Geometry namespace, then use:
New MapPoint(1.0, 1.0)
To import a namespace:
-
At the bottom of the design area, select the Imports tab.
-
Do one of the following:
-
Click the down arrow
 of the drop-down list at the top of the Imported namespaces list and select the namespace you want to import.
 -
Type the name of the namespace into the drop-down box.
The namespace is added to the Import drop-down list, where you can select it.
-
When you save your workflow, any unused imported namespaces are removed from the drop-down list.
IntelliSense
IntelliSense is a powerful feature that can help you write expressions and choose variables. It can also help you discover and learn the properties and methods that may be available for use in a given expression.
By default, Essentials Workflow Designer provides a basic list of suggestions for expressions. The suggestions appear automatically when clicking on an expression text box, or when you press Ctrl + Space while an expression text box has focus. The suggestions provided include:
-
A list of all variables that are in the current scope.
-
A list of all known enumeration values (if the current expression type is an enum type).
-
A list of commonly used expressions (only available for a small set of types).
-
A "Create Variable" option that will create a new variable of the appropriate type and use it as the expression value.
Essentials Workflow Designer also provides an option to enable an advanced IntelliSense system. This mode is geared towards developers with experience using Visual Studio or other software development IDEs. The suggestions appear when you press Ctrl + Space while an expression text box has focus. The suggestions provided include:
-
A list of all variables that are in the current scope.
-
A list of all .NET types and namespaces that can be used at the current position in the expression.
-
A list of all valid members (methods and properties) that can be used at the current position in the expression.
The "Create Variable" option is not available when IntelliSense is enabled. However you can create a variable at any time by pressing F3.
IntelliSense does not support multi-line expressions. If you edit a multi-line expression when IntelliSense is enabled it will become a single line expression.
To toggle IntelliSense mode:
-
Do one of the following:
-
Select Edit | Enable IntelliSense, or
-
Press Ctrl + Shift + I
The IntelliSense mode will toggle.
-