Custom Activities
You can create custom activities to use in workflows. This section walks you through the process of creating your own server and client activities and importing your own activity library into Geocortex Workflow Designer.
Requirements
-
Geocortex Workflow Designer
-
Visual Studio 2015
Although 2012 or newer are supported, this documentation recommends that you use Visual Studio 2015. If you do not have a Visual Studio Professional license, you can download download Visual Studio Community 2015 for free from Microsoft.
-
Working knowledge of the C# programming language
To learn more, see Microsoft’s C# Programming Guide.
Other Resources
Geocortex Workflow Designer is based on Windows Workflow Foundation. If you are looking for more information about custom workflow development, you may find generic Workflow Foundation tutorials useful:
-
Create SendEmail Workflow 4 Custom Activity on CodeProject
-
Windows Workflow 4: Creating a Simple Custom Activity by Adam Prescott
Visual Studio Setup
Before you can start to create custom activities, you need to set up an activity library in Visual Studio.
To create a new activity library:
-
Select File | New Project.
-
In the New Project dialog, select the Visual C# project template called Activity Library.
Before you create the project, you can customize the name, location, and solution name for the project in the New Project dialog. Throughout this example, the name and solution name are set to
CustomActivityLibrary. -
Select OK to create the new project.
You can see in the Solution Explorer that a solution, CustomActivityLibrary, has been created for you.
If the Solution Explorer is not already open, you can open it by selecting View | Solution Explorer from Visual Studio’s menu bar.
The default activity library template contains the following items:
-
Properties
In an activity library, Properties contains one C# file,
AssemblyInfo.cs, by default. -
References
In an activity library, References contains a list of Microsoft and System assemblies (such as
System.Activities) commonly used for activity development. -
Activity1.xamlA default activity file. XAML-based activities allow you to string existing activities together to create compound custom activities for specific functions. . For more information about XAML files, see Microsoft’s article, What is XAML?
This tutorial does not cover XAML-based activities. Unless you intend to create a custom activity with the provided Activity1.xaml, you should remove it from your activity library so it is not included when you build the library and add it to Workflow Designer.
Add Esri Assemblies to Your Project
If your custom workflows require Esri objects like geometries, graphics, or symbols, you need to reference Esri assemblies in your project.
The ArcGIS Resource Center contains the ArcGIS Runtime SDK for WPF to help you find the objects you need to complete your custom activities.
To add references to your activity library:
-
From the Solution Explorer, right-click the References item and select Add Reference.
If the Solution Explorer is not visible, open it from Visual Studio’s menu bar by selecting View | Solution Explorer.
-
Select Add Reference from the context menu.
-
Use the Browse button to locate the assembly from your computer.
Esri’s assemblies are available from the folder where Geocortex Workflow Designer is installed. For a typical installation, the file path is:
C:\Program Files (x86)\Latitude Geographics\Geocortex Essentials\Default\Workflow Designer
-
From the Browse dialog, select the assemblies you wish to add and use the Add button.
-
Select the checkbox next to each assembly.
-
Press OK to add the assemblies.
Once the references you require are added, Visual Studio recognizes object names from the installed assemblies.
In the Develop a Custom Code Activity tutorial, you will require the ESRI.ArcGIS.Client.dll assembly to create arguments with types <Geometry> and <MapPoint>. So, once you have added the assembly, you could create an argument, InArgument<Geometry>, Visual Studio’s IntelliSense feature matches the type with any installed assemblies.
In this case, it matches type <Geometry> with <ESRI.ArcGIS.Client.Geometry.Geometry> and suggests that you either
-
Include
using ESRI.ArcGIS.Client.Geometryat the top of the file -
Include the full reference inline
In this example, Visual Studio would suggest changing
InArgument<Geometry>toInArgument<ESRI.ArcGIS.Client.Geometry.Geometry> -
Generate a new type.
In this example, you would not need to generate a new type.
You can review IntelliSense’s suggestions by selecting the light bulb icon in the margin or beside code decorated with a wavy red line.
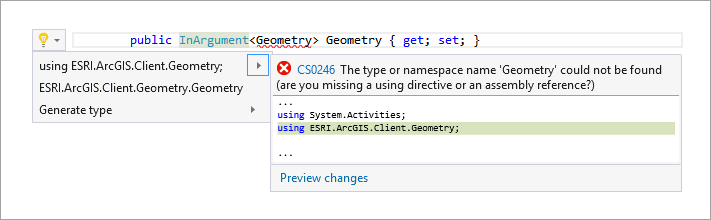
IntelliSense suggestions for a missing assembly
Develop a Custom Code Activity
This tutorial requires a reference to the ESRI.ArcGIS.Client.dll assembly. For instructions, see Add Esri Assemblies to Your Project.
Visual Studio provides activity templates you can use to create new activities. This tutorial focuses on writing custom activities that execute logic written in code. Visual Studio calls these activities code activities.
The example activity built in this tutorial finds the center of an extent. It showcases the necessary parts to create a working server-side code activity and provides a basic framework for developing your own custom activities. In addition to this tutorial, you may want to reference Microsoft’s C# Programming Guide and Esri’s ArcGIS Runtime SDK for WPF.
A custom code activity uses these three elements:
-
Input arguments: Values passed to the activity from users or from other activities.
-
Output arguments: Values that you want to pass to other activities in the workflow.
-
An execution method: The code logic.
In this tutorial, the code takes the values of the input arguments and generates the values of the output arguments. However, in activities without input and output arguments, the code executed performs all of the activity's functionality by itself.
To create a new code activity:
-
From the Solution Explorer, right-click your project and choose Add Item from the context menu.
If the Solution Explorer is not visible, open it from Visual Studio’s menu bar by selecting View | Solution Explorer.
-
Locate Code Activity from the list of Visual C# items and select it.
-
Name the activity using the text input provided.
For this tutorial, name the file
GetGeometryCenter.cs, which describes the task that the activity will perform when it is run. -
Press Add to add the new code activity item to your project.
Code Activity Structure
The Visual Studio code activity template provides a basic structure to help you get started with activity development. When you open a code activity, the basic structure of the file looks like this:
using System.Text;
using System.Activities;

namespace CustomActivityLibrary
{
	public sealed class GetGeometryCenter : CodeActivity
	{
		public InArgument<string > Text { get; set; }

		protected override void Execute (CodeActivityContext context)
		{
			string text = context.GetValue(this.Text);
		}
	}
}
The activity is defined within the class GetGeometryCenter.
Take note of these included lines:
-
A
public InArgument<String>argument.An in argument is a value that is passed into an argument from the user or from another activity. The in argument type included in the activity template is a string. You can add additional input arguments and output arguments of any type. For more information about how arguments work, see Arguments.
-
A
protected override void Execute()method.The
Execute()method is where the activity is built. The functionality you build into the activity is placed within this method.
The following three sections detail how to write the following pieces that make up a custom code activity:
-
Input arguments
-
Output arguments
-
The code to execute
Some code activities you may want to build do not use input or output arguments and function as a standalone activity. However, the activity you build as part of this tutorial provides an example of an input argument, an output argument, and executable code.
It is good practice to document your code’s functionality, even if it is very basic. In the following sections, expect to see comments documenting the code in each code sample.
Define Input Arguments
Input arguments are the arguments passed into your activity from the user or from another activity. You can define as many input arguments you want in a code activity. For an activity that calculates the center point of a geometry, you require an InArgument of type <Geometry>.
// A geometry passed in from another activity.
public InArgument<Geometry> Geometry { get; set; }
The type <Geometry> is an Esri object and requires a reference to ESRI.ArcGIS.Client.Geometry. See Add Esri Assemblies to Your Project to learn about adding references to your activity.
Here is the function that each part of the example input argument performs:
-
public: An access modifier.publicspecifies that any part of your program can use this class. -
InArgument<Geometry>: An input argument of type<Geometry>. You expect that data in the form of geometry shall be passed into this activity. -
Geometry: The name of the input argument. Using a semantic name likeGeometrymakes your code easier to read. -
{ get; set; }: Automatic properties that allow the argument togetand aset. Each argument in a code activity should include thegetandsetproperties.
Define Output Arguments
Output arguments pass the new values generated by your activity back to the user or to another activity. For an activity that calculates the center point of a geometry, you require an OutArgument of type <MapPoint>.
// The center point of the input geometry.
public OutArgument<MapPoint> Center { get; set; }
The type <MapPoint> is an Esri object and requires a reference to ESRI.ArcGIS.Client.Geometry. See Add Esri Assemblies to Your Project to learn about adding references to your activity.
Here is the function that each of the example output argument performs:
-
public: An access modifier.publicspecifies that any part of your program can use this class. -
OutArgument<MapPoint>: An output argument of type<MapPoint>. You want to take the geometry passed into the activity and pass it out of the activity as a singular, center point of that geometry. -
Center: The name of the output argument. Using a semantic name likeCentermakes your code easier to read. -
{ get; set; }: Automatic properties that allow the argument togetand aset. Each argument in a code activity should include thegetandsetproperties.
Define the Execute() Method
Now that you have defined the input and output arguments, you can pass the value of a InArgument<Geometry> into your code and create the value of OutArgument<MapPoint>, which is the center point of the geometry.
Put your code within the Execute() method that is included in the code activity template:
protected override void Execute (CodeActivityContext context)
{
	// Your code activity here
}
The provided Execute() method uses keywords and is extended:
-
protected override void: These are access modifier keywords. For more information, see protected, override, and void in the C# Reference. -
Execute(CodeActivityContext context): Here, theExecute()method is called when the workflow reaches your activity. Thecontextthat is passed to the method provides access to the values of the input and output arguments at runtime.
First, you need to get the values of the input arguments. Set a variable that uses the value of the <Geometry> input argument, which is passed in by the user or by another activity:
// Obtain the runtime value of the input geometry.
var inputGeometry = context.GetValue(this.Geometry);
You use context to get the value of the Geometry argument, and then you assign the value to a local variable called inputGeometry.
Next, calculate the center point of inputGeometry’s value and assign it to a variable called outputCenter:
// Get the geometry's center point.
var outputCenter = inputGeometry.Extent.GetCenter();
Because you are using the types <Geometry> and <MapPoint> in your input arguments and output argument, you already have the line using ESRI.ArcGIS.Client.Geometry in the head of this file. This allows you to use Extent and GetCenter(), which are also Esri objects:
-
ESRI.ArcGIS.Client.Geometry.Geometry.Extent: Gets the extent ofinputGeometry. -
ESRI.ArcGIS.Client.Geometry.Envelope.GetCenter(): Retrieves the center ofinputGeometry.Extent.
For more information about Extent and GetCenter() see ArcGIS Runtime SDK for WPF.
Finally, now that the inputGeometry and outputCenter variables have been set, you can send the center value to your output argument, Center:
// Set the runtime value of the output map point.
Center.Set(context, outputCenter);
You have successfully implemented the Execute() method that retrieves an input argument and sets an output argument. Your Execute() method gets the value of the Geometry input argument, finds the center point, and sets the value of the Center output argument in just three lines of code:
// Obtain the runtime value of the input geometry.
var inputGeometry = context.GetValue(this.Geometry);

// Get the geometry's center point.
var outputCenter = inputGeometry.Extent.GetCenter();

// Set the runtime value of the output map point.
Center.Set(context, outputCenter);
Your activity can now run successfully. However, you should also consider that
-
Your activity does not yet fail gracefully.
If the workflow supplies a geometry with the value
null, your activity fails with aNullReferenceExceptionand does not provide helpful information about why it failed. See Throw Exceptions for next steps. -
Your activity will not have user-friendly labels and tool tips when imported into Geocortex Workflow Designer.
You can define display names, descriptions, categories, whether an argument is required, and other information with
System.Componentsattributes. For more information see Define Activity Information.
Throw Exceptions
If the geometry value passed into this activity is empty (null), you should ensure that the activity stops and cannot complete. If you do not throw an exception, the activity will fail and not be able to tell the user why the process failed.
Throw an exception underneath the line where you created the inputGeometry variable:
// Obtain the runtime value of the input geometry.
var inputGeometry = context.GetValue(this.Geometry);

// If the runtime value of the input geometry is empty, throw a meaningful error.
if (inputGeometry == null)
{
	throw new InvalidOperationException("Geometry is required.");
}
You now have a working code activity that throws a meaningful error if the input geometry is null.
Define Activity Information
While the activity you created in this tutorial would work properly when imported into Geocortex Workflow Designer, it would not display in a user-friendly way. Activities built into Geocortex Workflow Designer include toolbox categories, display names, and property information. In the same way, you can set your custom activities to include this information.
Activities
To assign names, toolbox categories, and other information to your activities, use System.ComponentModel attributes in your code above the activity’s class:
[DisplayName("Get Geometry Center")]
[Description("Finds the center of an input geometry.")]
[Category("Geometry Tasks")]
public sealed class GetGeometryCenter : CodeActivity>
When you import your activity library to Geocortex Workflow Designer, your custom activities appear in the activities list. Your custom activity library can include any number of toolbox categories.
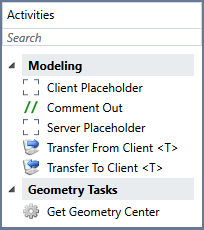
A custom toolbox category, Geometry Tasks, in the toolbox
If you want to put multiple activities into the same toolbox category, assign them the same [Category()] value.
Activity Arguments and Properties
In addition to high-level activity info, you can define the information for a custom activity's arguments and properties in same way that the built-in activities appear. Take the Confirm activity’s properties in Workflow Designer as an example:
-
Arguments and properties have display names, descriptions and tool tips
-
Arguments and properties are categorized by In Arguments, Out Arguments, or Misc
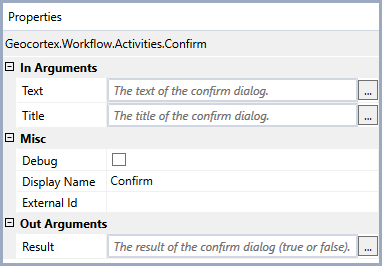
Properties of the Confirm activity
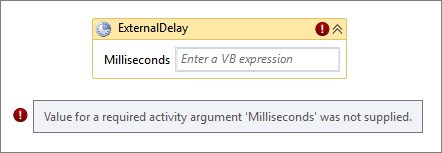
Additionally, arguments can be flagged as required by using [RequiredArgument]. If a required argument is not supplied, the workflow will not run. Flagging an argument as required forces a workflow author to supply a value during the design phase.
Activity with a required argument
You can set activity information above each argument in your code:
[DisplayName("Geometry")]
[Description("The geometry to get the center of.")]
[Category("In Arguments")]
[RequiredArgument]
public InArgument<Geometry> Geometry { get; set; }
For each argument, you can define Geocortex Workflow Designer activity information using the System.ComponentModel attributes listed in the table below.
System.ComponentModel Attributes
|
Attributes |
Description |
|---|---|
|
|
Takes a string. Sets the display name of a property. A property |
|
|
Takes a string. Sets the display category for a property. For example, you could set all of an activity’s InArguments to have a category of “In Arguments”. |
|
|
Takes a string. Sets the description and tool tip for a property. This text describes the function of a property and appears in the input field and on tool tips. |
|
|
If included on an argument, an activity cannot be used in a workflow until the required argument is set. |
Completed Activity
The completed activity that this tutorial has used as an example looks like this:
using System;
using System.Activities;
using System.ComponentModel;
using ESRI.ArcGIS.Client.Geometry;
namespace CustomActivities
{
	[DisplayName("Get Geometry Center")]
	[Description("Finds the center of an input geometry.")]
	[Category("Geometry Tasks")]
	public sealed class GetGeometryCenter : CodeActivity
	{
		[Description("The geometry to get the center of.")]
		[Category("In Arguments")]
		// A geometry passed in from another activity.
		public InArgument<Geometry> Geometry { get; set; }

		[Description("The center point.")]
		[Category("Out Arguments")]
		// The center point of the input geometry.
		public OutArgument<MapPoint> Center { get; set; }

		protected override void Execute(CodeActivityContext context)
		{
			// Obtain the runtime value of the input geometry.
			var inputGeometry = context.GetValue(this.Geometry);

			// If the runtime value of the input geometry is empty, throw a meaningful error.
			if (inputGeometry == null)
			{
				throw new InvalidOperationException("Geometry is required.");
			}

			// Get the geometry's center point.
			var outputCenter = inputGeometry.Extent.GetCenter();

			// Set the runtime value of the output map point.
			Center.Set(context, outputCenter);
		}
	}
}
Build an Activity Assembly
Once you have created all of the custom activities you want to add to your activity library, you can build it as a .dll file and import it to Geocortex Workflow Designer. By default, your activity library appears in the toolbox named after your project. However, you can assign toolbox categories for each activity individually. For more information see Define Activity Information.
To build the activity library, select Build | Build Solution in Visual Studio's menu bar.
You can change the name of the activity library’s output .dll file by changing the assembly name in your project’s Properties dialog. You can access this by right-clicking your project and selecting Properties from the context menu.
Geocortex Workflow Designer loads all of its activity libraries on startup. In order to have your custom library load on startup, you can put it Workflow Designer’s root folder alongside the other libraries. For a typical Geocortex Essentials installation, Workflow Designer’s root folder is in the following location:
C:\Program Files (x86)\Latitude Geographics\Geocortex Essentials\Default\Workflow Designer\
To automatically add your activity library to Workflow Designer:
-
From the Solution Explorer, expand your activity library project and open the Properties item.
If the Solution Explorer is not visible, open it from Visual Studio’s menu bar by selecting View | Solution Explorer.
-
From the list of sections, choose Build Events.
-
Press the Edit post-build button to open the Post-build Event Command Line dialog.
-
Add the following
xcopycommand to the text box:xcopy /E /Y /R "$(TargetPath)" "%programfiles%\Latitude Geographics\Geocortex Essentials\Default\Workflow Designer" xcopy /E /Y /R "$(TargetPath)" "%programfiles%\Latitude Geographics\Geocortex Essentials\Default\REST Elements\REST\bin"
Note that the file locations may need to be updated if you use a custom or named instance of Essentials.
These commands add your custom activity library to Workflow Designer whenever you build the library in Visual Studio.
In order to successfully build an activity library to these file locations, you need to run the commands as an administrator. Before you attempt to build, reopen Visual Studio with the Run as administrator option selected. You can find this option in the context menu when you right-click on Visual Studio in your Start menu.
Test Your Activity in a Viewer
If the activities you are developing need to be tested in specific workflows that the Workflow Designer Simulator cannot provide, you can deploy the custom activity library to an installation of Essentials automatically whenever you compile it in Visual Studio.
To automatically add your activity library to a Geocortex Essentials installation:
-
From the Solution Explorer, expand your activity library project and open the Properties item.
If the Solution Explorer is not visible, open it from Visual Studio’s menu bar by selecting View | Solution Explorer.
-
From the list of sections, choose Build Events.
-
Click Edit post-build to open the Post-build Event Command Line dialog.
-
Add the following
xcopycommand to the text box:xcopy /E /Y /R "$(TargetPath)" "%programfiles%\Latitude Geographics\Geocortex Essentials\Default\REST Elements\REST\bin"
Note that the file locations may need to be updated if you use a custom or named instance of Essentials.
These commands add your custom activity library to Essentials’ REST bin whenever you build the library in Visual Studio.
In order to successfully build an activity library to these file locations, you need to run the commands as an administrator. Before you attempt to build, reopen Visual Studio with the Run as administrator option selected. You can find this option in the context menu when you right-click on Visual Studio in your Start menu.
Deploy Your Activity to Geocortex Essentials
When your activity library has been developed and tested, you can add it to your Geocortex Essentials environment's REST API and use it in the viewer. For a typical Essentials installation, you can copy the activity .dll to the following directory:
C:\Program Files (x86)\Latitude Geographics\Geocortex Essentials\Default\REST Elements\REST\bin
Once the activity library is in the REST bin folder, you can use your new activities in workflows.