Introduction to Geocortex Essentials Workflow
Geocortex Workflow provides a quick and easy way to develop RESTful applications (workflows) that work with Geocortex Essentials. For example, you could create a workflow that produces a report about a set of features that the user selects. When the user runs the workflow, the workflow might start by prompting the user to select some points on the map. The workflow then adds some buffering, performs a server-side query, and returns the list of features found by the query to the viewer. In the viewer, the user selects which features to include in the report. The list of features is returned to the server, where the report is generated, and then sent back to the viewer for display.
Workflows handle many of the low-level complexities associated with software development, like serialization, client-server communication, and coordination of asynchronous processes. This speeds development and frees you to focus on the business problem.
At its simplest, a workflow is a sequence of activities. A simple workflow takes inputs, operates on the inputs, and produces the output. Many GIS workflows fit this pattern.
Geocortex workflows go well beyond this simple model. Geocortex workflows:
-
Include business processes: Geocortex workflows extend the model to general business processes, so your workflows can be made up of a combination of business activities and GIS activities.
-
Can pause for user input: Geocortex workflows can pause and wait for user input as many times as needed and for as long as needed, so they can model your business or GIS process precisely.
-
Are extensible: Geocortex workflows can be expanded by creating custom activities. Once created, the new activities appear in Workflow Designer beside the original activities and the Designer treats them just like any other activity.
-
Are dynamically interactive: Geocortex workflows are interactive throughout the execution of the workflow. You do not only input data at the start and then collect outputs at the end. Workflows allow you to insert user decision points and interactions at any point in the workflow.
-
Include enterprise and GIS processes: Geocortex workflows have the power to mimic enterprise activities in the process, combining GIS with business processes. For example, a workflow could interact with an existing back-end system or database.
-
Are REST endpoints: Geocortex workflows are exposed as REST endpoints, which allows third-party applications to interact with them.
-
Are API agnostic: Geocortex workflows can interact with the Silverlight or Java API.
-
Can contain GIS data types: Workflows have built-in GIS data types like Esri geometries and feature sets that allow interaction with Esri objects.
Geocortex Workflow Designer
Geocortex Essentials comes with a powerful designer for creating workflows, Geocortex Essentials Workflow Designer.
Geocortex Workflow Designer has many features that facilitate the creation of workflows:
-
Drag-and-drop interface: Workflows are built by dragging activities from the Activities panel and dropping them into the design area.
-
Built-in library of activities: The Activities panel contains a wide range of activities that include specialized Geocortex Essentials, ArcGIS Server, and GIS activities, like buffering, geocoding, querying, geoprocessing, routing, emailing, form inputs, control flow, error handling, debugging, and more.
-
Auto-completion: Workflow Designer provides auto-completion suggestions when you are creating variables and other elements.
-
Quick access to common data types: When selecting a data type for a variable, Workflow Designer allows you to select from lists of common data types for working with Geocortex Essentials and ArcGIS Server objects.
-
Validation and error checking: Workflow Designer automatically performs error checking and displays an icon if there is an error. Hovering the mouse over the icon displays a tool tip that describes the error.
-
Simulation: Workflow Designer has a built-in simulator for testing workflows. The simulator enables you to run workflows in a simulated environment, which saves you from having to leave Workflow Designer to test your workflows. This reduces the time and effort it takes to test workflows.
Installation
Geocortex Essentials Workflow Designer is installed when you install Geocortex Essentials.
Launch Workflow Designer
To launch Geocortex Essentials Workflow Designer:
-
Follow the instructions for the operating system you are using:
-
Windows Server 2012, Windows 8, and Newer Versions:
On the Start menu, type (Undefined variable: GE.Geocortex), and then click Geocortex Essentials Workflow Designer.
-
Windows Server 2008, Windows 7, and Older Versions:
In the Start menu, select All Programs | VertiGIS | Geocortex Essentials [Version] [Instance] | Geocortex Essentials Workflow Designer.
[Version] is the Essentials version number. [Instance] is the instance name, if Essentials is installed as a named instance. The default installation does not have an instance name.
-
Design Interface
Workflow Designer displays a visual representation of your workflow within the design area ( in the screen capture below, labelled ActivityBuilder). To create a workflow, you drag activities from the Activities panel (
 ) to the design area () and group them into a logical sequence. Each activity has configurable properties (
 ) that govern how the activity behaves and how it relates to other activities. Values are passed from one activity to the next using variables and arguments (
 ). Workflow Designer's built-in simulator allows you to run a simulation of your workflow without having to deploy a host application. Click Start Simulator
 ![]() in the ribbon (
in the ribbon ( ) to open the simulator.
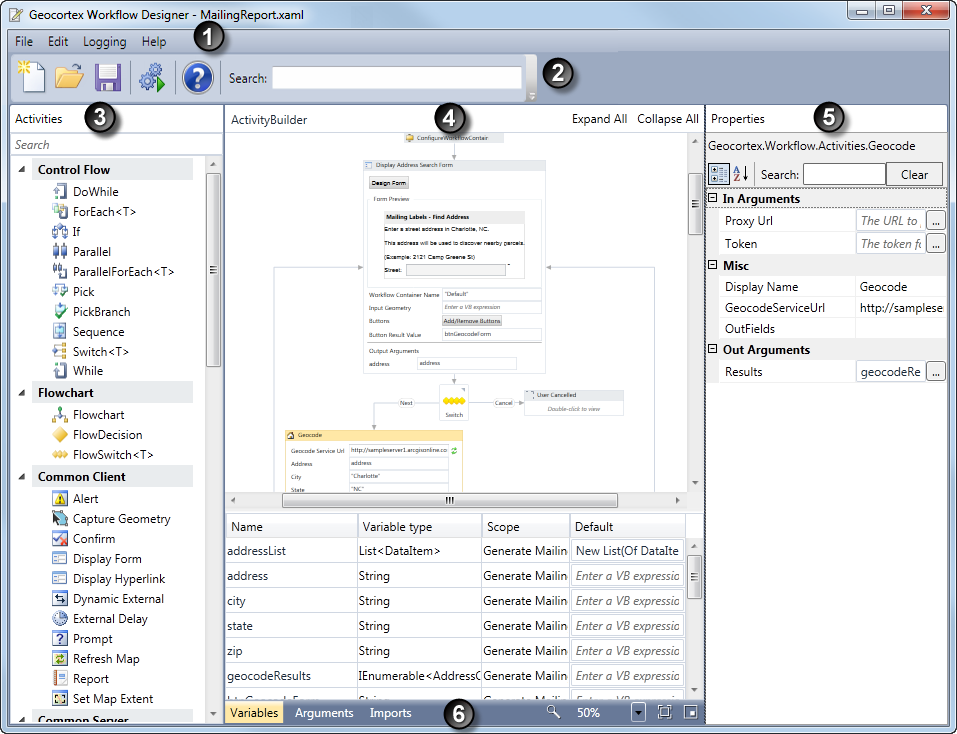
Workflow Designer's design interface
The table below summarizes the main parts of Workflow Designer's design interface. The numbers in the screen capture correspond to the numbers in the table.
Main Parts of the Design Interface
|
# |
Component |
Description |
|---|---|---|

|
Menu bar |
The menu bar contains standard File, Edit, and Help menus. In addition, the Edit menu has commands to export the workflow image. The Logging menu allows you set the log levels for the server-side logs. |
|
|
Ribbon with Search box |
The ribbon contains a subset of the commands that are available through the File menu, plus an icon to open the simulator. The ribbon also contains the search tool that you can use to find and highlight elements within a workflow. |
|
|
Activities panel |
The Activities panel lists the activities that you can use in workflows. To add an activity to the workflow you are creating, drag the activity from the Activities panel to the design area. To open the help page for an activity, right-click the activity in the Activities panel and select the Help option. |
|
|
Activity Builder |
The Activity Builder is the design area where you build your workflow. Along the bottom of the design area are tabs that you use to add variables, arguments, and to import namespaces. |
|
|
Properties |
The Properties panel displays all the properties of the currently selected activity and any assigned values. |
|
|
Variables Tab, Arguments Tab, and Imports Tab |
The Variables, Arguments and Imports tabs allow you to create and edit variables and arguments, and to import namespaces and libraries for use within a workflow. To open a tab, click the tab's name. |
See also...
Navigate a Workflow
The table below lists ways to move around and see different parts of a workflow in Essentials Workflow Designer's design area.
Navigate the Workflow Image in Essentials Workflow Designer's Design Area
|
To: |
Do this: |
|---|---|
|
Fit the whole workflow image within the existing design area |
Click Fit to screen |
|
Open and view a nested activity (which could contain other activities) |
Double-click the activity in the workflow image. (Do not click within a field.) Alternatively, right-click the activity and select Open. |
|
Zoom out one or more levels, when viewing a nested activity |
Click Expand All or Collapse All at the top of the design area. Alternatively, click a specific link in the breadcrumb at the top of the design area to go to that part of the workflow. |
|
View the image at 100% |
Click Reset zoom to 100% Alternatively, select 100% from the magnification drop-down list |
|
Maximize the area available for the image within Essentials Workflow Designer |
Click Variables / Arguments / Imports at the bottom of the design area to minimize the Variables, Arguments, or Imports area. |
|
Find the currently visible part of the image within the workflow |
Click Overview |
|
Pan the image |
Click Overview Alternatively, use the scroll bars. |
|
Zoom in or out a preset amount |
Select a zoom level from the magnification drop-down list Alternatively, hold down the Ctrl key and scroll your mouse wheel. |
|
Hide or show nested activities and the properties for all activities |
Click Collapse All / Expand All at the top of the design area. |
|
Undo Collapse All or Expand All |
Click Restore at the top of the design area. |
Workflow Files
Workflows are stored as .xaml files. When you create a workflow in Workflow Designer, you are actually creating a .xaml file. The .xaml file contains all the information needed to run the workflow.
Because they are based on XML, workflows are not compiled. This means that you can inspect and edit a workflow in a text editor or XML editor if you want to.
Workflow Architecture
Geocortex Workflow is based on Microsoft Workflow Foundation 4.0, which is part of the .NET 4.0 stack. Being implemented in .NET on the server has many advantages. The main advantage is that it places the power of Windows Communication Foundation (WCF) and other .NET technologies at your command. Another advantage is having access to the libraries of the .NET Framework, which makes interaction with other systems straightforward. It also allows you to leverage existing knowledge in .NET programming for creating custom activities.
Geocortex Workflow extends Microsoft Workflow Foundation in several ways:
-
Interactivity: Geocortex workflows are interactive. Because workflows are served through REST, which is stateless, the entire state of the workflow is packaged and sent to the client for execution of client-side activities. No server resources are tied up while the workflow is waiting for input or displaying alerts on the client.
-
Activities: Many of the activities in the Workflow Designer's built-in library of activities complement out-of-the-box Microsoft Workflow. A minority are out-of-the-box Microsoft Workflow activities. The Workflow Designer's extended set of activities includes a wide variety of activities that work with ArcGIS Server and GIS objects and data types.
-
Simulation: The Workflow Designer's built-in simulator enables you to run workflows in a simulated environment. Simulation saves you from having to deploy your workflow, which reduces the time and effort it takes to test your workflows.
To learn more about Microsoft Workflow Foundation, read A Developer's Introduction to Windows Workflow Foundation (WF) in .NET 4.