Work with Actions
Actions are configured events that users can trigger from a band, chart or feature in an VertiGIS Inline view. For example, you might want to create an action that allows the user to print a report from a chart or search for data on the map.
Users trigger actions from the context menu of the band, chart, or feature. Actions triggered from a feature are known as feature actions.
There are two types of actions:
-
Default Actions: Pre-configured actions that come with VertiGIS Inline.
-
Custom Actions: Created by invoking a workflow.
Default Actions
Default Actions can be added directly to a band, chart or feature. No additional configuration is required. To add an action to a band, chart or feature, see Add an Action to a Band or Chart.
Point of Interest
By default, every new view you create contains a Points of Interest (POI) band. This band allows your users to add points of interest to the charts contained in the view.
The Remove Point of Interest action is a feature action and requires a POI feature. The Add Point of Interest action may be added as a band or chart action (that is, it does not require a feature).
You can remove POI actions. You can also remove the POI band from the view, if required.
Measure Tool
The measure tool allows users to define a start and end measurement at the band, chart or feature level. The measure tool includes:
-
A Measurement chart in the Points of Interest band.
-
Start Measurement and End Measurement context menu options.
-
Remove Measurement as a Measurement chart feature action.
-
Measurement Actions and Data Sources as default actions.
For Views created prior to version 1.4, measure tools must be enabled.
To enable measure tools for a View created prior to version 1.4:
-
Open the Points of Interest band.
-
In the Points of Interest menu, select the Reset option.
Measurement tools are now available.
Custom Actions
Each custom Inline action invokes a workflow—created in VertiGIS Studio Workflow, and consists of:
-
A command that invokes the workflow. Inline v1.0 supports the following commands:
-
RunWorkflow—the basic command used to trigger and optionally pass parameters into a workflow.
-
GetAndAppendDataFromWorkflow, GetAndAppendDataFromWorkflow, and GetDataFromWorkflow—used to specify a workflow data source and retrieve and display feature set data at runtime. For details, see Specify a Workflow Data Source and Return Feature Set Data.
-
-
A command parameter that specifies the URL of the workflow to be run.
-
Context parameters passed into the target workflow automatically.
-
Optional custom parameters that you can specify, if required.
Once you have created an action, you can add it to a band or chart in the view.
Pass Parameters into a Workflow
When a workflow is invoked via an Inline action, certain context parameters are automatically passed into it. In addition, you can optionally pass any number of custom parameters into the target workflow.
Context Parameters
By default, the following context-based parameters are passed into the target workflow:
-
stationInfo
-
band
-
chart
-
rangeInfo
-
featureData (only available if the action is a feature action)
These parameters are available as workflow inputs in the target workflow via the context property.
Custom Parameters
In addition to passing in the URL of the target workflow, you can also pass in custom parameters. These should be specified after the URL, using the following syntax:
{
 "url": "<workflowurl>",
 "customParam1": "<value 1>",
 "customParam2": "<value 2>"
}
Custom parameters are available as workflow inputs in the target workflow via the inputArgs property.
Access Input Parameters in a Workflow
To use context or custom parameters in a target workflow, access them using the Get Workflow Inputs Workflow activity. For details, see Get Workflow Inputs Activity.
When the activity is run, the result resembles the following:
{
  inputArgs: {
     "customParam1": "<value 1>",
     "customParam2": "<value 2>"
  },
  context: {
    "stationInfo": "<value>",
    "band": "<value>",
    "chart": "<value>",
    "rangeInfo": "<value>",
    "featureData": "<value if applicable>"
  }
}
Specify a Workflow Data Source and Return Feature Set Data
You can use an external workflow, created in VertiGIS Studio Workflow, as a data source for any chart in a view. This functionality allows you to return feature set data at runtime and display it in the chart.
When configuring a workflow data source, use one of the following commands to specify the action that invokes the workflow to be used as the data source:
-
GetDataFromWorkflow
-
GetAndAppendDataFromWorkflow
-
GetDataFromWorkflowInNewBand
GetDataFromWorkflow
The GetDataFromWorkflow command retrieves data from a specified workflow and returns a feature set to be used as the primary chart data source for a chart.
GetDataFromWorkflow is intended to be used to return the primary chart data source only. If invoked as a chart or feature action, this command functions exactly as GetAndAppendDataFromWorkflow.
GetAndAppendDataFromWorkflow
The GetAndAppendDataFromWorkflow command retrieves data from a specified workflow and appends it to the data already present in the band.
The retrieved data is added as a new chart within the existing band.
-
You can add this command to a chart action or a feature action, the former being the most common use case.
-
If used as the primary chart data source, this command functions exactly as GetDataFromWorkflow.
GetDataFromWorkflowInNewBand
The GetDataFromWorkflowInNewBand command retrieves data from a specified workflow and adds it as a new chart within a new band.
-
You can add this command to a chart action or a feature action, the former being the most common use case.
-
If used as the primary chart data source, this command functions exactly as GetDataFromWorkflow.
Each chart can only add one copy of itself for each configured data source action. If the action is re-run, the data is refreshed. This allows the user to add data from as many data sources as needed, while preventing the creation of unnecessary duplicates if the same action is run multiple times.
Add or Import a Custom Action
Before you can add a custom band, chart, or feature action, you must add it to the view's Actions panel.
Once you have saved an action, you can import it into other views.
To add a custom action to the Actions panel:
-
In the left toolbar, click Actions.
The Action panel opens. All actions configured for the view are listed.
-
Click Add Action.
-
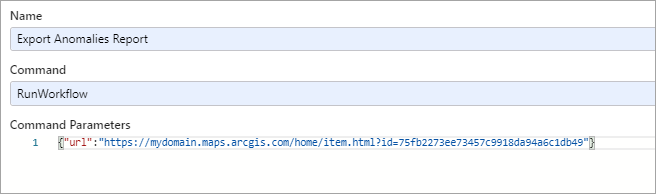
Configure the new action as follows:
-
Name: Enter a name for the action. This will be seen by your users, so the name should be meaningful and reflect the event/workflow the action will invoke.
-
Command:
-
For general band, chart, or feature actions, enter RunWorkflow (shown below).
-
For actions whose purpose is to invoke workflows to be used as data sources, enter GetAndAppendDataFromWorkflow, GetDataFromWorkflowInNewBand, or GetDataFromWorkflow, as required.
-
-
Command Parameter: Enter the URL of the workflow to be invoked, using the following syntax:
{"url":"<workflowurl>"}For example:
{"url":"https://mydomain.maps.arcgis.com/home/item.html?id=75fb2273ee73457c9918da94a6c1db49"}You can also specify any custom parameters, if required.
-
-
Click Apply.
Your action now appears under Custom Actions in the Action panel.
You can now add the action to a band or chart.
-
In the left toolbar, click Actions.
-
Click Import Actions.
-
In the Import window, select the view containing the actions you want to import and click Open.
The actions are imported and added to the list in the Actions panel.
Add an Action to a Band or Chart
The steps to add an action are the same for both bands and charts. However, you can only add feature actions to charts. Feature actions allow the user to run the action from the context menu of a feature (data point) on the chart.
-
At the bottom of the Band Options panel, in the Actions section, click Add Action.
The Actions list opens, displaying all of the actions configured for the view.
-
Select an action from the list and click Submit.
The action displays under the Band Actions heading on the panel.
To add a chart or feature action:
-
At the bottom of the Chart configuration panel, in the Actions section, add either a chart action or a feature action by clicking the appropriate Add Action button.
The Actions list opens, displaying all of the actions configured for the view.
-
Select an action from the list and click Submit.
-
The action displays under the Chart Actions or Feature Actions heading on the panel.
Edit or Remove an Action
Once you have added actions to a view, and the bands and charts it contains, you can make the following changes:
- Remove an action from a band, chart, or feature
- Reorder band, chart, or feature action lists
- Delete an action from the view
When you delete an action from the view's Actions panel, any band, chart, or feature actions created from this action are removed from the Band Options and/or Chart Options panels.
To remove an action from a band, chart, or feature
-
At the bottom of the Band Options or Chart Options panel, in the Actions section, click Edit Items.
-
Click the action's Remove button.
-
Click Done.
To reorder a band, chart, or feature action list
-
At the bottom of the Band Options or Chart Options panel, in the Actions section, click Edit Items.
-
To reorder actions, click and drag the action position controls.
-
Click Done.
To delete an action from a view
-
In the left toolbar, click Actions.
-
The Actions panel lists all of the actions configured for the view. Locate the action you want to delete, and click its More
 button.
 -
Click Delete.
-
You will be prompted to confirm the deletion. Click Yes to proceed or No to cancel.
When you delete an action from the view's Actions panel, any band, chart, or feature actions created from this action are removed from the Band Options and/or Chart Options panels.