Use the Layer Presets component to create tailored views of your map data that highlight information relevant to your user.
Configuring layer presets allows you to maintain a single app with many layers, rather than creating multiple web apps for different purposes.
You can configure a layer preset to do the following:
•Apply a different basemap to provide the most effective background for the data you want to emphasize.
•Show or hide layers in the layer list to focus your users' attention on the relevant information.
•Set a group extension to be expanded, collapsed, or retain its current state when the preset is applied.
These are the best practices to follow if you want to edit a layer preset.
You can also import a layer preset from Portal, making it easier to migrate complex configurations without manually rebuilding them.
Create a Layer Preset
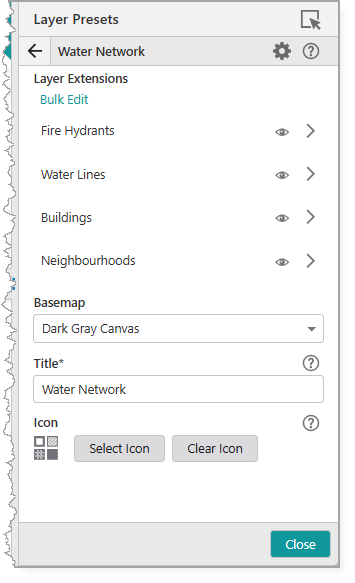
The procedure below shows you how to create a layer preset. As our example, we create a layer preset called "Water Network". When the user selects this preset, all fire hydrants and water lines appear on the map and remain visible regardless of how far out the user zooms.
When you create a layer preset, you may want to also create a default preset that resets the view back to its original state.
To create a layer preset:
1.Add a Layer Presets component to your app, or select an existing one.
2.Click Add Layer Preset and give your new preset a descriptive Title (for example, ours is called Water Network).
3.Click the new layer preset to open its settings.
4.Use the Visibility icon ( ) to configure the visibility for each layer extension. The available options are:
•No Changes: Leaves the layer's current visibility state unchanged.
This option is the most flexible. It allows you to apply a preset to manage a group of layers without affecting other layers a user may have manually enabled. This is especially useful if you want your layer presets to apply definition expressions to certain layers but leave all other layers untouched.
•Visible: Forces the layer to be visible when the preset is applied.
•Not Visible: Forces the layer to be hidden when the preset is applied.
In our example, we want to make the Fire Hydrants and Water Lines layers visible and hide the Buildings and Neighbourhoods layers.
To apply a visibility setting to multiple layers at the same time, click Bulk Edit.

5.Select a Basemap that emphasizes your data. For our example, we use Dark Gray Canvas.
6.Click Back to return to the settings for the layer preset.
7.Configure the Layout settings, described in the table below.
Setting |
Description |
|---|---|
Adjust component size |
Redirects you to the settings for the parent component so you can resize it. |
Margin (px) |
The space around the component, measured in pixels. |
Padding (px) |
The space inside the component, measured in pixels. |
Visibility |
Determines how the component appears in the app. The options are as follows: •Default: Defers to each component's default "autoActivate" property, which determines the default behavior on startup. •Visible: Displays the component on app startup. A parent component with hidden visibility will hide its children components until the parent becomes visible. •Hidden: Hides the component on app startup and requires an action or trigger to make it appear. |
Map |
The map that this component depends on. If a map is an ancestor of this component, or if there is only one map in the app, the dependency is automatically inferred and cannot be manually set. |
8.Save your app.
When your user selects the configured layer preset, Studio Mobile automatically applies the settings to the current layer.
Set the Expansion State of a Group Extension
Use the Layer Presets component to define the initial expanded or collapsed state of group extensions.
When a user applies a preset, you can automatically expand relevant layer groups while collapsing others, guiding them directly to the information they need.
In the following example, the map contains two group extensions: Water Infrastructure and Electric Grid. We will create a preset named Water Network Focus for users who only works with water assets.
To set the group layer expansion:
1.Add a Layer Presets component to your app, or select an existing one.
2.Click Add Layer Preset and give your new preset a descriptive Title (for example, Water Network Focus).
3.Select the Group Extension whose expansion state you want to configure.
4.Choose one of the following options under Expanded in Layer List:
•No Changes: The preset does not affect the group's current expanded or collapsed state.
•Expanded: The group extension is automatically expanded with the layer preset is applied.
•Collapsed: The group extension is collapsed when the layer preset is applied.
For our example, we will set the Water Infrastructure group extension to Expanded and the Electric Grid group extension to Collapsed.
5.Save your app.
When users open the app and select the Water Network Focus preset, the Water Infrastructure group automatically expands while the Electric Grid group collapses, providing an immediate view of the relevant data.
Best Practices to Edit a Layer Preset
Changes made to a web map after creating a layer preset can affect how that preset behaves.
To keep configurations aligned and avoid unexpected results, follow the best practices described in the table below.
Best Practise |
Description |
|---|---|
Save the web map before editing presets. |
Ensures that all updates are captured and available to the app. |
Refresh App Designer after making map changes. |
Reloads the latest map configuration into App Designer so presets stay in sync. |
Save App Designer after refresh. |
Ensures the refreshed configuration is committed and available the next time you open App Designer. |
Open each preset after making any layer changes. |
Verifies that layers, sublayers, and settings are still correctly applied. |
Wait for the app to fully load before editing presets. |
Prevents partial loading issues that can cause missing or misaligned layers. |
Avoid null or undefined sublayer titles. |
Reduces errors in preset mapping. Make sure you use clear, consistent names. |
Reset the configuration for renamed or re-added layers. |
If you add, remove, or rename layers and sublayers so that they no longer match the preset configuration, you must reopen the preset and manually update the settings. |
Import a Layer Preset from Portal
Layer presets must be created in VertiGIS Studio Desktop and published to Portal before you can import them into Studio Web.
To import a layer preset:
1.Open the Layer Presets settings and click the dropdown beside Add Layer Preset.
2.Click Add Layer Presets from Portal.
The Select Items window opens.
3.Locate the layer preset in your ArcGIS Online or ArcGIS Enterprise Portal.
You can select multiple items and import them in bulk.
4.Click Select to add the items.
The imported items appear in your list of available Layer Presets.
If a layer referenced in the imported layer preset does not exist in the web map of your current app, its configuration is ignored when you activate the layer preset.
If a layer in your web map is not referenced in the imported layer preset, its configuration is set to the default values shown below.