Pre-Installation
Installation Prerequisites
Prior to installing Mobile Designer on premises, you must ensure that you have the following:
-
Windows Server: 2019, 2022, or 2025.
-
An ArcGIS Online or Portal for ArcGIS: You must have either an ArcGIS or Portal for ArcGIS identity to sign in to Mobile Designer or VertiGIS Studio Go.
For an on-premises installation of Mobile Designer, the free, public ArcGIS Online accounts are not supported, because they do not permit you to create an ArcGIS Online app for Mobile that is essential for it to function. You must have an ArcGIS Online license that is for at least a Developer or Organization account. -
Add a Mobile app in Portal for ArcGIS or ArcGIS Online: You must add an Application for Mobile Designer and VertiGIS Studio Go to your organization's Esri portal, as you need it to obtain an App ID and a Redirect URL from that app to use during the installation process. You can use a single portal app for Mobile Designer and VertiGIS Studio Go.
This application must be registered. In some organizations, this can only be done by Administrators.
Adding an app is particularly important if you plan to use Portal for ArcGIS and VertiGIS Studio Go, as you will get an error message trying to open VertiGIS Studio Go unless you have configured the App correctly.
-
IIS Website: If you are installing VertiGIS Studio Mobile Designer on premises, and you want to use a website in IIS that is not the Default Web Site, you should have (or create) that web site before you run the Post Installer. Although IIS is installed during the post-installation process, if you plan to use a custom folder, you must install IIS first and then follow the steps in Use a Custom IIS Website.
Create an App in ArcGIS Online or Portal for ArcGIS
You need to create an app in ArcGIS Online or Portal for ArcGIS to enable the use of an ArcGIS Login for Mobile Designer and VertiGIS Studio Go. You can use the same app for both Mobile Designer and VertiGIS Studio Go. You also need this application to log in to a Custom Mobile app.
To add an app in ArcGIS Online or Portal for ArcGIS:
-
Open your browser and sign in to ArcGIS Online or your Portal for ArcGIS.
You can also add an ArcGIS application just after you install Mobile Designer, during the post-installation process. To create an application from the Post Installer, click Launch to open your Portal in the browser, then continue from step 2 below. -
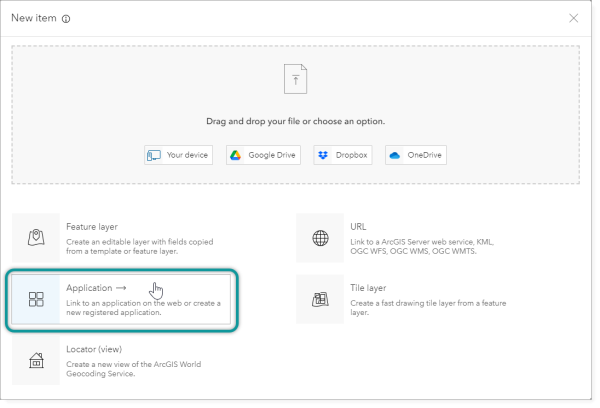
Select the Content tab.
-
Click New Item.
-
Select Application.
-
Select Other application as the Application type.
-
Click Next.
-
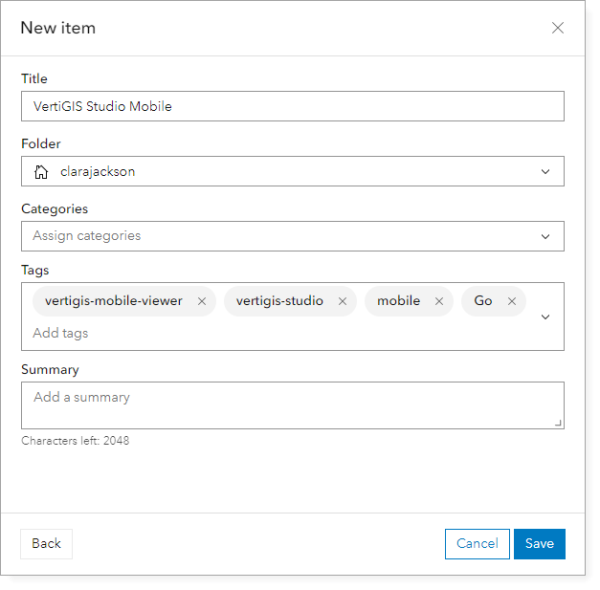
Configure the application using the following settings:
-
Title: Enter "VertiGIS Studio Mobile". This is the title you see when you log in to Mobile Designer and VertiGIS Studio Go and it requests your permission to use your login information.
-
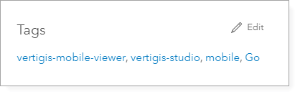
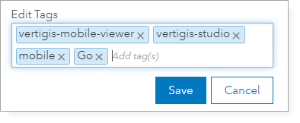
Tags: Enter "vertigis-mobile-viewer". This is a required tag. You can add other optional tags, such as, "vertigis-studio", "mobile", "Go", or tags for your organization. Type each tag name and press Enter to separate multiple tags.
These tags should only be applied to this Portal for ArcGIS application, not the web mapping applications that you create in Mobile Designer.
-
-
Click Save.
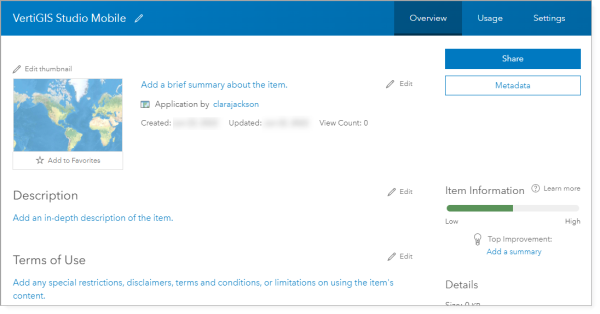
The VertiGIS Studio Mobile application opens in the Overview tab.
Register the Application
To register the application:
-
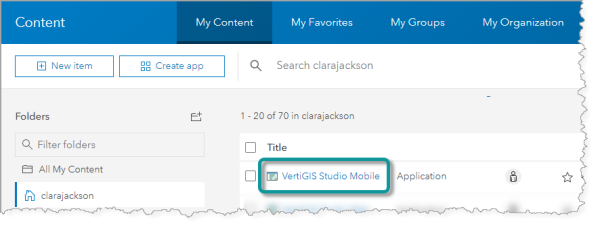
In your ArcGIS portal, select the Content tab.
-
Select the VertiGIS Studio Mobile application.
-
Select the Settings tab and scroll to the Application section.
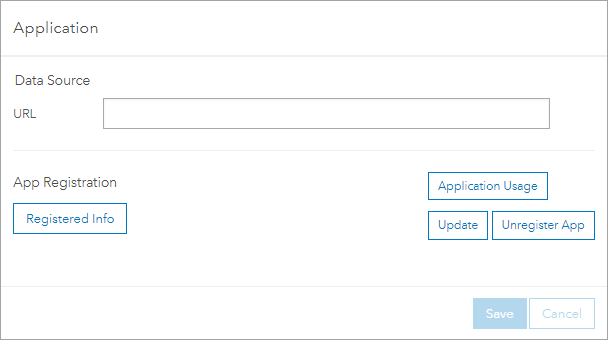
-
Click Update.
If the Update button is not available, click Register.
The Registered Info window opens.
-
Ensure that the following host name is in the Redirect URI box:
urn:ietf:wg:oauth:2.0:oob.If the Redirect URI box is blank:
-
Type the host name for your web server into the Redirect URI box.
-
Click Add.
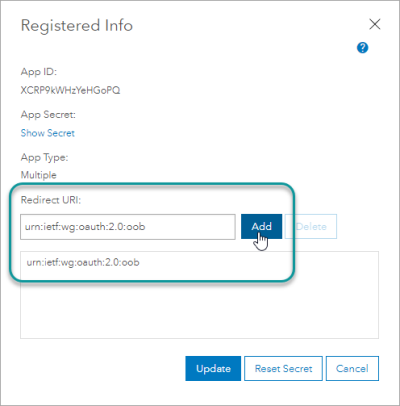
-
-
Click Update to complete the registration of the application.
If the Update button is not available, click Register.
-
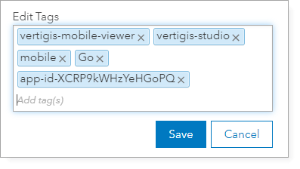
Copy the App ID in the Application section, as you will need it in the next steps to add the app-id-[App-ID] tag. In the figure below, the App ID is XCRP9kWHzYeHGoPQ.
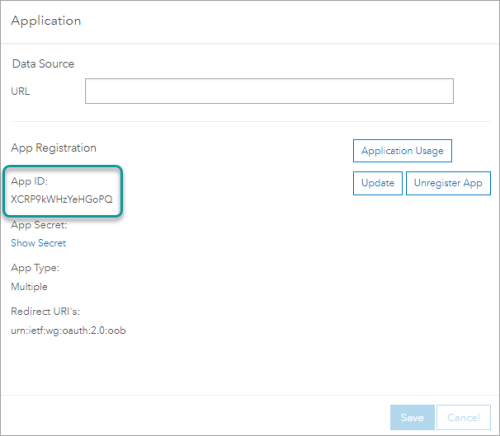 Leave the application open in the browser so that you can copy and paste the App ID and Redirect URL when you need them during installation.
 -
Select the Overview tab.
-
Click Edit in the Tags section, located in the right sidebar.
The Tags section changes to Edit Tags.
- Add the app-id-[APP-ID] tag, replacing [APP-ID] with the App ID copied from the Application section. For example, the tag in the figure below is app-id-XCRP9kWHzYeHGoPQ.
-
Click Save.
-
In your portal, share this application with everyone.
You must share this application with everyone so that users can sign into Mobile Designer with Esri identities. If you use other VertiGIS Studio products, we recommend using the same portal and app ID across all applications so users can switch between them without needing to sign in again.
Do not include the square brackets in the App ID tag.
Use a Custom IIS Website
- In Windows Explorer, add a custom folder.
- Create a web.config file, add it to the custom folder, and insert your preferred URL prefix.
- In Windows, grant IIS permission to access the custom folder.
- In IIS, add a custom website and point its Physical Path to the custom folder.
- During the Post Installation process, on the IIS Settings page, select the website you created in Step 5. and enter the Prefix you created in Step 3.
If you are installing VertiGIS Studio Mobile Designer on premises, and you want to use a custom website in IIS that is not the Default Web Site, there are manual steps to follow before you run the Post Installer.
You must do these steps before you run the post installer so that the website and the prefix are available for selection when you get to the IIS section of the post installer.
Although IIS is normally installed during the post-installation process, if you plan to use a custom folder, you will need to install IIS first and then follow the steps below.
The high-level steps to make it possible to use a custom IIS website include:
Add a Custom Folder
To add a custom folder:
-
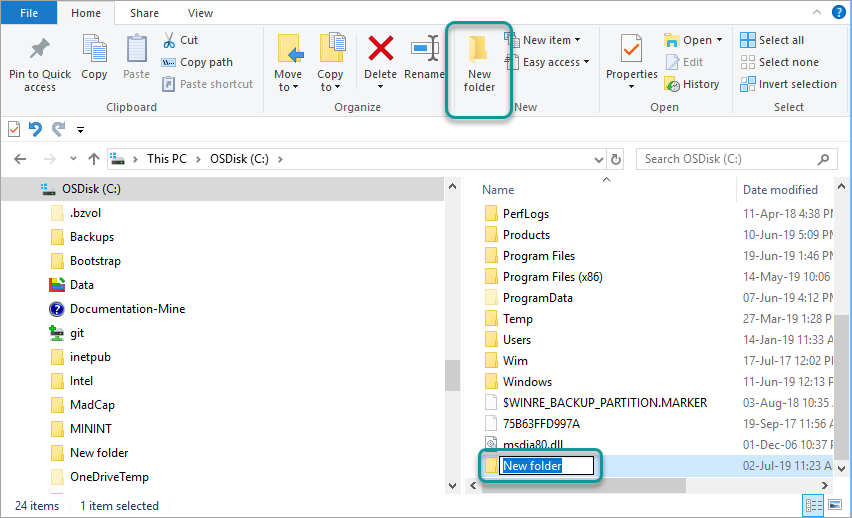
In Windows Explorer, add a new custom folder in any location you want it to be.
Create and Edit a Web.Config File in the Custom Folder
You need to create a web.config file, add it to the custom folder and insert your preferred URL prefix into the web.config file.
To create a Web.Config file in the custom folder:
- Open a text editor like (like Notepad++).
- Create a new file called web.config and save it to the custom folder.
-
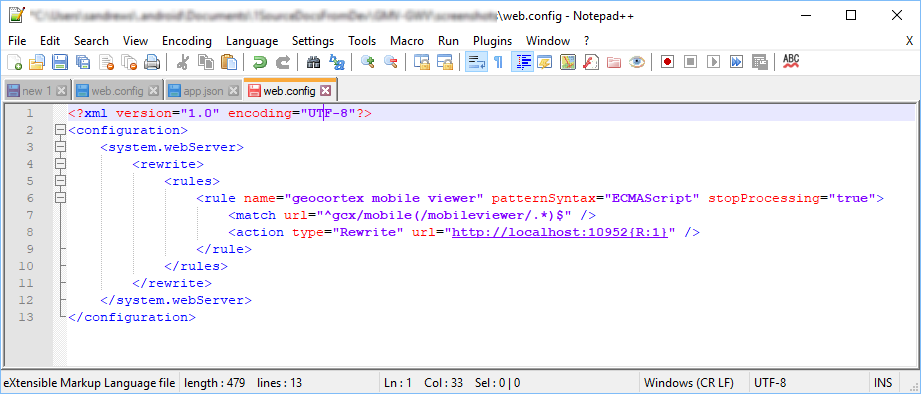
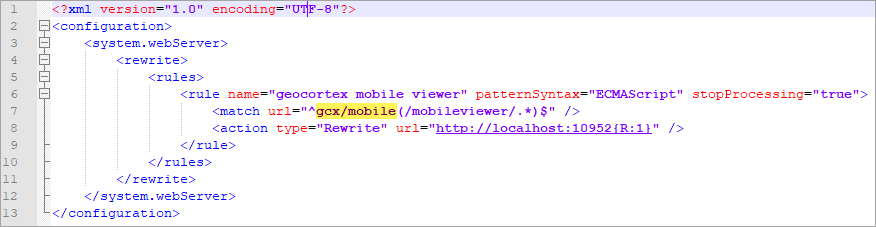
Copy the following code into the web.config file:
Copy<?xml version="1.0" encoding="UTF-8"?>
<configuration>
<system.webServer>
<rewrite>
<rules>
<rule name="vertigis studio mobile viewer" patternSyntax="ECMAScript" stopProcessing="true">
<match url="^gcx/mobile(/mobileviewer/.*)$" />
<action type="Rewrite" url="http://localhost:10952{R:1}" />
</rule>
</rules>
</rewrite>
</system.webServer>
</configuration> -
Verify that your web.config file looks the same as the one below:
- Save the web.config file.
To edit the Prefix in the Web.Config file:
-
In the web.config file, locate the match url prefix: gcx/mobile.
- Replace the URL prefix with the one you want to use.
- Save the web.config file.
Grant IIS Permission to the Custom Folder
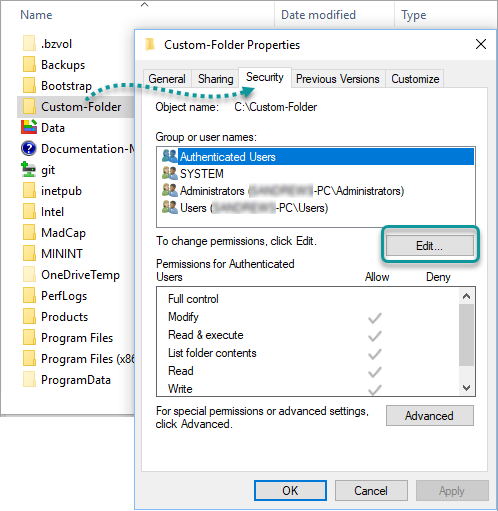
To allow IIS to access the custom folder, you need to grant IIS permission to the folder.
To grant IIS permission to the custom folder:
-
In Windows, right-click the Custom-Folder you just created and select Properties from the menu.
-
Select the Security tab, and then click Edit.
-
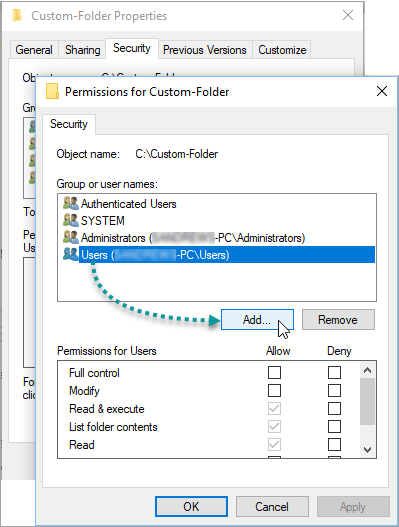
In the Permissions dialog, in the Group or user names box, click Users and then Add.
-
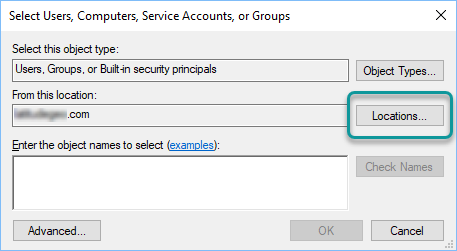
In the Select Users, Computers, Service Accounts or Groups dialog, click Locations.
 If you are asked to enter the credentials of the user, click Cancel.
 -
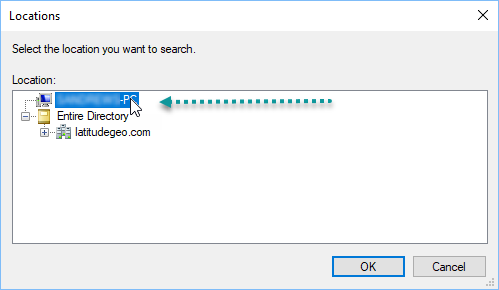
In the Locations dialog, select the machine name, and then click OK.
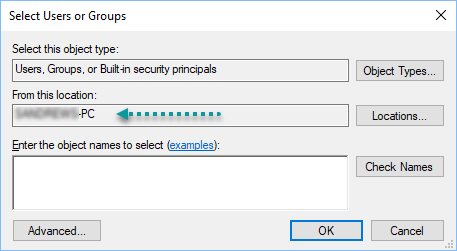
When you return to the Select Users, Computers, Service Accounts or Groups dialog, the name of the machine is in the From this location box.
-
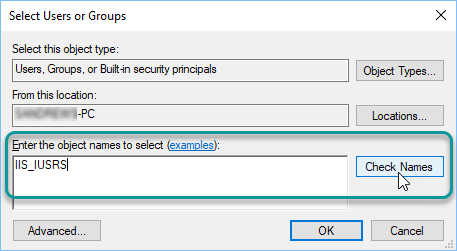
In the Enter the object names to select box, type in IIS_IUSRS, and then click Check Names.
-
In the Permission for.... dialog, click Apply and then OK.

- In the Properties dialog, click OK again.
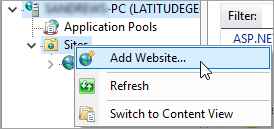
Add a Custom IIS Website
To add a custom IIS website:
-
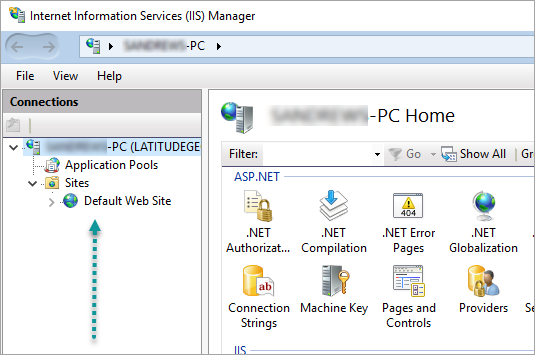
Open Internet Information Services (IIS) and expand the tree under the User's Computer name on the left.
-
Right-click the Sites folder and select Add Website.
-
In the Add Website dialog, add the following settings and then click OK:
-
Site name: Type in mobile-site.
-
Physical path: Enter the path to the custom folder you created.
-
Type: Select https. New fields appear in the dialog after you select this option.
-
Port: Type in 443.
-
SSL Certificate: Select the SSL certificate installed on the server.
To find the SSL certificate, click on the root folder in IIS, and then select Server Certificates.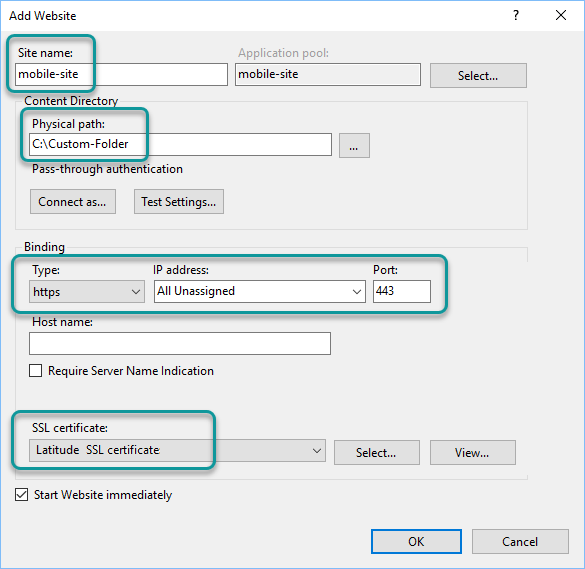
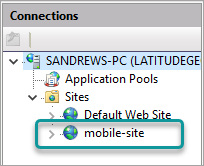
The custom website appears in the Site folder in IIS.
-