Expressions
Expressions are a way to specify the inputs for an activity when you don't know what the input's value will actually be. Expressions specify how to find or compute input values when the workflow runs.
The most common use for expressions is to access the output of activities that have already run. For example, if you have an activity that calculates the length of a geometry, you could follow it with an activity that displays the calculated length. When you build the workflow, you don't know what the actual length will be, but you do know which activity will calculate the length, so you use an expression that gets the output of the activity that calculated the length.
To help you build expressions, VertiGIS Studio Workflow Designer provides auto-complete suggestions when you enter an expression. This allows you to select from a list of possible items for each part of the expression.
Expression Syntax
VertiGIS Studio Workflow uses JavaScript expressions. In Workflow Designer, expressions are preceded by an equals sign (=). The equals sign tells Workflow Designer to expect a JavaScript expression.
Expressions are made up of terms. The simplest expression has a single term, for example, =12. More complex expressions have multiple terms that are combined according to the operators given in the expression, for example, =12*37/2. In either case, expressions evaluate to a single value of a particular type—numeric expressions evaluate to a value of type Number, Boolean expressions evaluate to a value of type Boolean (true or false), string expressions evaluate to a value of type String, and so on.
To access the output of an activity, you must use an expression. The term that refers to the output starts with a dollar sign ($). The form of an expression that accesses a simple activity output is:
=$[activity_ID].[output_name]
For example, an expression that accesses the result output of a Get Absolute Value activity with ID abs1 is as follows:
=$abs1.result
You can use activity outputs in complex expressions, for example:
=$abs1.result * 23
In this expression, the first term ($abs1.result) refers to the value of a particular activity output and the second term (23) is a literal. A literal does not require interpretation—it is the value itself.
If an expression only has one term and it is a literal, you do not need to use an expression—you can simply enter the literal value in the input box. For example:
- To configure the value 74 in a numeric input, you can either enter
=74or74 - To configure the value false in a Boolean input, you can either enter
=falseorfalse - To configure the value Pick another? in a string input, you can either enter
="Pick another?"orPick another?
String Expressions
String expressions are expressions that evaluate to a value of type String. String literals are simply text, for example, This is a string literal. Like literals of other types, string literals can be expressed as an expression: ="This is a string literal". They can also be combined (concatenated) with other strings in complex expressions.
Sometimes you may need to configure a numeric value in a string input. In this case, you must enter the value as an expression. For example, to enter the number 123 in a string input, enter: ="123"
Concatenate Strings Using Plus Signs or Template Literals
Concatenating strings in an expression allows you to build complete sentences and other meaningful strings that contain dynamic values, such as activity outputs. For example, suppose your workflow contains a Prompt activity that gets a name from the user. You might want to display the name back to the user to confirm that it is correct. You use a Confirm activity to do this. You want the Confirm activity's message to say You entered [name entered by the user]. Is this correct?
There are two ways to configure this message in Workflow Designer:
-
Plus Operators (+): You can use plus operators to concatenate any number of strings, in the given order. The message can be divided into three sub strings:
-
You entered
-
[name entered by the user] (the output of the Prompt activity)
-
. Is this correct?
To use the plus operator, put a plus sign (+) between each pair of terms and enclose string literals in quotes. You can use single quotes or double quotes.
To configure the Confirm activity's Text input using plus operators:
="You entered " + $prompt1.result + ". Is this correct?" -
-
Template Literal: Template literals provide a compact alternative to concatenating strings using multiple plus signs. They allow you to embed activity outputs within string literals using this notation:
${activity_output}. For example, to embed$prompt1.resultin a literal string, you would use${$prompt1.result}. Template literals are enclosed between grave accents ( ` ), also known as backticks.To configure the Confirm activity's Text input using a template literal:
=`You entered ${$prompt1.result}. Is this correct?`For more information, see Template Literals.
Use Quotes or Backticks in an Expression
Quotes have a special meaning in strings that are concatenated using the plus operator: they surround literals. Similarly, backticks have a special meaning in template literals. If you want one of these special characters to appear in the output string, put a backslash (\) before it. For example, suppose you want a confirmation message to put double quotes around the name entered by the user: You entered "[name entered by the user]". Is this correct? To configure this message using the plus operator, you would put a backslash before the quote mark at each end of the name:
="You entered \"" + $prompt1.result + "\". Is this correct?"
Alternatively, you could use single quotes around the literals. In this case, you don't need backslashes:
='You entered "' + $prompt1.result + '". Is this correct?'
Go to a New Line
Some string inputs in VertiGIS Studio Workflow can contain multiple lines of text. For example, the Confirm activity's Text input allows multiple lines. Suppose you want a confirmation message to appear on two lines:
You entered [name entered by the user].
Is this correct?
You can use \n to go to a new line in strings configured using either method:
-
Plus Operators:
="You entered " + $prompt1.result + ".\nIs this correct?" -
Template Literal:
=`You entered ${$prompt1.result}.\nIs this correct?`
Template literals also allow you to simply press Return to go to a new line, so your configuration has the same lines as the string that is displayed to the user. For example, you could configure the Confirm activity's Text input like this:
=`You entered ${$prompt1.result}.
Is this correct?`
Auto-Complete Suggestions
To help you build expressions, VertiGIS Studio Workflow Designer provides auto-complete suggestions when you enter an expression. This allows you to select from a list of possible items for each part of the expression, instead of having to type the whole expression.
Auto-complete suggestions open when you enter any character following the equal sign (=). The suggestions contain the text you entered.
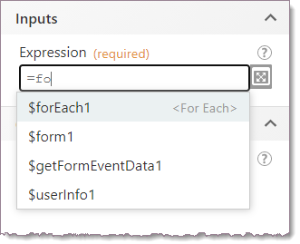
Example auto-complete suggestions that contain "fo"
Auto completion is more than just an authoring aid. Auto completion for object properties and functions defines the set of properties and functions that are supported by VertiGIS Studio Workflow. This has implications for which environments a workflow can run in. If you use a property or function that is not suggested by auto completion, the expression may not work in all environments. For example, the expression might work in a client workflow running in VertiGIS Studio Web but not in a server workflow, or it might work in VertiGIS Studio Mobile but not in VertiGIS Studio Web. For more information, see Run a Workflow in Different Environments.
Example - Enter an Expression to Access Another Activity’s Output
This example illustrates how to use Workflow Designer's auto-complete suggestions to enter an expression that accesses the output of a previous activity. The example workflow has a Display Form activity followed by an Alert activity.
Workflow Logic
The workflow has the following activities, in the order shown:
-
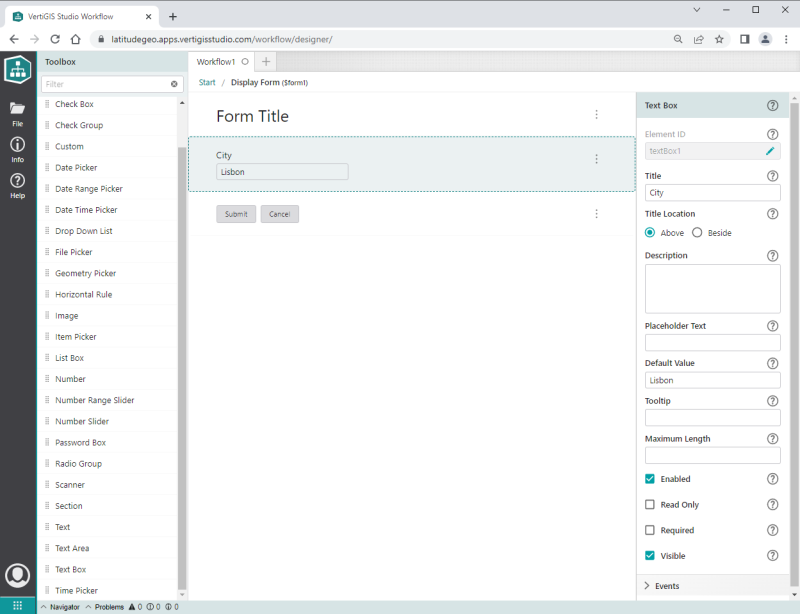
Display Form (
form1): Display a form that uses a Text Box element to get a city from the user. -
Alert: Display the city that the user entered.
-
In Workflow Designer, create a new, blank workflow.
To create a blank workflow, click File in the sidebar, click New, select Blank Workflow, and click Create.
-
Create a form with a Text Box element and configure the Text Box's settings. Set Title to City. Set Default Value to Lisbon.
To create the form:
-
Drag a Display Form activity from the Toolbox and drop it on the Start block to position and connect the activity.
The activity's ID is
form1. -
Double-click the Display Form activity to open the form for editing.
-
Drag a Text Box element from the Toolbox and drop it between Form Title and the Submit and Cancel buttons.
The Text Box's ID is
TextBox1. -
Configure the Text Box's Title and Default Value.
The form should look like this:
-
-
Click Start in the breadcrumbs to return to the main workflow.
-
Add an Alert activity and configure it to display the value of the Display Form's City element.
You will use VertiGIS Studio Workflow Designer's built-in auto completion to build the expression.
You can type in expressions instead of using auto completion. Make sure you match the capitalization used in Workflow Designer, as expressions are case sensitive.
To create the expression that accesses the city entered by the user:
-
If you want a larger area to enter the expression, click
 beside the Text input to open the Input Editor.
 -
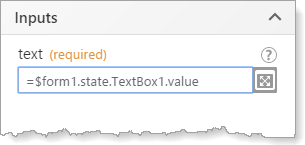
In the Alert activity's Text input, enter an equals sign (=), followed by a dollar sign ($).
The = sign indicates that you are going to enter an expression. The $ activates the auto-complete suggestions that will help you to enter the correct syntax for the activity ID you wish to use.
A drop-down list opens. The list shows the IDs of the other activities in the workflow. In this case, the workflow only has one other activity, the Display Form activity. The ID of the Display Form activity is
form1. -
Select
$form1to add it to the expression. -
Type a period (.) to open the next drop-down list of auto-complete suggestions.
-
Select
stateto add it to the expression. -
Type a period.
-
Select
TextBox1to add it to the expression.TextBox1is the ID of the City element. -
Type a period.
-
Select
value.The expression should look like this:
-
-
To test the workflow, run the workflow in the Sandbox.
-
Save the workflow.