Events
In VertiGIS Studio Workflow, an event is something that happens in a form. This could be an action by the user, like a button click, or a step in the form's life cycle, like the validation step after the user submits the form.
Events allow you to monitor what is happening in the form and customize how the workflow responds. For example, you could monitor a Check Box form element and show additional form elements if the user selects the associated checkbox.
To customize the response to an event, you add a subworkflow that defines the custom behavior. When the event occurs (fires), its subworkflow runs.
Adding a subworkflow to an event overrides VertiGIS Studio Workflow's default behavior for handling the event. This is your way of telling the workflow that you want to take control of how the event is handled.
Sometimes, you may want to have both custom behavior and the default behavior, such as verifying that the user has entered a value for a Required form element. In this case, you can add a Propagate Form Event activity to the event's subworkflow. The Propagate Form Event activity instructs the workflow to perform the default behavior after the event's subworkflow completes.
Different types of form elements support different types of events. For example, Radio Groups have load and change events, whereas Button Bars have load, click, and submit events. Each element in a form has its own events. For example, if a form has two Radio Groups, each Radio Group has its own load and change events.
Add Events to a Form Element
To add events to a form element:
-
In the Form Designer, select the desired form element to show its properties.
-
In the Events area at the bottom of the Properties panel, click the arrow
 to show the available events for that form element.
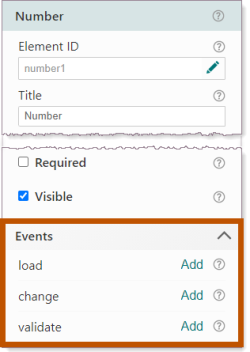
Events for a Number form element
-
Click Add beside the event that you want to configure.
A blank subworkflow opens. The subworkflow begins with an Event block
 .
.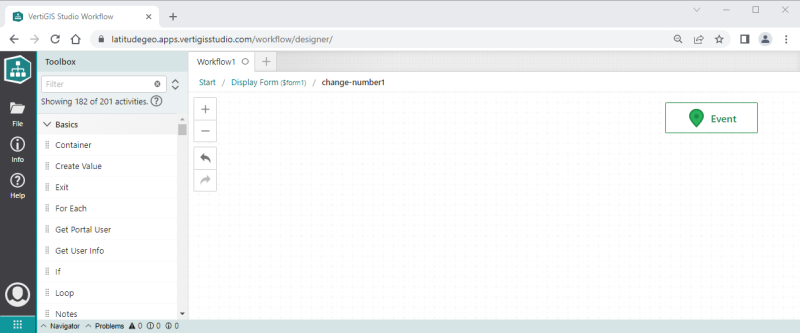
Blank subworkflow for the change event for the number1 form element in form1
-
Build the subworkflow the same way you build the main workflow: drag activities from the Toolbox to the design surface, configure their settings, and connect them into a flowchart.
-
When you have completed the subworkflow, click Display Form in the breadcrumbs to return to the Form Designer.
You can re-open the subworkflow from the form element's Actions menu
 or by clicking Edit in the Events area of the form element's properties.
 -
Repeat these steps for each event that you want to add.
Pass Values out of Events
After an event fires, you can use the data from the event in other activities. Event data includes the IDs of the form element and item that fired the event, the value of the form element or item (the user's input), and more.
To access an event's data, add a Get Form Event Data activity to the event's subworkflow. This makes the event's data accessible outside the Display Form activity. The data is contained in the outputs of the Get Form Event Data activity, for example, the value output contains the form element's (or item's) value. To access the value in an expression:
$getFormEventData1.value
Types of Events
VertiGIS Studio Workflow has the following types of events:
-
load: When a Display Form activity runs, the form elements load. Every form element has aloadevent that tells you when that element has finished loading. -
change: When the user makes a selection or enters some input, thechangeevent fires. Thechangeevent can fire zero or more times, depending on whether the user enters anything for that element. -
click: When the user clicks a button, theclickevent fires. -
cancel: When the user cancels the action, thecancelevent fires. -
validate: When the user clicks a button that causes validation, thevalidateevent fires. -
submit: When the user clicks a button that submits the form and all form elements have passed validation, thesubmitevent fires.
For more information about a particular event, refer to the form element's page in the Form Element Reference.
Some events can fire multiple times for the same form element, causing the event's subworkflow to run multiple times. For this reason, we recommend that you ensure event subworkflows are not computationally intensive or long running.
Submit Event
Forms are typically used to gather input from the user. In a typical scenario, the user fills in the form and then submits it. If the input has errors or omissions, the user makes corrections and resubmits the form. This cycle of making corrections and submitting the form is repeated as many times as necessary. When the form is free of errors, the input is ready to be processed. The form closes and the workflow continues running at the next activity after the Display Form activity.
Buttons are used to control form validation and submission. When you configure a button, you specify whether the button causes validation and/or submits (exits) the form. When the user clicks the button:
- If the button causes validation, the validation is performed.
- If the button submits the form and the form is valid, the form closes and the workflow continues running at the next activity after Display Form.
By default, forms have a Footer Button Bar with Submit and Cancel buttons. The Submit button causes validation and submits the form. The Cancel button submits the form without validating the user's input.
Every new form you create has a Footer Button Bar. You can modify the Footer Button Bar's properties (except the Element ID), but you cannot move or delete the Button Bar. If you do not want your form to have a footer, clear the Button Bar's Visible checkbox to hide the Button Bar.
Validate Event
When the user clicks a button that is configured to cause validation, validation is performed for each element in the form that has validation configured. There are two ways to configure validation for a form element:
- Add a
validateevent to the form element. - Select the form element's Required checkbox.
In the following screen capture, the user has submitted the form without selecting a state. Because the state is configured to be required, the form will not pass validation until the user enters the state.
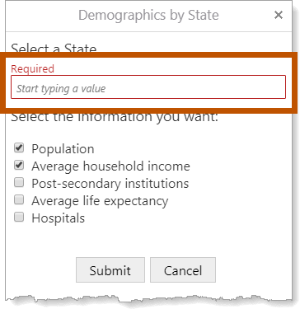
Example of a validation message in a form
Example - Subworkflow for a Validate Event
This example illustrates one way to validate an email address in a validate subworkflow. The subworkflow looks like this:
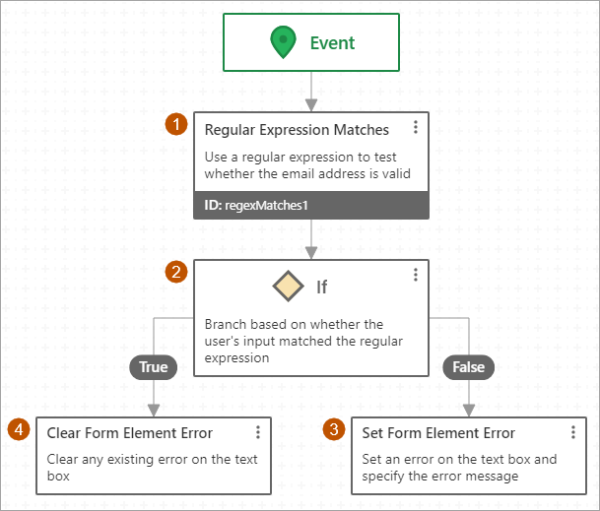
Flowchart for a subworkflow that validates an email address
The validate subworkflow uses a Regular Expression Matches activity to compare the user's input to the regular expression for a valid email address ( ), and then branches based on whether the input matches the regular expression or not (
 ). If it doesn't match (
 ), the subworkflow sets an error on the input element and the error message displays in red text above the element. If the input does match the regular expression (
 ), the subworkflow clears any error that was previously set on the input element.
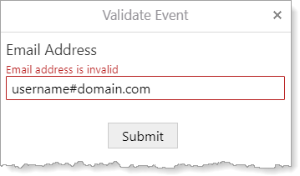
Error message on the Email Address Text Box
To configure a validate subworkflow that tests the validity of an email address:
-
Add a Text Box with a
validateevent:-
Edit a Display Form activity to open the Form Designer.
-
Add a Text Box to the form and change its title to Email Address.
-
Select the Text Box to show the Properties panel, and then click the arrow
beside Events to show the events. -
Click Add beside the
validateevent.A blank Event subworkflow opens.
-
-
Test whether the input is valid:
-
Drag a Regular Expression Matches activity to the design surface and connect it to the Event block.
-
In the Text input, type an equals sign (=) followed by a reference to the user's input, for example,
$form1.state.textBox1.value. -
In the Pattern input, type or paste the regular expression that defines the pattern for the email address, for example:
^[a-zA-Z0-9.!#$%&’*+/=?^_`{|}~-]+@[a-zA-Z0-9-]+(?:\.[a-zA-Z0-9-]+)
-
-
Branch based on whether the input is valid:
-
Drag an If activity to the design surface and connect it to the Regular Expression Matches activity.
-
Set the Condition input to the result of the Regular Expression Matches activity, for example,
=$regexMatches1.result.
-
-
Configure the branch for invalid input:
-
Drag a Set Form Element Error activity to the design surface and connect it to the If activity's False branch.
-
Set the Element ID input to the Element ID of the Text Box.
-
Set the Error input to the error message that you want to display above the Text Box, for example,
Email address is invalid.
-
-
Configure the branch for valid input:
-
Drag a Clear Form Element Error activity to the design surface and connect it to the If activity's True branch.
Whenever you use a Set Form Element Error activity, make sure you also use a Clear Form Element Error activity to clear the error. Otherwise the form may get stuck in an invalid state.
-
Set the Element ID input to the Element ID of the Text Box.
-
-
Click Display Form in the breadcrumbs to return to the Form Designer.
-
Run the workflow in the Sandbox to test it.