The Bulk Update allows you to change the attribute values for a multiple records in a single edit operation. You can also perform bulk calculations on the attribute level.
You can apply a bulk update to multiple records within the same layer or across different layers, provided the layers share attribute fields with identical names and data types.
This tool is particularly useful for streamlining editing workflows and ensuring data consistency across multiple records.
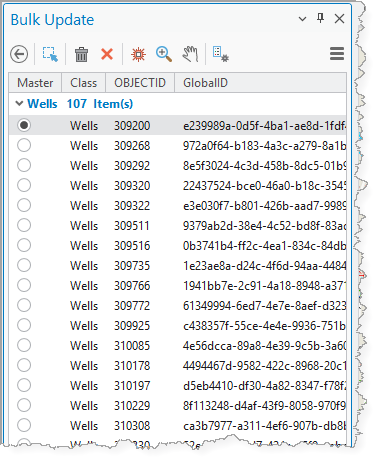
Use Master Mode to designate one record as the master. The attribute values from the master record are then used as the source for updating the other selected records.
See Options for a description of the menu items.
The table below describes the Bulk Update buttons.
Button |
Description |
|---|---|
|
Adds all features from the current map selection to the list of records to update. |
|
Removes the selected feature. |
|
Clears all features from the Bulk Update panel. |
|
Flashes all selected records on the active map to identify them. |
|
Zooms the map to all selected records. |
|
Pans the map to all selected records. |
|
Designates a selected record as the master. The attribute values of the master record serve as a preset for the bulk update operation. All properties that are available to the current bulk update are included in the operation. Properties that do not provide a specific value to the master are defined as NULL by default. You must enable Use Master Mode in the Project Options for this button to be visible. |


To perform a bulk update:
1.Go to Studio Toolkit > Attributes > Bulk Update.
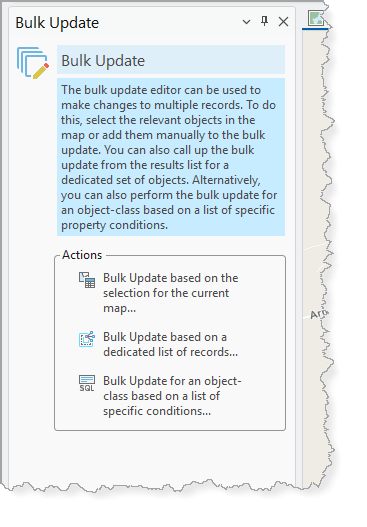
You can also access the Bulk Update from a selected group of records in the Results List. In this case, you can open the Bulk Update panel from the toolbar or the context menu. When Bulk Update is opened from the ribbon, any features currently selected in the map are automatically included in the list of records to be updated.
2.Use one of the following actions to populate the panel with the records you want to update.
•Bulk Update based on the selection for the current map
•Bulk Update based on a dedicated list of records
•Bulk Update for an object-class based on a list of specific conditions
For our example, we use Bulk update based on the selection for the current map.
3.Add the features from the map to load them into the Bulk Update ( ).
).
A dialog appears, confirming the number of records in the selection set of the map.
4.Click OK. The records are loaded from the map into the Bulk Update.
5.Collapse the list of objects to see the Properties.
The list of available properties is determined by the common field definitions shared by all selected records.

6.For each property you want to update, use the arrows to change the value.
You must ensure that all entered values are valid for the selected feature classes. The Bulk Update does not perform validation of input values across feature classes.
7.Click Update.
A summary of the changed records appears.

8.Click Yes. A message confirms that the update was successful.
You can use the Calculations tab to calculate the attribute statistics of the loaded records. No values are changed in this operation; it is only to give you an idea about the value range of a selected attribute field. You can only perform calculations on numeric fields.
The following statistics are available:
•Sum: Calculates the sum of all field values for the selected property from all involved records.
•Min: Calculates the minimum of all field values for the selected property from all involved records.
•Max: Calculates the maximum of all field values for the selected property from all involved records.
Use Master Mode
Use Master mode to designate one record as the master. The master record's attribute values are used as the source data for the update.
When Master mode is enabled:
•properties cannot be removed from the list of attributes to be updated. Instead, markers appear on the left side of the attribute form to indicate which attributes are included in the bulk update.
•only attributes whose values differ from those of the master record are updated.
To perform a bulk update using Master mode:
1.Enable Master Mode in the Bulk Update Options.
2.Select a record in the Bulk Update to be the master record.
3.Click Set as Master ( ).
).
4.Click Update.
All records in the Bulk Update are updated using the attribute values from the designated master record.
Configure Bulk Update Options
To access the Bulk Update options, go to Project > Options > Bulk Update.
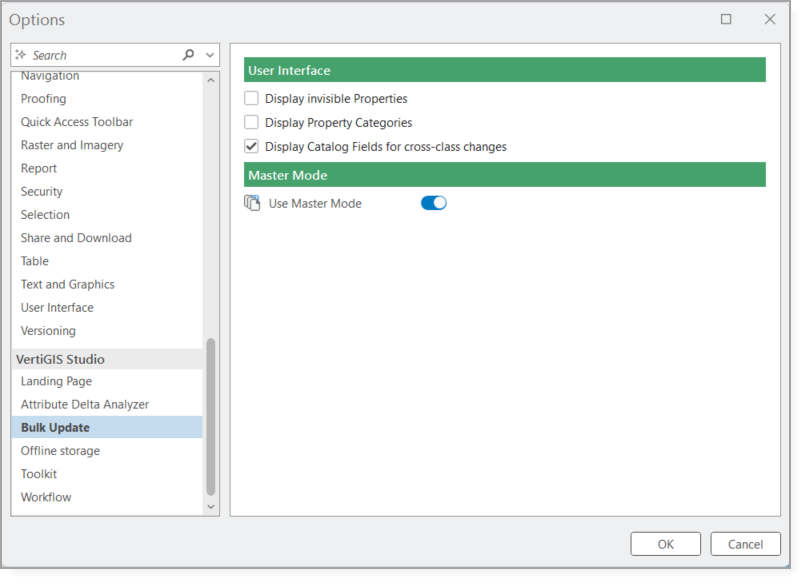
Use the settings described in the table below to customize the Bulk Update.
Setting |
Description |
|---|---|
Display Invisible Properties |
When enabled, attributes that are hidden in the user interface (in the attribute form or the Results List) are included in the bulk update. By default, any property configured to be hidden from the user interface is excluded from the list of properties available for bulk updates. |
Display Property Categories |
When enabled, attributes in the Bulk Update panel are organized by category instead of being listed alphabetically. By default, the attribute form displays all selected attributes in alphabetical order. However, when all selected records belong to the same feature class, grouping attributes by category may be more appropriate. |
Display Catalog Fields for Cross-Class Changes |
Controls whether fields that use catalogs are shown in the Bulk Update panel. Because the Bulk Update does not support catalogs, disable this option to prevent invalid values from being set for catalog fields during cross-class updates. |
Use Master Mode |
When enabled, the Bulk Update editor can operate in Master mode, which designates one record as the master. The master record is highlighted in the list of selected records, making it clear which record’s attribute values will be used as the source data for the update. When Master Mode is enabled: •properties cannot be removed from the list of attributes to be updated. Instead, markers appear on the left side of the attribute form to indicate which attributes are included in the bulk update. •only attributes whose values differ from those of the master record are updated. |