Geocortex Essentials Installation
Installing Essentials is a two-step process:
-
Install Essentials: This step installs Essentials' software components and desktop tools.
-
Perform Post-Installation Configuration: After Essentials is installed, you can run the Post Installer to install Geocortex Core and configure the web components that Essentials requires, including Manager sign-in authentication and viewer template deployment.
If the server is running another Geocortex product that uses Geocortex Core, such as Geocortex Analytics, then Geocortex Core is already installed. In this case, Geocortex Core is upgraded.
The Geocortex Essentials installer is a .msi file. You can download the installer from the VertiGIS Studio Support. For instructions, see Download Geocortex Essentials.
Setting up a dual-server or multi-server Essentials system is an advanced scenario. Contact VertiGIS Studio Support to arrange a consultation. The time required to complete the set-up depends on the complexity of your environment. Please ensure that you have adequate Support hours available.
To install a new instance of Essentials, follow the instructions in Install a New Instance of Essentials. If the server already has Essentials installed, follow the instructions in Geocortex Essentials Upgrading.
What the Installer Installs
Software
By default, the Essentials installer installs all of the software components. We recommend using the Typical installation option, even if you do not use all of the Essentials components. The components are:
-
Essentials REST API: Used by viewers to get information about the site and its services.
The Essentials REST API is a required component. You must install the Essentials REST Api.
-
Essentials Manager: Creates and manages Essentials sites and viewers.
-
Identity Server: Provides security services for securing sites.
-
Desktop Tools:
- Essentials Workflow Designer: Used to program workflows, which are complex, interactive GIS and business processes.
- Essentials Report Designer: Used to create report templates and print templates for Essentials' reporting and printing features.
- Language Tool: Used to translate Manager.
-
Geocortex Core: Provides software services to Geocortex products.
If you are using other Geocortex products besides Essentials, Geocortex Core may already be installed on the server. If Geocortex Core is already installed, Essentials uses the existing instance of Core or upgrades it. If it is not already installed, the Geocortex Core installer launches when the Essentials installer completes. For more information about Core, see Geocortex Core and Clustering.
Sample Sites
-
Sample Sites:
-
LA_County: A fully functioning demonstration site with many configured features, like reports, print templates, viewers, workflows and forms, charts, data links, and more.
-
Sample_Workflows: Contains samples of workflow activities.
-
About Post-Installation Configuration
You must run the Post Installer at least once after you install or upgrade Essentials.
Running the Post Installer performs various configuration tasks:
-
Installs or Upgrades Geocortex Core: The Post Installer checks for an existing instance of Geocortex Core and either installs or upgrades it. Core is required to run Geocortex Essentials or Geocortex Analytics. See Geocortex Core and Clustering for more information.
-
Activates Essentials Licenses: When you install Geocortex Essentials for the first time, you have 60 days to activate your license.
-
Configures Environmental Settings: Configure settings related to the environment that Essentials runs in, such as web server settings, host names, and Windows features.
-
Adds and Upgrades Viewer Templates: Deploy viewer templates to IIS and install viewer Management Packs so that you can use Manager to add viewers to your sites.
-
Configures the Sign-In Method: Configure a Portal for ArcGIS, ArcGIS Online, or Windows sign-in method for Essentials.
The sign-in method has implications for the types of content that you can use in your sites and the methods that you can use to secure your sites. For information, see Choose a Method to Sign In to Manager.
See also...
Post-Installation Configuration
Essentials Trial Versions
The first time Essentials is installed on a server, it defaults to a 60-day evaluation period. This is true whether you have purchased Essentials or not. During the evaluation period, you have the full Geocortex Essentials product to work with, not a subset.
If you do not activate Essentials within the 60-day evaluation period, the license status will change to Expired and you will not be able to use Essentials anymore. If you need more time for your evaluation, you can request an extension from your Account Manager.
The expiry date for your Essentials trial is displayed on Essentials' banner, as well as on the Post Installer's Activation panel. To prevent service interruptions, make sure you activate Essentials before you deploy it to a production server.
To install a trial version of Essentials, follow the instructions in Install a New Instance of Essentials.
Installation Options
Installation Options for Essentials
The Essentials installer provides several options that control such things as the naming and location of the installation.
The options are:
-
Unnamed vs. Named Instance: You can install multiple instances of Essentials on one server by naming the instances.
-
Typical vs. Custom Installation: A typical installation installs all the components and support materials. A custom installation can install a subset of the components.
-
Default vs. Custom Locations: You can choose the location in the file system to install Essentials.
Named Instances
You can install multiple instances of a particular version of Essentials on one server. The ability to name instances makes this possible. Essentials does not place any limit on the number of named instances you can install.
In addition to running multiple instances of one version of Essentials on a server, you can simultaneously run multiple different versions of Essentials starting from version 4.4. Note that each instance of Essentials requires a unique name, regardless of its version.
If you do not specify a name when you perform the installation, the instance is unnamed. Only one instance of Essentials can be unnamed per server.
In a clustered, multi-server deployment, Essentials must either be installed under the same name on every server, or installed as the unnamed instance on every server. For more information see Multi-Server Deployments.
Instance names must be unique across versions. For example, you cannot have an instance of Essentials 4.5 named Public and an instance of Essentials 4.6 named Public installed on the same server.
In a multi-server system, Essentials must either be installed under the same name on every server, or installed as the unnamed instance on every server.
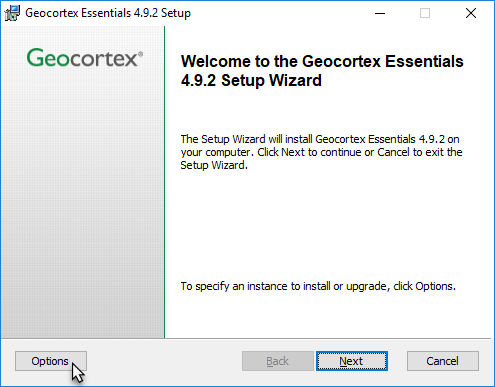
The Essentials installer operates on a single instance at one time. You must re-run the installer for each instance that you want to install or upgrade. By default, the installer operates on the unnamed instance. To specify a named instance to install or upgrade, select the Options button in the installer's Welcome panel.

Location of the Options button on the Essentials installer's Welcome panel
The instance's name appears in the installer's title bar. If there is no name in the title bar, then the installer is operating on the unnamed Essentials instance. In the same way, the Post Installer's title bar shows the name of the instance that is being configured.
Each instance of Essentials includes the Post Installer application. To modify the post-installation configuration for a particular instance of Essentials, run the Post Installer that belongs to that instance of Essentials.
Typical vs. Custom Installation
If you select the typical installation in the Essentials installer, you can choose where to install Essentials, but not which components to install. The typical installation installs all the software components and support materials. If you run a custom installation, you can choose which components to install and where to install them.
Installation Options for Geocortex Core
If Geocortex Core needs to be installed or upgraded, the Geocortex Core installer launches when the Post Installer is run. The Geocortex Core installer has the following options:
-
Geocortex Core Location: Select the location in the file system to install Geocortex Core.
-
Data Folder Location: Select the location in the file system for Geocortex Core's data folder.
The data folder has a
Searchsubfolder that the Instant Search feature uses to store its indexed files. Instant Search reads from the storage drive where the index is stored. If you will be using the Instant Search feature, we recommend that you use a partition on a solid-state drive (SSD) for the data folder. For instructions on changing the data folder's location, see Install a New Instance of Essentials.If you are not going to use Instant Search, there is no reason to change the location of the data folder.
For more information about Instant Search, see Instant Search.
-
Configure Cluster Information: Create or join a Geocortex Core cluster.
If you do not intend to cluster multiple servers, a single server still requires a cluster name. In this case you would select the "I want to create a new cluster" option when the Core installer presents it.
-
Enter a cluster name: The name of the cluster you wish to create or join.
If you are joining a cluster, this name should match the configured cluster name from your other Core installations. A cluster name should not contain spaces.
-
Shared Secret: A password that is shared between Core installations in a cluster.
Shared secrets should not contain trailing spaces.
-
For more information about Core and clustering instances of Core over multiple servers, see Geocortex Core and Clustering.
Installation Options for the Geocortex Viewer for HTML5
There are two ways to install a viewer framework:
-
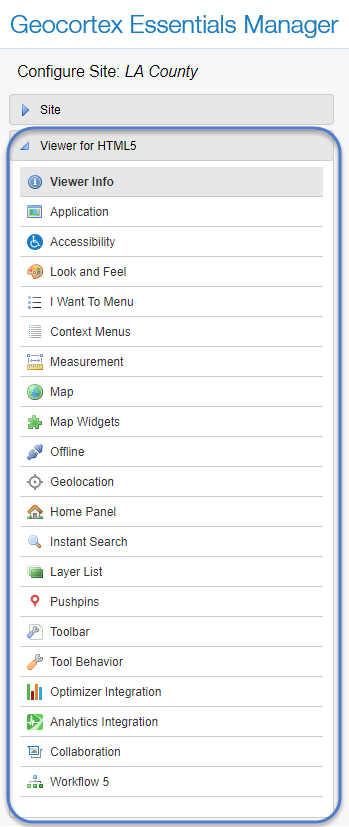
Use the Viewer Template: (recommended) Use the Post Installer to add the viewer template, deploy the template to IIS, and install the Management Pack. Installing the Management Pack enables you to manage viewers using Manager—when a viewer is open for editing, Manager's side panel has a Viewer section with links to the viewer's Management Pack pages.

Viewer section of Manager's side panel
-
Install the Viewer Manually: Drop the viewer directly into a web server.
The manual method is for advanced users with a good understanding of web servers and a willingness to manage their viewers by hand.
What's next?