Install a New Instance of Essentials
The instructions in this section apply to single-server systems. To install the software in a system with more than one server, contact Geocortex Support to arrange a consultation. Please ensure that you have adequate Support hours available.
This section explains how to install Essentials on a server that does not already have Essentials installed. If the server already has Essentials installed, follow the instructions in Geocortex Essentials Upgrading.
The main steps are:
-
Install Essentials and its components and tools.
-
Perform the most common post-installation configuration, specifically:
You must run the Post Installer at least once after you install Essentials, even if you do not install viewer templates or make any changes to the configuration—when you click Finish, the Post Installer deploys the Essentials web applications to IIS.
You should also:
-
Enable the IIS components that Essentials requires. For information, see IIS Configuration.
-
Reserve the ports that Geocortex Core uses and, if necessary, configure firewall access for Geocortex Core. For information, see Geocortex Core Ports and Firewall Access.
When you complete this procedure, you will be able to run Essentials on this server. If you want to do additional post-installation configuration, such as activating your Essentials licenses or configuring cross-domain support, follow the instructions in Post-Installation Configuration.
This section does not provide instructions for setting up a reverse proxy. To run Essentials behind a reverse proxy, install Essentials, and then follow the instructions in Run Essentials Behind a Reverse Proxy.
Install Essentials
Before you begin the installation, download the installation packages following the instructions in Download Geocortex Essentials.
For information about which components to install on a server, see Geocortex Essentials Deployment.
When you complete these steps, you will have a working installation of Essentials.
To install a new instance of Essentials:
Step 1: Run the Essentials Installer
-
Run the Essentials installer that you downloaded from the Support.
The Geocortex Essentials Setup Wizard launches.
-
If you want to give your Essentials installation a name:
-
Click the Options button.
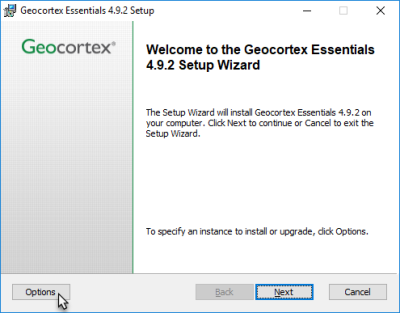
Location of the Options button on the Essentials installer's Welcome panel
-
In the Install a new instance of Geocortex Essentials box, type the instance name to use.
-
Click Next.
-
-
Click Next.
-
Read the license agreement. If you agree to the terms of the license agreement, select the I accept the terms in the License Agreement checkbox, and then click Next.
-
Do one of the following:
Install the Typical Installation
The typical installation installs all software components.
-
Click Typical.
-
If you want to change the location in the file system where Essentials is installed, type in the path, or click Change to browse to the location.
-
Click Next.
Install a Custom Installation
The custom installation allows you to choose which components to install.
-
Click Custom.
-
If you do not want to install a component, click the
 icon beside the component and deselect it
  .
. This prevents the component from being installed.
-
If you want to change the location in the file system where Essentials is installed, type in the path, or click Change to browse to the location.
-
Click Next.
-
-
Click Install.
The Setup Wizard installs the software. When the installation is complete, the Setup Wizard's final panel displays.
-
Make sure the Launch Post-Installation Configuration checkbox is selected.
-
Click Finish.
The Essentials Setup Wizard closes.
Step 2: Install Geocortex Core
If Geocortex Core is not already installed on the server, the Geocortex Core Setup Wizard launches. Follow the instructions below to install Geocortex Core.
If Geocortex Core is already installed but Essentials needs a newer version, Geocortex Core will be upgraded. Wait until the upgrade completes, skip the remainder of this step, and then continue at Step 3: Install the Viewer Template (recommended).
-
Click Next.
-
Click Next.
This accepts the default installation location.
-
If you want to change the location in the file system where the data files and log files are stored, type in the path, or click Change to browse to the location.
If you are going to use Instant Search, the data folder can get very large. Running out of disk space interferes with indexing. Make sure your server meets the Requirements for Servers Running Instant Search.
-
Click Next.
-
Do one of the following:
-
If this is the first server that you are installing Geocortex Core on, select I want to create a new cluster. Enter the cluster name that you want to use and a Shared Secret.
-
If you already have other Geocortex Core instances running on your network, select I want to join an existing cluster. Choose an existing cluster name from the drop-down menu.
Cluster names can include dashes (-) and underscores (_), but they cannot contain spaces or special characters. The cluster name must be unique among clusters.
-
-
Enter a Shared Secret.
The secret is used by all Core instances in the cluster, so ensure that you remember it.
-
Click Next.
-
Click Install.
-
Click Finish.
The Geocortex CoreSetup Wizard closes.
Step 3: Install the Viewer Template (recommended)
If you do not want to install the viewer template now, you can install it later and proceed to the next step. For instructions on installing the viewer later, see Manage Viewer Templates.
If you have not yet downloaded the viewer's installation package, download it from the Geocortex Support Center. For instructions, see Download Geocortex Essentials.
-
In the Post Installer's side panel, click Configure Viewer Templates.
-
Click Add.
-
Browse to the folder where you extracted the files from the installation package.
-
Select the template file (
.vtefile), and then click Open.You are prompted to install the Management Pack.
-
Click Yes.
You are prompted to deploy the template to an IIS virtual directory.
-
Click Yes.
The Deploy Template to IIS dialog box opens.
-
If the virtual directory listed in the Select Virtual Directory box already exists, type a name for a new virtual directory.
Each viewer template must be deployed to a virtual directory that does not yet exist in the selected website.
-
Click Deploy, and then close the success message that displays.
The template is listed in the Installed Templates area.
You must configure the host names that browsers and other web applications will use to reach the Essentials web applications. For information, see Hosts.
-
Open the list of hosts for the desired website:
-
REST API: To configure the host names for the website that the REST API uses, click Configure Geocortex Essentials REST API in the Post Installer's side panel, and then click Hosts.
-
Manager: To configure the host names for the website that Manager uses, click Configure Geocortex Essentials Manager in the Post Installer's side panel, and then click Hosts.
Essentials uses Windows Authentication by default and may require the computer name as a host name to allow an administrator to log in on the server.
-
Identity Server: To configure the host names for the website that Identity Server uses, click Configure Geocortex Identity Server in the Post Installer's side panel, and then click Hosts.
If any two of the web applications use the same website, you can access the list of hosts from either panel—there is only one list of hosts for a particular website.
-
-
Add Hosts:
-
In the blank box at the bottom of the list, copy or type the host name that you want to add.
If you are not using the default port (port 80 for HTTP, port 443 for HTTPS), make sure to include the port, for example,
host.domain.com:7777. -
Click the down arrow
 in the Type box and select the protocol—http:// or https://.
If you want Essentials to accept both HTTP and HTTPS, without upgrading HTTP to HTTPS, add both versions of the URL and make sure that the HTTP version is higher in the list than the HTTPS version. However, HTTPS protects data exchanged between Essentials and users and we recommend upgrading to use HTTPS.
-
Continue adding host names until you have added all the names that you want to allow.
-
-
Remove Hosts:
-
If you do not want to allow a default host name, click the Remove tool
 beside the name to remove it.
-
-
Order the List:
-
Click
 beside a host name that you want to move and drag the name to its new position in the list.
 -
Continue dragging and dropping host names until the list is ordered the way that you want it.
-
-
Click OK.
Step 5: Configure the Sign-In Method
If you do not configure the sign-in method, the default sign-in method will be used. Windows Authentication is the default sign-in method. You can change the sign-in method later. For instructions, see Choose a Method to Sign In to Manager. Continue the post-installation configuration at Step 6: Complete the Post-Installation Configuration.
There are three options for how administrators sign in to Manager:
-
Portal for ArcGIS: See Option 1: Configure Sign-In Using Portal for ArcGIS.
-
ArcGIS Online: See Option 2: Configure Sign-In Using ArcGIS Online.
-
Windows: See Option 3: Configure Sign-In Using Windows.
Option 1: Configure Sign-In Using Portal for ArcGIS
Step 1: Configure the Portal for ArcGIS URL in the Post Installer
-
In the Post Installer, click Configure Sign-In Options in the side panel.
-
Beside Sign in using, select ArcGIS.
-
In the URL box, type or paste the URL for your portal.
If you deployed Portal for ArcGIS to the default location, the URL will be similar to
https://server.domain.com/arcgis/. Replaceserver.domain.comwith the fully qualified host name of the server that hosts Portal for ArcGIS. -
Click Test.
The Post Installer connects to the URL. When the connection succeeds, the Post Installer displays a hyperlink to your portal.
-
Click the hyperlink to open your portal in a browser.
Step 2: Create an app in Portal for ArcGIS
-
Sign in to your portal.
-
In your portal, create a Portal for ArcGIS application for the Post Installer to use.
The Post Installer will use this application to add two web mapping applications to your portal. Essentials and Essentials Manager use the web mapping applications to access your private portal content.
If you have already created an application for the Post Installer to use, you can skip this step and use the existing application.
-
Click Add Item.
-
Select An application from the The item is drop-down list.
-
Select Application.
-
In the Title box, enter a title for the application, for example, Geocortex Post Installer.
-
In the Tags box, add a search tag to help locate this application, for example, Geocortex.
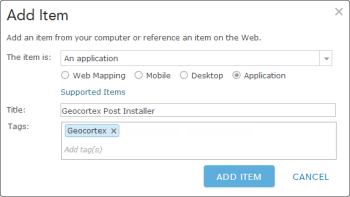
Add a Portal for ArcGIS application for the Post Installer to use
-
Click Add Item.
The application's details page opens.

Details page for the Geocortex Post Installer application in Portal for ArcGIS
In the screen capture above, the App Registration area has a Registered Info hyperlink. This indicates that the application was registered automatically when you added it.
-
-
If the App Registration area has a Register hyperlink instead of a Registered Info hyperlink, you must register the application manually:
-
In the App Registration area, click Register.
-
In the App Type drop-down list, select Multiple.
-
In the Redirect URI box, type or paste the following URI:
urn:ietf:wg:oauth:2.0:oob
-
Click Add.
-
Click Register.
The dialog box closes and the application is registered. Registration creates the application's ID and secret, which are used like a user name and password.
-
-
In the App Registration area, click Registered Info.
You will need the App Registration information when you finish the post-installation configuration.

App Registration information in Portal for ArcGIS
Continue the post-installation configuration at Step 6: Complete the Post-Installation Configuration.
Option 2: Configure Sign-In Using ArcGIS Online
-
In the Post Installer, click Configure Sign-In Options in the side panel.
-
Beside Sign in using, select ArcGIS.
-
Do one of the following: In the URL box, type or paste the ArcGIS Online URL where you want end users to sign in:
Enter the URL for Your Organization's ArcGIS Online Portal
-
In the URL box, type or paste the URL for your organization's ArcGIS Online portal.
For example,
https://organization.maps.arcgis.com/. Replaceorganizationwith the name of your organization's ArcGIS Online subdomain.
Enter URL of ArcGIS Online's Home Page
-
In the URL box, type or paste the URL for ArcGIS Online's home page.
The URL is
https://www.arcgis.com/.Alternatively, you can click the
https://www.argis.com/hyperlink to enter the URL.
-
-
Click Test.
The Post Installer connects to the URL. When the connection succeeds, the Post Installer displays a hyperlink for the URL.
You will be prompted to sign in to ArcGIS Online when you finish the post-installation configuration. This allows the Post Installer to set up access to ArcGIS Online for Essentials.
Continue the post-installation configuration at Step 6: Complete the Post-Installation Configuration.
Option 3: Configure Sign-In Using Windows
-
In the Post Installer, click Configure Sign-In Options in the side panel.
-
Beside Sign in using, select Windows.
-
In the Group box, type the name of the Windows group that users must belong to in order to sign in to Manager.
The default value is the built-in administrators group.
Step 6: Complete the Post-Installation Configuration
This step is required, even if you have not performed any configuration in the Post Installer. In this step, the Post Installer deploys the Essentials web applications to IIS.
-
Click Finish.
-
If you configured one of the ArcGIS methods of signing in to Manager, follow the instructions for the method that you configured:
Portal for ArcGIS
-
In the App Registration dialog box, copy and paste the App ID and App Secret from Portal for ArcGIS to the Post Installer, and then click OK.
You are prompted to sign in to Portal for ArcGIS.
The application's secret is encrypted in Essentials. Essentials does not share this information with any other application.
-
Sign in to Portal for ArcGIS using the same account that you signed in with when you created the application.
The Post Installer sets up access to your private Portal for ArcGIS content for Essentials, and then signs you out of Portal for ArcGIS.
If you clear the Remember Me checkbox when you sign in, you will have to enter the App ID and App Secret each time you launch the Post Installer.
ArcGIS Online
-
In the App Registration dialog box, sign in to ArcGIS Online.
The Post Installer sets up access to your private ArcGIS Online content for Essentials, and then signs you out of ArcGIS Online.
The information gathered from ArcGIS Online is encrypted in Essentials. Essentials does not share this information with any other application.
You have now completed the installation.
-
See also...
Geocortex Core Ports and Firewall Access
Get Started with Essentials
To learn about Essentials and begin creating sites, refer to the Geocortex Essentials administrator help. The Administrator Help has a Quick Start section that steps you through creating a simple site, adding a viewer, and launching the viewer in a browser to view the site you created. The Quick Start also has a section on exploring the sample site that ships with Essentials.
If you are new to Essentials, the Quick Start section is a good place to start.