Run Reports from VertiGIS Studio Workflows
VertiGIS Studio Workflow is a licensed product. You can find out about licensing here.
In addition to running reports from VertiGIS Studio workflows, you can host and run reports in ArcGIS Web AppBuilder and the Geocortex Viewer for HTML5. See Host Reports in ArcGIS Web AppBuilder and Host Reports in the Geocortex Viewer for HTML5.
VertiGIS Studio Workflow has a Run Report activity that allows you to run VertiGIS Studio reports from workflows. This allows you to integrate report creation with the other business processes that you automate using VertiGIS Studio Workflow.
The Run Report activity takes the URL of the report's ArcGIS item as input. When the Run Report activity executes, it passes the URL to VertiGIS Studio Reporting to generate the report. The output of the Run Report activity, href, is the URL of the generated report. To allow the user to download the report, you use the href output to display a hyperlink that points to the report.
The Run Report activity has two additional inputs that you can use to parameterize the report—Feature Ids and Parameters. The Feature Ids input is used to pass feature IDs to a layer report. The Parameters input is used to pass other types of values besides feature IDs to the report.
Only workflows are capable of passing additional inputs of various types to reports. Host applications can only pass feature IDs. This is an advantage of using workflows instead of host applications to run reports.
When you configure a workflow to run a report, the report does not need to be hosted by an application. Instead, the workflow is hosted and the workflow controls when the report runs.
See Also...
Tech Tip: How to run reports from a workflow using parameters and object IDs
Main Steps to Run a Report from a Workflow
-
In the Report: If you want the report to take inputs, configure report parameters.
-
In the Workflow:
- Add a Run Report activity to the workflow and configure it to run the desired report, with the desired parameters.
- Add a Display Form activity to the workflow and configure it to display a link to the generated report.
-
In a Host Application: Configure the application to host the workflow.
See Run Workflows in ArcGIS Web AppBuilder or Run Workflows in the Geocortex Viewer for HTML5.
Pass Values from a Workflow to a Report
If you want to pass values from a workflow to a report that is run using a Run Report activity, you must configure the workflow to pass the values to the report, and configure the report to receive the values. The way that you configure the workflow and report depends on the types of values you want to pass:
-
Feature IDs: To pass feature IDs from a workflow to a report:
-
In the Report: Configure a report parameter called FeatureIds and filter the report's query on the input feature IDs. The easiest way to configure this is to use the Layer Report template to create the report. You can also adapt an existing report to take feature IDs as inputs. See Use the Current Features as Report Inputs for instructions.
Configuring a report to take inputs from a workflow is exactly the same as configuring the report to take inputs from host applications. This follows from the fact that you can run any report from any supported type of host application and from workflows, without modifying the report.
-
In the Workflow: Configure the Run Report activity's Feature Ids input, as described in Configure a Workflow to Run a Report.
-
-
Other Values: To pass other types of values besides feature IDs from a workflow to a report:
-
In the Report: Configure a report parameter for each value that is passed to the report. For instructions, see Configure a Report to Take Other Values from a Workflow.
-
In the Workflow: Specify the values in the Run Report activity's Parameters input, as described in Configure a Workflow to Run a Report.
-
Configure a Report to Take Other Values from a Workflow
To configure a report to take other values besides feature IDs as inputs:
This procedure assumes that you have already created the report.
Step 1: Add a report parameter
-
Launch Report Designer and open the report.
-
In the Field List
 , click
  Parameters to show the management buttons.
 -
Click Add parameter
 .
. A new report parameter is added.
-
Click Edit
 to edit the report parameter.
 -
Configure the report parameter's properties:
-
In the Name box, type a name for the report parameter.
The name can include letters, numbers, and underscore characters (_). The name cannot contain spaces or special characters.
-
If the report parameter represents a single input value, for example a report title, clear the MultiValue checkbox.
If the report parameter represents multiple values of a particular type, for example, a collection of distances, select the MultiValue checkbox.
-
Select the type of value from the Type drop-down list.
-
Step 2: Use the report parameter in the report
The way that you use a report parameter depends on what it represents and your intended use. Report parameters are similar to data fields, in that they both represent run-time values. Like data fields, you can add a report parameter to the report's layout to show its value in the generated report. To do this, drag the report parameter from the ![]() Parameters list in the Field List and drop it on the design surface.
Parameters list in the Field List and drop it on the design surface.
You can also combine report parameters with other content in expressions, either by typing the parameter directly into the expression using the syntax [Parameters.ParameterName], or by using the Expression Editor to add the report parameter to the expression.
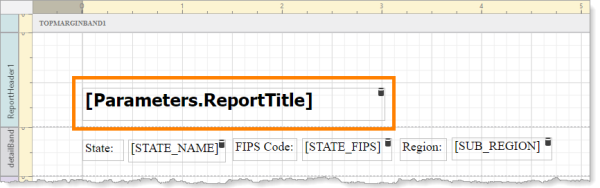
Formatted report parameter called ReportTitle in a report's layout
Step 3: Repeat for each input value
-
Repeat steps 1 and 2 for each input value that is not a feature ID.
Configure a Workflow to Run a Report
To configure a workflow to run a report:
Step 1: Add a Run Report activity to the workflow
-
In Workflow Designer, open the workflow that you want to run the report.
-
Drag a Run Report activity to the desired location in the flowchart and connect it.
-
Url: Configure the Run Report activity's Url input:
-
In Report Designer, open the report that you want to run.
-
Click Info to open the Info panel.
-
Copy the URL for the report's ArcGIS item.
-
In Workflow Designer, select the Run Report activity on the design surface to show the activity's properties.
-
Paste the URL into the Url box.
-
-
Feature Ids: If the report is a layer report, specify the collection of feature IDs in the Run Report activity's Feature Ids input.
The way that you specify the collection depends on how you created the collection in the workflow. For example, you could query the layer for the IDs of the features that you want to include in the report and then use a Get Feature Set Object IDs activity to create a collection of the feature IDs to use as the Run Report activity's FeatureIds input. For testing purposes, you may want to specify a collection of known feature IDs, for example:
=[ 5238, 5239, 5240 ] -
Parameters: If the report expects additional inputs to be passed to it, specify a collection of additional inputs in Parameters.
The way that you specify the collection depends on how the collection was created in the workflow. You can specify the collection using syntax similar to this:
={ parameter1: "string literal", parameter2: 123456, parameter3: $form1.state.textBox1.value, parameter4: $distance1.distance }
The names of the parameters that you specify in the Parameters input must match the names of the report parameters configured in the report, including capitalization. For example, if the report parameters are called RequestedBy, Maximum, and ReportTitle, then you could set the Parameters input to
={ RequestedBy: "Admin", Maximum: 20, ReportTitle: $form1.state.textBox1.value }. -
Include Map: If the report includes a Map Picture Box control, specify that it must be populated.
To populate the Map Picture Box control with the map from the user's session in the report output, set the Include Map property to
True. If the report does not include a Map Picture Box control, leave this property blank.
Step 2: Add a Display Form activity to the workflow
-
In Workflow Designer, drag a Display Form activity to the flowchart and connect it.
-
Double-click the Display Form activity to edit it.
-
Select Form Title in the form preview to show the Header element's properties and type a Title for the form.
-
Add a Text element to the form.
-
Expand the Text element's Events and add a load event.
The load subworkflow opens.
-
Drag a Set Form Element Property activity to the design surface and connect it.
-
Select the Set Form Element Property activity on the design surface.
-
Set the Property Name input to:
description -
Set the Property Value input to:
=`[Open Report](${$runReport1.href})`If the Run Report activity's ID is not
runReport1in your workflow, replacerunReport1in the expression with the actual ID.The Property Value defines an Open Report hyperlink that points to the report. Here's how:
-
The equals sign (
=) at the beginning means that this is an expression. -
The expression uses Markdown to create the hyperlink. Markdown notation for hyperlinks is
[Link Text](URL). In this case, the Link Text isOpen Reportand the URL is the output of the Run Report activity,$runReport1.href. -
The backticks (
``) mean that the expression is represented as a template literal . Template literals combine string literals with run-time values, like activity outputs. The notation for activity outputs in template literals is${activity_output}. In this case, the activity output is$runReport1.href, so it is represented as${$runReport1.href}.
-
-
Either leave the Markdown input blank or set it to
true.The Markdown input indicates whether Markdown has been used in the Property Value input. In this case, Markdown is used to create the hyperlink, so the Markdown input must evaluate to
true. The Markdown input istrueby default.
Step 3: Test the workflow
-
Press Ctrl+S to save the workflow.
-
Run the workflow in the Sandbox.
To run a workflow in the Sandbox, click Info in the sidebar, click Run in Sandbox, select the environment, and then click Run Workflow. You can press F12 at any time to see the verbose log.
The Run Report activity will generate the report and the Display Form activity will display the link that the user clicks to open the report.
-
If you haven't yet configured a host application to host the workflow, follow the instructions for the desired host application: Run Workflows in ArcGIS Web AppBuilder or Run Workflows in the Geocortex Viewer for HTML5.
-
Run the workflow in the host application.