The Map
Most Geocortex Essentials sites have a map. When you create an empty site, the map is initially empty. The map is created automatically when you add the first service. A site can only have one map.
Sites do not have to have a map. For example, a dedicated site for print templates would not have a map.
A site's map is configured on Manager's Map page.
Manager's Map Page
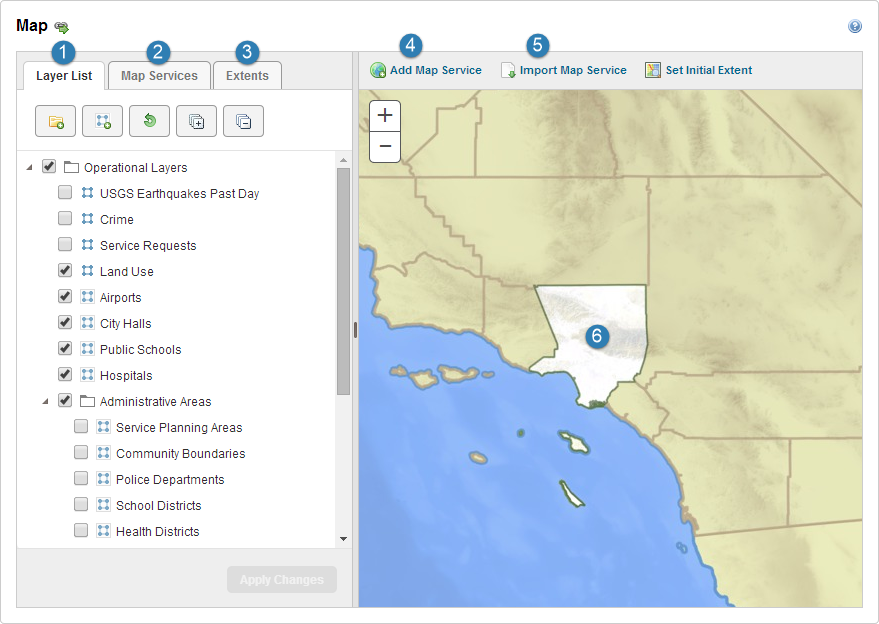
Manager's Map page, with the main parts numbered
The main parts of the Map page are:

|
Layer List Tab - The Layer List tab is used to configure the Layer List that appears in viewers. You can specify which services and layers you want to appear in the Layer List, reorder them, and organize them into folders. In addition, the Layer List tab gives you access to some common settings, and allows you to batch edit the settings for multiple layers at one time. |

|
Map Services Tab - The Map Services tab lists all the services that you have added to the map, and their layers. You can reorder the services on the Map Services tab. The order of the services determines the drawing order and the map's spatial reference. In addition, the Map Services tab gives you access to some common settings, and allows you to batch edit the settings for multiple layers at one time. |

|
Extents Tab - The Extents tab is used to set the map's initial extent and full extent, and to configure bookmarks. |

|
Add Map Service - The Add Map Service function allows you to add map services to the map, and to create and manage service connections. |

|
Import Map Service - The Import Map Service function allows you to import map services to the map from other sites where they are already configured. |

|
Map Preview - The map preview shows a preview of what the map will look like in viewers. The preview is live—if you add or remove services from the map, or you change the visibility of layers, your changes appear immediately in the preview. While Geocortex Viewer for HTML5 supports Smart Mapping symbology, Manager's map preview does not. |
Spatial Reference of a Map
The bottom-most service listed on the Map page's Map Services tab is the primary service. The primary service determines the map's spatial reference. If you move a service with a different spatial reference to the bottom of the Map Services list, the map's spatial reference changes.
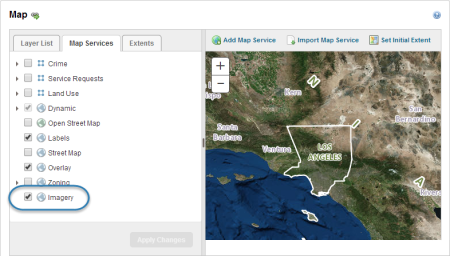
The bottom-most map service is the primary service
Each service in the map must be compatible with the primary service. For a service to be compatible, either the service has the same spatial reference as the primary service, or the service can be reprojected to the primary service's spatial reference. Geocortex Essentials automatically reprojects services to the primary service's spatial reference when necessary. This ensures that all the services in the map display in the same spatial reference.
Manager will warn you if you add a service that cannot be reprojected to the primary service's spatial reference. If you save the site when it contains a service that is not compatible with the primary service, the incompatible service will not show on the map.
Because tiled services cannot be reprojected, tiled services are often placed at the bottom of the list on the Map Services tab. To move a service to a different position in the list, drag the service and drop it in its new position.
In addition to determining the map's spatial reference, the primary service's full extent and initial extent are used as the defaults for the map's full extent and initial extent. You can override the default extents.
See also...
Map Coordinate Systems Settings
Find Out a Map's Spatial Reference Using Manager
To find out a map's spatial reference using Manager:
There are several ways to find out a map's spatial reference using Manager:
-
In
-
Position the pointer over the primary service.
The management tools show.
-
Click the Edit icon
 .
.The spatial reference is shown on the Details tab.
Method 2: Edit an Extent or Bookmark
-
In
-
Position the pointer over Initial Extent, or Full Extent, or a bookmark.
The management tools show.
-
Click the Edit icon
.The spatial reference is shown in the dialog box that opens.
Method 3: Look in the REST API Sites Directory
-
In
-
Click the View REST Endpoint icon
 beside Map.
The spatial reference is labelled Coordinate System.
Change a Map's Primary Service
If you change the primary service to a service with a different spatial reference, you will have to reconfigure the map's initial extent and full extent, and any bookmarks that you have configured.
To change a map's primary service:
-
In
-
Click and hold the service that you want to be the primary service.
-
Drag the service to the bottom of the list.
A guideline shows where the service can be placed.
-
Release the mouse button.
The service is moved to the position where you dropped it.
-
Click Apply Changes.
Define a Custom Spatial Reference
If you define a custom spatial reference, it overrides how Geocortex Core and Geocortex Essentials project geographical values. Custom spatial references are only necessary if your organization uses spatial reference definitions that do not conform to the software's built-in definitions.
You may want to define a custom spatial reference for Essentials in the following circumstances:
-
Define a new spatial reference: You want to add a definition for a new spatial reference that is not known to Essentials.
-
Override an existing spatial reference: You want to change the definition for an existing spatial reference that Essentials is aware of.
This is most commonly done to change the datum transformation parameters of a spatial reference.
Example
The “S-JTSK / Krovak East North” (WKID 5514) spatial reference can be used for both the Czech Republic and Slovakia. The default well-known text (WKT) uses datum transformation parameters for the Czech Republic (TOWGS84[570.8,85.7,462.8,4.998,1.587,5.261,3.56]). The default well-known text (WKT) is:
PROJCS["S-JTSK_Krovak_East_North",GEOGCS["GCS_S_JTSK",DATUM["D_S_JTSK",SPHEROID["Bessel_1841",6377397.155,299.1528128],TOWGS84[570.8,85.7,462.8,4.998,1.587,5.261,3.56]],PRIMEM["Greenwich",0.0],UNIT["Degree",0.0174532925199433]],PROJECTION["Krovak"],PARAMETER["False_Easting",0.0],PARAMETER["False_Northing",0.0],PARAMETER["Pseudo_Standard_Parallel_1",78.5],PARAMETER["Scale_Factor",0.9999],PARAMETER["Azimuth",30.28813975277778],PARAMETER["Longitude_Of_Center",24.83333333333333],PARAMETER["Latitude_Of_Center",49.5],PARAMETER["X_Scale",-1.0],PARAMETER["Y_Scale",1.0],PARAMETER["XY_Plane_Rotation",90.0],UNIT["Meter",1.0]]
To get accurate datum transformation results in Slovakia, you need to use different datum transformation parameters (TOWGS84[485,169.5,483.8,7.786,4.398,4.103,0]):
PROJCS["S-JTSK_Krovak_East_North",GEOGCS["GCS_S_JTSK",DATUM["D_S_JTSK",SPHEROID["Bessel_1841",6377397.155,299.1528128],TOWGS84[485,169.5,483.8,7.786,4.398,4.103,0]],PRIMEM["Greenwich",0.0],UNIT["Degree",0.0174532925199433]],PROJECTION["Krovak"],PARAMETER["False_Easting",0.0],PARAMETER["False_Northing",0.0],PARAMETER["Pseudo_Standard_Parallel_1",78.5],PARAMETER["Scale_Factor",0.9999],PARAMETER["Azimuth",30.28813975277778],PARAMETER["Longitude_Of_Center",24.83333333333333],PARAMETER["Latitude_Of_Center",49.5],PARAMETER["X_Scale",-1.0],PARAMETER["Y_Scale",1.0],PARAMETER["XY_Plane_Rotation",90.0],UNIT["Meter",1.0]]
Define a Custom Spatial Reference in CoordinateSystems.xml
If you need to create or override Essentials' existing spatial references, you can modify the CoordinateSystems.xml file to use the well-known ID and well-known text of your coordinate system. The custom spatial reference will load when Essentials starts.
Any changes that you make to CoordinateSystems.xml will be preserved when you upgrade Essentials.
To define a custom spatial reference:
-
Open
CoordinateSystems.xmlin a text editor or XML editor.In the default installation,
CoordinateSystems.xmlis here:C:\ProgramData\Latitude Geographics\CoordinateSystems.xml
-
Add a
<CoordinateSystem>element with<Wkid>and<Wkt>subelements:<CoordinateSystems> <CoordinateSystem> <Wkid>YOUR-CUSTOM-WKID</Wkid> <Wkt>YOUR-CUSTOM-WKT</Wkt> </CoordinateSystem> </CoordinateSystems> -
Replace
YOUR-CUSTOM-WKIDwith your spatial reference's well-known ID, andYOUR-CUSTOM-WKTwith a well-known text definition of the spatial reference. -
Restart the REST API, Manager, and Geocortex Core.
Override the Default Projection Library
By default, Essentials performs spatial operations using the external projection library Proj.NET. Some functionality, like buffering or generating new spatial features when extracting shapefiles, requires a spatial projection library like Proj.NET.
If the projection operation for the spatial reference you use is not supported by Proj.NET, you can configure Essentials to use the PROJ.4 library instead. For example, if you use the Double_Stereographic/Oblique_Stereographic projection that “Amersfoort RD New” (WKID 28992) uses, you need to change your projection library to PROJ.4.
You can change the projection library to PROJ.4 from the CoordinateSystems.xml. For a typical installation, CoordinateSystems.xml can be found at the following location:
C:\ProgramData\Latitude Geographics\CoordinateSystems.xml
To override the default projection library:
-
Add the
DefaultLibrary="Proj4"attribute to the root<CoordinateSystems>element:<CoordinateSystems DefaultLibrary="Proj4"> </CoordinateSystems>
-
Restart Geocortex Core:
-
Open Windows Services.
-
Right-click Geocortex Core in the list of services and click Restart.
-
-
Restart IIS:
-
Open Internet Information Services (IIS) Manager.
You can open IIS Manager from Control Panel's Administrative Tools or by typing
inetmgrin the Windows Run command dialog box. -
Click Restart under Manage Server in the Actions panel.
-
Full Extent of a Map
The full extent of a map is the extent that displays when an end user clicks a Full Extent tool in a viewer.
By default, the map's full extent is the full extent of the primary service. You can change the full extent to show the part of the map that you want end users to see when they zoom to the full extent.
Setting a map's full extent to a subset of the primary service's full extent does not limit the parts of the map that end users can access—users can pan the map beyond the full extent that you configure, search and query operations can return results from outside the full extent, and so on.
Manager's Map page has an Extents tab where you configure the full extent.
Zoom the Map Preview to the Full Extent
To zoom the map preview to the full extent:
-
In
-
Click Full Extent.
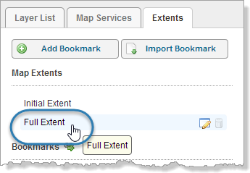
Zoom the map preview to the full extent
Set a Map's Full Extent Using the Map Preview
To set a map's full extent using the map preview:
-
In
-
Pan and zoom the map preview to show the extent that you want to use as the full extent.
-
On the Extents tab, position the pointer over Full Extent.
The management tools show.
-
Click the Edit icon
 .
. -
Click Use Current View.
-
Click OK.
-
Click Apply Changes.
Set a Map's Full Extent to the Extent of a Map Service or Layer
This is a variation of using the map preview to configure the full extent.
To set a map's full extent to the extent of a map service or layer:
-
In
-
Click the down arrow
 beside the map service or layer whose extent you want to use.
 -
To use the initial extent, click Zoom to Initial Extent. To use the full extent, click Zoom to Full Extent.
The map preview zooms to the extent.
Zoom to an extent that is defined in the map service
-
Click the Extents tab.
-
Position the pointer over Full Extent.
The management tools show.
-
Click the Edit icon
. -
Click Use Current View.
-
Click OK.
-
Click Apply Changes.
Set a Map's Full Extent Using Coordinates
To set a map's full extent using coordinates:
-
In
-
Position the pointer over Full Extent.
The management tools show.
-
Click Edit
. -
Edit each coordinate that you want to change. To change a coordinate, click in the box and edit the value.
The coordinates that you enter must be in the same spatial reference as the map.
You can edit all four coordinates at one time using copy and paste (Ctrl-C and Ctrl-V). Copy them as a comma-delimited list, for example, -80, -160, 80, 160. Paste them into any one of the boxes. Essentials will sort them into the correct boxes.
-
Click OK.
-
On the Extents tab, click Full Extent.
The map preview updates to show the full extent, so you can verify it.
-
Click Apply Changes.
Reset a Map's Full Extent to the Default
To reset a map's full extent to the default:
-
In
-
Position the pointer over Full Extent.
The management tools show.
-
Click Edit
. -
Click Reset Default.
-
Click OK.
-
On the Extents tab, click Full Extent.
The map preview updates to show the default full extent.
-
Click Apply Changes.
Initial Extent of a Map
The initial extent of a map is the extent that shows when the map first loads in a viewer. It is the first view of the map that end users see.
By default, the map's initial extent is the initial extent of the primary service. You can change the initial extent to show the part of the map that you want end users to see when the map loads.
There are several ways to set the extent when a viewer loads, for example, by configuring the initial extent in Manager, by running a startup workflow that sets the extent, or by using the extent URL parameter in the launch URL. Using multiple methods of setting the extent may lead to unexpected results.
Manager's Map page has an Extents tab where you configure the initial extent. There are two approaches to configuring the initial extent:
-
Navigate the map preview to the desired extent.
-
Enter the coordinates of the desired extent.
You can also reset the initial extent to the default value.
The initial extent in the Viewer is centered within the available map display area. With any increase or decrease in the map display area, the initial extent is re-centered. For example, when a side panel opens, the initial extent is re-centered within the reduced horizontal map display area.
Zoom the Map Preview to the Initial Extent
To zoom the map preview to the initial extent:
-
In
-
Click Initial Extent.

Zoom the map preview to the initial extent
Set a Map's Initial Extent Using the Map Preview
This procedure explains how to set the initial extent using the ![]() Set Initial Extent function on the Map page. You can also set the initial extent by editing the initial extent and clicking Use Current View.
Set Initial Extent function on the Map page. You can also set the initial extent by editing the initial extent and clicking Use Current View.
To set a map's initial extent using the map preview:
-
In
-
Pan and zoom the map preview to show the extent that you want to use as the initial extent.
-
Click
 Set Initial Extent.
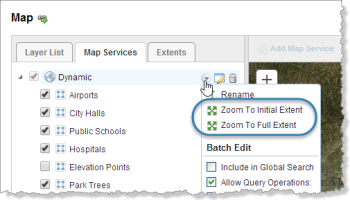
Set a Map's Initial Extent to the Extent of a Map Service or Layer
This is a variation of using the map preview to configure the initial extent.
To set a map's initial extent to the extent of a map service or layer:
-
In
-
Click the down arrow
beside the map service or layer whose extent you want to use. -
To use the initial extent, click Zoom to Initial Extent. To use the full extent, click Zoom to Full Extent.
The map preview zooms to the extent.
Some layers do not have an initial extent. In this case, there is no Zoom to Initial Extent option.
Zoom to an extent that is defined in the map service
-
Click the Extents tab.
-
Position the pointer over Initial Extent.
The management tools show.
-
Click Edit
. -
Click Use Current View.
-
Click OK.
-
Click Apply Changes.
Set a Map's Initial Extent Using Coordinates
To set a map's initial extent using coordinates:
-
In
-
Position the pointer over Initial Extent.
The management tools show.
-
Click Edit
. -
Edit each coordinate that you want to change. To change a coordinate, click in the box and edit the value.
The coordinates that you enter must be in the same spatial reference as the map.
You can edit all four coordinates at one time using copy and paste (Ctrl-C and Ctrl-V). Copy them as a comma-delimited list, for example, -80, -160, 80, 160. Paste them into any one of the boxes. Essentials will sort them into the correct boxes.
-
Click OK.
-
On the Extents tab, click Initial Extent.
The map preview updates to show the initial extent, so you can verify it.
-
Click Apply Changes.
Reset a Map's Initial Extent to the Default
To reset a map's initial extent to the default:
-
In
-
Position the pointer over Initial Extent.
The management tools show.
-
Click Edit
. -
Click Reset Default.
-
Click OK.
-
On the Extents tab, click Initial Extent.
The map preview updates to show the default initial extent.
-
Click Apply Changes.
Drawing Order of a Map
The drawing order of a map is the order in which map services are drawn. When a map service lies on top of other map services, the upper service's layers may obscure the layers in the services underneath it.
A map 's drawing order is determined by the order that the map services are listed on the Map page's Map Services tab. Map services that are higher in the list lie on top of map services that are lower in the list.
You can also change the drawing order of dynamic layers.
Change a Map's Drawing Order
To change the drawing order of a map:
-
In
-
Click the
 tool beside each service to hide the layers.
 This makes it easier to see the list of services.
-
Click and hold a service that you want to move in the list.
-
Drag the service to the desired position in the list.
A guideline shows where the service can be placed.
-
Release the mouse button.
The service is moved to the position where you dropped it.
-
Continue dragging and dropping services until the list is sorted the way you want it.
-
Click Apply Changes.